I don’t know about you, but I hate watching TV with my phone nearby. Every few minutes, I’d check it, lose my place, and get distracted for far longer than I intended. Sure, I could put it away, but then I’d be constantly guessing what each buzz or ping might be. That anxious “what did I miss?” feeling never really goes away.
It’s not such a problem when I’m working, since I already connect my phone notifications to the PC with Phone Link. Well, guess what? With the Tv Overlay Remote app, you can do the same thing on your TV, and it’s a total game-changer. With it, you can mirror notifications for calls, emails, WhatsApp messages, and more directly onto your TV.
Keeping up with phone notifications while binge-watching
Stay in the loop without ever picking up your phone
Screenshot by Pankil Shah — No attribution required
Nothing kills the flow of a binge session like constantly checking your phone. You pause the show, unlock your device to check notifications, and suddenly you’ve lost track of the plot. The same goes for gaming. If you’re like me, pausing every few minutes to check for messages can be incredibly annoying.
Putting your phone’s notifications on the TV can save you from constantly reaching for your device. You get a subtle pop-up in the top right corner, so you can glance at it, decide if it’s urgent, and keep watching or gaming if it’s not. It’s that simple.
Tv Overlay Remote is an app that lets you display your Android phone’s notifications on your TV. This includes everything from phone calls and messages to app alerts and even system notifications. If you don’t want to be bombarded by every alert that comes in, you can customize what appears. With this setup, I can binge an entire season, play through long gaming sessions, or watch movies without that nagging fear that I’m ignoring an important alert.
Setting up Tv Overlay Remote
Get it running within minutes
Getting started with Tv Overlay Remote is quite easy. First, you need to download the app on your TV and follow the prompts to allow a few necessary permissions—things like showing over other apps, adjusting battery optimization, and a couple of small settings to make sure notifications flow smoothly. Once the initial setup is done, a QR code will appear on your TV screen.
Next, download the Tv Overlay Remote app on your phone. Open it and use your phone’s camera to scan the QR code on the TV. Make sure both your phone and TV are connected to the same Wi-Fi network—this is crucial for the notifications to sync.
Once everything is paired, any notifications you receive on your phone will instantly appear on your TV. By default, they show up in the top-right corner, but you’re free to move them anywhere—top-left, bottom-left, or bottom-right.
The app also lets you choose the notification layout. The Default layout shows all the information from the alert, the Minimalist layout trims it down to the essentials, and the Only Icon layout displays just the app icon for privacy.
Each notification appears for five seconds by default, but you can easily adjust the duration to suit your preference. Tv Overlay Remote isn’t just about notifications. When there aren’t any alerts, you’ll see a tiny clock in the top-right corner of your screen. And if you don’t want it, you can hide it with a single toggle.
See only the alerts that matter
Never get distracted by useless notifications again
Screenshot by Pankil Shah — No attribution required
Screenshot by Pankil Shah — No attribution required
Screenshot by Pankil Shah — No attribution required
Being able to mirror phone notifications to your TV is great, but let’s be honest—most of the alerts on our phones aren’t urgent. Social media likes, app updates, or random newsletters can certainly wait while you’re enjoying your downtime.
That’s where the Tv Overlay Remote really shines. You get full control over what appears on your screen. You can choose to allow notifications from specific apps while ignoring the rest. For example, I’ve set mine to only show alerts for calls, WhatsApp messages, Gmail, and Slack. This way, I never miss something important but avoid constant distractions from irrelevant notifications.
The free version of the app already offers all the essential features, so I haven’t felt the need to upgrade. But if you want a few extra perks, the premium version is affordable too, with a one-time fee of around $5.
With it, you can mirror notifications to multiple TVs, customize the clock and notification backgrounds, and even create presets to save your preferred setup. If you have multiple TVs or want more control over how alerts appear, the premium version is a solid deal. You can check out all the available customization options on the app’s GitHub page.
Putting your phone’s notifications on your TV might sound over the top at first, but once you try it, it’s hard to go back. Now I can enjoy watching TV or gaming whether my phone is on silent, charging in another room, or buried in my bag. I don’t have to keep reaching for it or worry about missing an important call or alert.
The Windows 11 taskbar may look modern, but it’s surprisingly rigid. Beyond a few basic tweaks, Microsoft gives you very little room to personalize, even less than in previous versions of Windows. Windhawk is a Windows customization platform that changes all of that.
I’ve been using it for a few weeks, and it offers modules to fix almost everything I find annoying about the taskbar, from its lack of styling options to missing features that used to be standard. You can make the taskbar transparent, change its position, resize it, add new tricks, and turn the Windows 11 taskbar into something that actually works the way you want.
6
Resize the taskbar with freedom
Make it taller or shorter
Screenshot by Pankil Shah — No attribution required
The default Windows 11 taskbar is reasonably sized, but unlike Windows 10, there’s no built-in option to resize it. It’s strictly one size fits all—and if that size doesn’t work for you, too bad.
Windhawk’s Taskbar height and icon size module lets you overcome this limitation. You can adjust not only the taskbar’s height but also the size of the icons on it. Whether you prefer a compact, space-saving strip or a taller bar with larger, easier-to-click icons, the module lets you fine-tune the layout without affecting other elements.
5
Bring back the vertical taskbar
Move it to the side like in the good old days
One of the most jarring changes in Windows 11 is the loss of a true vertical taskbar. Unlike Windows 10 and earlier, you can’t just drag the taskbar to the left or right side of the screen for a more classic, space-saving layout.
Windhawk’s Vertical taskbar for Windows 11 module restores that missing feature. With it, you can move the taskbar to either the left or right edge of your display, just like in older versions of Windows. You also get control over its width so you can make it as slim or roomy as you like.
If you’re running a dual-monitor setup, it gets even better: you can keep the taskbar on the left side of one monitor and the right side of the other.
4
Plenty of style options
From transparency to color tweaks, make it truly yours
When it comes to customizing the taskbar, Windows 11 itself doesn’t offer much beyond tweaking the search icon, hiding the Widgets button, or showing app labels. But with Windhawk’s Windows 11 taskbar styler, you get plenty of options that let you go far beyond Microsoft’s defaults.
You can make your taskbar semi-transparent with TranslucentTaskbar, give it a macOS-like dock appearance with DockLike, or go for a super-clean minimalist look with SimplyTransparent. And if you’re feeling nostalgic, you can even revive classic designs from Windows 7, Vista, or Windows XP, complete with their distinctive buttons and color schemes.
3
Hide unwanted icons from the taskbar
Show only what matters
Screenshot by Pankil Shah — No attribution required
By default, the Windows 11 taskbar displays several system icons like network, battery, volume, and more. It even adds microphone and camera indicators when an app is using them. While some of these indicators can be helpful, others just add clutter.
Windhawk’s Taskbar tray system icon tweaks module gives you complete control over what appears in the corner of your taskbar. You can selectively hide system icons you don’t need for a cleaner, less distracting look.
For instance, I find the input-language icon redundant, and I rarely use the notification icon since the Win + N shortcut opens the same panel. With this module, I can either hide the notification icon completely or have it appear only when there’s an actual alert.
2
Middle-click to instantly close apps from the taskbar
Screenshot by Pankil Shah — No attribution required
The Windows 11 taskbar already offers a couple of ways to close apps. You can hover over an app’s icon and click the X on its thumbnail, or right-click and choose End task if you’ve enabled that option for unresponsive programs.
Windhawk’s Middle click to close on the taskbar module makes the process much faster. With it, you simply hover over any running app on the taskbar and press the middle mouse button to close it instantly. You can fine-tune its behavior, choosing to close all instances of an app or just the active window. And if you need to force-close a stubborn program, hold down the Ctrl key while middle-clicking its icon.
1
Add important performance metrics on taskbar
Watch CPU, RAM and network usage at a glance
Screenshot by Pankil Shah — No attribution required
The Windows 11 taskbar is sleek, but it’s not very informative. To check your PC’s performance, you normally have to open Task Manager or a separate monitoring app. That’s a few extra clicks when all you want is a quick glance at your system’s health.
Windhawk solves this with its Taskbar clock customization module. It lets you pin real-time system stats like CPU usage, RAM consumption, or network speed directly onto your taskbar. You can also add extras such as the weather, the day of the week, or even news headlines for quick, at-a-glance updates.
Your Windows 11 taskbar is something you look at more than almost any other part of the interface, so it makes sense to make it both beautiful and functional. Windhawk’s modules fill the gap left by Microsoft and let you style the taskbar exactly how you want it. And the best part is, it’s completely free to use.
I love a good thriller, especially ones that linger long after the credits roll. These are the films that kept me awake, replaying every twist and turn, making me question reality and trust. The thrillers I’ve chosen maintain their tension, pulling you deeper into each scene.
If you enjoy watching movies that last with you, these five emotionally powerful films could be a good fit for you.
Have you ever woken up from a dream so real that it took a moment to remember where you were? Shutter Island taps into that feeling and doesn’t let go, slowly luring you into a world in which nothing feels certain. U.S. Marshal Teddy Daniels (Leonardo DiCaprio) arrives at a remote psychiatric hospital with his partner to investigate a missing patient.
What starts as a routine investigation soon feels like a trap. A violent storm cuts off the escape. The staff stay guarded, and patients offer cryptic answers that only make the case more confusing.
As Teddy digs deeper, the investigation stops being just a case and starts consuming him. Clues lead him in circles, the island grows more hostile, and every answer only raises new questions. When it ends, you share Teddy’s confusion, unsure if he uncovered the truth or walked into a trap. It still sparks debate, and some call the ending disappointing. That divide is part of what makes it so memorable.
Memento turns memory loss into a ticking clock. Leonard (Guy Pearce) can’t form new memories, so he relies on Polaroid photos, scribbled notes, and tattoos to hold on to the truth. Every decision feels urgent because he might forget why he made it moments later. His entire life revolves around a single mission: finding the man he believes killed his wife.
Christopher Nolan tells this story in a way that mirrors Leonard’s fractured mind. Most scenes play in reverse, revealing outcomes before causes, while a second timeline moves forward until the two finally meet. Each scene reshapes what you think you know, making you question who to trust and whether Leonard’s story is true.
A missing child turns Thanksgiving into a nightmare. Keller Dover (Hugh Jackman) is a father whose daughter and her friend vanish that day, leaving him desperate for answers. When police detain a suspect but release him for lack of evidence, Keller takes matters into his own hands, convinced time is running out.
Detective Loki (Jake Gyllenhaal) chases every lead as they twist into dead ends, and the pressure builds with each passing day. Neighbors begin to look suspicious, the quiet streets feel hostile, and every decision carries the weight of being right or devastatingly wrong. The film makes you sit with that fear, asking what you might have done in Keller’s place.
In Gone Girl, the disappearance of Amy Dunne (Rosamund Pike) explodes into a media circus that overtakes the town. Reporters gather on the lawn, cameras capture Nick Dunne (Ben Affleck) stumbling through interviews, and the public dissects his every move. What starts as a search for a missing woman quickly becomes a trial by public opinion, where Nick’s innocence is questioned long before the truth is clear.
The turning point comes when investigators uncover Amy’s diary, revealing a version of their marriage that collides with Nick’s story. The deeper the film goes, the more you realize neither side can be trusted at face value. Rosamund Pike delivers an unsettling and magnetic performance, pulling you into Amy’s world until you cannot look away. It leaves you weighing every reveal and asking whose truth you’ve been watching.
The Handmaiden is a story where nothing is what it seems. Love, loyalty, and even the truth keep shifting as the story unfolds. Set in the 1930s Korea under Japanese rule, it follows Sook-hee (Kim Tae-ri), a young pickpocket hired to serve Lady Hideko (Kim Min-hee), an heiress living under her uncle’s suffocating control. Sook-hee secretly works with Count Fujiwara (Ha Jung-woo) on a scheme to trick Hideko into marriage so he can claim her inheritance.
Inside the mansion, Sook-hee finds a world of velvet and cruelty. Hideko is forced to read her uncle’s collection of erotic books to wealthy guests, a ritual that keeps her isolated and afraid. The longer Sook-hee stays, the more her mission collides with her growing feelings for Hideko, and the plan spirals into something far more dangerous. New layers keep emerging, and every turn raises the stakes in a game of trust and betrayal.
The stories that stay with me
These thrillers remind me of why I keep coming back to this genre. They pulled me in, made me notice every detail, and left me glued to the screen. Watch them when you can give them your full attention, because they are at their best when you let them take over completely.
iOS 26 is here, and while everyone’s buzzing about Liquid Glass and big-ticket features like call screening, live translation, and Spatial Scenes, there’s so much more. Sure, those upgrades are flashy and useful, but they don’t tell the whole story. This update also quietly fixes some of the iPhone’s most frustrating behaviors.
Many of these improvements are easy to miss because they haven’t been talked about much. From estimated charging times and improved spam message detection to custom ringtones and smarter call history, iOS 26 is packed with thoughtful changes that address some of the long-standing annoyances.
8
See estimated charging time
Know when your iPhone will be ready to go
Screenshot by Pankil Shah — No attribution required
Screenshot by Pankil Shah — No attribution required
Screenshot by Pankil Shah — No attribution required
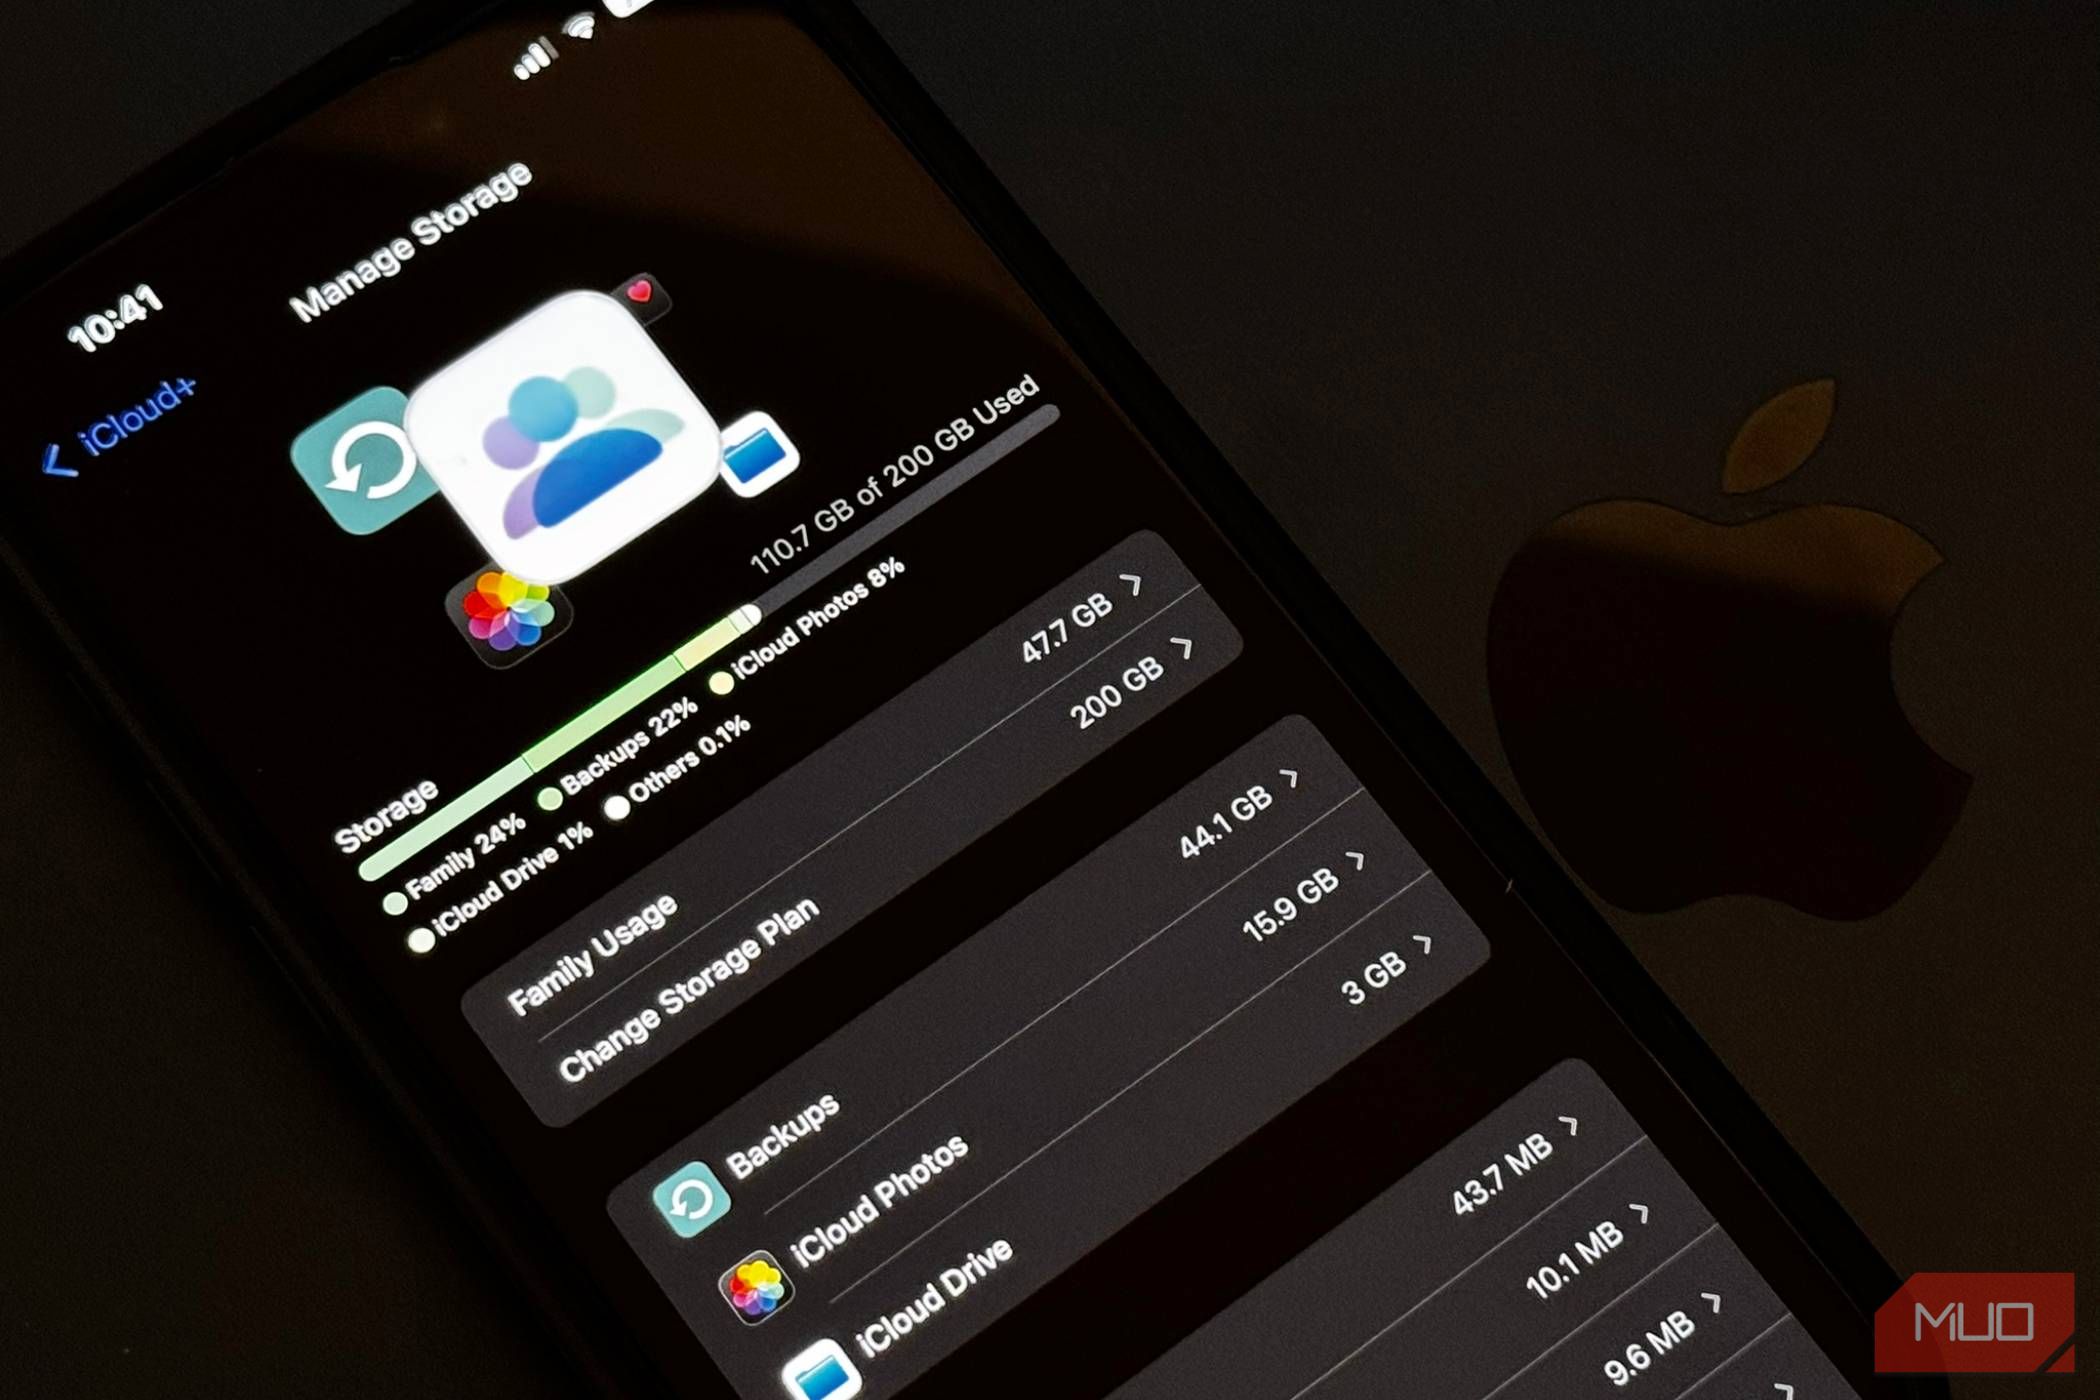
Charging your iPhone is something most of us do every day, sometimes multiple times. And every time you plug it in, one thing you want to know is how long it’ll take to be ready.
iOS 26 quietly solves this daily frustration by showing an estimated charging time right on your lock screen. You can also go to Settings > Battery to see when your iPhone will reach 80 percent and then 100 percent.
Android users have had this feature for years, and it’s easy to see why it’s so useful. It helps you avoid leaving your iPhone plugged in longer than necessary and shows when you’re using a slow charger.
7
Better spam message detection
Enjoy a clean inbox
Screenshot by Pankil Shah — No attribution required
Screenshot by Pankil Shah — No attribution required
Screenshot by Pankil Shah — No attribution required
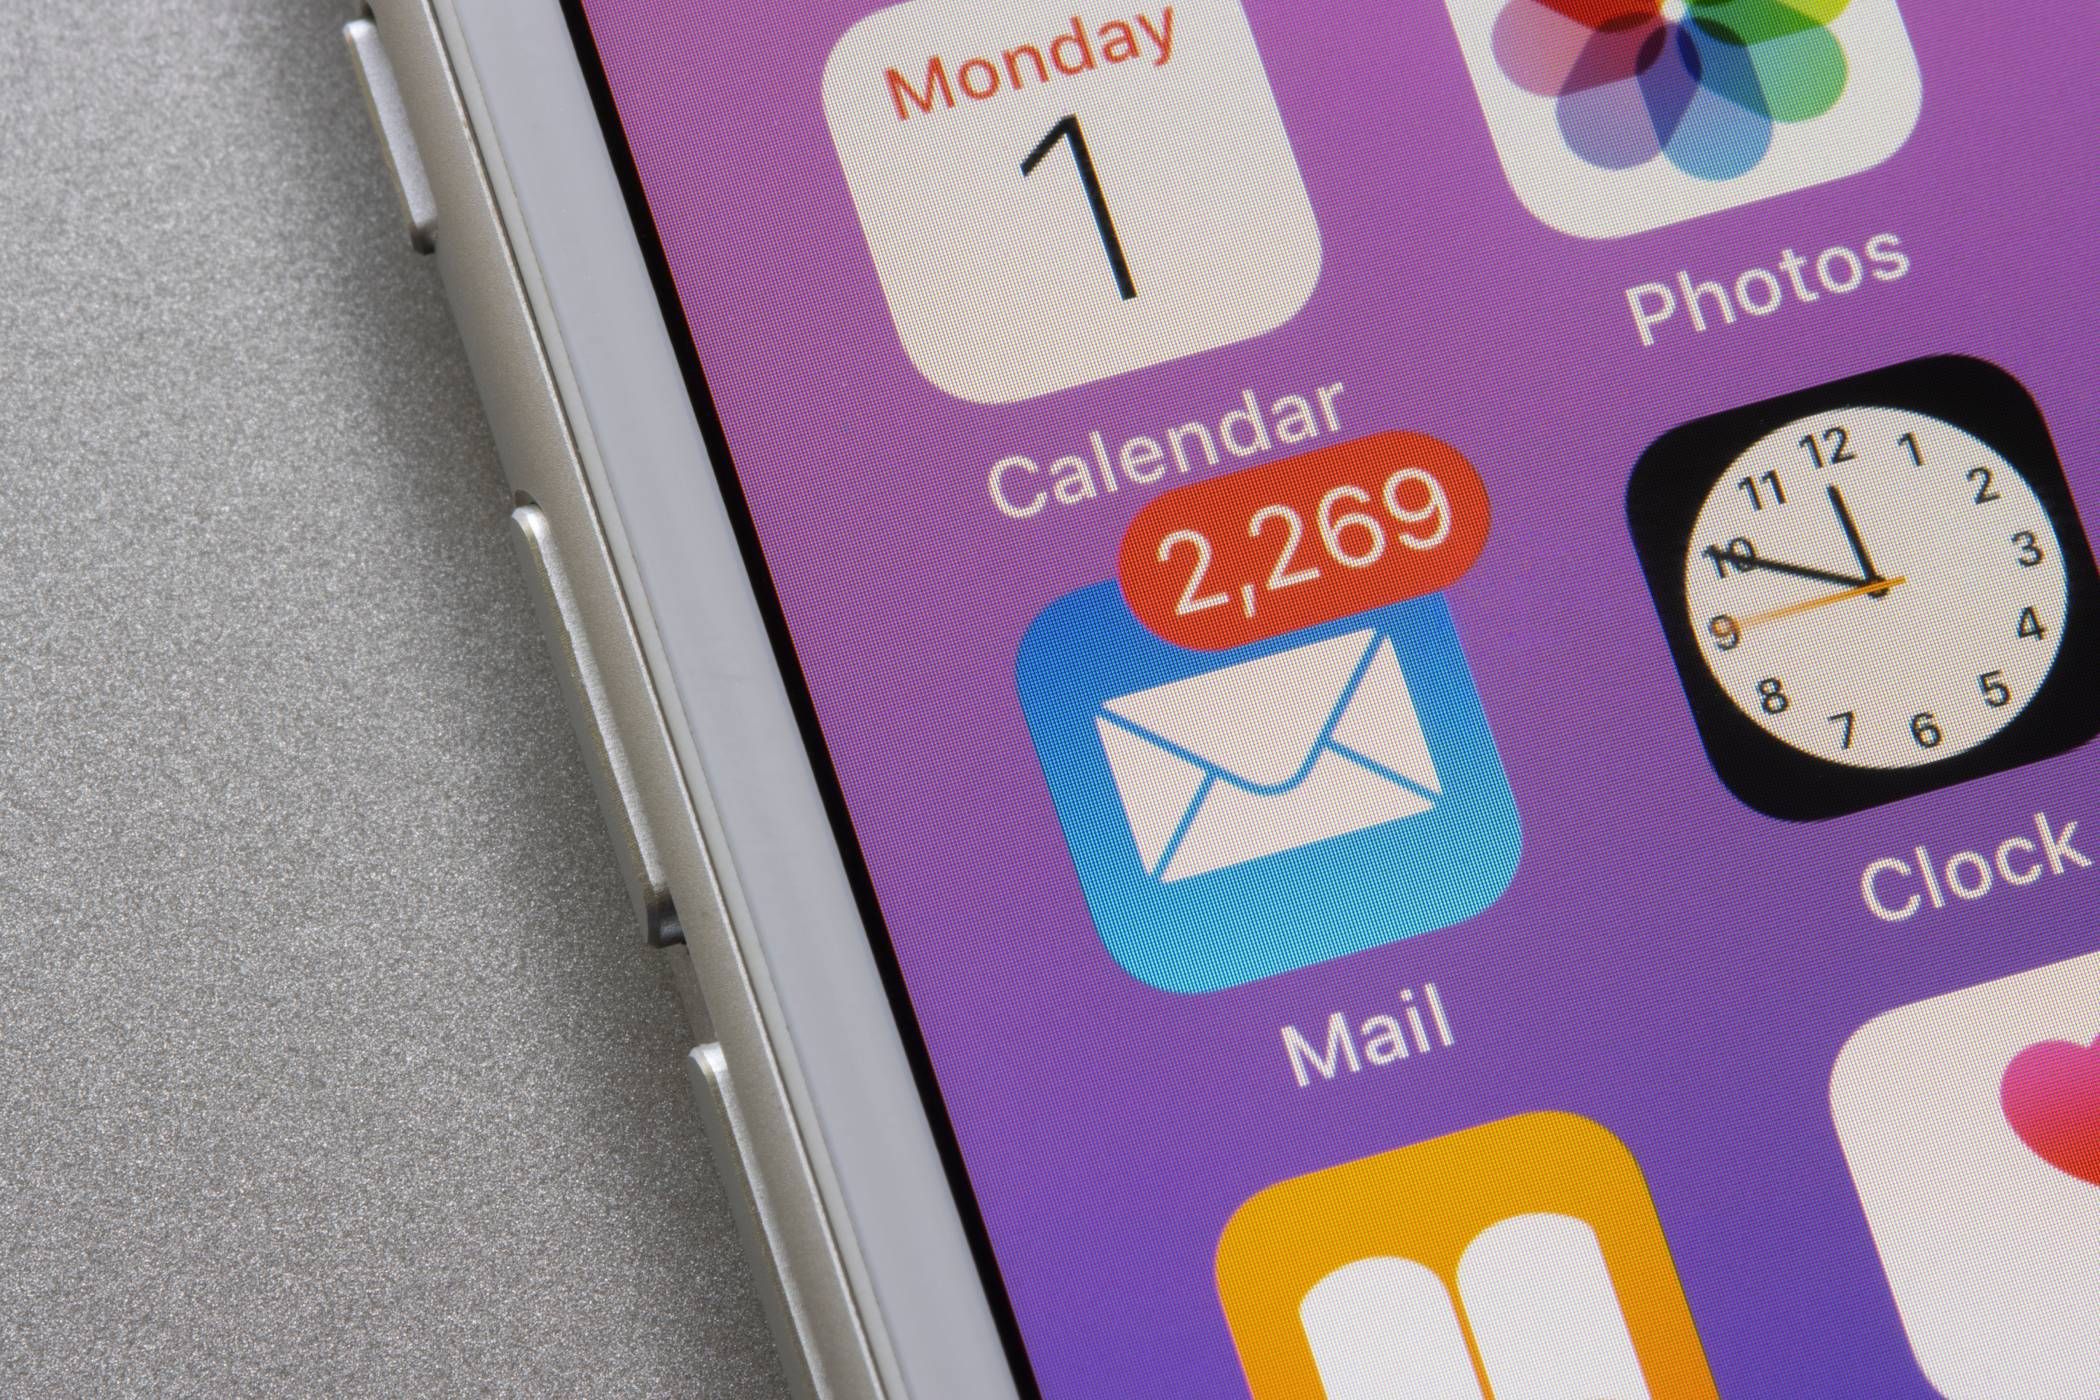
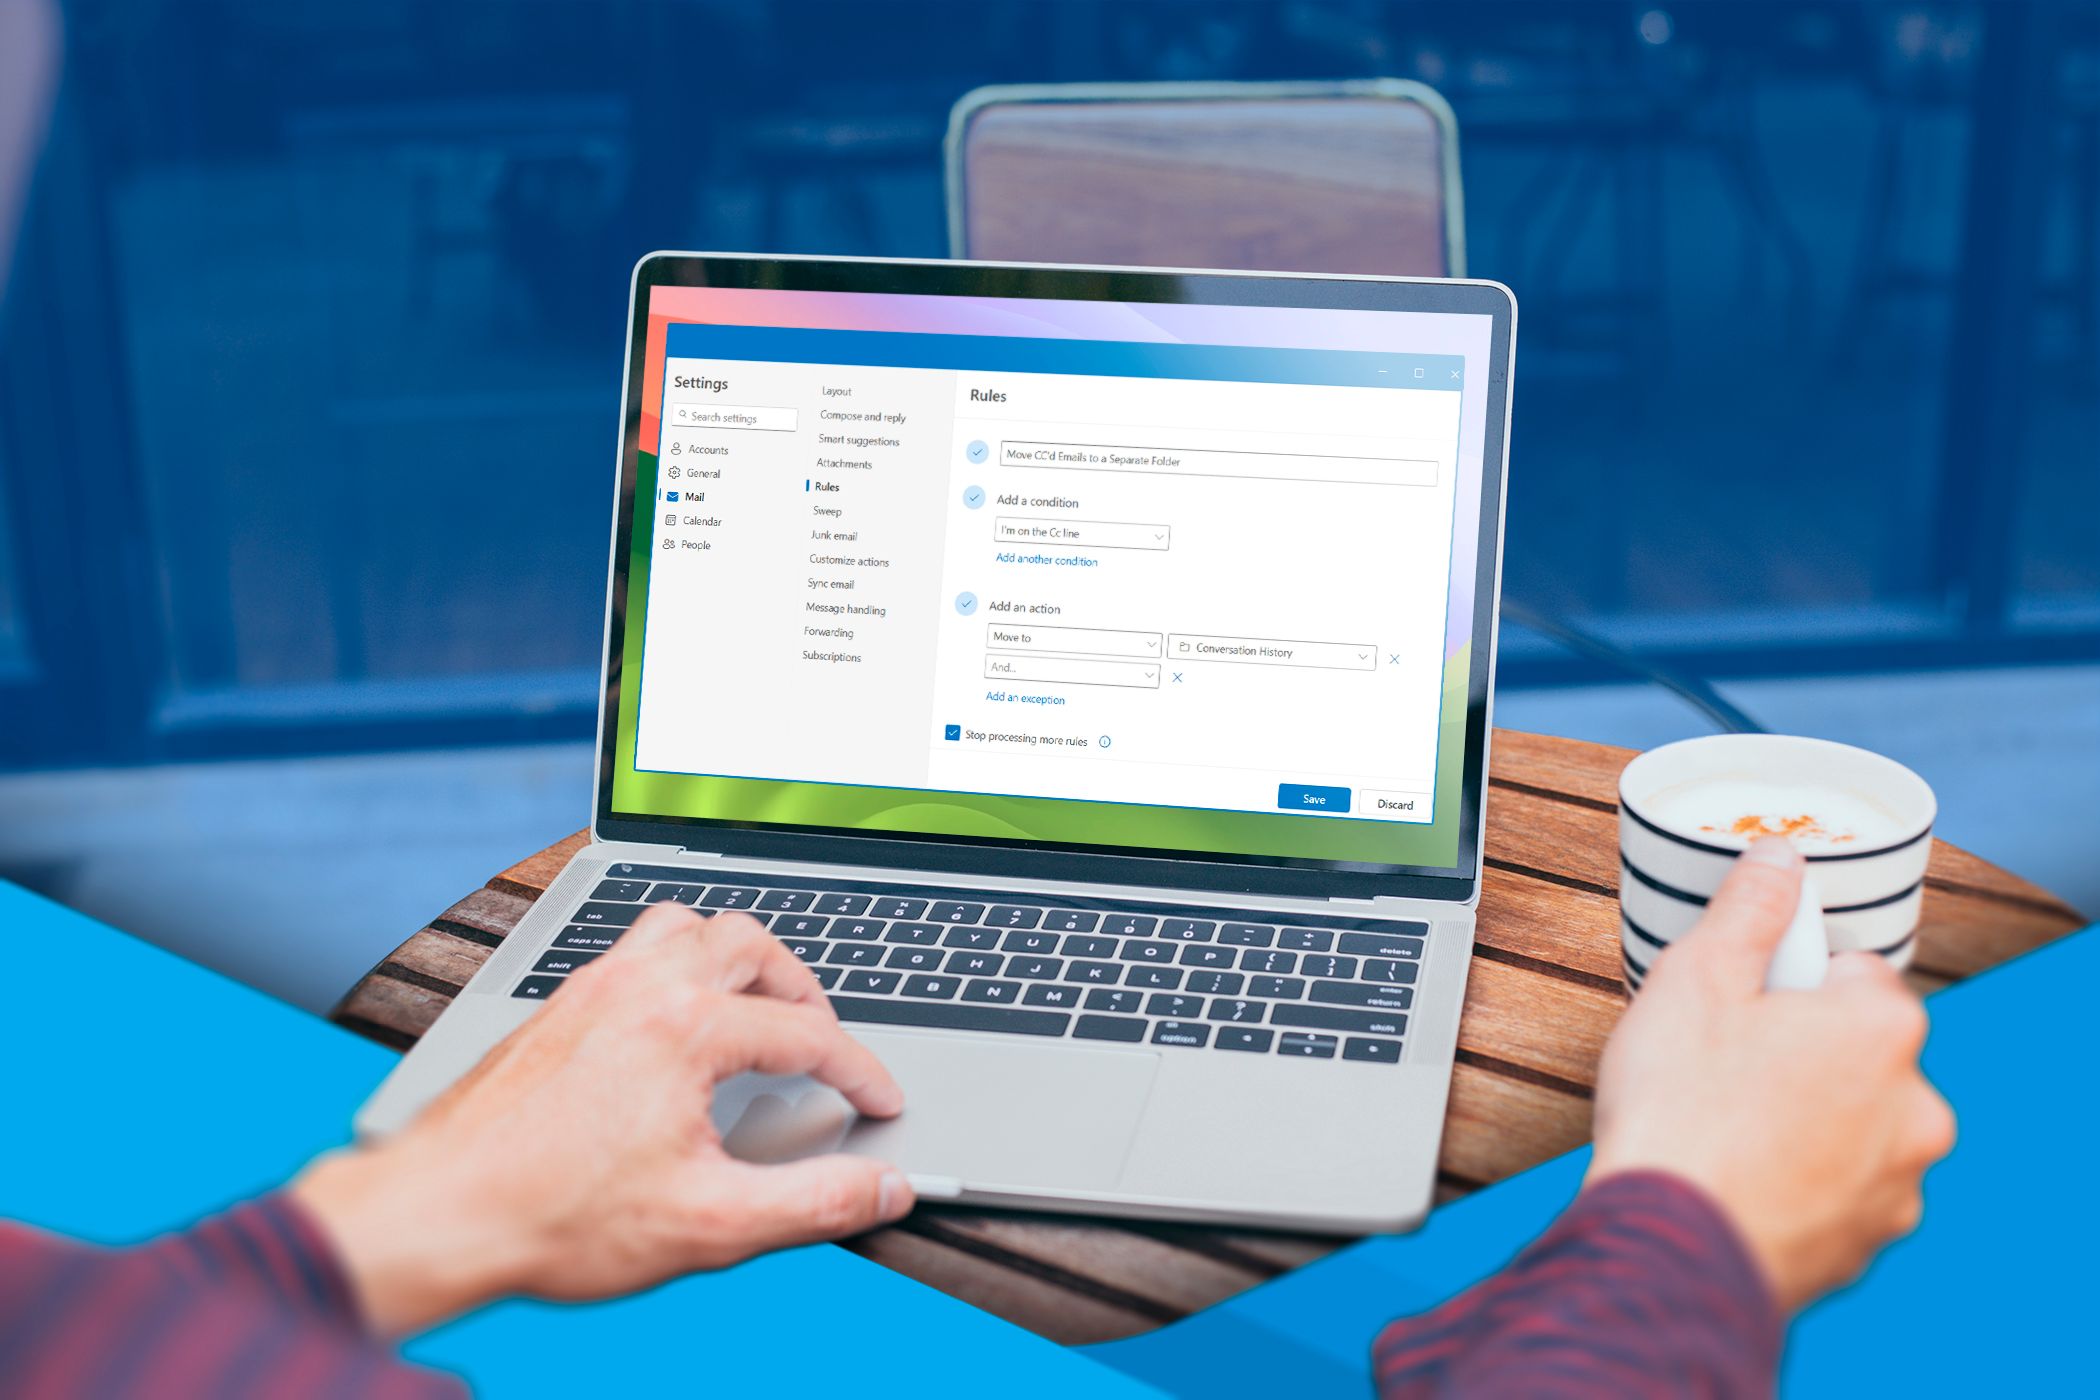
Another iOS 26 feature that’s been on Android phones for some time is spam message filtration. Spam texts are always a nuisance and can appear at the worst possible moments with annoying promotions or suspicious links. iOS 26 makes this problem far less frustrating by improving how it filters unwanted messages.
Now, when a text arrives from someone who isn’t in your contacts, your iPhone automatically moves it to a separate folder. These messages don’t even trigger notifications or appear on your lock screen. This way, your main inbox only shows important conversations.
You can open the Unknown Senders folder in the Messages app to view them anytime. From there, you can mark a sender as known if it’s someone you want to hear from, or simply delete the message without a second thought.
6
Easily select specific text within a message
Focus on the important stuff
Screenshot by Pankil Shah — No attribution required
Screenshot by Pankil Shah — No attribution required
Screenshot by Pankil Shah — No attribution required
Sometimes, you don’t need to copy an entire message, just a small piece of it. Maybe it’s a key detail in a long text, a snippet of an address, or a single sentence you want to translate. Until now, long-pressing a message only let you copy the whole bubble, which could be frustrating when all you needed was a tiny portion.
iOS 26 fixes this with a simple update. Now, when you long-press a message, you’ll see a Select option appear alongside Copy. Tap it to highlight exactly the text you want within the bubble. From there, you can easily copy it, translate it, or even search the web for more information.
5
View call history for a single contact
Track all calls with the people who matter most
Screenshot by Pankil Shah — No attribution required
Screenshot by Pankil Shah — No attribution required
Screenshot by Pankil Shah — No attribution required
Previously, viewing the call history for a specific contact meant endlessly scrolling through your entire call log. However, that’s no longer the case with iOS 26.
Now, if you want to check how many times you called a friend, family member, or colleague, it’s easy. Simply open the contact’s card, tap Call History, and you’ll see a complete list of incoming, outgoing, and missed calls, all neatly organized with dates and times. It’s a small change, but one that makes it easy to keep track of your call logs.
The Phone app now uses a unified layout, but if you prefer the old style, just tap the three horizontal lines and select Classic.
4
Disable “tap recents to call”
Stop accidental calls
Screenshot by Pankil Shah — No attribution required
Screenshot by Pankil Shah — No attribution required
Screenshot by Pankil Shah — No attribution required
You know those moments when you’re scrolling through your call history and your iPhone suddenly starts dialing someone you didn’t mean to call? It has certainly happened to me more times than I can count. iOS 26 fixes this by letting you disable the “Tap Recents to Call” feature entirely.
Head to Settings > Apps > Phone, and you’ll see the Tap Recents to Call toggle. Turn it off, your iPhone will no longer start a call when you tap a number or contact in Recents. Instead, you’ll see the contact’s information, from where you can call, message, or FaceTime. This simple tweak can save you from plenty of awkward moments.
3
Set a custom ringtone
Finally…without complicated workarounds
If you have ever tried setting your favorite song as a ringtone on your iPhone, you know how cumbersome the process was. You either had to use Apple’s GarageBand app and deal with complicated file conversions or buy the tone from the iTunes Store. For something as simple as setting a ringtone, that’s far too much work.
With iOS 26, that’s no longer a problem. You can now set any MP3 or M4A audio file under 30 seconds as your ringtone. To do this, download the ringtone for your iPhone, open the Files app on your iPhone, and locate the file. Long-press it, tap Share in the pop-up menu, and choose Use as Ringtone. It’s that simple.
Once you do this, the audio will appear as an option in your iPhone’s Ringtone settings alongside the default tones. If you ever want to remove it, simply swipe left on it and tap Delete.
2
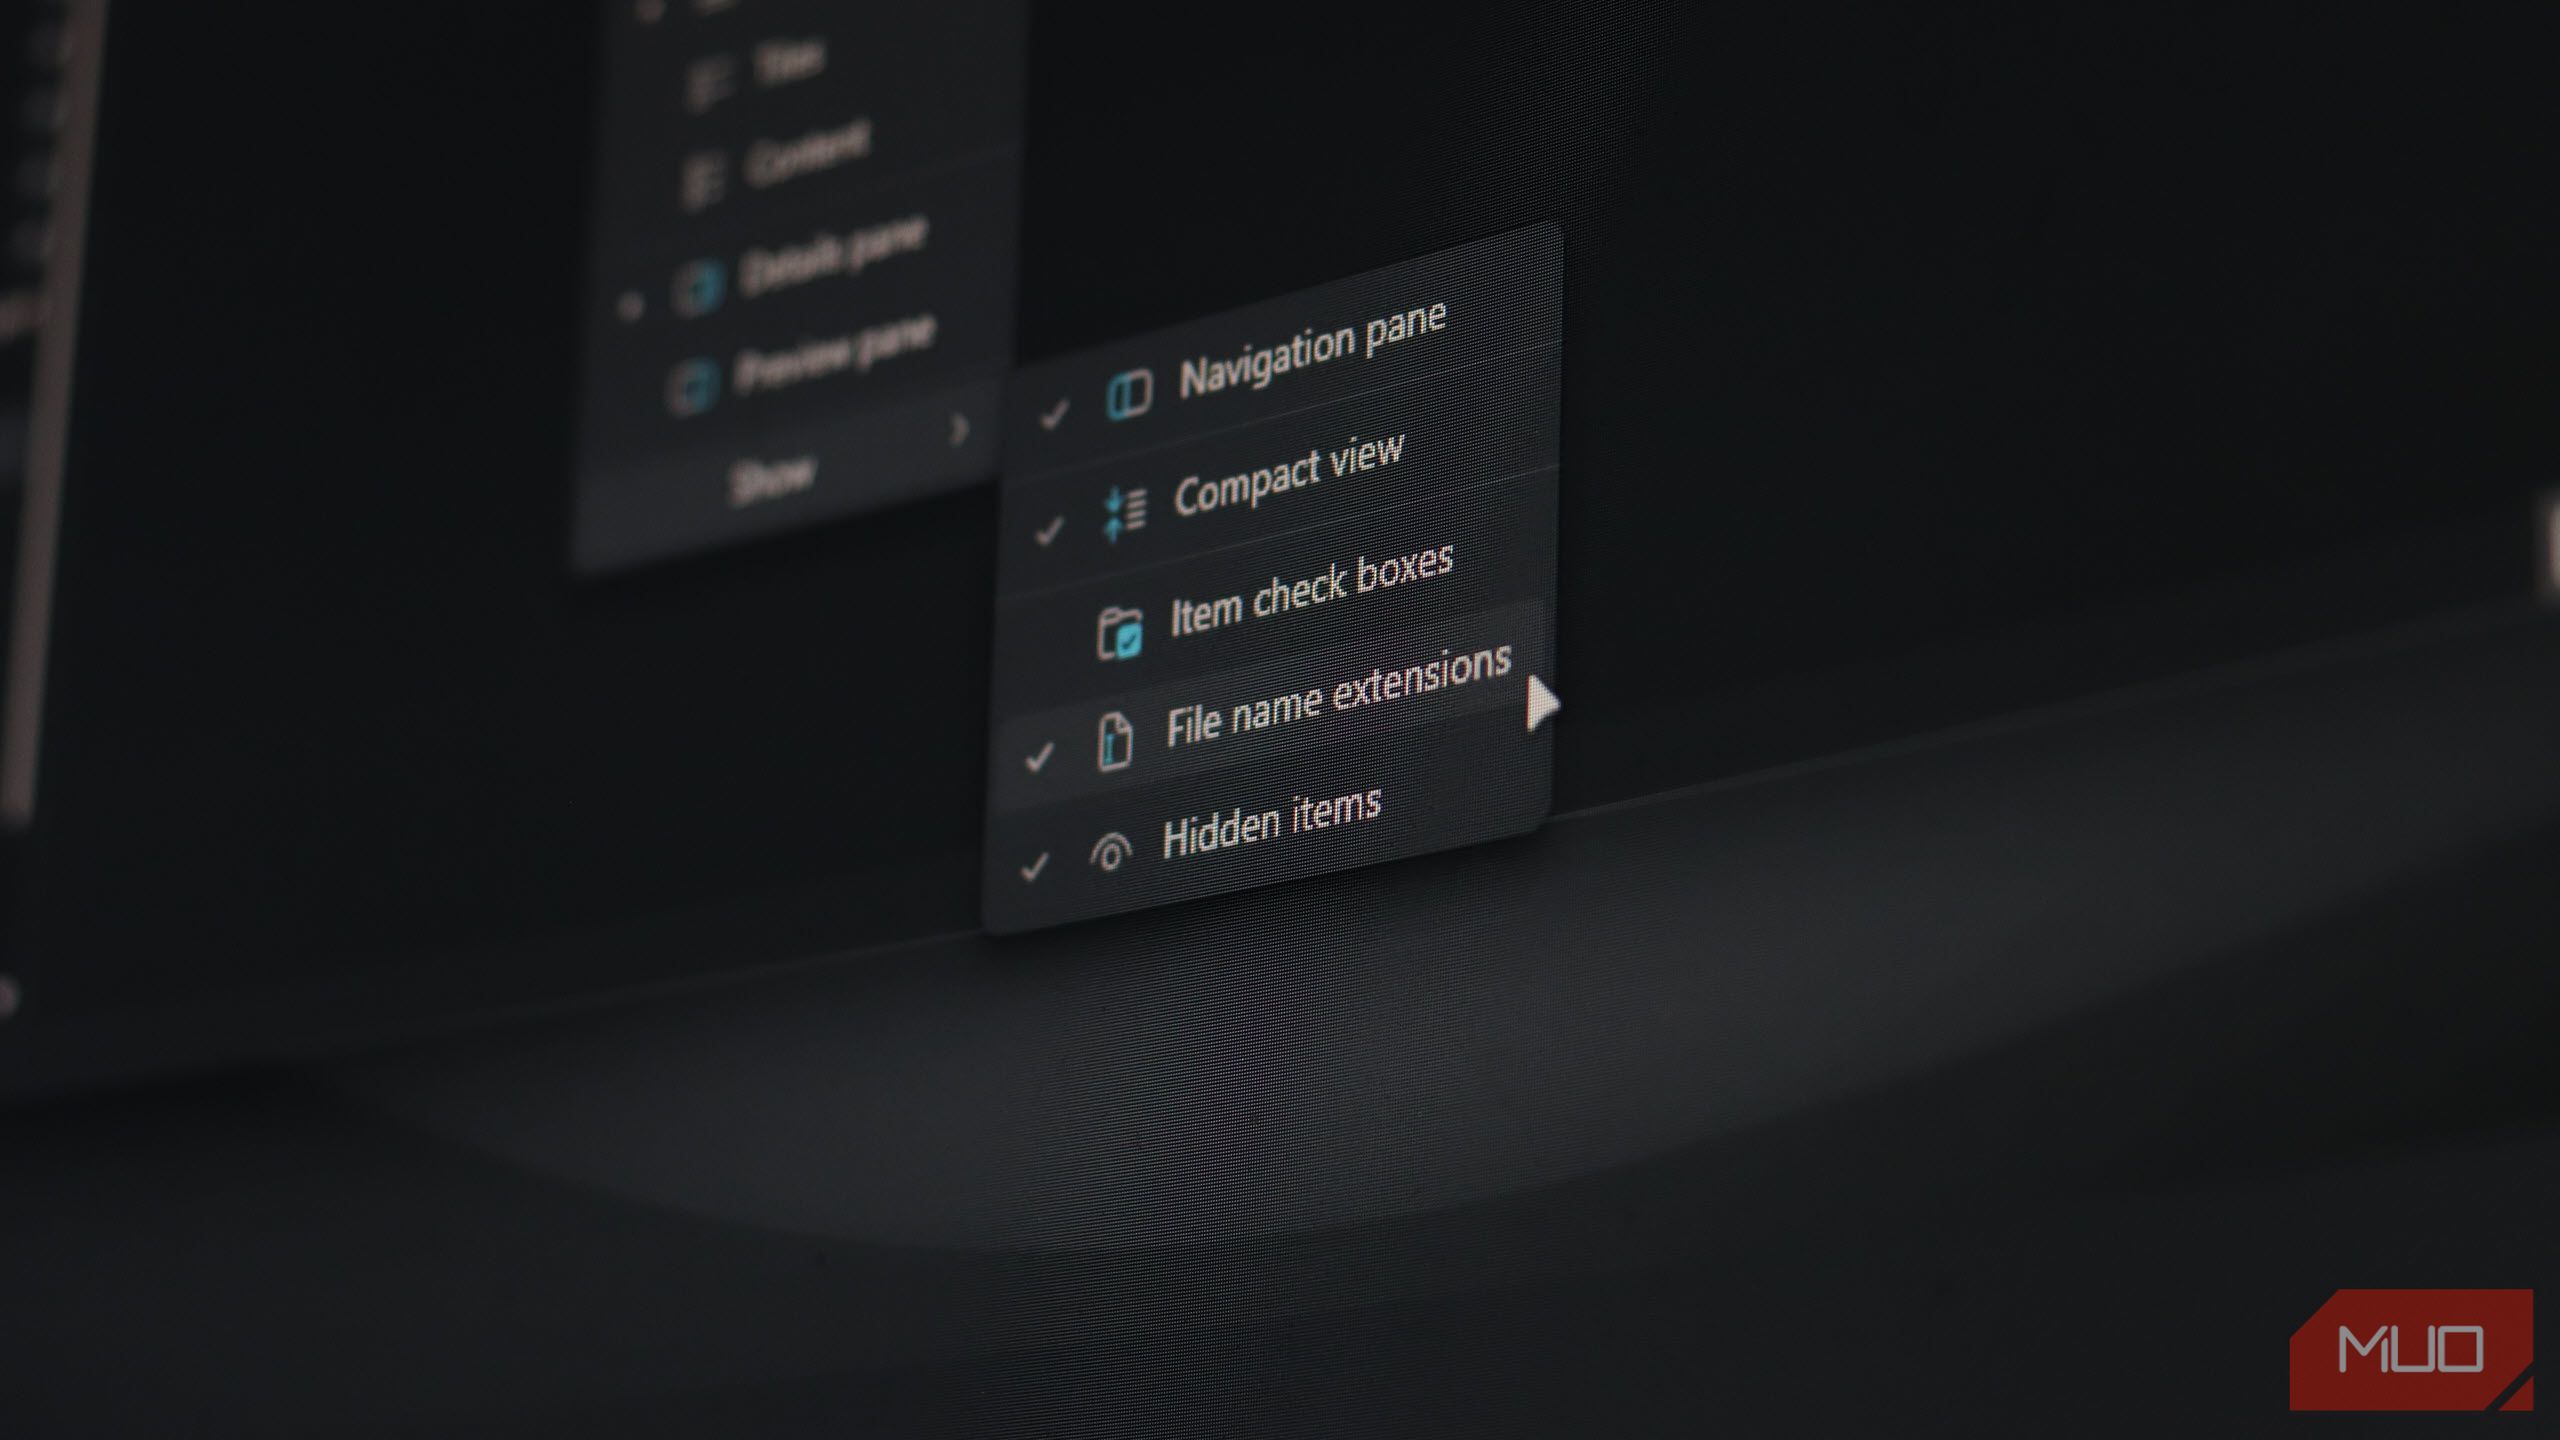
Get a dirty lens warning
Sometimes, it’s the small things we overlook
Screenshot by Pankil Shah — No attribution required
Screenshot by Pankil Shah — No attribution required
Screenshot by Pankil Shah — No attribution required
There’s nothing more frustrating than trying to take a photo only to end up with a blurry, smudged mess instead of the crisp image you expected. Your iPhone, which once captured stunning shots, suddenly seems average.
More often than not, the culprit is a dirty camera lens. It might sound obvious, but something as simple as cleaning the lens can turn a so-so photo into something spectacular.
iOS 26 now helps you avoid this headache with a simple but clever feature. If your iPhone detects that the lens is obstructed by fingerprints, dust, or grime, it alerts you before you snap the photo. This small heads-up keeps your images sharp and saves you from frustrating retakes or endless post-editing fixes. To enable it, go to Settings > Camera and turn on Lens Cleaning Hints.
1
Customize alarm snooze options
Wake up your way with flexible snooze settings
Screenshot by Pankil Shah — No attribution required
Screenshot by Pankil Shah — No attribution required
Screenshot by Pankil Shah — No attribution required
Alarms are meant to wake you up, not frustrate you. Yet, for years, iPhone users had to deal with a single default 9-minute snooze option. Interestingly, there’s a historical reason for the odd duration: when the snooze feature was first added to alarm clocks decades ago, designers had to fit the new mechanism into existing clock designs. Nine minutes was the longest interval they could manage without altering the mechanics, and the tradition stuck.
iOS 26 finally breaks free from this legacy limitation. You can now customize your snooze interval to match your morning routine. Open the Clock app, set your alarm, tap Snooze Options, and pick your preferred interval anywhere from 1 to 15 minutes. The default is still 9 minutes, but you can easily change it to whatever works best for you.
iOS 26 comes packed with headline-making features, but the real magic lies in the small, quiet improvements, details that long-time iPhone users will truly appreciate. It’s proof that Apple isn’t just chasing flashy upgrades; they’re also focusing on the things that matter most.
I love high-quality television as much as the next person, and we certainly live in an era where there are a lot of fantastic prestige shows to watch. From Severance to The Bear, I will always seek out that next big hit that will win every award under the sun. Sometimes, though, my brain just can not handle the heavy themes and dramatic plots that leave you feeling emotionally raw.
So, like anyone else, I turn to less demanding content when I just can not be bothered to watch that latest episode of Silo. Luckily, there are still a lot of options out there for television that can just exist and entertain without scarring you for life, or even shows that are perfect for background noise while you do something else entirely.
Ah, a good old murder mystery show with a fun, modern twist. PokerFace tells of the adventures of Charlie Cale (Natasha Lyonne) as she travels across the country, solving murders. As with any quirky detective series, Cale has her own little special ability that gives her the edge: She can always tell when someone is lying. It’s not so much a mystery of who did it, but how Cale will prove it.
Think Columbo, but set in the modern era with a character you equally wouldn’t expect to be out there solving crimes, albeit for different reasons than Columbo. What really makes Poker Face work so well is Lyonne’s performance and the whip-smart writing. Sure, it’s about murder, and there are some overarching storylines, but Poker Face is fun and low-key above everything else.
Sometimes I want to watch a show like Friends, but with a little bit more of a modern setting (and less bigotry). This is where New Girl comes into play. Starring Zooey Deschanel as Jessica Day, this charming little sitcom focuses on Jessica as she moves into a new apartment with three men. What follows is seven whole seasons of relatively low-stakes viewing, fueled by a great cast that includes the likes of Jake Johnson, Lamorne Morris, Max Greenfield, and Damon Wayans Jr.
You won’t find anything you haven’t seen in other sitcoms here, and that’s perfectly okay. I love the unpredictability of prestige television, but sometimes I just want to turn a show on and know exactly what I’m tuning into. New Girl is that show to a tee.
No matter how many times I throw on Arrested Development, I can’t help but get lost in the dysfunctional hilarity of the Bluth family. Anchored by Jason Bateman’s performance as Michael Bluth, Arrested Development never lacks ambition throughout its five-season run. Even when that ambition doesn’t necessarily work, especially in later seasons, you can’t help but appreciate what it’s trying to do.
Plus, the ensemble central cast is truly next-to-none when it comes to comedic talent. Jessica Walter, David Cross, and Michael Cera are just a few of the main players that you will come to know throughout, and they’re worth every second. Even when the plot starts to fall apart, you’ll stick around for the ensemble cast. Arrested Development is a sitcom that you could watch forever without getting bored.
Ah, who can forget USA Network’s Blue Sky era of television? Shows that didn’t require a lot of attention, and often came with a comedic twist in the pitch. While many might point to Psych or Monk as premiere examples, for good reason, Burn Notice was that perfect show if you’re looking for something in the espionage genre, but without the violence or heavy themes.
Following former spy Michael Weston (Jeffrey Donovan), Burn Notice balances Weston’s search for why he was fired from his agency with case-of-the-week stories where he uses his skills to help people in Miami as a private investigator. It’s exactly the kind of low-stakes action that you think it is, and thank goodness for that. I was sad when USA Network moved away from shows like this, because in an age where every network is trying to find that next big prestige hit, they’re kind of few and far between.
Workplace comedies can be surprisingly calming, given their setting, and Superstore is no different. Like The Office, this sitcom takes place primarily in a place of work, namely Cloud 9, a fictional store not unlike Walmart. As you can probably guess, Superstore centers on the employees of Cloud 9, though the early seasons focus mainly on Jonah Simms (Ben Feldman), who is hired in the first episode.
While it would be easy to compare it with The Office or Parks and Rec, Superstore is a show all its own, with characters that really start to grow on you as the series progresses. It also deals with some real-world events, and it’s amazing just how right it gets things. Almost scary, actually. Ultimately, however, Superstore is a relaxing watch, and something you can easily throw on after a hard day’s work. If you’re interested in watching others work, that is.
Sometimes it’s nice to take a break from prestige television
Looking at all the prestige television out there now, it’s easy to get overwhelmed by it all. For me, I mainly watch television to relax and feel entertained, and sometimes, you just don’t get the former when watching serious dramas all the time. So these shows really scratch that itch for me. But if you are looking for some captivating, slow-burning thriller series that scratches the prestige itch, we have some ideas for you.
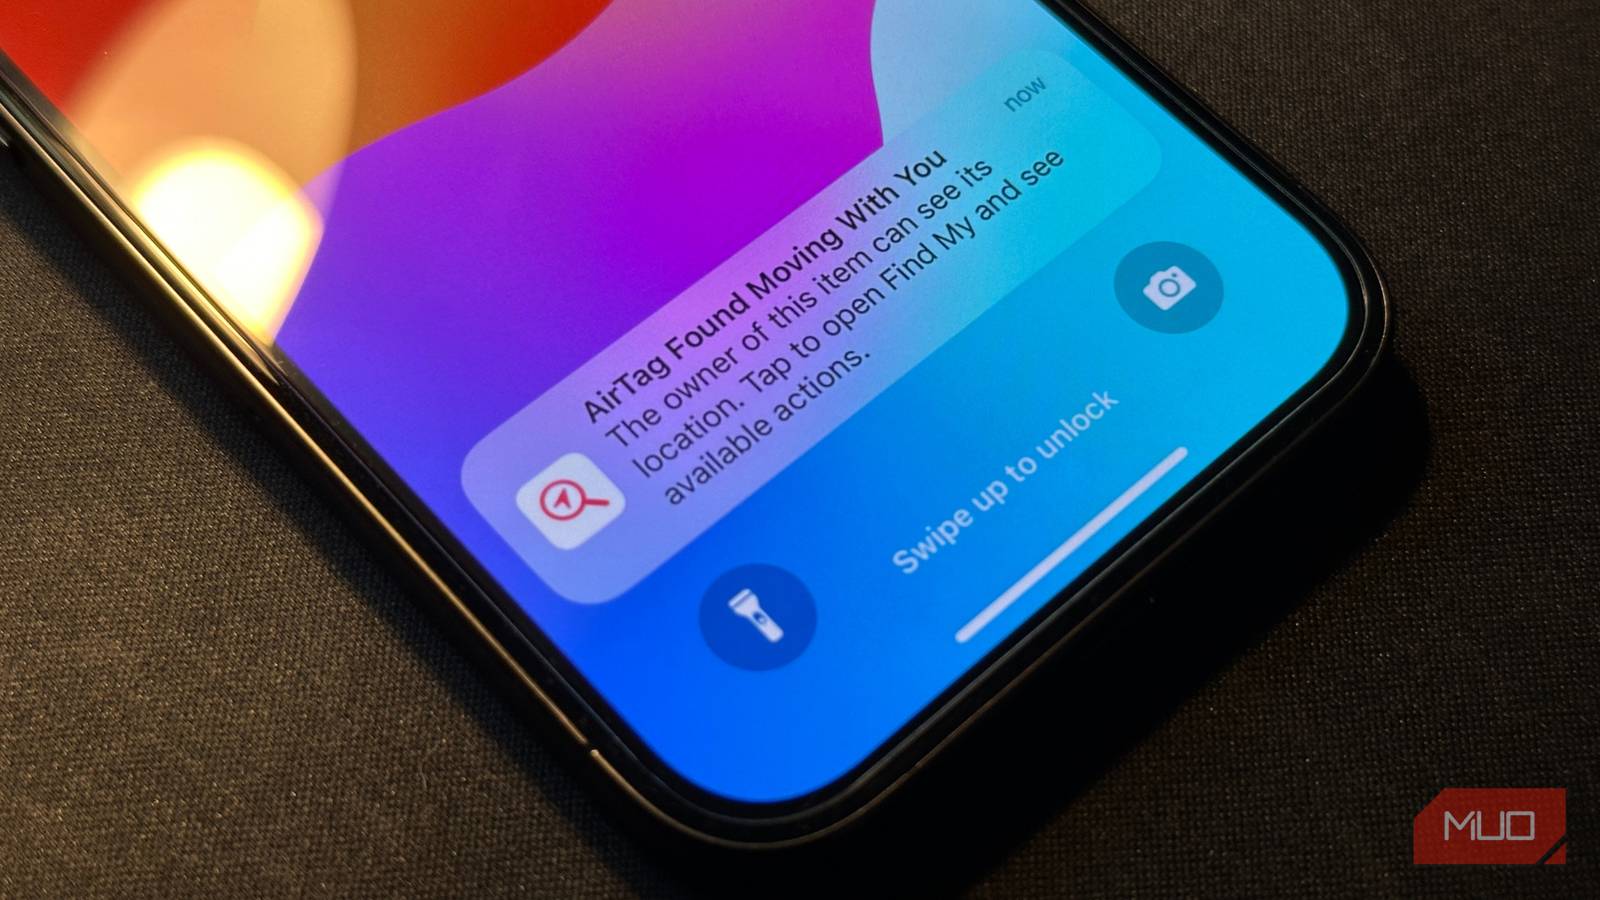
Last Tuesday, I woke up in the middle of the night and grabbed my iPhone to check the time. Immediately, it turned on the flashlight at full brightness and jolted me fully awake. There’s a specific iPhone feature behind these random activations: Back Tap.
Back Tap lets you tap your phone’s back to perform quick actions, including enabling the flashlight. The frustrating part is that it fails miserably when you intentionally try to use it, yet it activates randomly throughout the day. I’ve dealt with this nonsense on my iPhone 13 Pro Max and now my iPhone 16 Pro Max, but there’s actually a simple fix.
What is Back Tap, and how does it work?
The hidden accessibility feature most people don’t know about
Jonathon Jachura / MUO
You’ll find Back Tap hiding in Settings > Accessibility > Touch. Think of it as turning your iPhone’s back into one big touch button. Apple introduced this with iOS 14 to give people quick access to screenshots, Control Center, flashlight controls, and other functions.
The feature lets you assign two different actions: one for a double-tap and another for a triple-tap. The available actions include system controls, accessibility features, and custom shortcuts from the Shortcuts app. Setting the flashlight as a Back Tap action seems like a great idea until you actually live with it.
Unfortunately, Back Tap’s sensitivity is maddeningly unpredictable. When you deliberately try to activate it in a dark hallway, it often ignores your taps completely. But set your phone down normally or shift your grip, and suddenly you’re blinded by an LED spotlight.
Why Back Tap keeps triggering your flashlight accidentally
The sensitivity problem that Apple hasn’t quite solved
Jonathon Jachura / MUO
The core issue isn’t hardware—it’s software sensitivity that behaves erratically across all compatible iPhone models. Normal phone handling becomes a minefield of potential triggers. Just placing your phone on a surface, slipping it into your jeans pocket, or adjusting your grip while texting can make the sensor think you meant to activate something.
Nighttime activations are the worst. Your phone rests on the nightstand when something minor—maybe a notification buzz or your furniture settling—sets off the Back Tap sensor. Next thing you know, you’re squinting at what might as well be a tiny flashbang at 3 AM.
Cases don’t fix the problem either. I’ve tried different case thicknesses and materials, but the detection system stays just as unreliable. This frustrating inconsistency spans iPhone models and accessories—it’s a fundamental software issue.
How to check if Back Tap is causing your flashlight issues
Finding the culprit in your iPhone settings
Screenshot by Jonathon Jachura; no attribution required
Screenshot by Jonathon Jachura; no attribution required
Screenshot by Jonathon Jachura; no attribution required
Head to Settings, then Accessibility > Touch > Back Tap. You’ll find Double Tap and Triple Tap settings here. Check what each one does by tapping on it.
Look for Flashlight listed under either option. When this is active, double or triple tapping your phone’s back will turn on the flashlight. Don’t stress if you can’t remember setting this up—it sometimes gets turned on during phone setup or when you’re poking around in the settings.
Your options for fixing the random flashlight problem
Three ways to stop the unexpected light show
Screenshot by Jonathon Jachura; no attribution required
Screenshot by Jonathon Jachura; no attribution required
Screenshot by Jonathon Jachura; no attribution required
Disable Back Tap Completely
The nuclear option: set both Double Tap and Triple Tap to None. This eliminates any possibility of accidental activation, since the feature becomes inactive. You lose the shortcut capability but gain peace of mind.
If both settings show None, but flashlight surprises keep happening, you’re looking at either another accessibility setting or a hardware issue. Try troubleshooting your iPhone’s flashlight further.
Change to a Less Disruptive Action
Alternatively, keep Back Tap active, but assign it to something harmless like taking screenshots. Accidental activation just creates an extra photo you can delete—no more surprise light shows. Other benign options include opening Control Center or triggering a custom shortcut that does something innocuous. You can even set the double and triple taps to trigger productivity tools.
Move Flashlight to Triple Tap Only
If you actually use the flashlight shortcut, assign it to Triple Tap while setting Double Tap to None. Triple taps require more deliberate action and rarely trigger accidentally during normal phone handling.
Alternative ways to quickly access your iPhone’s flashlight
Better methods that won’t surprise you at 3 AM
Jonathon Jachura / MUO
Control Center remains the most reliable flashlight access method. On modern iPhones, swipe down from the upper-right corner; on older models with Home buttons, swipe up from the bottom. Then tap the flashlight button. This approach never lets me down.
The Lock screen offers another dependable route. Look for the flashlight symbol in the bottom-left corner and press down hard until it lights up. The force requirement prevents accidental bumps from triggering it.
Siri handles voice requests reliably—just say “Hey Siri, turn on the flashlight.” This works great when you’re carrying something or trying to navigate in pitch-black conditions.
Take back control of your iPhone’s flashlight
Random flashlight activations almost always trace back to Back Tap’s flashlight setting. This accessibility feature suffers from inconsistent sensitivity that makes it more annoying than useful. The good news is that fixing it takes seconds—disable Back Tap entirely, change its action to something harmless, or move the flashlight to triple-tap.
With reliable alternatives like Control Center and lock screen shortcuts readily available, you can ditch the problematic Back Tap feature and finally sleep soundly without unexpected illumination ruining your night. I also recommend looking into useful accessibility features on your iPhone that work much better.
Science fiction is a great genre for hiding critiques of social issues and posing big questions that extend beyond the mere speculation of whether aliens exist. And through the medium of movies, there’s an opportunity to use imagery to further convey those questions and, hopefully, offer a solution or answer.
As someone who frequently watches sci-fi movies, I want to be moved by these ideas and twisted into a philosophical pretzel. I’m not necessarily looking for a feel-good movie, either. When I walk away questioning my existence or seeing a fresh point of view, I know that the movie did something right.
What is a soul? Is it even real? When you have two copies of the same person, with the same memories, are they two different people? And if you could clone people, to what extent would the power be abused when in the wrong hands? Mickey 17 asks a lot of questions that keep me awake at night (and inspire me to write my own short stories, too).
The same way Bong Joon-ho’s Parasite had me grappling with wealth disparity and class divides in real life, Mickey 17 had me wrestling with the concept of disposability. I felt a lot of empathy and anxiety watching Mickey get abused and die over and over again for the sake of his job. There’s a kinship there that hits a little too close to home.
5
Blade Runner
Watch Blade Runner on Amazon Prime Video
Blade Runner is a bit of a unique case among my picks, and it comes down to which version of Blade Runner you watch. Both versions—the Final Cut or the original—have distinct differences that offer their own existential crisis. I won’t argue which is better because I like both for different reasons.
In the original cut, in whatever form that is, the movie highlights Roy and the question of whether or not he’s a “real boy,” despite being an android. What does it mean to be human? Is it even possible for a machine with enough advancements in technology to reach consciousness? In the other version—the director’s cut, essentially—adds to the discussion of Deckard possibly being an android as well.
Most of my entries are dark, somewhat brooding stories, but Interstellar is unique in that it’s a more hopeful story. Sure, the planet becoming uninhabitable is a bummer, but the movie focuses on the strengths of humanity and how we can overcome our weaknesses through love. What Interstellar does best is take real scientific knowledge and facts (with just a dash of science fiction) to create a mind-bending story.
It’s one thing to know black holes bend space and time, but it’s another to see how you’ll be affected in a real-world scenario, like Cooper experiencing time dilation on a planet close to a black hole. Once you realize a lot of the science checks out—thanks to theoretical physicist Kip Thorne being involved—it completely shatters your reality.
Not only did Annihilation freak me out because of its story, the nature of the Shimmer was kaledioscopic—alien, and yet familiar. It had me feeling like I was on a completely different planet, especially with the strange and bizarre ambient music that would definitely have a place on a list of movies with the most underrated soundtracks. The Shimmer was freaky in its own right, but what had me questioning my own reality was the characters and their self-destructive tendencies.
You want to imagine yourself making the right decision in these scenarios, but they’re so painfully human, you wonder if it’s simply in our nature to implode. And of course, the nature of consciousness on display here is the kind of existential crisis I like to chew on, especially when we’re dealing with alien life. I like to imagine humanity’s flavor of consciousness may not apply to life on other worlds.
2
Blade Runner 2049
Watch Blade Runner 2049 on Amazon Prime Video
You’d think Blade Runner has said everything it could on consciousness and identity, or that a sequel would only tread the same ground, but Blade Runner 2049 has a whole new kind of philosophy to grapple with. Now we follow the life of a replicant, who is also a blade runner, following clues that point to another replicant somehow giving birth.
Once again, Blade Runner 2049 contends with what it means to be human, the tricky nature of memories, free will, and the line between man and machine becoming almost indistinguishable. Despite being a replicant, K experiences human emotion, and because of that, I’d have a hard time arguing against him being conscious.
With its constant use of body horror, Crimes of the Future is not for the squeamish, I can tell you that much. In a future where humans are experiencing rapid evolution, no matter how minor the transformations are, the movie had me wondering what the future of human evolution would look like. After all, we may think ourselves static now, but in a few thousand years, it’s impossible to imagine how we’d behave or even look.
What’s most fascinating about the film is how the strange machines humans use to merely function, like the chair Saul sits in to help him digest, are merely tools of conformity. In a sense, the chair is a detriment to Saul’s identity and prevents him from truly evolving. Once the credits rolled, Crimes of the Future had me wondering what technology was stunting my own growth.
I adore movies that challenge reality and conventional thinking, like an exercise in philosophy and critical thinking. Often, they’re the most emotionally powerful movies too, and who doesn’t love a good cry? If and when you do check these movies out, bring a friend or two. They’re perfect for discussions!
With the lack of a Home button, modern iPhones are more gesture-based than ever before. Everyone knows about swiping up to go back to the Home screen or dragging down from the top-right corner to access Control Center, but there are lots of other iPhone gestures Apple doesn’t make so clear.
Whether they make common actions faster or unlock entire shortcuts you didn’t know were present, these gestures are worth learning. There aren’t as many gestures as the iPad offers, given the smaller screen, but they’re powerful all the same.
Drag and drop between apps
Dragging files, images, and other data between apps is easy with a mouse, but have you ever tried it on your iPhone? While it’s a bit clunkier with your fingers, it still works.
To drag and drop content between different iPhone apps, press and hold on an image, bit of text, link, or whatever else you want to reuse. While holding it with that finger, use another finger to go back to the Home screen, then open another app. Inside that app, keep using the second finger to navigate, then drop what you’re holding into the applicable spot.
Try using this to move text between group chats quickly, share links, or share an image from the web without downloading it first.
Hold the spacebar for a trackpad
Screenshot by Ben Stegner; no attribution required
Screenshot by Ben Stegner; no attribution required
Screenshot by Ben Stegner; no attribution required
Did you know your iPhone has a trackpad hiding in the keyboard? It’s a great utility, as it provides a more precise way to move the cursor instead of trying to tap the exact right spot.
To activate this, press and hold the spacebar while your phone’s keyboard is open. Once the keys turn blank, slide your finger around the keyboard area as needed to freely control the cursor.
Try it next time you need to correct a voice-typed message or navigate around a lot of text.
Three-finger swipe to undo/redo
Screenshot by Ben Stegner; no attribution required
Screenshot by Ben Stegner; no attribution required
Screenshot by Ben Stegner; no attribution required
By default, shaking your iPhone undoes the last action you took. However, I’ve long found this to be unreliable, plus it’s not always easy to perform. There’s a better way to undo and redo with a quick gesture.
To undo your last action, place three fingers on the screen and slide them to the left. If you want to redo that undo, swipe three fingers to the right instead. You’ll see Undo or Redo text at the top to confirm it was successful.
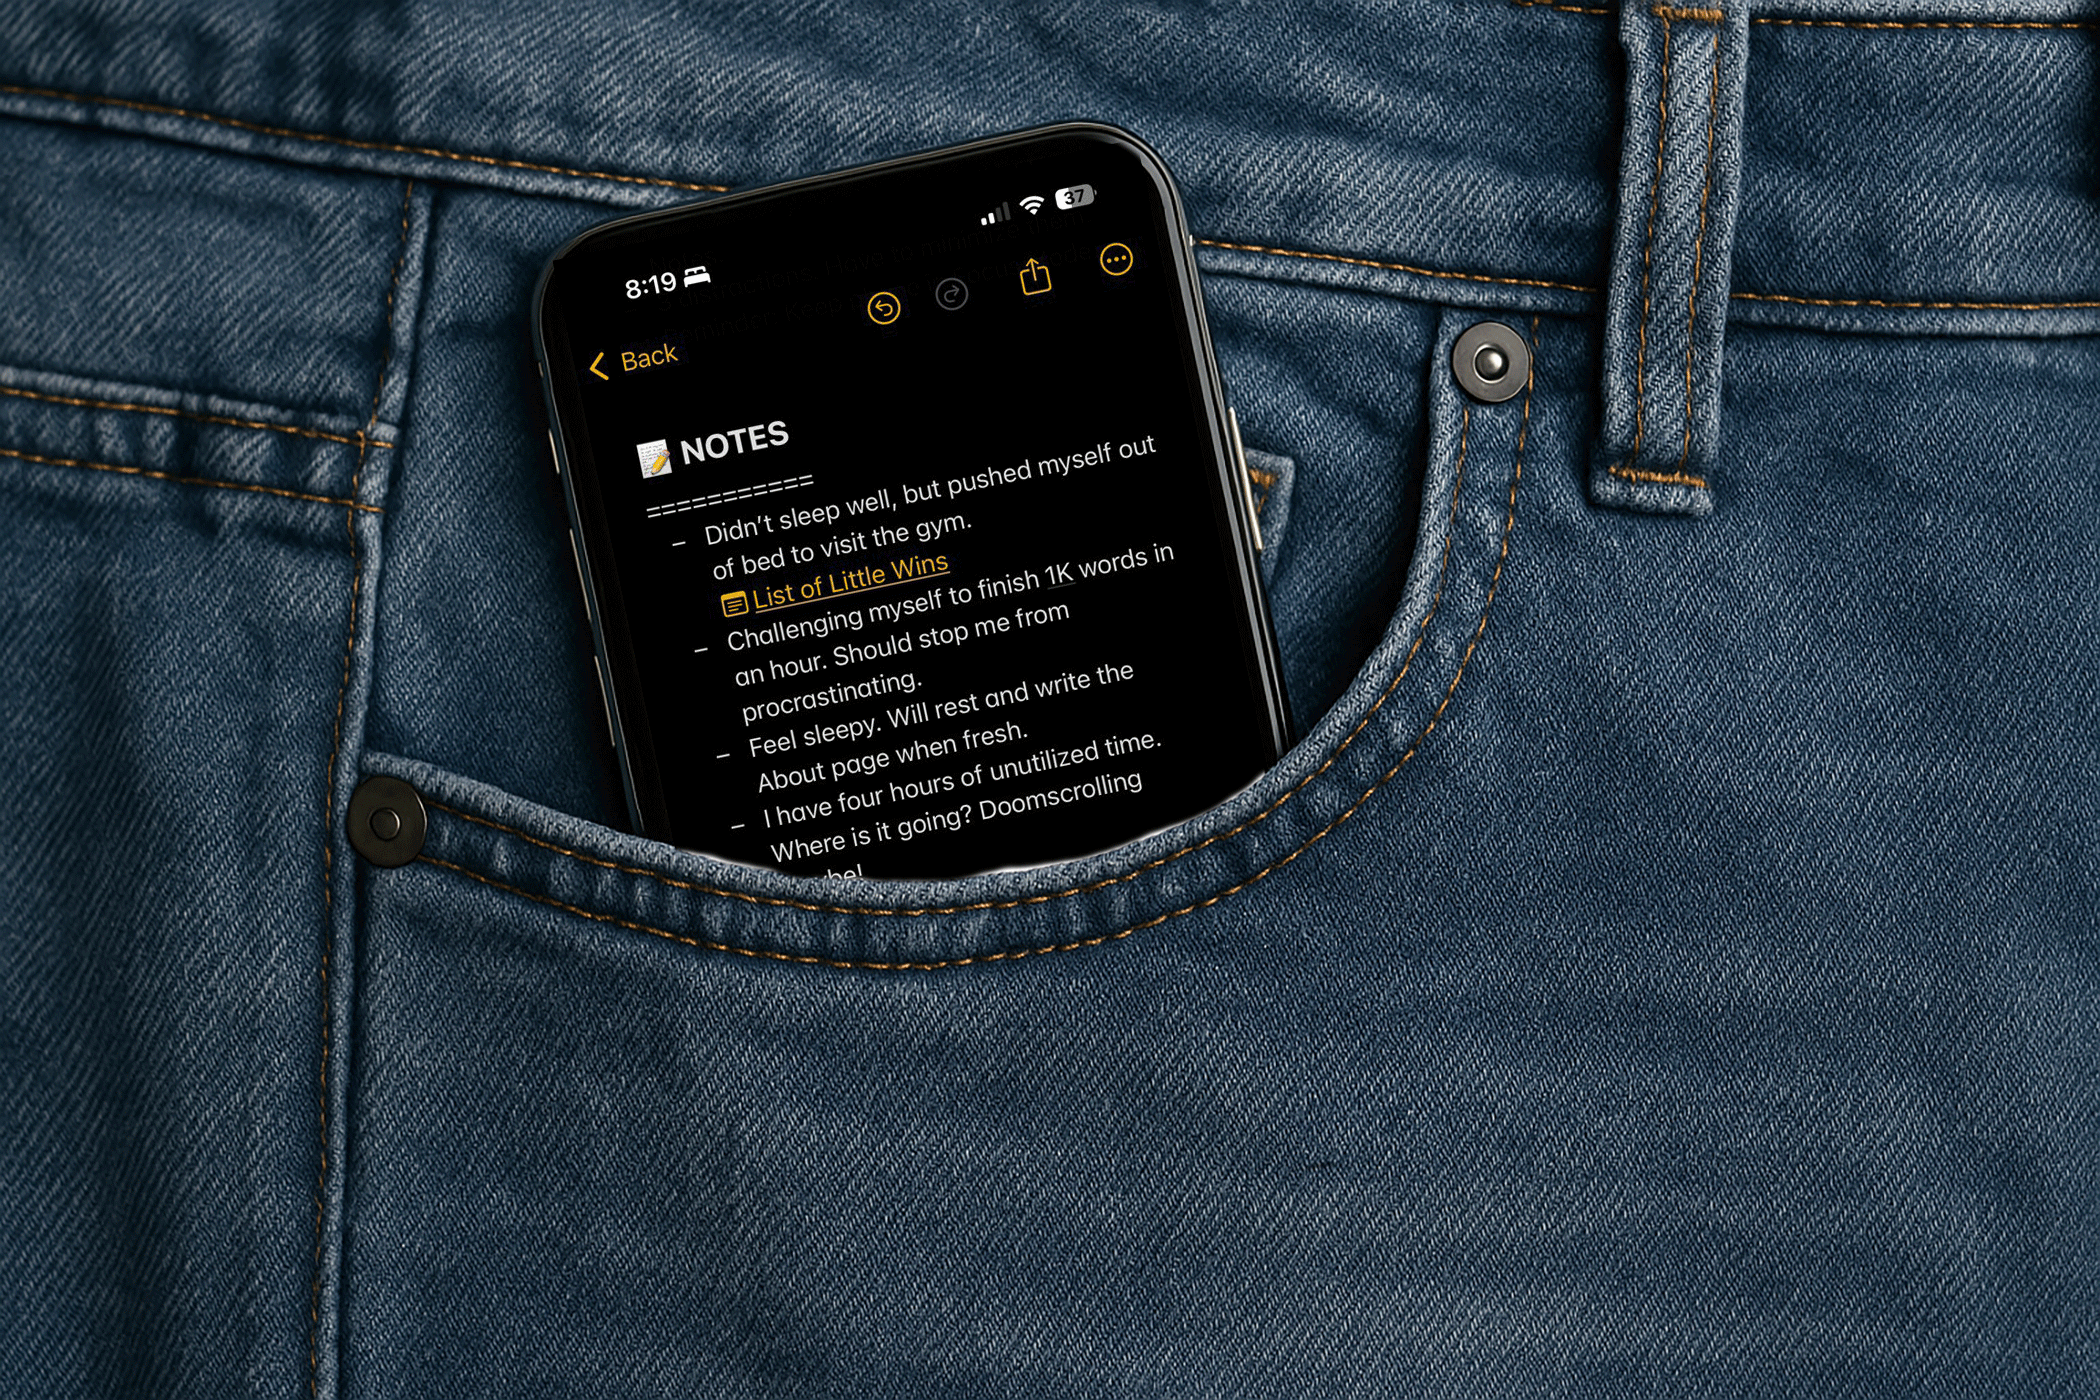
For example, if you accidentally delete a paragraph of text in Notes or Messages, perform the undo action to bring that text back. This is much easier than flailing your device around.
Three-finger pinch to copy, cut, and paste
Screenshot by Ben Stegner; no attribution required
Screenshot by Ben Stegner; no attribution required
Having three fingers on the screen unlocks yet more gestures you might not have known about. While you can perform standard cut, copy, and paste actions by selecting text and using the resulting tooltip, this isn’t the fastest method.
Instead, pinch with three fingers (in the same way you zoom in with two fingers) to copy the currently selected text. To cut instead (removing the text from its current position), perform this three-finger pinch gesture twice.
Then, once you’ve navigated to where you want to paste that snippet (and placed the cursor in the text box accordingly), reverse the three-finger gesture by “pinching out” (spreading). If you do it right, your copied or cut text will appear in its new home.
If you have trouble selecting the exact text to copy or cut, or placing the cursor to paste, the trackpad tip mentioned above will help.
While not strictly gesture-based, there are also lots of little iPhone typing tricks that will also save you time.
Two-finger multi-selection
Screenshot by Ben Stegner; no attribution required
Screenshot by Ben Stegner; no attribution required
Next time you need to select a bunch of items in a row, don’t tap them one by one. Instead, adding a second finger lets you select lots of emails, message conversations, files, or other data.
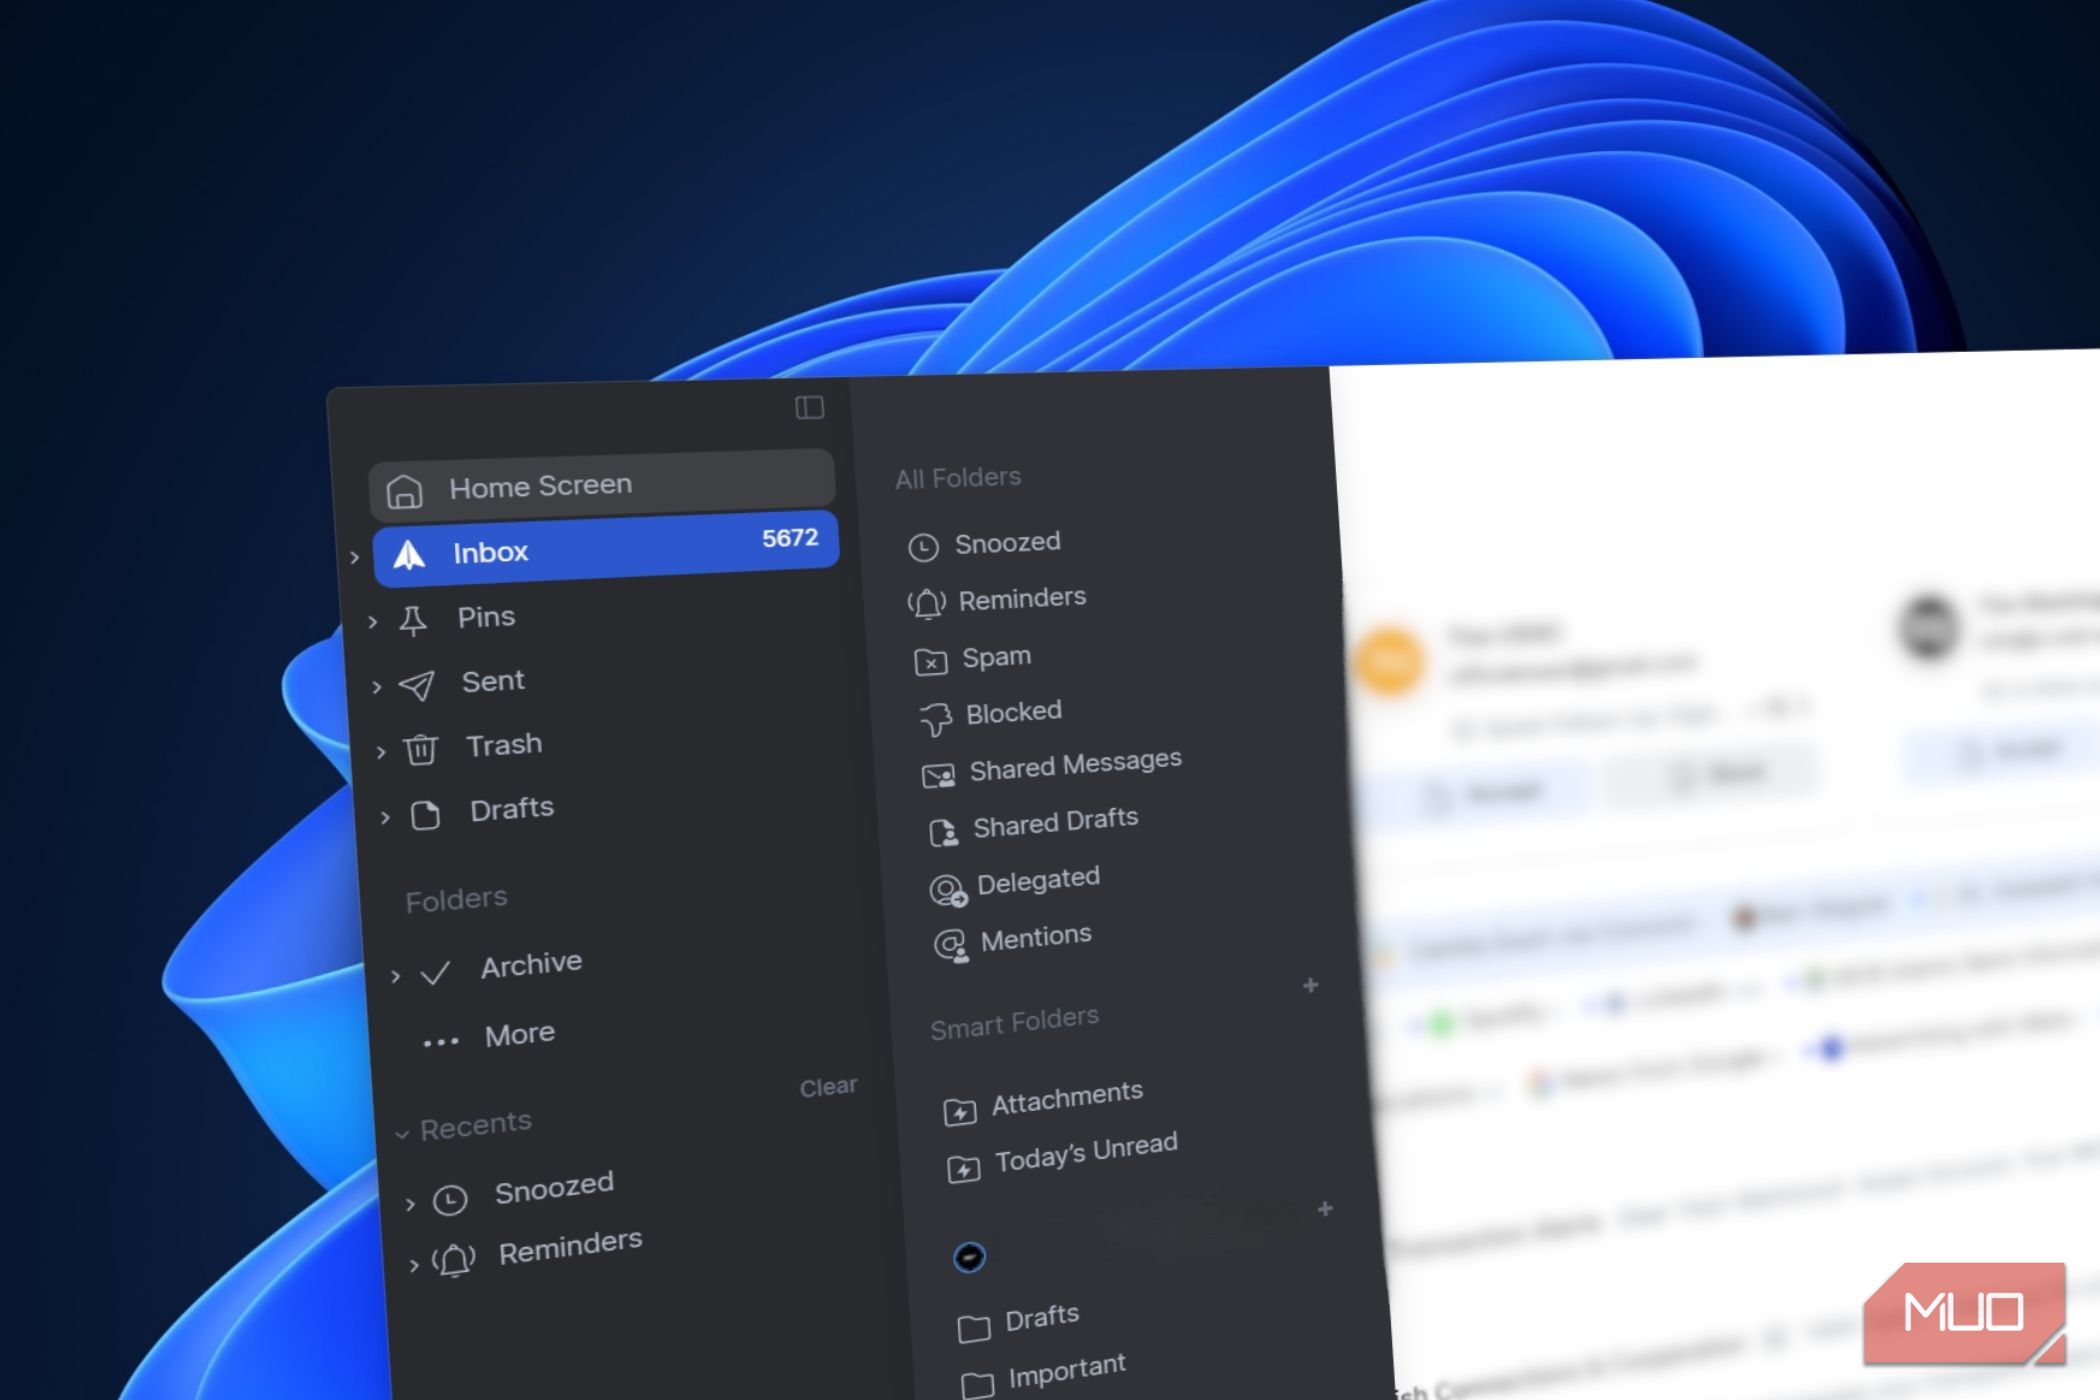
For example, in the Mail app, use two fingers to press the first email, then immediately swipe down. Once you do this, you’ll see selection circles appear on the left side. Continue to slide your fingers down over the next items to swiftly select them.
If you hold your fingers at the bottom of the screen once you reach it, it will continue to scroll as long as there’s more. You can also select non-consecutive items by lifting your fingers, scrolling to the next area you want to select, then performing the gesture again.
The hidden shortcuts on your lock screen
Screenshot by Ben Stegner; no attribution required
Screenshot by Ben Stegner; no attribution required
Even the iPhone’s Lock screen hides a couple of gestures you might have missed or forgotten about.
Swiping in from the right side opens the camera; knowing this allows you to replace the redundant default Camera widget at the bottom-right. Customizing your Lock screen lets you replace that with something else, like the Calculator or a Shortcut.
Swiping in from the left opens the Today View, which is a collection of iOS widgets. If you haven’t taken the time to customize this, it’s worth setting it up so you can access this info without unlocking your phone.
Smaller gestures are all around iOS
There are lots of little gestures that aren’t as major as the above, but still help you navigate your iPhone faster. Try these out:
When you start scrolling on a long page, touch the scroll bar that appears on the right side of the screen. Slide this to scroll much faster; this saves effort compared to making repeated huge swipes.
In Safari, you can jump to the tab overview page by performing the two-finger “pinch out” gesture (used to zoom out) when already zoomed out.
In many apps, press and hold on a link to open a small preview of it. This lets you see what’s linked without opening a new tab or switching apps.
In apps that show the Back menu at the top-left, you can press and hold on the text to show the breadcrumb trail, then let go to select. For example, if you’re two pages deep in Settings, this lets you go back to the main Settings page without tapping twice.
Screenshot by Ben Stegner; no attribution required
Screenshot by Ben Stegner; no attribution required
Tap the top-center center of your iPhone’s screen (around the Dynamic Island on modern iPhone models) to scroll to the top of the page. This is a huge time-saver when you’ve scrolled to the bottom of a massive page.
If you’re into gestures, you also shouldn’t forget about Back Tap, which lets you run two different actions of your choosing by tapping your finger on the back of your phone.
I love Spotify Wrapped, as do most Spotify users. The stats are fun to look at, and it’s great to compare your data with your friends and family. When Wrapped rolls out towards the end of November each year, my socials are filled with people comparing their most listened-to tracks and artists, or marveling at how Spotify classifies genres, with some truly wild word-salad combos.
But it’s just not enough.
I wanted to know about all of my Spotify stats; just how much Spotify have I listened to since I created my account? That’s where Spotigraph, the Spotify Data Visualizer, comes in.
The Spotify Data Visualizer is the ultimate version of Spotify Wrapped
It’s time to see everything you’ve listened to, ever
nar by Gavin
Most Spotify users have had the question once: how many minutes of music have I streamed on Spotify, ever? Or, what was my favorite album and song a decade ago?
Spotigraph is the solution you’ve been waiting for. It takes your extended Spotify listening history and turns it into a customizable graph spanning the ages, letting you delve into that giant Spotify nostalgia pool you’ve been dying to dive into.
Download your extended Spotify Account data
This process can take a few days to complete
NAR by Gaivn
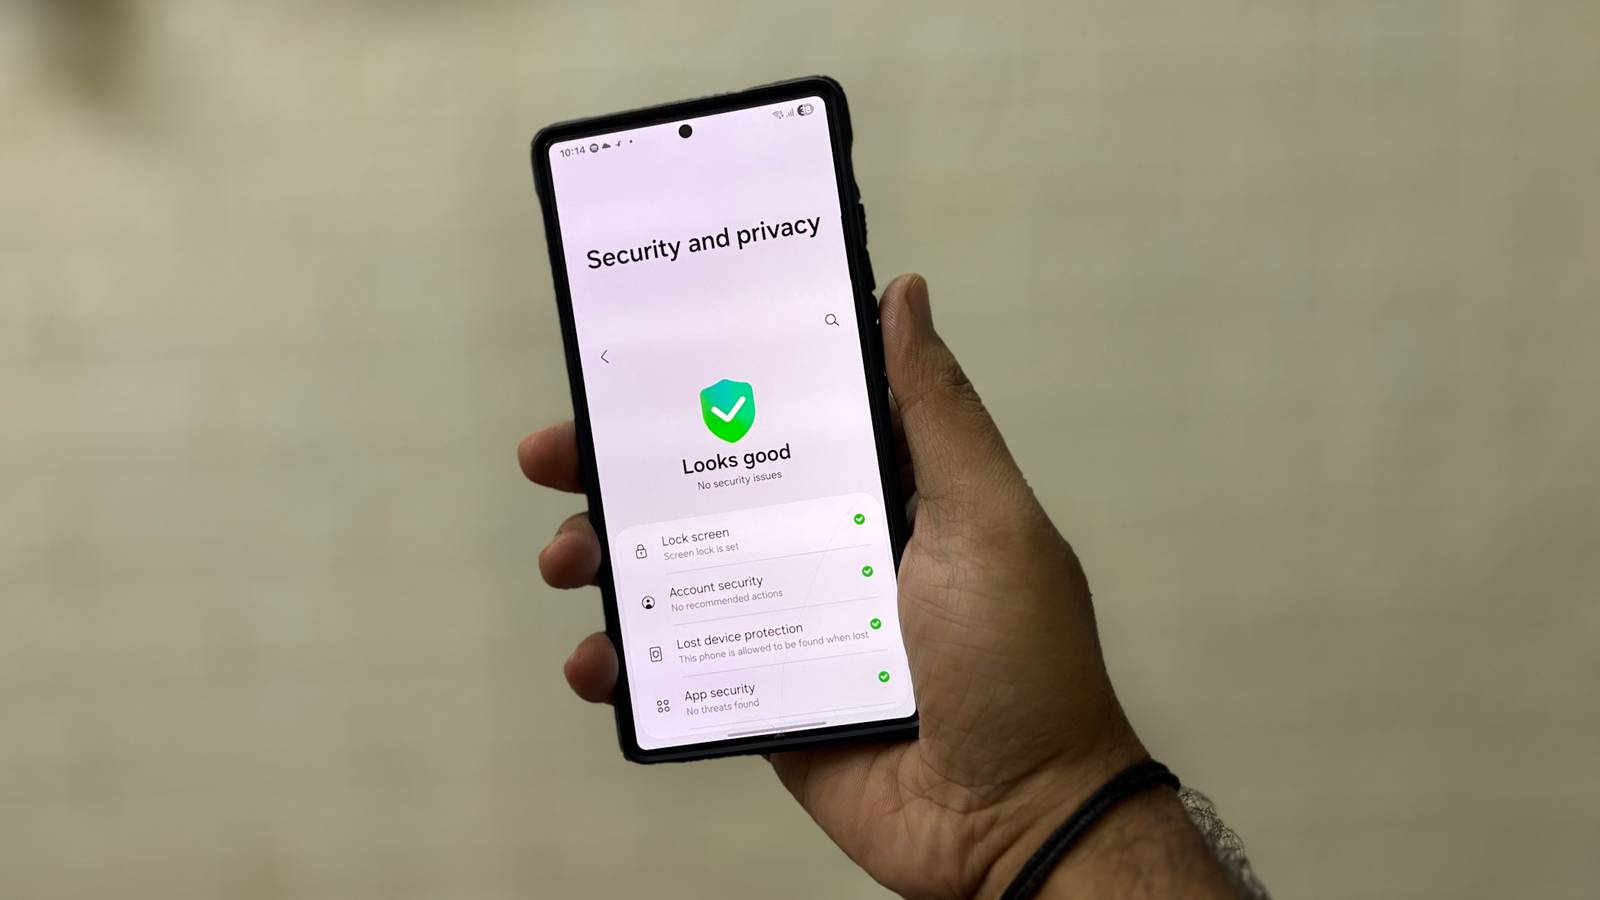
The Spotify Data Visualizer requires your full Spotify listening history. Depending on how long you’ve been using Spotify, this can take a day or two to prepare. You also need to request this data through your Spotify account in a web browser. It’s not accessible through the Spotify desktop or smartphone app.
Then, head to Account > Security and Privacy > Account Privacy.
Scroll down to Account Data and select Select Account data.
Next, underneath, select Select Extended streaming history. Note that this section warns “Preparation time 30 days,” but mine was delivered within 48 hours.
Once selected, scroll down and select Request data.
You’ll receive an email on your linked Spotify profile when the data is ready. Download the file, and you’re ready to go.
You don’t need to extract the data from the archive for the next part of the process to work.
How to use the Spotify Data Visualizer to see everything you’ve ever listened to
You’re about to step back in time—I hope you had good taste
Once you have your data, head over to the Spotify Data Visualizer. This is where the fun really begins.
Drag your Spotify data file into Spotigraph and drop it onto the area marked Click to upload or drag and drop.
The magic starts almost immediately, as your entire listening history begins to whizz past your eyes. Spotigraph’s bars start populating the screen, starting from the moment you created your Spotify account. I’ve been using my Spotify account for 14 years, so there is a fair amount of music to trawl through, though I was a more sporadic user in the early years, before I had a Premium account. The video below shows my entire history from start to finish.
It also highlights how I get really stuck on certain songs, or where they are typically placed in playlists, often at the top. One of my top listened-to songs, Raphael Treza’s Noizy Birdz, is the first track on my go-to Spotify concentration playlist, so it gets played all of the time. My absolute top track (which I wasn’t expecting), Todd Terje’s Inspector Norse features on several of my go-to playlists, frequently appears on Spotify’s Daylists, and is served up by Spotify’s AI DJ.
I find my all-time listening stats for artists interesting, too. Like the songs, specific artists capture moments in your life, and it’s nice to look back on that. Really, though, it shows that over time, my listening has become more siloed into fewer genres, and I’m probably not as experimental as I once was.
For me, it also shows that I used to listen to albums more thoroughly; these days, I tend to use Spotify’s various playlists and listen to many different single tracks, rather than sitting down and really engaging with the music properly. In itself, that’s telling. I was at a tech show with a friend, and he talked about listening to music as a specific activity, rather than as the side-dish to your daily life. It’s something I haven’t done for a long while, and Spotigraph is a great way to try and visualize how to fix it.
Fair warning, though, the artist data takes much longer to run than the songs. It took around 13 minutes for mine to complete. I’d guess that’s because the number of artists listened to on Spotify is really quite vast, especially if you use a lot of different playlists, genres, and so on. Still, it’s worth the wait. I’m genuinely blown away that I’ve listened to Kolsch for 62 hours.
Oh, and if you’re worried it’ll show all podcasts, don’t: the developer has specifically filtered out podcast content to show you just the music.
It’s not just about the all-time Spotify listening stats
What did you listen to on those big days?
I don’t know if the original creator of Spotigraph envisioned this, but one way I really like to use this data is to find out what I was listening to during some of the important moments in my life. Like, what tracks was I listening to on the day my kids were born? How about the day I got married, or when I turned 30 a few years back?
It’s a cool way to glimpse your musical past, when figuring out these small details are easily lost to time.
Give Spotigraph a try, and you’ll see your musical past
What will you uncover?
I’ve tried quite a few different apps that promise to reveal your full Spotify listening history, but Yobeast’s (the developer) is the first I’ve found that gives such a detailed view.
With that said, there are some improvements that would be super useful.
Export the top 15 tracks and albums to a new Spotify playlist
Show the artist for each song
Scroll down to see more data. Once it’s gone from the screen, you can’t see it anymore, but it’s still being processed.
Maybe something that shows us specific genres of music
Overall, Spotigraph is a great way to visualize your entire Spotify history. It’s almost like Spotify Wrapped cranked up to 11, and it really makes me wonder why Spotify hasn’t bothered rolling out a tool like this. It would be an instant hit!
I didn’t expect a note-taking app to change how I work. Apple Notes had always been “good enough”—free, simple, and built right into my iPhone. But one of my biggest frustrations was the lack of a proper Windows version. Sure, you can access Apple Notes through a web browser, but it’s far from the seamless experience I wanted.
That’s not the only limitation, but it was the one that finally pushed me to look for an alternative notes app. Once I discovered Craft, I realized what I was missing. It gave me everything I liked about Apple Notes and then some. So much so that it’s now impossible for me to go back.
Why Craft feels different
And beautiful
When you open Craft for the first time, its clean interface may remind you of Apple Notes, but it’s in a different league. Beyond simply storing your thoughts, the app encourages you to shape, connect, and present them in ways that feel deliberate and polished.
The first thing that draws you into Craft isn’t a feature but the overall experience. From the moment you start typing, the clean design, elegant typography, and subtle animations make organizing ideas feel satisfying instead of tedious.
One of my favorite features is the ability to drag and drop elements anywhere on the page. Whether it’s a paragraph, table, or image, there’s no need to cut and paste. You simply grab it and drop it where it fits best. It feels natural, almost like the app anticipates what you want to do.
And then there’s the styling. Craft gives you all the options you’d expect and more. You can add colorful highlights, gradients, and different backgrounds, while the Decorations feature lets you format text in Blocks or Focus mode to make key ideas stand out.
The little features that make a big difference
Craft isn’t just a pretty face
Craft is packed with features that make your workflow smoother. One of the useful ones is notes within notes. Instead of juggling separate files or endless scrolling, you can nest ideas inside each other. For example, you might keep a main note for a project and then nest meeting notes, research snippets, or brainstorm ideas right inside it.
Another handy feature is AI-powered note assistant. With it, you can brainstorm ideas, summarize long notes in seconds, or even tweak your text for tone and style. It’s perfect for turning rough thoughts into polished sections without rewriting everything from scratch.
Craft plays nicely with the tools you already use. You can import all your reminders from Apple Reminders at once, pulling tasks, deadlines, and to-dos directly into Craft. This way, you don’t have to jump between apps or copy information manually.
Craft also lets you undo and redo changes even after you’ve saved and come back days later. I use this constantly when tweaking a project outline or experimenting with layouts, and being able to roll back to an earlier version takes the stress out of creative work.
Collaboration, cross-device availability, and export options
Perfect for teams and sharing
Image Credit: Pankil ShahPankil Shah/MakeUseOf
Collaboration is another area where Craft excels. Its Spaces feature lets you work with others in real time. You can share entire projects, brainstorm together, or build structured notes as a team. Changes appear instantly, which keeps everyone on the same page.
One thing you can’t compromise on when choosing a note-taking app is cross-platform availability. Craft works on iPhone, iPad, Mac, Windows, and even in a web browser. I use a Windows PC for work, and the PC version of the app is just as capable and smooth as its mobile counterparts.
While I usually don’t need to export notes, Craft has that covered too. When the occasion arises, you can export notes as Word (DOCX), PDF, or Markdown, which is perfect for sending polished documents to colleagues, publishing content, or backing up important projects.
The free version may not be enough
The only downside
Screenshot by Pankil Shah — No attribution required
Craft’s free plan is generous enough to give you a taste of what the app can do. You can create up to ten documents, enjoy 1GB of cloud storage, and even collaborate in real time. It’s perfect for testing the waters, seeing how notes feel in the app.
However, once you start using Craft regularly, the free plan may not be enough. Ten documents fill up faster than you’d think, especially as you begin nesting notes, adding images, or experimenting with layouts. And if you want to go beyond the basics and use advanced features like custom branding or an option to publish notes with a custom domain, you’ll need to upgrade to a paid plan, which starts at $8 a month.
If Apple Notes is a dependable notepad, Craft feels like a full creative studio for your thoughts. By the time you finish your first note, you realize Craft has done something Apple Notes never did: it makes you want to write, structure, and revisit your ideas. Of course, paying for a note-taking app isn’t worth it for everyone, but if you rely on your notes daily for work, Craft is worth every penny.
Hostage is a classic Netflix limited series. Full of tensions, twists, and turns, with some explosive (literally) moments to keep you attempting to figure it all out.
My only gripe is that it ended too soon, and as a limited series, there won’t be a follow-up. The clue is, of course, in the name.
So, if you’re like me, you’ll want to know exactly what to watch once you finish enjoying Hostage. Thankfully, there are heaps of British thrillers to keep you watching for weeks—and on the edge of your seat.
The BBC’s biggest modern thriller, Line of Duty, is built on one simple question: who can you really trust?
Following the work of AC-12, the anti-corruption unit, every season dives into a new case of police misconduct, except nothing is ever straightforward. The series is famous for shocking reveals, interrogation scenes that feel like high-stakes chess matches, and cliffhangers that keep viewers glued.
Across six seasons, Line of Duty mastered the art of long-term mystery and explosive payoff, making it the gold standard for British thrillers. However, I’ll throw in one caveat to this series: it also made my most disappointing TV show endings list, too.
But even with that sobering point, there is some good news about Line of Duty. Series 7 is due to hit screens in 2026, and could finally resolve who the mysterious “H” is (because we all know the person revealed in Series 6 is just not the one!).
I’m fairly certain I’ve watched every one of Netflix’s dramatizations of Harlan Coben’s thrillers. Missing You is the latest addition to the long-running series, and it’s definitely up there with the best.
Detective Kat Donovan’s (Rosalind Eleazar) life is thrown upside down when she spots her long-lost fiancé on a dating app—the same man who vanished more than a decade earlier. That discovery rips open old wounds, including the unsolved murder of her father, and drags her into a conspiracy that blurs the line between past and present.
Like all of Coben’s dramatizations, Missing You blends emotional rawness and depth with twists, suspense, and considerable intrigue. There are multiple layers to unpack here, and as soon as one is revealed, more arrive to darken the waters again.
With only five fast-paced episodes, it’s a binge you can knock out in a weekend, but the story lingers thanks to its mix of heartbreak, betrayal, and Coben’s trademark “just one more episode” cliffhangers.
Luther is a proper British police thriller, with some really dark and violent moments to keep you pulled in.
Idris Elba’s portrayal of DCI John Luther is unforgettable. A brilliant detective with a mind for catching killers, but a soul weighed down by obsession and rage. Across its five seasons, the series explores what happens when a detective blurs the line between justice and vengeance, often breaking rules in pursuit of criminals who are as intelligent as they are terrifying.
And then there is the sociopathic presence of Alice Morgan (Ruth Wilson), a constant in the show who becomes both Luther’s nemesis and his confidant. Their wild, twisting relationship adds a whole extra level to what’s already a deeply engrossing, “just one more episode” crime show.
If you love Luther and want more, you should check out Luther: The Fallen Sun on Netflix. It features Elba as Luther once again, with some seriously dark, morally ambiguous moments. I’d love another Luther series, or at the very least, another film. In 2024, Screen Rant reported that Elba thought there was a good chance of another film, and that’s something I’ll have to cling to.
Vigil takes the classic police thriller format and places it in one of the most claustrophobic settings imaginable: a nuclear submarine. When a sailor’s mysterious death puts DCI Amy Silva (Suranne Jones) on board to investigate, she finds herself navigating not just a crime scene but also military secrecy, Cold War politics, and the ever-present danger of being trapped underwater.
It felt dark and dingy, constantly cold, and like every turn is a new trap, waiting to happen. It evokes a strong sense of atmosphere that strongly contributes to Vigil’s suspense, which only builds. As Silva digs deeper, she uncovers a conspiracy that reaches far beyond the submarine, connecting to national security and political interests back on land, ending in a dramatic tying of tales to give you some closure.
But then, Vigil returned with a second series, this time focusing on the Royal Air Force rather than the Royal Navy. It can be difficult for a series to keep the same pacing and style and maintain its intrigue, but Vigil pulls it off well. What I like is that some of the headline moments from Vigil feel like they could come straight from the front page of a newspaper on a given day, giving the show some real modern relevance in this complicated world.
The newest British thriller on the list is Dept. Q, an adaptation of a series of Danish novels written by Jussi Adler-Olsen.
Set in Edinburgh (instead of Copenhagen), it introduces us to DCI Carl Mørck (Matthew Goode), a detective reeling from a traumatic shooting that left one colleague dead and another paralyzed. As a form of damage control, he’s assigned to Department Q, a newly formed unit tasked with solving long-cold cases. What begins as a desk job quickly spirals into something much darker as Carl discovers that some of these forgotten cases are very much alive.
The British public loves a Scandi-noir crossover, and Dept. Q duly delivers, melding the dark storytelling with the pacing and style of a classic British thriller. Mørck is a complex character, haunted and abrasive, but unwilling to let victims be forgotten (in this, he reminds me a little of Bosch in some ways). He’s paired with Akram Salim (Alexej Manvelov), a newcomer who brings both cultural clashes and fresh energy to the department.
With its mix of personal trauma, unsolved mysteries, and conspiracies that refuse to stay buried, Dept. Q feels like the perfect next step after Hostage. It’s dark, layered, and addictive, with enough twists to keep even seasoned thriller fans on edge—and with a second season already confirmed, it’s only getting started.
British thrillers will keep you wanting more
I’m obviously biased, being from England, but British thrillers are some of the best TV you can watch. The balance of grit, tension, and intelligence makes it some of the best TV in the world, and with suspense built through character, dialogue, and a sense of realism, every twist hits harder.
Of course, there are plenty more British thrillers that could have (and maybe should have!) made this list. Bodyguard is one of the best in recent years, and really sets the standards high, while Marcella takes it a different direction with an unpredictable lead detective.
Then there are each of Netflix’s dramatizations of Harlan Coben’s books, which now stands at 11 and counting. It’s hard enough pinning down the best of those, let alone among other thrilling TV shows.
That’s the beauty of British thrillers: there’s always another gem waiting to be discovered—and whichever one you choose next, you’re in for a ride.
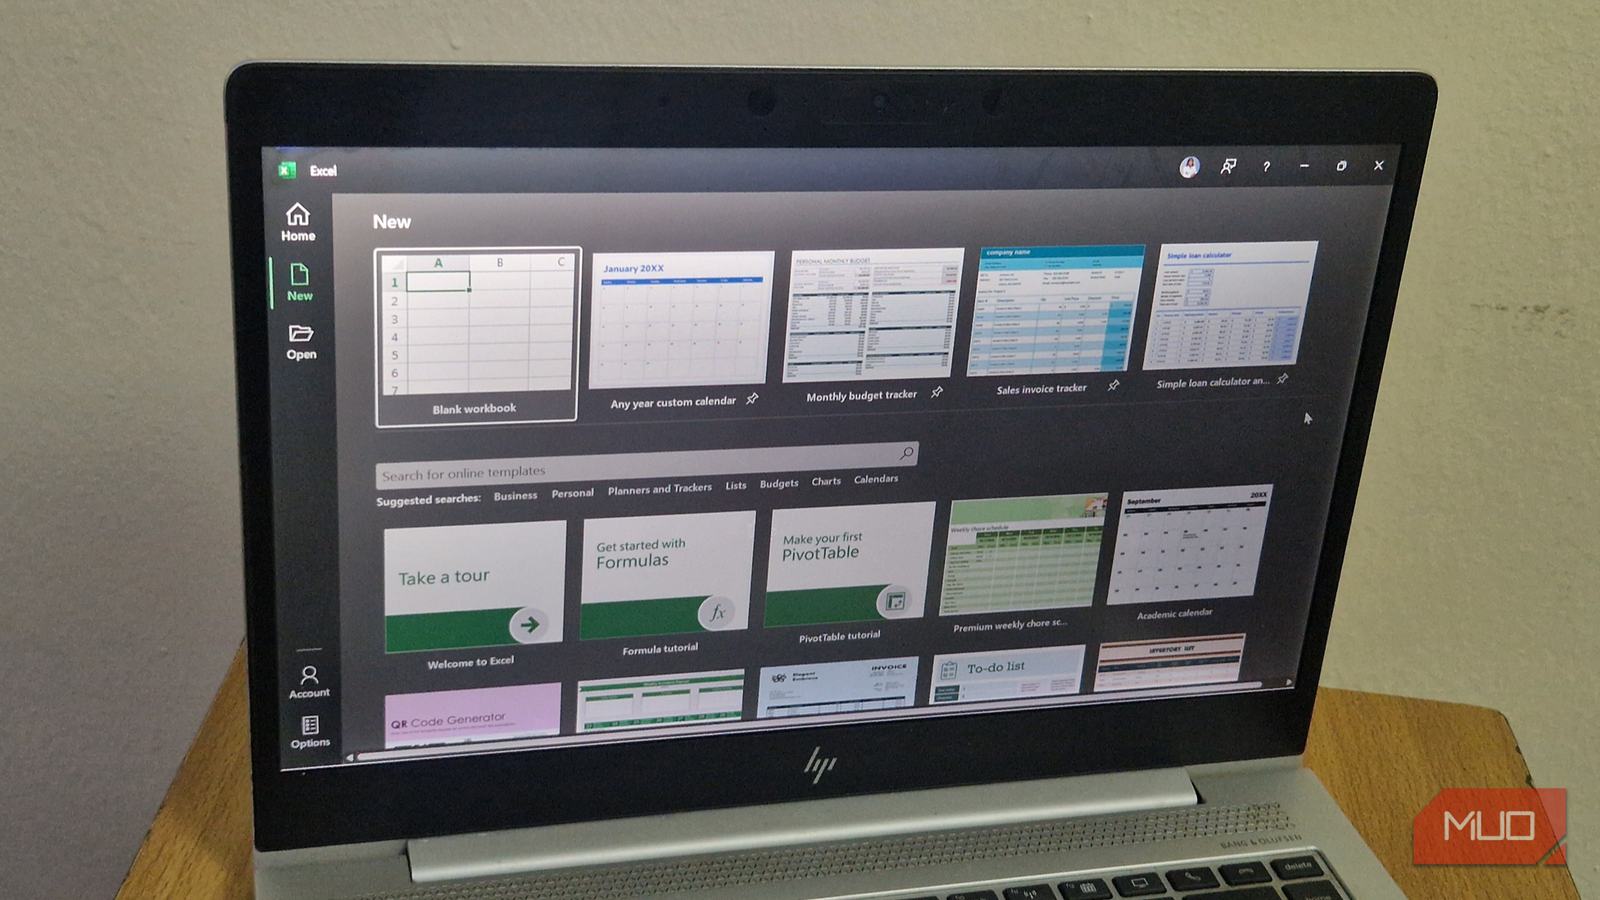
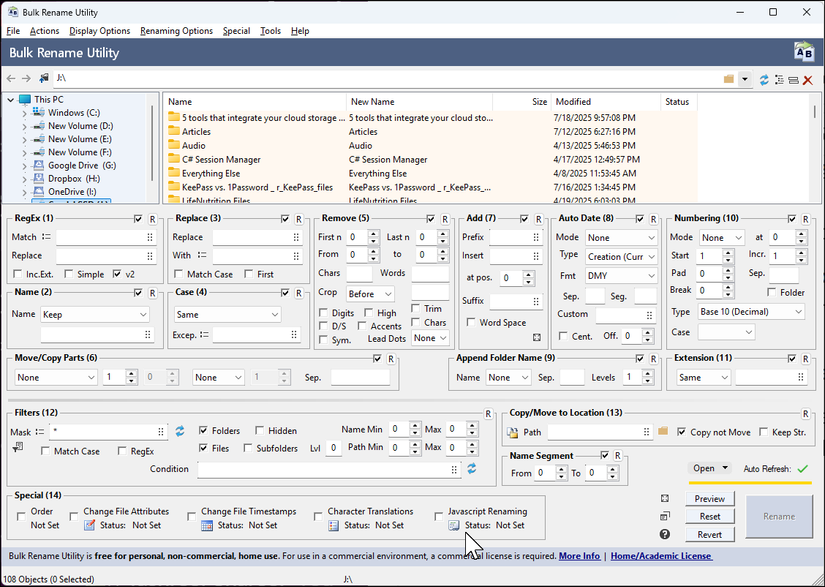
To be honest, building a spreadsheet from scratch can feel like you’re staring at a blank canvas with no idea where to begin. You know you need something to track your expenses, plan a project, or maintain a calendar, but the endless formatting, formulas, and fiddling often eat up more time than the task itself.
That’s why many people turn to ready-made Excel templates. After trying them myself, I realized I don’t need to reinvent the wheel every time I launch Excel. Templates save hours and spark ideas for layouts you wouldn’t have thought of on your own.
Now, instead of grimacing at a blank sheet all the time, I have a small library of favorites I use repeatedly.
Simple loan calculator and amortization table
Stop guessing loan payments
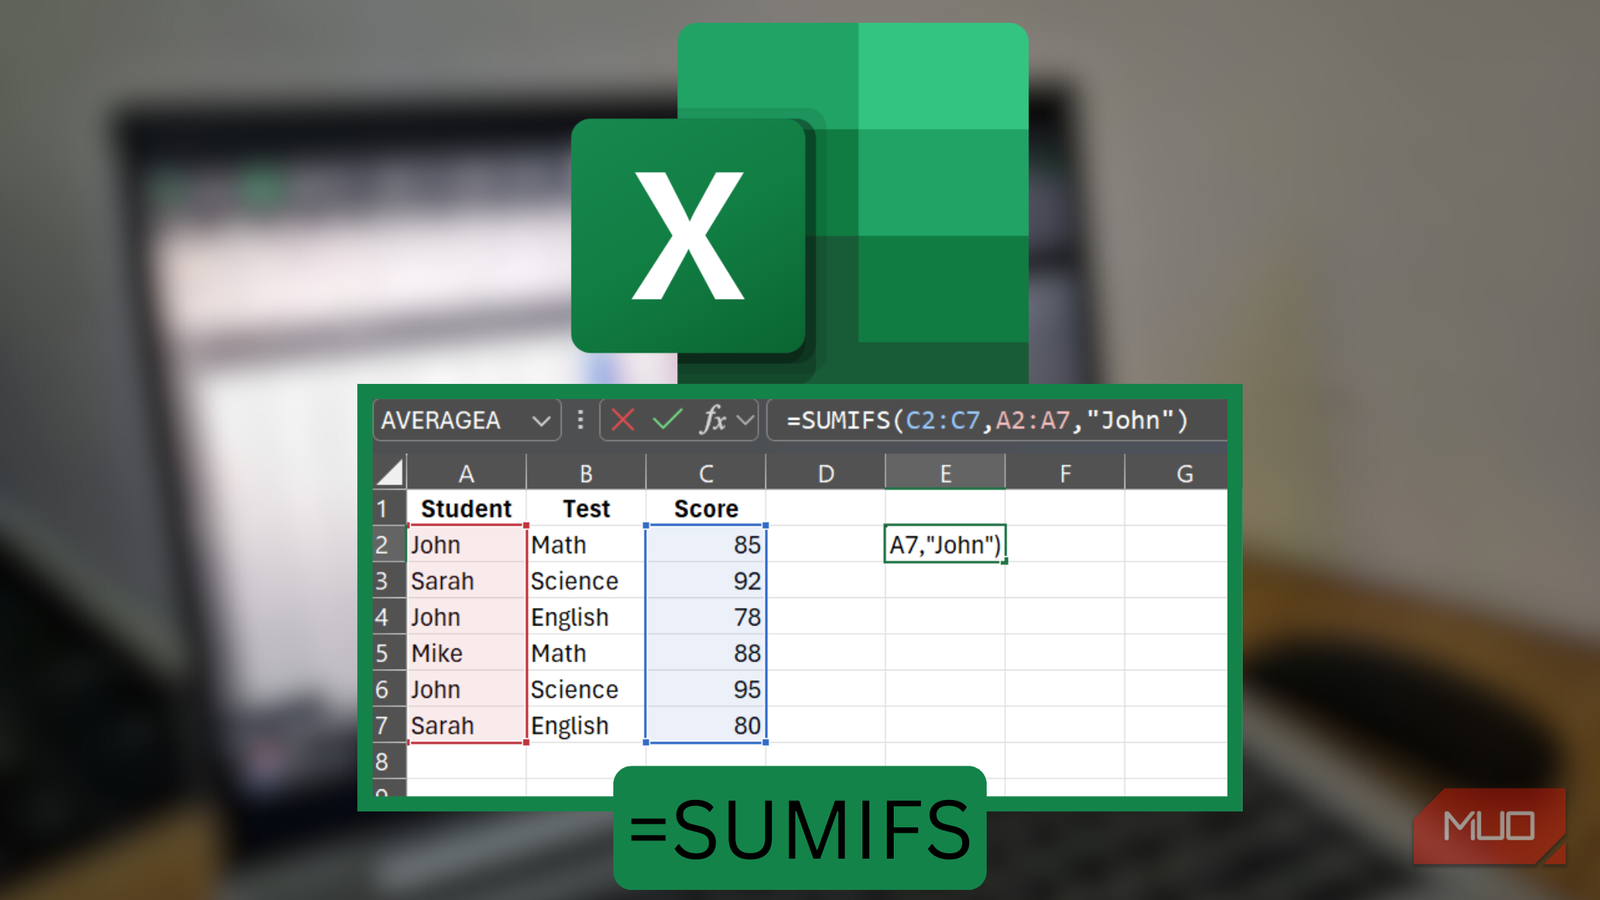
This template is exactly what it promises — simple. It has just a single sheet, and you only need to fill in four details: the loan amount, annual interest rate, loan period in years (use decimals for months — e.g., 0.5 for six months), and start date of the loan (today’s date is set by default, but you can change it).
Once you’ve entered the numbers, Excel does the rest. The template generates a clean payment schedule that shows exactly how much you’ll owe each month.
The figures are formatted in USD by default, but it’s easy to switch. Just select the cells (hold the Ctrl key to grab multiple at once) and expand the Number group on the Home tab. From there, choose Accounting, pick your preferred currency symbol, and click OK.
With this template, you don’t need to create or adjust formulas yourself. Everything is already built in, so after entering the numbers, you instantly get a straightforward breakdown you can understand at a glance.
Any year custom calendar
Build a calendar that fits your year
Screenshot by Ada
If you like having a calendar you can print, customize, and actually write on, this template is a gem. It comes with 13 sheets — one about page and 12 monthly sheets. The About page isn’t just instructions; it’s the engine that drives the whole calendar. Here, you’ll enter the year and pick your preferred starting day of the week (Sunday is 1, Monday is 2, and so on). Don’t delete this sheet, because the rest of the calendar depends on it.
Once you’ve set those options, the 12 monthly sheets automatically rearrange to match. Each month is neatly formatted and ready for printing. You can also change the look of the calendar by going to Page Layout –>Themes, or you can keep the default design. Either way, the layout is clean, professional, and easy to use.
I find the boxes big enough to jot down bills, deadlines, or daily reminders. You can even add notes directly inside the sheet, like typing in cell C6 for extra details, before printing the sheets. That makes it just as useful as a wall calendar, but with the bonus of being customizable and diary-like.
Monthly budget tracker
Keep your spending in check
This is the template I use the most. Every month, I compare my planned budget with what I actually spent, and this sheet makes that process far less painful. It comes with two tabs: a start sheet (basically an about page) and the tracker sheet, which is where all the action happens.
The Start sheet gives a quick overview of how the template works and explains some hidden notes built into the Tracker. Personally, I like leaving those instructions hidden because the layout looks cleaner that way. If you’re curious, you can just scroll through column A, and Excel will display the hidden text in the input bar. Alternatively, you can unhide the column, as it’s quite easy to do.
What I love most about this template is the organization. The spending categories make sense, and each one has a tidy set of rows underneath. You can edit them to fit your own expenses, but I’ve never needed to add more.
At the end of one month, I enter my projected income (in cells E4 and E5) and my projected costs (across the categories) for the coming month. As the new month goes on, I update my actual income (in cells E8 and E9) and plug in my actual costs. The template then calculates three numbers for you: your projected balance (projected income minus projected cost), actual balance (actual income minus actual cost), and the difference between the two.
I think it’s really cool to see your budget hits and misses at the end of the month in one fell swoop. I can’t say it’s helped me perfect my finances, but it definitely keeps me honest, and it pushes me to keep improving month after month.
Sales invoice tracker
Take the stress out of invoicing
Invoicing is one of those tasks that always seems harder than it should be. Between tracking customers, keeping invoices organized, and making sure the math is right, it’s easy to feel overwhelmed. This template reduces the stress by only requiring you to add your customers and their purchases.
The workbook comes with five sheets, each with its own job:
Sheet name
What it’s all about
About This Invoice Tracker
A guide with tips for filtering and navigation.
Invoice
This is the star of the show. Pick an invoice number in cell G6, and Excel fills in your customer details, items, and totals automatically. Just add in your company info (name in B1, details in rows 4–5, footer in B41) and you’re one click away from a polished invoice you can print or email.
Customers
Your client list lives here (ID, name, address, etc.).
Invoices – main
A master log that keeps one row per invoice, with filters to track dates, clients, and payment status.
Invoice details
This sheet breaks each invoice into line items (up to 25 per invoice). For instance, if invoice #3-456-2 has 12 products, the Invoices –main sheet shows one row, while the Invoice details sheet shows 12.
Here’s how I usually work with this template:
Add or update customer info in the Customers sheet by right-clicking the last filled row and selecting Insert.
Add or update rows in the Invoices – main sheet, assign an invoice number to each row, and select the client for each invoice from the dropdown list.
Head to the Invoice details sheet to enter the products or services tied to that invoice. Update the Invoice # column for each product or service by selecting an invoice number from the dropdown list.
Once you’ve filled in these three sheets (in the above sequence), the Invoice sheet updates automatically once you select an invoice number. If you need to record more than 25 items for an invoice, you’ll have to split the items across two or more invoices. However, in most cases, 25 items are enough.
Since this is Excel, you can also brand the template to match your business. Go to Page Layout –>Themes, pick a palette, and instantly make the whole thing look more on-brand.
Why start from scratch?
If you search Excel’s online template library, you’ll find almost anything — checklists, family trees, semester calendars, and even an online QR code generator template. The four I’ve shared here are simply the ones I use most often, but there’s no shortage of options.
These days, it’s rare for me to start with a completely blank spreadsheet. Sure, there are times when building something custom makes sense, but most of the time, I don’t have to. With thousands of ready-made templates just a few clicks away, Excel gives you a head start on almost any task and saves you from wasting time reinventing the wheel.
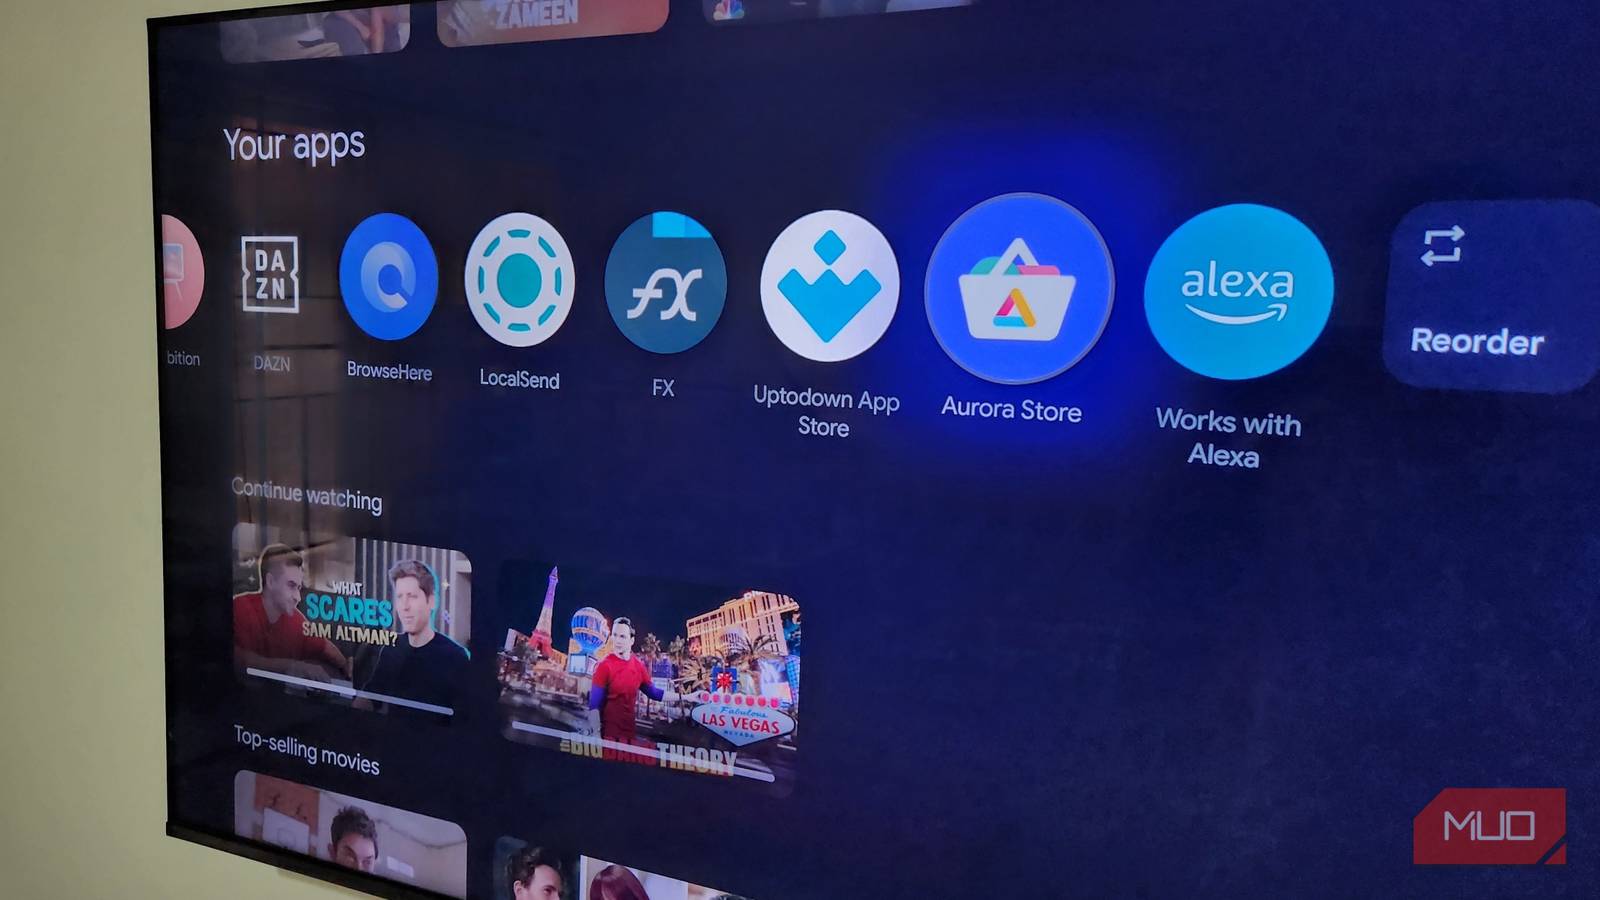
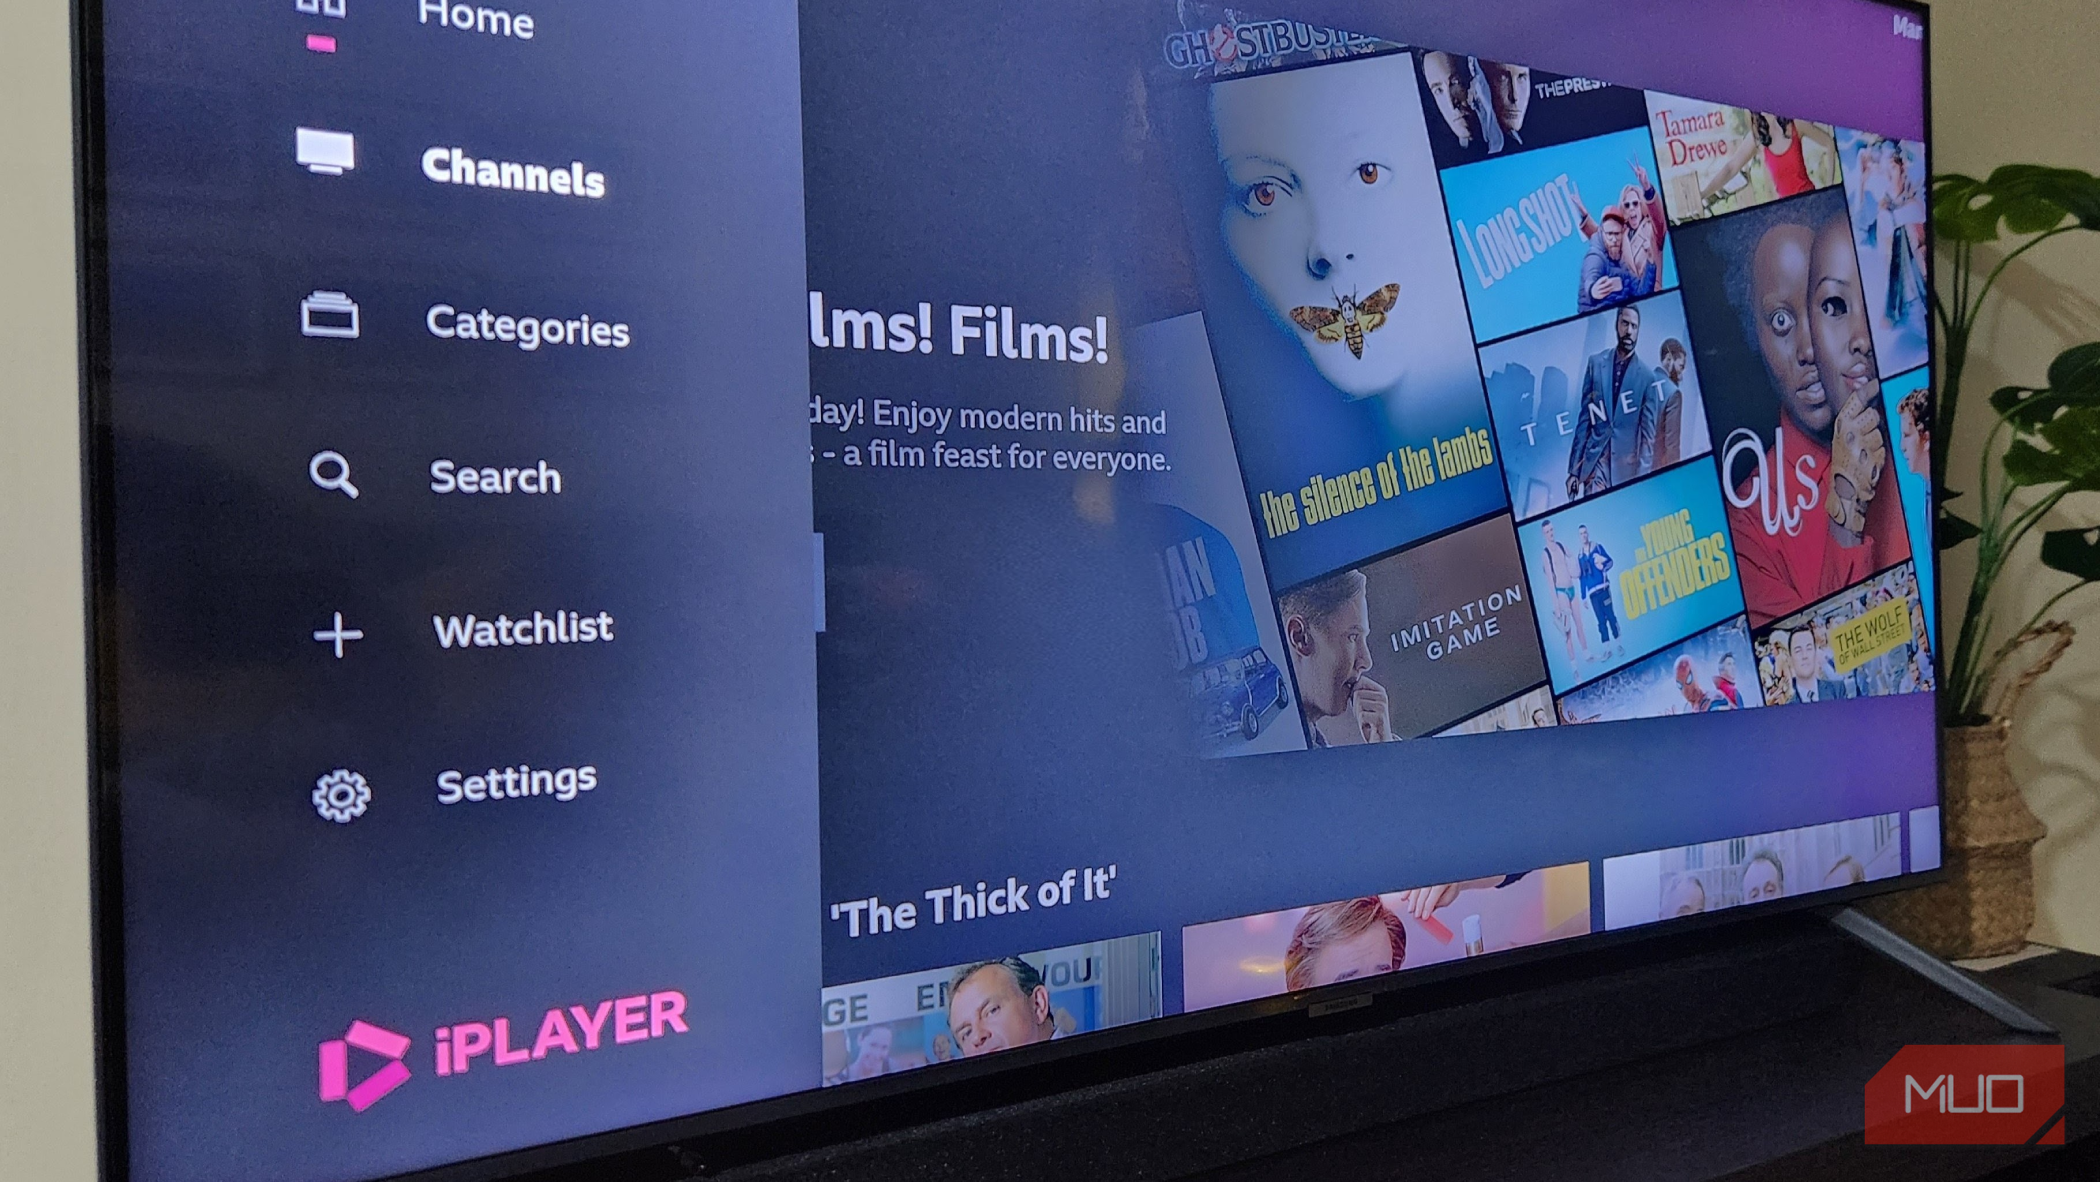
The default Google TV interface feels slick and modern at first glance. You get rows of recommendations, trending shows, and colorful banners clearly designed to help you discover new content. The problem is, these suggestions often don’t feel personal. Much of the screen is dominated by ads for shows you never asked to see or, worse, services you don’t even subscribe to. It feels less like your TV and more like a billboard you happen to own.
That’s exactly why I switched to Projectivity Launcher, and honestly, I don’t see myself going back. It wipes out the ads, speeds up navigation, offers deep customization options, and even adds handy features that the stock launcher simply doesn’t provide.
Google’s apps-only mode is good but not enough
It’s not without limitations
Image Credit: Pankil ShahPankil Shah/MakeUseOf
Google does offer an Apps Only Mode that cleans things up, but it’s really just a band-aid solution. Sure, turning it on scrubs away the sponsored content, but the trade-off is steep. You get a cleaner screen, but you lose the features that make a smart TV feel smart: voice commands stop working, installing new apps becomes impossible, and live TV integration disappears.
For something as central as the TV you use every day, that’s not a great set of choices. You can either live with a cluttered, ad-heavy experience or settle for a barebones interface that leaves out core features. Neither choice feels like a win.
Projectivity Launcher wipes out annoying ads
No more banners or unwanted promotions
Screenshot by Pankil Shah — No attribution required
One of the best things about Google TV is the freedom it gives you to switch things up. Unlike some locked-down platforms, you’re not stuck with the default experience if you don’t want it. That means you can install a third-party app like Projectivity Launcher and change the way your Google TV feels in just a few minutes.
Projectivity Launcher doesn’t waste your screen with giant banners, sponsored shows, or nagging promos for services you never asked for. Instead, you’re greeted with a clean, functional interface that puts your apps front and center. Right below that, you’ll find the Inputs menu, your Continue Watching section, and a few simple controls. That’s it.
But the benefits go beyond aesthetics. With Projectivity Launcher, your Google TV actually feels faster. And the reason is simple. The home screen isn’t wasting time pulling in ads or crunching recommendation algorithms.
It’s all about customization
Take full control
Google TV’s stock interface is basically one-size-fits-all, and if that size doesn’t fit you, too bad. Projectivity Launcher solves that problem by giving you the freedom to design the experience around your own habits.
The customization goes well beyond shuffling app order. You can decide whether you want everything in a single row or a grid layout, and even in grid mode you get to choose how many apps appear per row. If you have too many apps, you can organize them into categories like Favorites, Video, Music, and Games. Each category appears as a separate section on your home screen, and of course, you can rearrange them however you like for quicker access.
Another small but powerful touch is the ability to hide apps. Maybe there’s a service you rarely use, or one you’d rather not see on your main screen. With Projectivity Launcher, you can tuck it away just like you would on your phone.
If you dive into the Projectivity Launcher settings, you’ll find options to customize the status bar, resize the clock, change the wallpaper, and fine-tune other details until the interface feels just right. This level of control lets you configure your TV exactly the way you want.
Where Projectivity really pulls ahead
The bonus features you didn’t know you needed
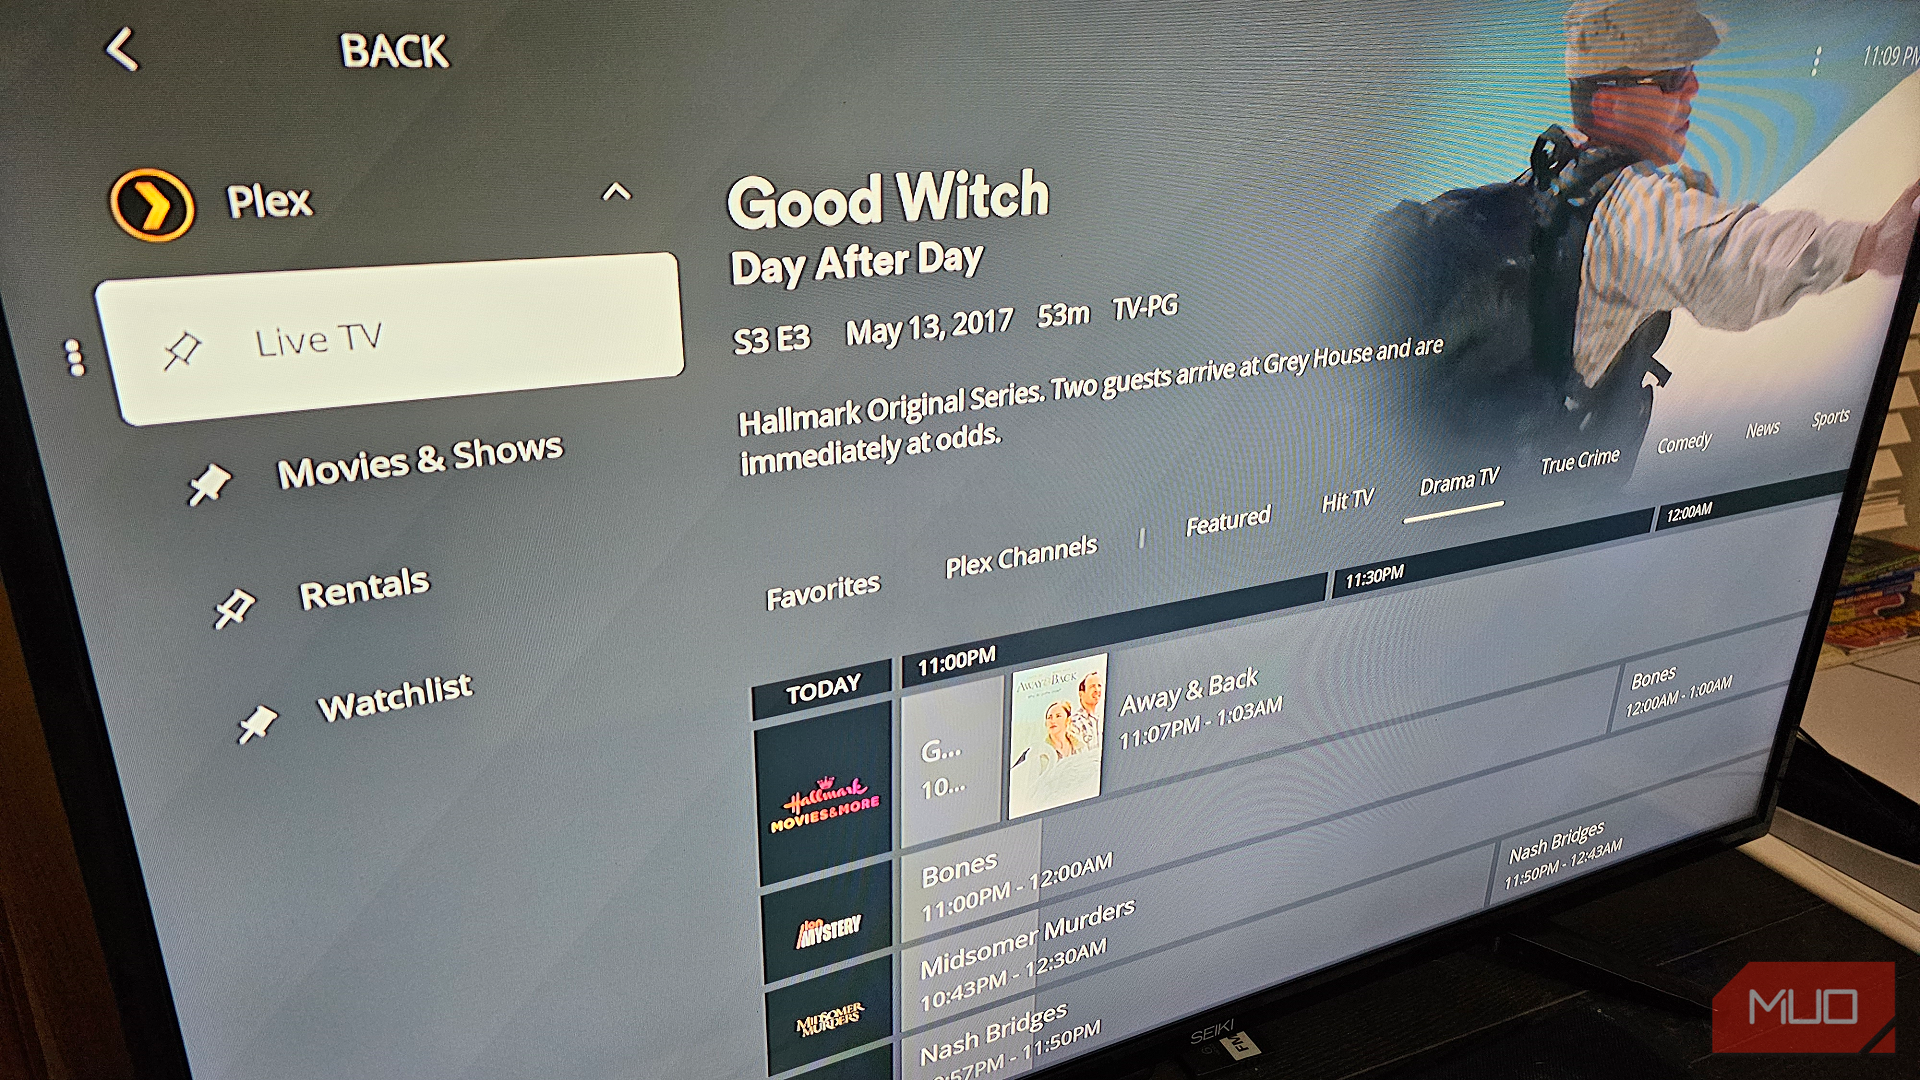
Having used Projectivity Launcher for a while, the idea of switching back to the stock Google TV interface feels unthinkable. It’s not just about removing ads or clearing clutter, but also about the extra features that make everyday use much more seamless.
One of the most useful options is the ability to auto-open an app on boot. For instance, if Netflix, YouTube, or Plex is the first thing you launch every time you power on your TV, you can set up Projectivity Launcher to open the app automatically.
There’s also built-in support for sideloading apps directly. Instead of transferring the APK file manually from your phone to TV, you can install apps by entering the URL. And then there’s the parental control option. With a simple lock, you can secure the launcher’s settings and layout so nothing gets rearranged or deleted by accident.
When you add it all up, Projectivity Launcher isn’t just a replacement for Google TV’s default interface—it puts you back in control of your experience. The best part is that most of these features are available in the free version. If you want extra perks like custom icons and display profiles, you can upgrade to the premium version for a one-time fee of around $8.
Apple has always struggled with how to bridge the gap between its Pro and base iPhones. While models like the iPhone 5c and XR were clearly budget versions, the bridging attempts really started with the Mini models in the iPhone 12 and 13 series, offering a smaller, more affordable option. Then came the Plus models with the iPhone 14, giving a bigger screen without pushing you into the Pro lineup.
Now, in its latest attempt, Apple has introduced the Air branding to the iPhone. It’s easily one of the most puzzling iPhones I’ve ever seen. On paper, it’s a technical marvel, but I’m still not sure who it’s meant for.
The iPhone Air is Apple’s newest gamble on form over function
It’s like Jony Ive never left
Apple seems to have taken a trip down memory lane this year by putting design front and center once again, instead of focusing on genuinely useful features. The entire pitch for the iPhone Air is that it’s insanely light and thin; I’ll admit that, from an engineering standpoint, it is impressive. At just 5.6 millimeters (0.22 in) thick, it’s even thinner than the Samsung Galaxy S25 Edge and weighs only 165 grams (5.8 oz).
It also gets all the fancy features from the higher-end models, like the smooth ProMotion screen, an always-on display, and even the upgraded selfie camera. It comes with the latest A19 Pro chip found in the iPhone 17 Pro, though with one less GPU core. Combined with the all-new design and these features, it looks like a compelling package on paper.
It reminds me of Steve Jobs introducing the original MacBook Air by pulling it out of an envelope. This feels like the smartphone version of that moment, where Apple is all about making something impossibly thin and sleek.
But at the same time, this is also a familiar story. Apple has a history of prioritizing form over function, which usually comes with major compromises. A great example of this from the past is the iPhone 7, which was the first model to remove the headphone jack. One of the reasons given for that decision was to achieve a thinner profile.
For starters, the iPhone Air only comes with one camera, which is the same as the main camera on the standard iPhone 17. It’s a Fusion camera, so you can still zoom in and take 2x photos by cropping from the 24MP sensor down to 12MP without losing much quality.
Where it really lets you down is the missing ultrawide lens. That’s a feature that’s pretty important for many people, and what makes it even worse is that you can’t shoot macro photos on this iPhone either.
Battery life is another area where you might have to compromise. During the keynote, Apple mentioned that the iPhone Air can get 40 hours of video playback, but that’s with the new $99 iPhone Air MagSafe Battery. It didn’t inspire much confidence when the battery life had to be advertised with an external accessory.
There are even smaller corners cut that you won’t find on the product pages. For example, the iPhone Air only has one speaker, meaning you miss out on stereo sound, and it also lacks mmWave 5G support. But what really kills the deal for me is the $999 price tag.
The other iPhones are better deals
You’ll get more bang for your buck
Screenshot by Raghav -> No attribution needed Source: https://www.apple.com/iphone/compare/
All those compromises are something you might be able to live with, but what really bothers me is that the other iPhones seem like a better deal. The iPhone 17 starts at the same base price of $799 and offers a lot more.
For starters, you get the same main camera along with a 48MP ultrawide lens. That means you also don’t have to settle for missing out on macro shots, and you can also shoot videos using Cinematic mode.
It also comes with a bigger battery, plus slightly faster MagSafe charging, better speakers, mmWave 5G, and more for $200 less. In the end, you’re getting more features at a lower price. Even the display is the same, with the only difference being that the iPhone Air is 0.2 inches bigger.
The irony is that the iPhone 17 has an aluminum body instead of the titanium body used in the iPhone Air. Since aluminum has a lower density than titanium, the Air only manages to be 12 grams (0.42 oz) lighter. So the only real advantage it offers is how it feels in your hand and its design.
The titanium frame is mainly for durability, but it comes with another downside: thermals. That makes it a good lead into the iPhone 17 Pro. After two years with titanium, Apple switched the Pro iPhones back to an aluminum unibody frame for better heat management, along with a newer vapor chamber. These are features the iPhone Air doesn’t have, even though it shares the same A19 Pro chip.
Even setting these issues aside, the iPhone 17 Pro is just $100 more and offers a lot more compared to the iPhone Air. It has better cameras, a larger battery, and improved thermals. The value clearly leans toward the Pro and the base iPhone 17.
A gorgeous phone that asks for some sacrifices
I do believe the Air is the most visually stunning iPhone Apple has ever made, but it still hasn’t been enough to convince me to give up other features for the look and feel. That said, if you can live with the trade-offs and you prioritize design, the iPhone Air is the perfect phone for you.
What I feel is that the iPhone Air is Apple’s new testing ground. It’s a way to experiment with how this design could trickle down to other iPhones. It’s also likely laying the groundwork for something bigger down the line, such as a foldable iPhone.
Every time I see a flat-panel TV installed without a soundbar, I ask myself, “Why?” They’re sleek, relatively inexpensive, easy to install, and far more powerful than built-in TV speakers. However, while most sound good right out of the box, your soundbar can perform much better with just a few quick adjustments.
While a soundbar will significantly improve the audiovisual experience without the bulk of a full home theater system, with a few simple placement tweaks and some fine-tuning, it’s possible to unlock its full potential. Whether you’re watching movies, gaming, or listening to music, optimizing your soundbar will help you achieve clearer dialogue, deeper bass, and a more immersive soundscape overall.
5
Position your soundbar correctly
Achieve clearer dialogue and a more balanced soundstage
Image by Jack Mitchell – no attribution required.Jack Mitchell/MakeUseOf
Placement plays an important role in sound quality. If your soundbar is blocked by furniture, positioned too low, or pushed against a wall, it won’t project sound effectively. Ideally, your soundbar should sit at ear level and centered in the room; however, this is often not practical, as your TV should be at eye level.
Placing your soundbar directly below the TV is usually fine, but consider angling it slightly upwards for optimal projection. If you are wall-mounting it, ensure that it doesn’t sit too high above the viewing position. Be aware that placing it inside a cabinet or enclosure can cause muffled audio or distort the bass. Proper positioning enables sound waves to travel freely, resulting in clearer dialogue and enhanced surround sound and spatial audio.
4
Adjust your TV and soundbar settings
Dive into your hidden features for sharper, more customized audio
Image by Jack Mitchell – no attribution required.Jack Mitchell/MakeUseOf
Most soundbars include some form of audio enhancement, such as sound modes, equalizers, or dialogue enhancement, that should be tweaked to suit your viewing habits and living space. You should also check your TV’s audio output and ensure it’s set to “auto,” “bitstream,” or “passthrough” rather than “PCM” to allow the soundbar to handle the audio processing, rather than your TV.
Changing your soundbar’s preset modes, such as “Movie,” “Music,” and “Game,” can make a significant difference. I often toggle between these if my audio sounds flat, or, if necessary, manually tweak my soundbar’s EQ to boost its clarity. Many models also offer a dedicated voice or dialogue mode that enhances speech, making it easier to follow conversations without needing to increase the volume.
3
Use HDMI ARC or eARC instead of optical
Experience higher-quality sound formats with improved connectivity
It may not be the first solution that comes to mind, but the type of audio connection is a crucial factor in determining sound quality. Optical cables are good enough, but if you really want to optimize your sound quality, consider using HDMI ARC or eARC connectivity. These provide a superior signal path that supports advanced audio formats like Dolby Atmos and DTS:X.
An HDMI ARC or eARC connection ensures that your soundbar receives uncompressed audio from your TV or media device. To achieve the best performance, eARC typically needs to be enabled in your TV’s audio settings. It’s also a good idea to spend a little extra on HDMI cables, and switching to HDMI ARC can make a big difference by unlocking more immersive sound.
2
Add a subwoofer or surround speakers
Create deeper bass and a truly immersive surround experience
Image by Jack Mitchell – no attribution required.Jack Mitchell/MakeUseOf
Many soundbars, including my own, are sold as part of a package that includes a subwoofer. If yours supports expansion, consider adding one, as this will significantly improve your sound quality by deepening the bass response, making action scenes, low-end atmospherics, and sound effects more dynamic.
Rear speakers, on the other hand, create a true surround sound effect, dramatically improving the immersive experience and giving your home a theater-like feel. While these can be tricky to install, wireless options are available, or you could opt for a soundbar that delivers 3D spatial audio, such as DTS:X, or Dolby Atmos, as a compromise.
1
Reduce interference and room echo
Enjoy cleaner, more natural sound tailored to your room
This last suggestion is often overlooked, but your room’s acoustics significantly affect how soundbars perform. Hard surfaces reflect sound, so placing it close to bare walls, glass tables, and tiled floors can create echoes and muffled dialogue. To counter this, keep your soundbar clear of solid obstructions and place it in proximity to soft furnishings, such as curtains, rugs, or wall hangings.
Some soundbars offer room calibration via a built-in microphone or companion app. In this instance, ensure you run it to tailor the audio output to your living space. If you change the layout of your room or reposition large objects, be sure to recalibrate your device. Reducing interference and improving acoustics are among the most effective ways to enhance your soundbar’s audio quality without incurring additional costs.
Don’t settle for a “good enough” sound
You don’t need to be a technical wizard or make expensive upgrades to significantly improve your soundbar’s performance. It might be as simple as adjusting the audio mode, repositioning the unit, or selecting the correct audio connection. Expanding with a subwoofer and/or satellite speakers can make a real difference to your sound, albeit at a cost. Meanwhile, reducing echo and calibrating your soundbar to your room will ensure that your setup remains optimized.
These steps can transform your soundbar from a “good enough” system to a true sonic powerhouse that will revolutionize your audiovisual experience with added clarity and real immersive impact.
When I bought my Samsung phone, I didn’t think much about how much data it was sending out. By default, Samsung can link your account to ads, and Google can save your searches, locations, and app activity. These are some of the default Android settings that threaten your privacy and share more than you expect.
The good news is you don’t have to leave all of that running. A few setting changes can block many of the biggest tracking sources, and it takes only a few minutes.
Pause Google’s activity tracking
Keep your daily habits private
Google records a lot of what happens on your phone. Searches, the apps you open, your routes in Maps, and even the videos you watch on YouTube are stored in your account by default, adding to how much Google already knows. Over time, this builds a timeline of your daily habits.
To change this:
Open Settings on your Samsung phone, scroll down to Google, tap your Gmail ID, and select Manage your Google Account.
Go to Data and privacy.
Under History settings, you’ll see three options: Web & App Activity, Timeline, and YouTube History. Open each one and turn it off (or Pause, where shown). You can also clear your past Google activity if you want to remove what’s already saved.
Once you’ve done this, the new activity won’t be logged into your account. Maps and YouTube still work, but without the constant tracking behind the scenes.
Reset or delete your Google advertising ID
Remove the ID advertisers rely on
Every Android phone has a unique advertising ID. Apps use it to follow your activity across different services, building a profile even when you’re not signed in. It works in the background, tying together what you do in different applications.
To remove it:
Open Settings on your Samsung phone, go to Security and privacy, then More privacy settings.
Tap Ads and choose Delete advertising ID, then confirm.
From that moment, your phone no longer provides an ID for tracking. If you’d rather reset than delete it, choose Reset advertising ID. That clears the old one and creates a fresh ID, breaking the link to your past activity.
Turn off Samsung’s personalized ads
Remove ads tied to your account
Samsung includes a feature called the Customization Service that links your account activity to targeted ads and recommendations. It collects details from how you use Samsung apps and services, then tailors ads based on that behavior.
To turn it off:
Open Settings and tap your Samsung account at the top.
Go to Security and privacy, then Privacy, and open Customization Service. Toggle off the options you see there, and Samsung will stop using your account data to shape ads.
The ads themselves won’t disappear, but they’ll become generic instead of being tied to your specific habits.
Stop sending diagnostics to Samsung
Keep diagnostics data private
Samsung phones don’t just send advertising data. In the background, they can also share diagnostic reports that include crash logs, performance details, and general usage information. Samsung says this helps improve its software, but it also means regular reports leave your device without you noticing.
To check this:
Open Settings, go to Security and privacy, then More privacy settings.
Tap Send diagnostic data and turn it off. From then on, those reports won’t be shared automatically.
Turning this off doesn’t affect how your phone works day to day. All features keep working as usual, and if you ever need to, you can still submit a report manually through the Samsung Members app.
Control which apps know your location
Share location only when necessary
Location is one of the most sensitive permissions on any phone. Navigation or ride-hailing apps need it to work properly, but plenty of others request it even when it adds little value.
To review these permissions:
Open Settings, go to Security and privacy, then More privacy settings.
Choose Permission manager, select Location, and you’ll see every app that has asked for access.
For any apps you don’t fully trust, change the permission to While using the app or Don’t allow.
You’ll also find a toggle for Use precise location. Turning it off limits apps to your approximate area instead of your exact spot. With these adjustments, your location is shared only with the apps you trust, and only when you choose to do so.
Stop Google from collecting usage & diagnostics
Turn off hidden background sharing
Google collects more than just your searches and location. It also gathers usage and diagnostics data, including app performance, battery levels, and system activity. The company frames this as a way to improve Android, though it results in technical information leaving your phone regularly.
To review this:
Open Settings, go to Security and privacy, then More privacy settings.
In the Google section, tap Usage & diagnostics and toggle it off.
Your phone will stop sending any usage and diagnostic data once this is done.
Keep checking, stay private
These are the settings I changed to prevent my Samsung phone from sending more data than necessary. But privacy on your phone isn’t something you fix once and forget. It works best when you treat it as a habit, checking in periodically to ensure the right switches are still off.
Updates can quietly reset defaults, and new apps often request more access than they actually need. Taking a few minutes every couple of months to review your settings is a simple way to stay in control.
One of the hardest lessons I learned shortly after I started my Plex server was to never ignore organizing your library. It’s one of those tidbits you wish someone would tell you before you start using Plex, but live and learn, right? Having a good foundation beforehand is important and will literally save you hours, possibly days, of backtracking and fiddling.
However, there’s one app that was particularly great at not only putting the finishing touches on my library, but it also helped fix cover images, artwork, subtitles, and even the naming scheme. If you’re going to run your own Plex server, FileBot double-checks your work so you don’t have to.
FileBot is a simple but effective double-checker
It’s like my second-in-command
Brady Meyers / MakeUseOf
FileBot isn’t a Plex plugin or an add-on, but a separate app, so you won’t need to fiddle with Docker (although you still have that option). You download the app and use it to locate your library folders, though there is a choice between a one-year or lifetime license. Installing it is still free, but a license is required for continued use. However, older versions also work, as long as you avoid updating them.
What you do with FileBot is have it scan your Plex library for the sake of mass organizing your media. Did you make the same mistake I did and haphazardly name movies and TV shows? Did you bother creating enough folders? Maybe your media is missing cover photos (or needs new ones) or lacks subtitles? FileBot rectifies those mistakes by fetching metadata that Plex might have missed.
Fixing the problem with cover images
Sometimes Plex doesn’t get it right
It’s not that Plex is bad at grabbing cover images, but it doesn’t always get it right. For example, I have Clash of the Titans on my server. Which one, you ask? Well, Plex incorrectly chose the cover art from the 2010 remake, when it’s actually the original film from 1981, in all its stop-motion glory.
Ideally, you want to do this before you rename your media files so you can knock out two birds with one stone. On the right-hand side, in the Rename tab, click Settings—the tiny wrench and screwdriver icon, then open Post Process.
Make sure Fetch artwork and Fetch cover images are check-marked, then click OK. When you’re ready to rename your media files, FileBot will also download images. More importantly, Plex will look nice and organized when everything is said and done.
Unifying my Plex library’s naming scheme
This is what I get for being lazy
The most powerful use case for FileBot, and the biggest reason I needed to use it, was to fix the really poor naming scheme I had going. I was far too careless with how files were named, like the lack of capitalization, using abbreviations, or just a lack of basic episode structure. It was downright frustrating finding a specific episode because I had duplicate names or failed to specify the number.
FileBot can take my entire Plex library and rename it with just a few clicks. Additionally, you can adjust the way movies, shows, and even music are formatted. Click Rename on the left-hand side, then Load at the bottom, and locate a folder you want to edit. On the right-hand side, click Fetch Data, then Edit Format from the menu.
Here’s where you can either write your own script or pick any of the formats already written under Examples. Also, on the bottom-left, use the arrows to switch between content types, like movies, TV shows, and music. Clicking on the line of code will then set the format, and you can finalize with Use Format. Exit the menu, then highlight every file on the left. Click Match, then finalize with Rename. It’s that easy!
I save time downloading subtitles
You can pick and choose a lot of languages
Depending on the software you use, ripping DVDs can be a lengthy and tedious process. I find it to be the worst part of setting up your Plex server, as you’re limited to playing a single movie at a time. So, what I do is limit the number of assets I have to rip, which means goodbye subtitles. However, this does introduce another problem: I like subtitles, especially when I’m watching anime in its original language.
Luckily, FileBot can help me out with that, too; in fact, I find it easier to rip a couple of movies without subtitles, then download them after and even snag a couple of languages the original DVDs may not have. You will need an OpenSubtitles account, though, since that’s where FileBot pulls translations from. The way it works is so simple, and I attribute that to FileBot’s basic UI.
On the left-hand side, click on Subtitles. You can then log into your OpenSubtitles account using the little green button next to the language drop-down menu at the top. To the left of that is where you search for a specific movie, and the Find button to the right of the language drop-down menu is what you use to scan for subtitles. Double-click on any of the search results, and FileBot will download them right away.
I just love that FileBot is so easy to use
My Plex library would probably still be an awkward, uncoordinated mess if it weren’t for FileBot. What I do appreciate is how easy it was to rectify the inconsistencies in naming and artwork, given its surprisingly simple UI. I’ll gladly trade features if it means having an easier time installing an app and navigating the menus.
You probably tap your phone’s search bar dozens of times a day, but if you are only doing that to find and open apps, you’re missing out. If you have a Samsung phone, that app drawer search bar can do much more than just launch apps.
It can help you jump straight to YouTube videos, set alarms and timers instantly, locate documents, access downloads and screenshots, and even open hidden apps—all without digging through menus. And the best part is, you can customize it to exclude irrelevant content, manage search preferences, and make the results work exactly the way you want.
Find, message, and call people faster
Screenshot by Pankil Shah — No attribution required
Screenshot by Pankil Shah — No attribution required
Screenshot by Pankil Shah — No attribution required
The T9 feature in your dialer app makes it quick to pull up a number when you’re ready to call, but what if you want to send a text or fire off a WhatsApp message? That’s where the search bar makes life easier.
Type a name into the app drawer search, and the contact will appear right there in the results. Tap it, and you’re taken straight into the Contacts app. Under the App options section in the search results, you’ll see the WhatsApp option, so you can jump right into a chat. If you scroll a little further, the Phone section neatly shows your call history with that specific contact.
8
Search YouTube, Maps, and Play Store
Skip app launches and go straight to content
Screenshot by Pankil Shah — No attribution required
Screenshot by Pankil Shah — No attribution required
Screenshot by Pankil Shah — No attribution required
Your phone’s search bar is also your shortcut into Google’s biggest apps. Instead of opening YouTube, Maps, or the Play Store separately, you can just type what you need right into the search bar and jump straight to it.
Say you want to look up the recipe for chocolate lava cake. Instead of opening the YouTube app, waiting for it to load, and then typing your search, you can simply type “chocolate lava cake” into your phone’s search. You’ll see results that link directly to recipe videos on YouTube.
The same goes for apps and places. If you want to download a specific app from the Play Store or Galaxy Store, type its name, and the search bar will take you to that app’s page directly. Similarly, you can also search for directions or start navigation to saved places instantly.
7
Set alarms and timers instantly
Fast-track your timers and alarms
Screenshot by Pankil Shah — No attribution required
Screenshot by Pankil Shah — No attribution required
Screenshot by Pankil Shah — No attribution required
When you search for an app in the app drawer, your Samsung phone also shows helpful shortcuts. For instance, if you type in Clock, you’ll see handy shortcuts like Set Timer, Add Alarm, or even Start Stopwatch.
You can then select the option you need, and it will take you directly to that feature in the Clock app. This saves a few extra taps, so you don’t have to switch tabs or hunt for the right option.
6
Search for important documents
Locate files and PDFs in seconds
Screenshot by Pankil Shah — No attribution required
Screenshot by Pankil Shah — No attribution required
Screenshot by Pankil Shah — No attribution required
Hunting down a specific document on your phone often means scrolling endlessly through your Downloads folder or using the search option in the Files app. The app drawer search offers a faster, simpler alternative.
Type in the name of the file you’re after, and it will show up in the results without you even opening another app. Best of all, if you don’t remember the exact file name, you can still find it by searching for text inside the document itself.
Whether it’s a PDF or a Word document, your phone’s search bar can help you find it in seconds.
5
Jump to specific settings
Screenshot by Pankil Shah — No attribution required
Screenshot by Pankil Shah — No attribution required
Screenshot by Pankil Shah — No attribution required
Scrolling through endless menus just to tweak one option in your phone’s settings can feel like a chore. A better way is to search for a setting directly from the app drawer. Type in SIM Manager, Date and Time, or even the name of a useful Accessibility setting, and you’ll land straight on the right page.
For some features, like Adaptive brightness, the search results even give you a direct toggle, so you can switch it on or off without opening the full Settings app at all. It’s a neat little shortcut that makes managing your phone feel effortless.
4
Access downloads and screenshots quickly
One-tap shortcuts to your recent files
Screenshot by Pankil Shah — No attribution required
Screenshot by Pankil Shah — No attribution required
Screenshot by Pankil Shah — No attribution required
If there’s one thing you often find yourself hunting for on your phone, it’s downloads. Usually, that means opening the Files app and navigating through folders. But your Samsung phone’s search bar makes it much simpler.
Tap on the search bar and you’ll see a Downloads shortcut. Tap it, and you’ll be taken straight to your Downloads folder inside the Files app.
You’ll also notice a Screenshots shortcut, which takes you directly to the Gallery app. This can be useful if you often need to view or share screenshots for work.
3
Open hidden apps
No need to unhide them
Screenshot by Pankil Shah — No attribution required
Screenshot by Pankil Shah — No attribution required
Screenshot by Pankil Shah — No attribution required
Samsung phones let you hide apps from the app drawer, which is perfect for keeping certain apps private or simply decluttering your home screen. But hiding them doesn’t mean you have to go through the hassle of unhiding them every time you want to use them.
The app drawer search can help with that. Simply type the name of the hidden app in the search bar. You won’t see the regular app shortcut, but the app will appear under the App info section. Tap it, and you’ll land on the app info page in Settings. From there, you can use the Open option to launch the app. It’s an extra step, but it keeps your apps private while still giving you access when you need it.
If you prefer faster access, you can configure the app drawer to show hidden apps directly. Tap the three-dot icon next to the search bar in the app drawer, go to Settings, and enable the Show hidden apps toggle.
2
Clear or hide your search history
Keep your searches private and tidy
Screenshot by Pankil Shah — No attribution required
Screenshot by Pankil Shah — No attribution required
Screenshot by Pankil Shah — No attribution required
Your phone’s search bar is a powerful shortcut, but you might not want all of your recent searches showing up in the history.
To clean it up, tap the search bar and look for the Recent searches section. From here, you can remove individual entries by tapping the X next to each one. If you want a fresh start, tap Clear all to wipe your entire search history in one go.
If you don’t want your phone to save the search history at all, tap the three-dot icon next to search bar and select Settings. Then, turn off the Show search history toggle.
1
Exclude specific apps from search
Enjoy a cleaner, faster search
Screenshot by Pankil Shah — No attribution required
Screenshot by Pankil Shah — No attribution required
Screenshot by Pankil Shah — No attribution required
By default, the app drawer search shows relevant suggestions from all compatible apps on your phone. But not every app has to appear in those results—maybe you don’t want suggestions from Samsung Music or Netflix every time you type something.
Samsung makes it easy to control which apps appear. Open the search bar, tap the three-dot menu, and select Choose apps to search in. You’ll see a list of all your apps, and you can turn off the toggles next to any apps you don’t want showing up in search results.
This simple step keeps your search results cleaner and more focused, so you find what you need faster without distractions.
You can go even further by diving into the Finder settings menu. Here, you can remove extra items like Downloads and Screenshots shortcuts, web search results, or even topics from Settings.
Knowing what your phone’s search bar can do can save you time, taps, and endless scrolling. From jumping straight to apps, settings, and downloads to finding contacts, documents, and hidden features, it’s a tool that makes your Samsung phone feel faster and smarter.
I always thought journaling was something other people managed to keep up with. I’d start off motivated, scribbling in a paper notebook or jotting quick thoughts into my phone, but it never stuck for more than a week. Nothing gave me a reason to keep coming back.
But that changed the moment I tried Day One. What began as an experiment has grown into a daily habit, and now I can’t imagine journaling without it.
Journaling always felt out of reach for me
Tried often, quit every time
I liked the idea of journaling, but actually keeping up with it never worked. I’d hear people talk about it, helping them clear their minds or track their progress, and I wanted that for myself. The problem was, every time I tried, I gave up almost as quickly as I started.
I first gave it a shot with Samsung Notes, since it was already on my phone and easy to open. For a few nights in a row, I typed short reflections before bed or jotted down little things I didn’t want to forget. But the habit never lasted. After a week, the entries stopped. Opening it felt more like tossing scraps into a drawer than keeping a real journal.
A few pages would fill up, then the notebook would sit untouched. Every time, it left me wondering if journaling just wasn’t for me. The page felt too empty, and without prompts in the app or reminders set up, I rarely knew what to write beyond a line or two. Even when I tried again on paper, I only managed a short burst of entries before falling silent.
The one app that finally pulled me in
Day One made it stick
After so many failed tries, I wasn’t really looking for another journaling app. I’d convinced myself that journaling just wasn’t something I could keep up with. But when I came across Day One, I decided to give it a chance. From the moment I opened it, I could tell it was different. The design was clean and welcoming. Creating an entry was as simple as tapping a button, and I could start writing without worrying about formatting or where to put it. It already felt like a proper journal instead of another notes app.
What really made me stick with it were the small details. I could drop in a photo when I didn’t feel like typing, and each entry could automatically save the weather and location when I enabled it. Those touches gave my words a sense of context and importance. Looking back, an entry wasn’t just text on a page. With a photo, the weather, and the location attached, it carried the feeling of the moment in a way plain writing never could. However, adding more than one photo is part of the subscription.
Most of my entries are written, but you don’t have to stick to typing. Day One also lets you record your voice, which makes it easier to capture thoughts at the moment (available with Premium). Then I discovered the On This Day view. It resurfaced past entries from the same date in earlier years, turning my journal into a timeline I could actually revisit. That was the moment I knew this app had solved the problem I’d struggled with for so long.
Before Day One, skipping a day usually meant I lost momentum. One missed entry turned into a week, and soon the notebook or app was set aside. Day One changed that cycle. Instead of relying solely on willpower, it provided me with small nudges, such as reminders and prompts, that made it easier to keep going. Even on busy days, I would add a note or a single photo just to stay consistent.
On days when I didn’t have much to say, a daily prompt gave me a place to start. Sometimes it was as simple as jotting down one thing I was grateful for, and that small entry was enough to keep my streak alive. Templates helped too, offering formats like a gratitude entry or daily summary that made writing feel less daunting and often encouraged me to write more.
The place my memories belong
Now that journaling has become part of my routine, Day One feels like the natural home for my memories. It isn’t just a place to store notes. It’s a real journal, and I notice that difference every time I open it.
Privacy matters to me, and Day One takes that seriously. My journals use end-to-end encryption, and on my iPhone I lock the app with Face ID. Knowing my entries are secure lets me write more freely. What began as a trial run is now part of my day, and Day One turned journaling into a routine I enjoy. It might do the same for you.
Microsoft has simplified the Start menu on Windows 11 to make it more search-friendly, much like a smartphone. Despite their best efforts, it’s clunky, has a micro delay during launch, and is a bit too basic for my needs.
I spent some time trying to customize the Start menu to navigate Windows better, but even with tweaks, it remained sluggish and limited. So, I decided to ditch my Start menu for Flow Launcher, an open-source app launcher, and I love it. It can find files, launch apps, run system commands, and even play my Spotify list without launching the app. Just what I needed for my keyboard-first workflow.
Launch and search everything
From apps to files, it can find anything
Flow Launcher makes launching apps and finding files ridiculously simple. Press Alt + Space, and it opens instantly with a satisfying tick sound that reminds me of the Netflix startup sound on a Smart TV.
To launch an app, type its name and hit Enter. But that’s just scratching the surface. Flow Launcher integrates with my favorite Windows search utility, Everything search, to find files instantly. Type any part of a filename, and it appears instantly. You can search for documents buried deep in folders, configuration files, or even files in System32 that Windows Search won’t touch.
The launcher also handles web searches without opening your browser first. Type your search query, and it defaults to Google. Install the Flow YouTube plugin from the Plugin Store, and you can add “YT” before your search to find videos from YouTube or even search within specific YouTube channels. The “S” prefix lets you search system settings. All of this happens from one place, without switching between different apps and windows.
Perfect for a keyboard-driven workflow
You can do a lot without reaching for your mouse
If you’re anything like me, you’ll love the keyboard-driven workflow that Flow Launcher offers. The entire experience keeps your hands on the keyboard, making everything incredibly fast once you get the hang of it.
Alt + Space brings up the launcher instantly. From there, the fuzzy search takes over—I can type sare for ShareX, and obsi for Obsidian, and Flow Launcher knows exactly what I want. Even when I completely butcher the spelling, it finds the right app. When multiple results show up, you can press Alt + Number (Alt + 1, Alt + 2, and so on) to pick what you need without reaching for the mouse.
Flow Launcher handles way more than just apps, though. Math equations, web searches, YouTube videos, system commands like shutdown or restart — it all works from the same search box. I don’t jump between different apps anymore or memorize special commands. Just type what you want in natural language, and more often than not, it’ll find what you need.
Plugins add a ton more functionality
It’s more than just an app launcher
Apart from the Everything Search plugin I mentioned earlier, Flow Launcher comes with pre-installed plugins like Browser Bookmark, Calculator, Explorer, Process, and Shell. However, you can extend the functionality by adding more plugins from the Plugin Store.
You can add a currency converter for quick conversions, integrate Todoist to add to-do tasks without opening the app, or access PowerToys utilities directly. The Spotify Premium plugin lets you play and control music entirely through keyboard commands. You can search for songs, pause, and skip all without opening Spotify.
For my games, the Steam Search plugin finds and launches games from the library instantly. There’s also integration with file explorer add-ons like QuickLook: press Space on any file in the search results to preview it without opening the app first.
Tons of customization options
Custom hotkeys and personalization
Flow Launcher is also highly customizable. You can configure your default file manager for opening folders and choose whether web searches open in new tabs, windows, or private mode. Similarly, choose a pre-defined theme, including Dracula, Sublime, and various dark and light options, to make it look like part of your desktop. You can adjust transparency, animation speed, and even the date format shown in the launcher.
The Hotkey tab is where you set different shortcuts for specific plugins or actions. I’ve configured mine to replace the Windows key entirely, so pressing it now opens Flow Launcher instead of the Start menu. You can set hotkeys for direct calculator mode, file search only, or any specific plugin.
Each plugin has its own settings, too. You can change prefix keywords, adjust search parameters, and fine-tune behavior to match your preferences.
Flow launcher fits my workflow
For someone like me who works with multiple apps every day, does a ton of web searches, watches YouTube videos, tweaks system settings, and has a very heavy keyboard-dependent workflow, Flow Launcher works like magic.
Flow Launcher responds instantly, searches accurately, and handles multiple tasks from one interface. The Start menu isn’t terrible, but Flow Launcher shows what a modern launcher should be — fast, extensible, and completely keyboard-driven.
The learning curve is minimal since basic usage is intuitive. And as you discover more features and add plugins that match your workflow, it becomes indispensable.
With the right tools and a smart approach, you can use lighting to transform how any space looks. I did just that without the complexity or mess of traditional methods.
Why lighting makes all the difference
In my case, I had two primary goals. First, I wanted the items in my display tower to feel genuinely showcased, rather than lost in shadows. Second, I had a classic china cabinet—beautiful on its own, but nearly invisible after dark. Rather than flooding either space with light, I wanted a soft, even glow that felt intentional and refined.
Tyler Fyock/MakeUseOf
Like many, I’d seen LED installations online, but most involved soldering irons, an array of essential power tools, and a level of precision that I didn’t have time for. I needed a cleaner, simpler solution that could be done in a small space and in a short amount of time. Below is a full walkthrough of how I brought this idea to life.
Materials I used (and what to avoid)
Before mounting anything or cutting any strips, it’s critical to assemble the right materials. Fortunately, the list is short and straightforward.
Required:
Optional (but helpful):
A drill with a large wood bit
Cable clips or adhesive guides to route wires discreetly
Traditional wire strippers can be difficult to use with 2-conductor wire, so you may want to opt for an automatic or self-adjusting wire stripper. Also, avoid LED accessories without adhesive backing, unless you’re prepared to use a lot of double-sided tape.
Plan your layout carefully
Before making any physical changes, I spent time mapping out the layout. This is where you’ll measure your shelves, decide how many LED strip segments you’ll need, and determine how wires will run between them.
Tyler Fyock/MakeUseOf
In my display tower, I had five horizontal shelves. I planned to install two LED strips beneath each one, casting light downward. This meant connecting all fifteen strip segments in series, each powered from the same source. That’s where the 2-conductor wire became essential.
There’s no need to orient all LED strips the same way; the positive and negative terminals don’t have to remain consistent throughout. If polarity is reversed, you can simply twist the 2-conductor wire the opposite way and adjust. Just make sure that you designate either red or black as the positive and the opposite as the negative.
Cut and test your LED strips
Each LED strip is marked with designated cut points, which look like small copper pads spaced at regular intervals. You can only cut at these points; cutting elsewhere will render the strip unusable.
Tyler Fyock/MakeUseOf
After measuring, I cut each strip to match the length of the individual shelves. The distance between the copper pads likely won’t line up perfectly with your measurements, so be sure to cut them to the shorter interval so they can fit in the available space.
Before cutting or mounting anything permanently, be sure to plug in the entire LED strip roll to ensure that each light on the strip functions properly.
Clip connectors for solder-free connections
Clip-on connectors are the key to this entire setup. They have small teeth on them that dig directly into the ends of the LED strips, making contact with the copper pads. On the other side, they have specially designed spikes that make contact with your wire ends and hold them securely.
Tyler Fyock/MakeUseOf
Here’s how to use them:
Open the flat side of the connector.
Slide the LED strip into place beneath the metal teeth, aligning it properly so that they dig into the + and – terminals (the copper pads).
Snap it closed—you’ll feel and hear it click.
Open the side of the connector with the two small holes.
Insert the red and black wires into the holes, ensuring proper polarity.
Snap that shut as well to secure the wires in place.
In under a minute, you’ve made a solid, functional connection without any soldering, electrical tape, or specialized tools.
Once either end of the connector is snapped shut, it’s nearly impossible to open it back up. If you’re determined enough, you can use a flathead screwdriver to force the end open, but it may bend or snap the plastic, rendering the connector useless.
Drill discreet holes for wire routing
Visible wires can detract from even the most well-lit installation. To keep the look clean, I drilled holes near the back corners underneath each shelf. These holes were just wide enough for the wire connectors to pass through, and allowed me to route the cable more discreetly out the back of my display tower.
Tyler Fyock/MakeUseOf
Before drilling, I measured and marked everything carefully, which is particularly important when working with older or delicate wood. In the case of my china cabinet, I used painter’s tape to guide my placement, then drilled roughly one inch in from each side.
If you’re working with open shelving, consider drilling additional holes or using slim cable raceways.
Mount components securely
Once all strips had been tested and cut, I peeled off the adhesive backing and pressed each strip firmly underneath the shelves. The adhesive is incredibly strong, but applying steady pressure helps ensure a lasting bond.
Tyler Fyock/MakeUseOf
For the connector clips themselves, I added my own double-sided mounting tape to reinforce them under the shelves. This held perfectly.
With everything in place, I ran the wires underneath the edges of each shelf and connected them all to the power source. I then plugged the adapter into the wall, and the entire lighting system came to life.
How to achieve a professional-looking result
A few key details can make all the difference between a lighting job that feels amateur and one that feels built-in. If a wire was visible from the front, I adjusted its path, moved it behind a panel, or secured it using painter’s tape in a discrete area. The goal is a clean, unobtrusive finish; you’ll want to conceal every wire in the setup.
Tyler Fyock/MakeUseOf
Similarly, you’ll also want to hide LED light dots. Some lower-density LED strips display noticeable hotspots or gaps. Although I chose this type of LED strip, there are plenty of high quality LED strips that offer smoother, more consistent illumination. The low-density ones still work great, as long as the strips themselves aren’t visible.
Choose warm or cool light based on ambiance. My general rule is the fancier the setup, the cooler the light. Opt for cooler tones if you’re illuminating a modern kitchen or china cabinet. Otherwise, you should choose something on the warmer end of the spectrum.
An inline dimmer switch gives you added control and can be a nice touch in a dark room. In the evenings, I often reduce the brightness to create a more ambient mood without overpowering the space.
Tyler Fyock/MakeUseOf
Tyler Fyock/MakeUseOf
Tyler Fyock/MakeUseOf
The final result exceeded my expectations without any burns, smoke, or melted plastic. Now, the ambient glow highlights my collectibles and china beautifully, adding depth and character to the room. Best of all, the modular design means I can expand or modify it in the future with minimal effort.
If you’re ready to enhance it further, consider adding motion sensors or syncing it with additional smart devices. There are lots of other stunning LED DIY projects you can try out. However you decide to set them up, you’ve taken full control of your lighting.
In 2025, Waze still stands out by focusing solely on one goal: getting you where you’re going fast. Unlike Google Maps’ exploratory approach, Waze navigates real-time traffic and offers community features that save you time.
7
Waze doesn’t play it safe, and that’s the point
While Google Maps may pretend to be a guidebook or prioritize the most “comfortable” route, Waze cuts through the jargon. Instead, it acts like a copilot who’s just as impatient as you are. It’ll take you through alleys, across a dirt road, or up a winding mountain if it means shaving minutes off your ETA. It’s an aggressive navigation app, and that’s exactly why I prefer it.
Google Maps leans on more predictable paths. It tends to stick to primary roads and is often less responsive to emerging traffic. That cautious nature means you’ll sometimes be sitting in a jam that Waze would’ve dodged five minutes ago.
The difference is real-time trust. Waze relies heavily on its users’ reports and uses that information immediately. Google wants to verify, while Waze adapts before your foot hits the brake.
If you value getting from point A to point B with zero fluff, Waze has your back. It doesn’t worry about how pretty the drive is; it cares about delivering results. Once you try Waze, you’ll never switch back to Google Maps.
6
A living network of drivers
The core of Waze’s success lies in its shared data among drivers. Waze taps into thousands of live users who constantly flag what’s happening on the road. These can be reports of potholes, crashes, stalled vehicles, construction zones, speed traps, and more.
When someone up ahead reports a police officer hiding on the shoulder, you’ll know instantaneously. Additionally, the system encourages accuracy by prompting others to confirm or dismiss alerts, which means the info I’m receiving is up-to-date and accurate. Waze doesn’t offer a passive experience like many other navigation apps.
Screenshot by Tyler Fyock; no attribution required
Screenshot by Tyler Fyock; no attribution required
Screenshot by Tyler Fyock; no attribution required
With Google Maps, those kinds of insights are present but diluted. They’re usually buried, vague, or delayed. Waze’s version is bold, obvious, and loud, which helps a lot with allowing you to keep your eyes on the road rather than on your phone.
That type of collaboration makes Waze feel like something bigger than just an app; it becomes a real-time community of drivers watching out for one another. That spirit of mutual aid makes the difference between casually traveling and actively navigating the road.
5
Real-time speed and adaptability
When I’m on the road, time is vitally important. In dense cities where one missed reroute can mean an extra 20 minutes in gridlock, I need a navigation app that can keep up. Waze’s rerouting logic is fast, confident, and reacts almost as quickly as somebody sitting in my passenger seat.
Waze can adjust your route within seconds of a slowdown being reported. It knows when something has shifted and recalculates accordingly—often so quickly you barely notice the change. It’s easy to avoid the jam without having to second-guess your route.
Compare that to Google Maps, which tends to wait. In my experience, it often lags behind real-world events, and by the time it does respond, it may be too late. That delay could mean you’re still getting sent down a closed-off road or into a parade you had no clue was happening.
Even changes to road layouts, such as new one-way streets, fresh construction zones, and unexpected lane closures, tend to appear faster on Waze. Its responsiveness becomes a quiet superpower when every block counts.
4
A UI designed with the driver in mind
When you launch Waze, you’re not greeted with a travel blog or options to review a sushi spot; you’re given a map and the simple goal of moving to your destination. That clarity isn’t just a stylistic choice; it’s a safety feature. Fewer distractions mean better focus, and when you’re driving, that means everything.
Waze’s interface is incredibly bold, with colorful, oversized icons. It succeeds in foregoing aesthetics for usefulness by making sure that its entire UI feels designed for motion.
Screenshot by Tyler Fyock; no attribution required
Screenshot by Tyler Fyock; no attribution required
Screenshot by Tyler Fyock; no attribution required
Buttons are large and easy to tap without taking your eyes off the road. Key information, such as ETA, next turn, and traffic conditions, is always front and center, never buried. The screen layout avoids clutter by only showing what matters in the moment, making navigation intuitive even in high-pressure driving situations.
Compare that with Google Maps’ slick but sometimes overly subtle visuals. The minimalist icons and whisper-quiet alerts may look great during trip planning, but on the road, they can fall short.
3
Fun and function can coexist
Waze brings personality into the driving experience without compromising performance. You can swap the voice giving you directions, change your car icon, and even customize your mood on the map. Of course, these features aren’t necessary, but they do bring the app a bit of life.
There’s value in fun, in that it breaks up the monotony. Whether it’s a pirate shouting commands or the latest celebrity Waze navigation voice, that absurdity can help lighten the mood when you’re dealing with borderline road rage. Google Maps, by comparison, is all utility and no charm. There’s always the same monotone assistant giving you robotic directions.
Because you’re likely using the app daily, that little layer of humor or personalization becomes a part of the routine. Waze gives you the option to make the experience more customizable and enjoyable.
2
No other app handles urban mayhem quite like Waze
Driving in a dense city is usually a massive headache. Routes change constantly, construction zones pop up overnight, traffic cops redirect entire blocks without warning, and special events can throw entire neighborhoods into chaos. One major advantage of Waze is that it’s built for this kind of havoc.
You can almost see Waze thinking as it reroutes you mid-drive during extreme traffic. It reacts to last-minute shifts, tailors your detours in real time, and does it with a level of accuracy that feels like magic. The best part about it is that it’s almost always spot-on.
Screenshot by Tyler Fyock; no attribution required
Screenshot by Tyler Fyock; no attribution required
Screenshot by Tyler Fyock; no attribution required
Waze thrives in gridlock, where precision matters most. It understands the difference between turning left at a light and getting stuck behind five rideshares waiting on passengers. It knows when a supposed “shortcut” is actually a one-way nightmare.
It also updates quickly without waiting for ideal conditions, trusting other Waze users to flag events on the road. In urban environments where timing and adaptability are everything, that functionality gives Waze a massive edge.
1
Waze is for driving, not trip-planning
Even with its versatile capabilities, like being able to remind you when to leave for appointments, Waze’s focus isn’t in showing you where the nearest gas station is. If you want restaurant ratings or local attractions, Google Maps should be your go-to. But if you’re commuting, going on a road trip, or just trying to outmaneuver a sea of brake lights on a Friday evening, you’ll want to opt for a navigation app built solely for drivers.
Unlike Google Maps, Waze is designed to help you on the road, not for trip-planning at home. From the settings to the search options, its functionalities revolve around clarity and quick decisions, minimizing distractions so your attention stays on the road.
Waze understands that drivers want a navigation experience that anticipates obstacles, traffic, and delays without cluttering the screen with irrelevant details. Google Maps hasn’t quite grasped that concept, and often yields more disruptions than anything else.
There’s a reason people like me haven’t switched to Google’s mainline offering. Waze might not be as “official” as Google Maps, but it’s faster, louder, and more in tune with what really matters on the road. It’s a tool that respects your time, trusts its users, and never stops adapting.
And when you’re behind the wheel, those are the aspects that truly matter.
My weekends used to disappear into household maintenance. Between vacuuming, laundry cycles, and chasing my escaped black lab Bella through neighbors’ yards, I felt like a full-time house manager. Smart home automation changed everything—not difficult overhauls, just targeted solutions for my biggest time drains. These simple fixes have given me back about 5–10 hours weekly.
4
My robotic floor cleaner changed everything
Jonathon Jachura / MUO
At 7 AM, while I’m taking my kids to school, my Roomba robot vacuum starts doing its work. Four hours later, I walk into a house with spotless floors; it looks like someone came by and vacuumed while I was gone. This has eliminated 45 minutes from my daily routine by tackling both hardwood and carpet without any input from me.
What really changed my life wasn’t just having clean floors—it was never having to think about it. I used to vacuum whenever the house looked messy or before people came over. Now my floors stay presentable all the time, which means way less weekend deep cleaning. It picks up all Bella’s black hair and figures out how to get around chair legs and coffee tables on its own.
Weekly maintenance is maybe five minutes to dump out the bin and pull hair from the brushes. I don’t miss how much of a pain it was hauling out that clunky old vacuum, fighting with that tangled cord, and squeezing it between furniture.
3
Smart kitchen and laundry appliances work while I don’t
I fire up my Whirlpool oven from the parking lot at work. As I walk through my front door, the oven’s already heated to 350°F and is waiting for me to put in dinner. This saves me from standing around the kitchen for 15–20 minutes watching the temperature climb.
Screenshot by Jonathon Jachura; no attribution required
Screenshot by Jonathon Jachura; no attribution required
Screenshot by Jonathon Jachura; no attribution required
Both my Whirlpool washer and dryer send alerts to my phone when cycles finish or something goes wrong. I’ve broken the habit of walking to the laundry room every few minutes to check if they’re done (or forgetting about the load until the next day)—now I just wait for the notification. The dryer sends a heads-up when lint starts building up, keeping it running well and avoiding those house fires you read about in the news.
I can see exactly how much power these appliances use and when electricity costs the least, so I’ve started to have better timing for when I run the laundry. The washer suggests the right settings for different loads, which saves water and shortens cycle times.
2
Home security that actually makes life easier
Screenshot by Jonathon Jachura; no attribution required
Screenshot by Jonathon Jachura; no attribution required
The MyQ garage door app has saved me more times than I can count with deliveries and repair crews. One time, I was running behind schedule when a couch delivery showed up. Thankfully, through the app, I was able to open my garage door so the delivery people could put it inside instead of leaving it out in the rain. No more missed deliveries or frantic drives home.
I used to get halfway to work and suddenly panic about whether I’d unplugged the clothes iron. That became my regular Tuesday morning routine until I got smart outlets. Now I just check the Alexa app and kill the power to whatever I forgot. I haven’t made a panic U-turn home in months.
Screenshot by Jonathon Jachura; no attribution required
Screenshot by Jonathon Jachura; no attribution required
Screenshot by Jonathon Jachura; no attribution required
My Ring setup lets me see who’s at the door and check on packages through the doorbell and floodlight cameras. I can verify everything’s locked up without walking around the house, testing every door and window.
1
Outdoor problems have automated solutions
Jonathon Jachura / MUO
A hydrangea tree in my side yard never got enough water from the main sprinkler system and was getting burnt, so I connected a B-hyve controller to a garden hose for drip irrigation. It waters based on actual weather and local rainfall amounts, not guesswork. Those weekly watering sessions with the hose are history, and the plant looks better than ever. And this is just one part of my smart watering setup.
Flood sensors from Ring monitor the basement, laundry room, and both bathrooms. Last month, one caught my four-year-old’s toilet overflow within minutes. I stopped a minor mess from becoming extensive water damage by getting the alert right away.
Bella’s Halo GPS collar put an end to those neighborhood search missions when she decided to go on an adventure. The virtual boundary alerts me if she escapes or if I forget to turn the GPS fence back on after our walk. The app shows her exact location, so there’s no more running around calling her name or knocking on doors.
Screenshot by Jonathon Jachura; no attribution required
Screenshot by Jonathon Jachura; no attribution required
Screenshot by Jonathon Jachura; no attribution required
My Camp Chef smoker hooks up to an app that monitors internal meat temperature. During those long Saturday brisket sessions, my phone gets temperature readings, so I don’t have to keep walking outside to check the thermometer. It sends alerts when it’s time to wrap the meat or once everything’s ready to come off.
Getting my weekends back
All these gadgets together have freed up around 5–10 hours in my week. I get to spend time with my wife and kids, work on home improvement projects I keep delaying, or just relax on the couch without a mental list of chores nagging at me. My advice is to pick the one household task that drives you the craziest and automate that one first.
After you see the difference, you’ll be hunting for other tasks to hand off to technology. Good smart home gear shouldn’t make your life more complicated—it should handle the mundane details so you can do what matters to you.
It’s my favorite time of the year: IFA 2025. The world’s largest tech show (yes, larger than CES!) brings the eyes of the world to the giant exhibition halls of Messe Berlin, and with more than 200,000 visitors expected, every tech company is vying for a piece of the action.
I’ve been on the IFA 2025 floor for the past few days, drinking in the tech and walking miles to do so. There is always a phenomenal amount of new tech to check out, but I’ve narrowed it down—this is the best new tech at IFA 2025.
Great sound and best-in-class battery life—what’s not to love?
Gavin Phillips / MakeUseOf
Baesus made a real statement at IFA 2025, launching a trio of new audio products that have caught the imagination of the thousands of tech enthusiasts here.
Of the three, the Baseus Inspire XH1 is the jewel in the crown. The company collaborated with Bose to create a new sound profile for the XH1s, and the collaboration has really hit home where it counts. The XH1 headphones sound great, and while they’re a little on the bass-heavy side, this can be easily managed in the companion app EQ settings.
I’ve also found the XH1s really comfortable. The plush ear cushions fit snuggly around my ears and create a good seal without crushing them to death. In that, they also don’t turn my ears into a sweaty mess, which really is one of my least favorite feelings when wearing headphones.
ANC is another strong point for the Inspire XH1s. With five different levels of ANC to choose from, you can tailor the level of noise cancellation to whatever noise you want to block out. They did a great job blocking out the constant drone of the plane on my flight to Berlin, and that’s one of the sterner tests for ANC headphones.
Then there is the outstanding battery life. I’ve been using these headphones for hours each day since leaving my house two days ago (with ANC), and I’ve still not had to reach for the charger. Baseus claims a 100-hour battery life (dropping to 65 hours with ANC), and I’m confident this figure is accurate.
And the cherry on the cake? You get all of this for a mere $150, which is what makes these some of the best headphones you can currently buy.
A wonderfully lightweight, minimalist smartphone
Gavin Phillips / MakeUseOf
The DuRoBo Krono is a 6.13-inch e-paper device carving out a space somewhere between an e-reader and a phone. It runs Android 13, powered by an octa-core processor with 6 GB of RAM and 128 GB of storage. The display is an E Ink Carta 1200 panel at 824 × 1648 pixels, with an adjustable front light for both warm and cool tones.
On paper, it reads like a compact e-reader that can double as a distraction-free productivity device. That’s exactly the point. Rather than another e-reader, DuRoBo is pitching Krono as a focus hub.
Spec-wise, it mirrors the Onyx Boox Palma 2 almost identically. Same screen, same RAM and storage, same Android OS. But where Boox looks and feels like an engineer’s utility device, Krono’s design is more inspired. The back features a cylindrical spine that houses both a rotating dial and breathing LEDs.
The dial is the most inspired touch. If you’ve ever used Samsung’s Galaxy smartwatches with their rotating bezels, you’ll get the point: a physical anchor makes the device feel tangible and tactile.
Battery life should also impress. With the same 3,950 mAh cell as the Palma 2, and paired with the low-power E Ink screen, you’re looking at weeks of use on a charge instead of days. If you’re sick of nightly charging like I am, that’s a pretty big deal.
Now, if you want to get in nice and early, you can join DuRoBo’s Kickstarter. I wouldn’t normally push anyone to a Kickstarter for the obvious reasons, but having talked to the DuRoBo team at IFA 2025, it’s clear that the Krono is coming to market whether this succeeds or not. It’s just a handy way to get your hands on it before anyone else if you’re that way inclined.
An absolute unit, but can it justify the price?
Gavin Phillips / MakeUseOf
Lenovo is launching the Legion Go 2, its second-generation Windows-based gaming handheld, following the success of its first version. The Legion Go 2 features the AMD Ryzen Z2 Extreme processor and up to 32GB 8000 MHz memory. It’s a significant performance improvement over the first generation, especially considering the changes to the display.
Lenovo has opted for a smaller resolution display for the Legion Go 2. Instead of the QHD+ 2560 x 1600 IPS panel in the first Legion Go, the second generation gets a WUXGA 1920 x 1200 144Hz OLED display with variable refresh rate support. While the resolution is smaller than before, at this screen size, I’d rather have OLED capabilities, as you won’t really be able to tell the difference on the 8.8-inch touchscreen.
The storage has also been doubled since the previous generation, with the new model coming with up to 2TB PCIe Gen 4 storage and a microSD slot with support for an additional 2TB. The battery capacity has also nearly doubled to a 4-cell 74 Wh battery in the second generation.
Other changes include a redesign of the TrueStrike controllers for a smoother and ergonomic feel. You get hall effect joysticks, three customizable buttons, and a fingerprint reader built into the power button.
My only real concern is the price. With the Legion Go 2 set to cost just under $1,100, it’s an expensive piece of kit. Has the modern gaming handheld market already priced itself out of reach for most people? It’s hard to say, but clearly, Lenovo doesn’t think so, and I’m keen to see how this behemoth performs.
7
EarFun Air Pro 4+
Hi-res audio under 100 bucks? Yes please
Gavin Phillips / MakeUseOf
The EarFun Air Pro 4+ claims to be the world’s first Hi-Res, dual-driver, hybrid ANC earbuds under $100. Those words might not mean a lot to you, but these earbuds pack a surprising amount of features for their price tag.
You get Bluetooth 6.0 support with codecs including aptX Lossless, aptX LDAC, Auracast, LC3, SBC, and AAC. The sound is delivered through 10mm hybrid drivers (with a balanced armature) in each earbud. There’s also Hi-Res certification, Qualcomm Snapdragon Sound support, and the accompanying app has custom EQ support to tune the sound to your liking.
Battery life is also pretty decent on the Air Pro 4+. EarFun claims up to 12 hours of battery life on the earbuds with the ANC off, and up to eight hours with ANC enabled. That’s a total of 54 hours and 36 hours with the charging case with ANC off and on, respectively. Actual battery life can vary by volume level and audio content, but these are respectable numbers regardless.
Speaking of ANC, you get adaptive hybrid ANC up to 50 dB. There’s also the usual crop of premium earbuds features, including multipoint connection, support for Google Fast Pair, in-ear detection, and an IP55 water and dust resistance rating.
6
Acer Swift Air 16
A 16-inch laptop has no right to be this lightweight
Gavin Phillips / MakeUseOf
I’m rarely blown away by new laptop tech, but the Acer Swift Air 16 has done it. This full-sized 16-inch laptop weighs under 1kg, which is less than a 13-inch MacBook Air, and looks pretty good while doing so.
The Swift Air 16’s frame is manufactured from an ultra-lightweight magnesium-aluminum alloy, so it’s plenty sturdy, but when you pick it up, it feels astonishingly light. The thickness of 15.9mm is also impressive, and gives the Swift Air 16 a really unique feel. I mean, where else can you see something like this?
It comes equipped with an AMD Ryzen AI 300-series chip, which is very competent, though you’re not going to be using this laptop for gaming (well, maybe a touch of light gaming, but don’t expect to be playing the latest Call of Duty).
My only real concern with the Swift Air 16 is the battery size. Despite its size, it only has a 50Wh battery, which in 2025 is criminally small. I get that Acer may have compromised here, but I’d be a little wary of this for that reason. Still, we’ll know more once the Swift Air 16 begins shipping and the real testing gets underway.
Step into the future of wireless charging
Gavin Phillips / MakeUseOf
UGREEN is no stranger to charging accessories, and its latest MagFlow Qi2 power bank feels like a preview of where wireless charging is headed. Rated at 10,000 mAh, it’s among the first to adopt the Qi2.2 standard, which pushes wireless charging speeds up to 25W, nearly twice as fast as its predecessor (15W). There’s a catch, though: you’ll need iOS 26 to unlock those speeds, at least on iPhones.
In testing, the results lined up with expectations. Wireless charging added about 20% in 25 minutes, while wired charging managed the same boost in just 20 minutes. UGREEN claims 50% in half an hour, but real-world use was closer to 35–40%, which still makes it noticeably faster than older power banks.
The bank itself is on the chunky side, roughly the thickness of two phones stacked, but that capacity allows for flexibility. You can wirelessly charge a Qi2-compatible iPhone or accessory, plug into the USB-C port for up to 30W wired charging, or use the built-in cable that doubles as a lanyard. All three can even run at once, making it a handy travel companion for people juggling multiple devices.
A small display on the side shows battery percentage and charging status, though it doesn’t yet display live wattage. At $90, it’s not the slimmest or cheapest option, but as one of the first Qi2 power banks on the market, it’s a sign of faster, more versatile wireless charging to come.
Note-taking has never been so easy… or compact
Gavin Phillips / MakeUseOf
The Plaud AI Note Pro takes everything compelling about the original Plaud Note and cranks up the capabilities significantly. At just 2.79mm thick and 30g, this credit card-sized AI recorder now packs four precision MEMS microphones instead of two, doubling its audio pickup range to 16.4 feet. That’s perfect for larger conference rooms where you’re not sitting right next to the speaker.
The standout upgrade is the 0.95-inch AMOLED display, which provides visual confirmation of what’s happening. No more wondering if you’re actually recording or if the battery died mid-meeting. The screen shows recording status, battery level, and even waveforms, solving the anxiety that plagued the original’s simple LED indicator.
As a dedicated standalone AI device, the Note Pro operates independently from your phone, preserving battery life and removing the distraction of notifications during critical meetings. Smart dual-mode detection automatically switches between phone calls and in-person meetings, eliminating the manual toggle that occasionally caused missed recordings on the first-gen device. A new press-to-highlight feature enables you to mark important moments in real-time, which should significantly improve the AI summary accuracy and also help you locate specific moments much faster.
Battery life stretches to 50 hours in endurance mode, and the companion app now supports multimodal input. You can add text notes and photos to provide richer context for transcription and summaries.
At $179, it’s only $20 more than the original Plaud Note, making this a worthwhile upgrade. For anyone who found the original compelling but wanted more polish and reliability, the Note Pro delivers exactly that.
3
Tecno Spark Slim
A bafflingly lightweight and slimline smartphone
Gavin Phillips / MakeUseOf
I first saw the Tecno Slim concept at MWC 2025, where I gave it an award for innovation in smartphone tech. And now, five months later, the Tecno Slim is a fully-fledged smartphone, ready for the world to marvel at its wonderful design.
Measuring just 5.95mm thick, the 5G Tecno Pova Slim is a really phenomenal bit of engineering. Tecno hasn’t held back elsewhere on this smartphone to make the concept work. It packs a really decent 5160mAh battery, complete with 45W charging, that uses lithium-cobalt oxide. It allowed Tecno to compact the battery to just 4.04mm thickness, allowing other components to fit around it.
Tecno has also developed an ultra-slim vapor chamber cooling system to help stop the Slim from overheating (with all the components crammed into such a small space, overheating is a major concern).
The rear case uses ultra-thin aerospace-grade fiberglass, which, according to Tecno, is “0.19mm thinner than standard composite plates, yet delivers 300% greater strength and 200% greater toughness.” On the front, it uses Corning Gorilla Glass 7i, and also comes with a decent IP64 water and dust resistance rating.
Also—and this is one of my favorite features—the Mood Light feature is super fun, and brings a little pair of eyes to the rear lighting panel that surrounds the camera housing.
It’s a great piece of engineering from Tecno.
2
Anker Soundcore Work AI Recorder
Never miss a note in a meeting again
Gavin Phillips / MakeUseOf
Anker is a long-trusted name for phone chargers, cables, headphones, and more, but this year the company is expanding into something new: a voice-recording tool for in-person meetings. The Soundcore Work looks like it’s roughly the size of a Tile tracker, and is designed to record everything during a discussion so you can review the transcription, along with an AI-generated summary, later. Currently, the AI summary uses GPT 4.1, but this will be upgraded to GPT 5 at a later date.
Everything about the device seems simple and lightweight. Pressing the button once starts recording; it’s also lockable, so you won’t accidentally disable it during a session. As you record, you can double-tap to mark an important moment, which will presumably be highlighted in the notes later.
Battery life shouldn’t be a factor, with the company quoting 10-day standby time, between 8 and 32 hours of recording time, and 2 hours of usage from just 10 minutes of charging. It’s also compatible with Apple’s Find My, so you can track the device with your iPhone if you lose it. If you’re concerned about privacy, Anker promises that while audio is temporarily processed by AI through cloud services, all data is deleted once it’s moved to your device.
Anker lists the device’s price plus “basic services” at $99.99, with a $15.99/month fee “for more” thereafter. Perhaps transcription will be free, but AI summaries will require a subscription?
As someone who appreciates the AI notetaking features in video calling tools, I’m curious to see how this fares. If I did more in-person meetings, I’d appreciate something like this so I can be fully present in the discussion and not worry about taking notes. The included necklace chain means you can wear it like you would a necklace, so you don’t have to carry around a clunky microphone or look weird doing so.
It feels like this is a coming-of-age for Chromebooks
Gavin Phillips / MakeUseOf
The Acer Chromebook Plus Spin 514 is one of those laptops designed to make life easier without feeling overly complicated. It’s powered by Mediatek’s new Kompanio Ultra 910 processor with about 50 TOPS of built-in AI muscle, plus an Arm Immortalis-G925 GPU to keep creative tasks like editing or rendering from dragging. Acer is also bragging about 17 hours of battery life, which is the kind of number that would make me want to test how long I can actually go without the charger.
The 14-inch touchscreen is available in WQXGA+ (2800×1800) or WUXGA (1920×1200), both of which are covered in Gorilla Glass with an anti-fingerprint coating. It supports USI 2.0 styluses, and ChromeOS now has handy gesture-based edits like scribble to delete and circle to move, which sound like little touches you’d quickly get addicted to. The hinge flips into laptop, tablet, tent, or display mode, and it’s MIL-STD 810H rated (military-grade durability), so you don’t have to baby it.
Connectivity is future-proof with Wi-Fi 7, Bluetooth 5.4, and dual USB-C ports. For calls, there’s a webcam option up to 5MP with AI tricks like lighting fixes, background blur, and noise cancellation, plus a physical shutter for when you want it off for real. I also like the smaller touches like upward-firing DTS-tuned speakers, a touchpad made from recycled ocean plastic, and even a full year of Google AI Pro with 2TB of cloud storage included.
Dolby’s latest HDR evolution promises smarter TVs, but as is the case with everything else these days, it crams AI into its feature set. Your content might look great with Dolby Vision 2, but the tech behind its Content Intelligence system is rather invasive.
Dolby Vision 2 brings new tools for studios and TV productions that let them achieve greater picture quality, especially on high-end TVs. The standard uses dynamic metadata to identify the Dolby Vision-compatible display it’s connected to and adjusts the video signal to best use what the specific screen can do.
The dynamic data also contains instructions that further tweak the signal based on various scenes, shots, or even specific frames. As a result, you get color and exposure-accurate video as close to the director’s original intent, tuned specifically to your TV’s display. It also introduces a brand new image engine—the underlying software that processes video content based on the included metadata.
Apart from jazzing up video quality on your TV, Dolby Vision 2 also includes Content Intelligence. This is a set of tools for content producers to “authentically and automatically” optimize your TV to present a more realistic and better-looking picture based on what and where you’re watching your content.
At the time of writing, Dolby supports the following features under Content Intelligence:
Light Sense: Fine-tunes the picture quality using ambient light detection reference lighting data from the content source.
Precision Black: Improves image clarity without compromising artistic intent. Should help fix issues where the image looks too dark.
Sports and Gaming Optimization: Includes new enhancements like white point adjustments and motion controls to better view sports and gaming content.
While I have no doubt these features will result in amazing picture quality on just about every Dolby Vision 2 compatible TV, the standard has to constantly monitor what you’re watching in order to optimize your content. And that’s where it gets concerning.
Better video quality at the cost of privacy
Brady Meyers / MakeUseOf
Dolby’s announcement doesn’t explain how exactly Dolby Vision 2 will optimize content automatically. However, it will need to constantly monitor what you’re watching and combine it with any sensor data received from your TV to achieve the results Dolby is bragging about. Since it’s an AI-powered system, the data collection and analysis can go deeper than you think.
Unlike simple data collection, AI systems can collect more sensitive information, like viewing patterns. Dolby Vision 2’s AI systems can just as easily analyze viewing behavior to build detailed psychological profiles.
You see, smart TVs already have features such as Automatic Content Recognition (ACR) that scan everything playing on your screen. You can stop your Smart TV from tracking you with certain tweaks, but the behavior already exists. And if you’re wondering whether the personalized ads on your TV are getting too accurate, that’s because LG Smart TVs use AI to track your emotions.
Additionally, no information on what AI system is powering the Content Intelligence suite of features was shared. Dolby hasn’t shared any information on how this data will be collected, analyzed, or stored either.
We’ll have to wait until Dolby Vision 2-compatible TVs and content start rolling out to get answers. Until then, Dolby’s invasive approach to improving image quality is sure to upset anyone looking out for their privacy.
Baseus is one of those brands I feel more people should know about. It always delivers excellent audio hardware at what can only be described as a bargain price.
And this year at IFA 2025, the story is no different. Baseus launched headphones, earbuds, and a really handy set of clip-on earbuds in collaboration with legendary audio outfit Bose, which should have some of the better-known audio brands worried.
Baseus’ brand-new audio products are the stars of the show, but they’re far from the only new tech the company unveiled at IFA 2025, with new portable chargers, security cameras, and more to complete its lineup.
5
Baseus Inspire XH1
My new favorite ANC headphones
Gavin Phillips / MakeUseOf
I’ve used a few Baseus headphones over the years, most recently the Bowie 30 Max ANC—which I actually found a little underwhelming. They were priced well, and for that price, the ANC was good, but the overall sound quality didn’t quite hit home for me.
It’s safe to say that the Baseus Inspire XH1 is a huge step forward in almost every area.
First, Baseus collaborated with Bose to produce a new sound profile for these headphones (and the earbuds, which I’ll come to in a minute). The uptick in overall quality is immediately noticeable, with the Inspire XH1s producing a good, balanced sound.
I’ll slightly caveat that by saying I did have to go into the Baseus app and turn off a Bass Boost setting that’s turned on out of the box, but once switched off, I enjoyed the Sound by Bose audio profile. It’s slightly bass-forward, even without the aforementioned bass boost setting.
Now, Baseus has tuned this towards bass, with SuperBass 3.0 and SuperBalance 3.0, but with some EQ tweaks in the Baseus companion app, you can find a real sweet spot for these cans.
These headphones are also super comfortable. The Inspire XH1’s earpads are thick and plush, meaning you can keep them on for hours at a time. I’d like the clamping pressure to be a bit stronger, but they don’t slip off easily.
And that comfortable design is also a strong part of why the Inspire XH1 ANC works so well. The earcups fit nicely around your ears, creating a good seal. Then, the XH1s have five different ANC levels to choose from, plus presets for indoor, outdoor, business, and commuting, plus an adaptive mode. I’ve tried the ANC in a few different scenarios, and found it works well against most noise, drastically cutting down the background droning of a flight and helping me keep focused at home during the school holidays.
Battery life is another big plus point for the Inspire XH1 headphones. Baseus claims a 100-hour battery life, dropping to 65 hours with ANC on. Those are top-tier numbers for ANC headphones, especially at this price point.
On that, the Inspire XH1 headphones are launching in the US on September 4, 2025, priced at $150.
4
Baseus Inspire XC1
Clip-on earbuds that actually sound good
Gavin Phillips / MakeUseOf
I’ve tried quite a few clip-on earbuds since this style really started to become popular. My favorite up to this point was the Soundcore AeroClip, which, in fairness, delivers where you’d expect from a Soundcore product.
With that said, I’ve been pleasantly surprised by the Baseus Inspire XC1 clip-on open-ear earbuds. Like the XH1, these buds have been tuned in collaboration with Bose, and it shows. Open-ear earbuds are always at a disadvantage. It’s just a part of the design; you can’t make a seal around or in the ear, so some fidelity is naturally lost.
But the XC1 design does accommodate for this well, in a couple of ways. First, the XC1 clip-on earbud is long enough that the earbud itself rests close to my ear canal, projecting the audio exactly where it needs to go. Second is the 10.8mm dynamic driver and a supporting Knowles-balanced armature driver, which, in combination, deliver a powerful sound.
So, while the XH1 cannot provide ANC due to the design, I still found these earbuds able to block out a decent range of noise. Take a recent flight I was on. The background noise of the plane wasn’t completely removed, but I was suitably impressed with how personalized and focused the audio was.
In the Baseus companion app, there are custom EQ options, along with the same Sound by Bose default setting. This time, there is no bass booster option to toggle off. One handy feature in the Baseus Sound Settings is the Enhanced Battery Life mode, which boosts your listening time by turning off any audio enhancements. It pares back the audio a little, but gives you several hours extra play time when you need it.
I like that these earbuds are rated IPX7 for water and dust resistance. This means they can withstand water and dust to a high level, making them the ideal partner for sports and other outdoor activities. Oh, and they have wear detection, too—such a handy feature that I always feel is missing when earbuds or headphones don’t include it.
The Baseus XC1 clip-on open-ear earbuds are launching on September 4, 2025, priced at $129.
3
Baseus Inspire XP1
Super comfortable earbuds with powerful bass
Gavin Phillips / MakeUseOf
Baseus’ new audio hardware is completed with its new Inspire XP1 earbuds, a tidy set of buds that look and feel great.
Like the headphones and clip-ons, Baseus has worked closely with Bose to develop an entirely new soundstage for these buds, and it shows. They’re a little on the bass-heavy side for me, but again, with a few small EQ tweaks in the Baseus app, you can tune that back down and really discover what makes these buds worth buying.
What I really like about the Baseus Inspire XP1 is the fit. I didn’t have to spend ages fiddling around to find a comfortable listening position, which is somewhat rare. These were straight out of the box and into my ears, and just felt right. Baseus designed the XP1 with a huge range of ear ergonomics in mind. It almost sounds counterintuitive, given how many ears there are in the world and how different each pair is. But the time spent crafting these has paid off.
The battery life of these buds is also worth noting. You get up to eight hours of battery life per charge (with a couple of hours lost with ANC on), and an additional 45 hours in the case. It’s not best in class, but it’ll get you through a day. Add onto that the 2.5 hours of playback on a rapid 10-minute charge, and it’s a tidy combination.
The Baseus XP1 earbuds are launching on September 4, 2025, priced at $129.
I’m always keen to keep my devices charged up on the go. These days, who isn’t? It’s why the portable power bank and charger market has become so enormous. Baseus is launching two different portable power banks to help you keep going, and both have some interesting features that make them worth a good look.
The GX11 MiFi is a combined 67W power bank and portable MiFi router, designed to give both power and Wi-Fi wherever you go. It uses an eSIM and can connect to up to 150+ different networks. And while you’re connected, you can keep your devices powered up, or at the very least, you know the MiFi won’t run out of battery.
Alternatively, the new EnerGeek GT011 is a 45W Qi2-certified magnetic portable charger. While it has a lower overall capacity, its magnetic charging and second-generation wireless charging make it a supremely useful addition to your day-to-day backpack.
The Baseus EnerGeek GX11 launched on August 30, 2025, priced $120, and the Baseus EnerGeek GT01 is launching September 4, 2025, priced at $100.
1
Baseus PrimeTrip VR2 240W Retractable Car Charger
Multiple charging cables, no mess involved
Everyone travels with a charger in the car, right? Whether plugged into the 12V port or into a dedicated USB port, they’re a mainstay of every modern vehicle.
So I can’t be alone with the dreaded curse of USB cables running around the car, with multiple cables draped throughout the interior.
That’s exactly the problem the Baseus PrimeTrip VR2 solves. You can finally get rid of all of those cables, with a 240W retractable charging unit that you can plug into basically any car. Each cable can deliver up to 105W, and the base unit actually features USB-A and USB-C ports if you want to plug something in directly.
It’s handy, it’s portable, and it’s available to buy right now for $34.
Baseus goes from strength to strength with its audio hardware. As mentioned, the Inspire XH1 headphones represent a significant upgrade over Baseus’s previous headphones, offering a great budget-friendly option for those seeking high-resolution audio and exceptional battery life. They look great, too. At the moment, you’ll struggle to find better headphones than these for under $200.
Google features a lot of jokes and fun little secrets, collectively known as Easter eggs, around its products. While you might be familiar with Easter eggs in video games, they’re also present in software and other tech sources.
These Google Search Easter eggs don’t have any practical use, but they’ll make you chuckle when you search for something that brings up a goofy result. Try entering these into Google and seeing the fun for yourself.
The Did you mean line appears on the results page when your search has a typo or Google thinks you meant to look up something similar. Some of the best Google Search Easter eggs take advantage of this.
When you search “Alex Trebek”, the Did you mean suggestion asks if you meant “Who is Alex Trebek”. This is a reference to his longtime hosting of the game show Jeopardy, where all contestant answers must be in the form of a question, starting with “who is”, to be accepted.
Searching Google for “steamed hams” will result in it asking if you meant “steamed clams“. If you’re a fan of The Simpsons or internet humor in general, you’ll recognize this.
It references a short scene where Skinner’s plans to have his boss over for lunch are ruined when he burns the roast. He lies that the smoke in the oven is actually steam from the “steamed clams” he’s preparing, then heads to a nearby fast food place and tries to pass their burgers off as his own cooking. When he’s questioned about this, he clarifies he said “steamed hams”, which he claims are what he called hamburgers where he grew up.
While this episode aired in 1996, it became major meme fodder in the late 2010s, when “Steamed hams but…” videos started parodying it in every conceivable way.
If you’ve been to a wedding lately, you’ll know where this one is going. The Cha Cha Slide is a line dancing song, first released in 2000, that has become a staple at wedding receptions.
Googling it lets you dance along at home, thanks to the icons to the left of the song name. As you click them, you’ll hear the instructions like “to the left” and “one hop this time!”
Screenshot by Ben Stegner; no attribution required
Continuing with the pop culture references, Google also has an amusing reference for fans of The Office. Searching “assistant regional manager” will result in Google asking if you meant “assistant to the regional manager”.
This is a running joke early in the series, where Dwight calls himself “assistant regional manager” but Michael continually corrects this to the lesser “assistant to the regional manager”. Even Google’s AI overview seems in on the joke, though this is likely because the overview is getting its information on this term primarily from content about The Office.
Screenshot by Ben Stegner; no attribution required
I’ve mostly chosen Easter eggs that were new to me, but this is a long-running one I’ve enjoyed for a while. Searching for “recursion” brings up a Did you mean prompt for the same word, which might lead you to think you spelled it wrong the first time. But each time you click it, the page refreshes, which is the joke.
Recursion is when a process depends on a prior version of itself, like when a programming function calls itself or the “infinity mirror” effect when you share your screen on a video call and create dozens of smaller copies of it.
If you like this one, try “Groundhog Day” (one of those movies you can watch over and over, if you will) and see what happens!
The One Ring is the central object of the Lord of the Rings series, and has an Easter egg for anyone searching for more info about it on Google. A search for it will ask if you instead meant “my Precioussss”, which is how the character Gollum refers to the ring after being corrupted by it and becoming obsessed with it.
It’s one of the most famous lines from an excellent series of movies, so it’s well-deserving of this amusing suggestion from Google.
If you were online during the internet’s early days, you’ll remember many webpages with ugly fonts, scrolling text, and other near-unreadable issues. Searching for “blink tag” lets you relive one of these: the deprecated HTML tag that flashes text.
Text disappearing and reappearing is annoying and doesn’t work well with accessibility tools, so we quickly moved on, thankfully. But it’s fun to relive those early days in this small way.
I didn’t realize this until recently: when you search for a font by name, Google displays its results page in that font. Not all are supported, but many common ones are. While this is a fun discovery, it can also be practical (unlike most of these).
Screenshot by Ben Stegner; no attribution required
If you’re not sure what a font looks like, or want to see it in use without fumbling around in a document of your own, this lets you easily preview it. Another fun one related to this: searching “best font ever” brings up Comic Sans, the internet’s “favorite” font.
Ever feel the desire to see what websites looked like in the past? You don’t need any special tools to do this for Google. Search “google in 1998” and you’ll be treated to a recreation of what the service looked like the year it launched.
Screenshot by Ben Stegner; no attribution required
It comes complete with the exclamation point in Google’s early logo, the option to change how many results appear, and links to try your query on other long-gone search tools like AltaVista and Infoseek.
Everyone around my age will remember growing up with DVDs. While their often-unique menus bring a lot of nostalgia, nothing evokes that as much as the classic screensaver. Google lets you relive this by searching “DVD screensaver”.
Wait a moment and you’ll see the logo fly around the screen in that predictable pattern. Every time the logo hits an edge, it changes color. And of course, the big moment comes when the logo hits a corner. A small pleasure, but one that brings back simpler times for many of us.
If you love this bit of nostalgia, the Bouncing DVD Logo site lets you put one up on the screen for as long as you like.
Google Drive is fantastic for storing and sharing files, but actually finding the file you need can sometimes be a challenge, especially if you don’t remember its name. Luckily, there are smarter ways to search, filter, and navigate your Drive so you can find exactly what you’re looking for—fast.
7
Filter files by type to find what you need fast
PDFs, Docs, Sheets—find them in a snap
Screenshot by Pankil Shah — No attribution required
A simple yet effective way to narrow down search results in Google Drive is to search by file type. Instead of scrolling through a long list of results, you can ask Google Drive to focus on what kind of file you are actually looking for.
Google Drive lets you filter by documents, spreadsheets, presentations, PDFs, images, videos, and even folders. For example, if you know the report you need is a PDF, use the Type drop-down menu before or after typing your search and select PDF.
This will cut your results down to only relevant files. It’s a simple trick, but it can save you a lot of time, especially if your Drive is overflowing with years of documents, old projects, and random downloads.
6
Locate files by owner or last modified date
Track files by dates, not by memory
Screenshot by Pankil Shah — No attribution required
Sometimes, filtering by just file type isn’t enough, especially when your Google Drive is full of similar files. That’s when searching by user or last modified date can prove useful.
If you remember who created or shared the file, the People drop-down menu is your best friend. Type the person’s name, hover over it, and choose from options like All, Owner, Creator, Shared by, or Shared with. This will narrow your results to files connected to that specific person and make it much easier to track down what you need.
Another powerful way to reduce irrelevant results is by filtering files based on their last modified date. You can search for files edited in the last 7 days, 30 days, a specific year, or even set a custom date range. This is perfect for when you roughly remember when you last worked on the file, but can’t recall the title.
5
Search inside files to find exactly what you’re looking for
Go beyond file names
Screenshot by Pankil Shah — No attribution required
Even when you have trouble remembering a file’s name, you’ll likely remember a word or phrase it contains. The good news is that Google Drive’s search bar can help you find the file based on that. It can scan the contents of your documents, spreadsheets, and presentations to locate the words or phrases you recall.
For example, if you know a report mentions Q3 sales projections, you can type that phrase into the search bar. Google Drive will bring up every file that contains those words. This method works for all types of text-based files, including Google Docs, Sheets, Slides, PDFs, and more.
You can combine this with other filters such as file type, user, or last modified date. Suddenly, finding that elusive file feels less like searching for a needle in a haystack and more like flipping straight to the right page in a well-organized binder.
Advanced search isn’t scary
Screenshot by Pankil Shah — No attribution required
Most of the time, basic search filters are enough to find what you’re looking for. But when they aren’t, Google Drive’s Advanced Search has you covered. Click the Advanced Search icon next to the search bar, and you’ll be able to combine all the filters in one place.
From this menu, you can narrow your search by file type, owner, location, date modified, and even keywords inside files. This is perfect for situations where you remember some details about a file but not its exact name.
Advanced Search also offers more specialized options, like approvals, e-signatures, and follow-ups, which are especially helpful if your Drive is packed with collaborative projects. The more details you add, the faster you’ll find what you’re looking for.
3
Use search operators
Turn keywords into search superpowers
Screenshot by Pankil Shah — No attribution required
Much like Gmail, Google Drive also supports Boolean operators. If you prefer not to click through menus, you can type specific keywords into the search bar to get highly precise results.
For instance, type:pdf will show only PDFs, while owner:me will limit results to files you own. If you remember something from the title, use title: followed by your keyword. You can also search by words inside the file with content: operator. The real magic happens when you combine these operators, for example, type:docx owner:me content:routine to find Word documents you created containing the word “routine.”
These are just a few examples. There are plenty more search operators listed on Google Drive’s help page. It might take a little practice to get comfortable with them, but once you do, finding the exact file you need will take much less time.
2
Access files via Recent and Starred folders
Your shortcut to the files you use most
Screenshot by Pankil Shah — No attribution required
Sometimes, the fastest way to find a file isn’t searching at all. Both Recent and Starred folders are easy to overlook, but they can save you a ton of time.
Google Drive’s Recent folder lists files you’ve opened or edited most recently, which makes it ideal for when you’re working on new projects and can’t remember the exact name of a file.
Click the Recent tab from the left pane, and you’ll see a chronological list of files you’ve accessed today, yesterday, earlier this week, or even earlier this month. You can also refine the list using the drop-down menu to filter by file type, owner, or date modified, which helps you zero in even faster.
Another handy feature is the Starred folder. If there are files you frequently need—like a monthly report, a team presentation, or a reference document—you can star them for easy access. Additionally, of course, you can also create folders and use color-coding to keep your Google Drive files organized.
1
Search directly from your browser’s address bar
Screenshot by Pankil Shah — No attribution required
You don’t always need to open Google Drive to start a search. Most browsers let you search your Drive directly from the address bar. This way, you can open a new tab, type @Drive followed by the name of the file or keyword in the address bar, and jump straight to the results.
In Chrome, you can set this up by going to Settings > Search engine > Manage search engine and site search. Under the Site search section, click Add. Enter Google Drive as the search engine name, @Drive as the shortcut, and paste the following address under the URL field.
https:
Finally, click save, and you’re ready to search instantly. This trick works in Edge and most other browsers too. You can even make Google Drive your default search engine if you don’t wish to type @Drive every time. Using your browser’s address bar for Drive searches is a neat trick that can help save extra steps.
Finding files in a cluttered Google Drive doesn’t have to be scary. Once you familiarize yourself with the above tricks, filters, search operators, and advanced search tools, you should be able to locate what you need in seconds.
The key is knowing which tool to use for the situation. Sometimes, a simple filter may be enough, while other times advanced search or operators will save you precious time. The more you use these Google Drive hacks, the easier it will get over time.
When I first noticed that my laptop was running hot, I panicked, thinking it was due to malware, like cryptojackers use the device’s CPU and GPU to mine for crypto. Laptops react differently depending on the type of malware they contract, but a common symptom of a virus is the device lagging and overheating.
I couldn’t recall clicking on a malicious link or downloading a suspicious file, so when my antivirus scan came back clean, I began considering other possibilities. If it wasn’t malware or spyware, then maybe there’s an underlying issue with the hardware or software of my laptop; hopefully, an easy fix!
6
Defective fan
All hardware breaks after some time
Your laptop overheating could be a hardware problem. Your device relies on one or more internal fans to regulate the temperature of its components. They’re usually quiet and only pick up speed (and become a bit noisy) when running resource-intensive software. However, if the fan is old or damaged, it may not work properly.
In the short term, this results in the device overheating and negatively impacting its performance. Long-term, however, this could damage more expensive components, such as your CPU, shortening its projected lifespan.
There are two ways you can check the health of your fan yourself. Either physically, by taking note of any weird noises or lack of spinning, or digitally. In fact, you can easily check the speed and temperature of your device’s CPU without needing to open it.
5
Blocked air vents
Your laptop needs to breathe, too!
On the body of your laptop, usually the bottom or sides, you’ll notice multiple rows of narrow slits. While some laptops may have them at the top, others utilize vents on multiple faces for optimal air circulation.
These are vents that allow the fans to exchange the hot air inside the laptop with the cooler air outside. But they can also bring in dust from the surrounding environment. And if you have any furry pets, fine hairs might even clog the small openings, drastically reducing the fan’s efficiency. In most cases, clogged vents are an easy and inexpensive fix. Power off your laptop and wipe any visible particles with a clean tissue paper or microfiber towel. Regularly checking that the vents are not blocked by anything will ensure your laptop gets the ventilation it needs.
If you notice hair or crumbs on the inside of the vents, don’t stick anything sharp or pointy in to nudge them out. Instead, use a can of compressed air, blowing it right into the slits from multiple angles. Just make sure you’re targeting as many of the vents and gaps between the keyboard keys as possible. The inside of a laptop is densely packed, and air can’t travel as well through the entirety of the inner cavity, so don’t be afraid to get creative with the angles!
4
Dust buildup
A little dust goes a long way
For laptops, dust buildup can be a trickier problem. Unlike desktop PCs, most laptops aren’t designed for you to open and clean them yourself. Dust buildup on the CPU and GPU can trap in heat and result in inefficient cooling. Even a few minutes of using a resource-intensive piece of software can be enough to spike your device’s internal temperature.
Generally, you’d want to avoid using your laptop on top of overly dirty surfaces. You should also be extra careful to prevent pet hair or food crumbs from getting in through the vents.
Frequently wipe the outside of the laptop (bottom, screen, and keyboard) with a clean paper towel or use a cleaning solution suitable for electronics. Also, don’t hesitate to use some keyboard slime every once in a while for a more thorough cleanup at home. Luckily, most local tech shops offer laptop clean-up services that’ll leave it as clean as new.
3
Too many ‘Launch on Startup’ apps
Not all apps are essential
“Launch on Startup” apps are applications that automatically launch as soon as you switch on your laptop. Usually, they’re useful tools to keep operating, like antivirus or auto backup, but that’s not always the case. Think about the last time you needed Visual Studio or Microsoft Teams to be running round-the-clock.
Many apps offer a “launch on startup” option as a feature. You could easily end up with almost a dozen apps all running at once as soon as you launch. Having so many apps open at once can also cause your device to heat up. Make sure you regularly go through your device’s settings, limiting startup launch apps to ones you personally need for your daily tasks. Search for Startup apps in the taskbar to see all the apps with “launch on startup” enabled.
You can also sort startup apps by Startup impact. This lets you better determine which apps you should allow to start automatically and which you should disable, depending on how much it impacts the speed of your startup and overall performance.
2
Background activity
Only keep it running when using it
Similar to “Launch on Startup,” a lot of apps don’t actually close when you hit that X icon in the far right corner. They keep running in the background, using up your device’s resources on top of the apps you’re actively using. Background activity isn’t all bad. For specific applications, such as your email or Discord, you need the app to keep running to receive desktop notifications on time. However, you probably don’t need Steam to be running in the background during school or work.
If you notice your laptop starts to run hot later in the day, background apps might be the cause. That’s because one or two might not be a problem, but once you have ten? Your laptop might not be able to handle the load.
Search background activity in your settings, then under Battery usage, you’ll have a detailed breakdown of the energy and resource consumption of all your applications. If you sort by Background, you’ll be able to see which applications consume the most energy while running in the background, rather than apps you actively use often.
1
Outdated software or drivers
Keep everything up-to-date
Older software and apps tend to be inefficient and incompatible with your current OS. If you notice your laptop getting hot when running a particular app or software that shouldn’t be resource-intensive, it might just be too old. Keeping software you regularly use up-to-date ensures you have access to the latest features and the best performance. Not to mention, older applications are more vulnerable to malware, so you might actually end up getting your device infected with something malicious.
As for drivers, which play a key role in how efficiently your hardware runs, they also need to be up-to-date. If you’ve been neglecting the “update available” notifications for too long, consider setting aside 20 minutes to let your laptop update all its components.
Simply search for Updates in the taskbar and click on Check for updates. Then, scroll down to Advanced options. There you’ll find a tab called Optional updates, where you can easily check for and update any outdated drivers.
What to do when your laptop is running hot
If you’ve been practicing proper online hygiene, you likely don’t have to worry about malware or spyware being the culprit. Still, if your laptop is running unexpectedly hot, you should run a quick device scan to rule out the worst-case scenario before exploring alternatives.
But more often than not, the solution to an overheating laptop is pretty simple. Whether it’s a quick tweak in your settings or dusting your desk more often, you can go back to having a cool laptop in no time.
ChatGPT isn’t perfect, but it has several features that genuinely make it more useful for everyday tasks. Rather than replacing my workflow entirely, these tools complement my existing work process.
4
Study and Learn
Makes ChatGPT a friendly tutor
I like ChatGPT’s study feature as it doesn’t simply answer but acts more like a tutor. Instead of just spitting out solutions, it guides you through problems step by step. I’ve found this useful when working on engineering or science topics, where understanding each step is more important than just the final result.
For instance, if you ask ChatGPT, “Explain the pressure drop calculation for turbulent flow in a pipe using the Darcy-Weisbach equation,” it won’t just deliver the formula and plug in numbers. Instead, it walks you through identifying the Reynolds number first, then determining the friction factor, and finally applying the formula. If your calculations go wrong, it points out the errors gently, encouraging you to correct them yourself.
As ChatGPT’s study mode trains your brain instead of handing over answers, it helps you reinforce learning, which is much better than straightforward Q&A sessions.
The guidance adapts based on your responses. If you demonstrate a solid understanding of basic concepts, it moves faster through fundamentals and focus on advanced applications. ChatGPT is more suitable for studying than Gemini when compared to other AI tools. The interactive nature keeps you engaged rather than letting you passively consume information.
3
Image creation styles
They styles improve creativity
Screenshot by Yasir Mahmood
ChatGPT’s image creation feature includes preset styles that simplify the creative process. Instead of providing detailed prompts, you can pick from styles such as Synthwave, Art Nouveau, or Retro Cartoon, each of which produces a distinct visual mood.
When I needed concept art, I used this prompt:
Create a futuristic laboratory with robotic arms assembling circuit boards, workers in clean suits monitoring the process.
I selected the Cyberpunk style, which placed a built-in prompt above what I asked, resulting in that gritty, neon-lit aesthetic I wanted without additional prompting.
The consistency of these styles is a big advantage. Whether it’s the specific nostalgia of 80s Glam or the polished look of Photo Shoot, you get reliable, high-quality results every time. These options remove much of the guesswork from creative projects and are predictable in a good way.
On the other hand, I want to love Claude as a ChatGPT alternative, but it misses image creation entirely. Also, ChatGPT’s range of styles gives it an edge. You can describe lighting, color palettes, or artistic techniques, but the style handles most of those details.
Although the styles may sometimes feel a bit limiting, for most projects, they provide exactly the creative direction you need without overthinking.
2
Canvas
bridges the gap between chat and document editing
Screenshot by Yasir Mahmood
The Canvas feature improves the interaction with long documents by providing a dedicated workspace right inside ChatGPT. Instead of copying and pasting text back and forth, you can edit directly within the interface—like working in a word processor. This integration removes friction and helps keep ideas organized.
It gives you various options, such as Suggest edits, which highlights potential improvements without making any automatic changes. Adjust the length lets you expand or contract sections while preserving the core message. The Reading level tailors the complexity of your text to fit your audience.
It also offers selective editing. When you highlight a sentence, a pop-up appears with formatting options—bold, italics, font size changes—plus an Ask ChatGPT button for targeted revisions.
For coding projects, Canvas becomes essential because it offers version control. This allows you to test different approaches to a function without having to start over each time. The various ways to use Canvas extend beyond writing, as Canvas supports exporting to PDF, Word, and markdown files, among others, allowing you to deliver files in the required format.
The interface isn’t perfect, as sometimes the Add final polish feature overcomplicates simple text. However, it is handy for iterative work that requires multiple revisions.
1
ChatGPT connectors
Make the workflow seamless
Screenshot by Yasir Mahmood
Connecting external apps eliminates the tedious download-and-reupload cycle. Instead of saving files locally first, the connectors allow you to share files with ChatGPT directly. So you don’t need to constantly switch between platforms. Setting up connectors is straightforward:
Open ChatGPT Settings and navigate to Connected Apps.
Select the app you want to connect to, such as Google Drive.
Authorize access through the standard OAuth process.
ChatGPT doesn’t have direct access to files from your apps, like Google Drive files, unless you explicitly use the file-sharing option to share a specific file.
When I need to analyze a document, I can prompt: “I’ll share three PDF reports from my Google Drive. Please summarize the key findings and identify common themes across all documents.” The connector lets me select and share those files with ease.
The advantage is removing friction from the workflow. Instead of managing local copies, you can pull files directly from cloud storage and work with them in ChatGPT. This beats opening multiple tabs, downloading files, and manually uploading them one by one.
These features won’t completely change how you work, but they do make ChatGPT more practical for everyday tasks. The improvements are incremental rather than groundbreaking—yet that’s exactly what makes them useful for workflow integration.
Many of the devices we treat as harmless have a hidden side that most people never consider. Once you start pulling at that thread, it’s surprising how much they are quietly paying attention to us.
6
Smart TVs
Smart TVs have carved out a permanent spot in our living rooms. We stream on them, browse on them, and even manage other smart devices from the comfort of the couch. But tucked behind that glossy interface, many of these TVs quietly monitor every button press, search term, and viewing choice.
A big part of this comes down to a feature called Automatic Content Recognition (ACR). It doesn’t just track the shows you stream, but can identify what’s playing through an HDMI input, whether that’s a Blu-ray disc, a console, or even cable TV.
Companies like Samsung, LG, and Vizio scoop up this information, bundle it neatly, and sell it to advertisers. Vizio, in fact, was slapped with a $2.2 million fine back in 2017 for secretly gathering viewing data from millions of households without asking permission. And while the fine made headlines, the tracking didn’t really disappear. It just got buried in those long, dense privacy policies most of us skip through while setting up a new TV.
Another layer of unease opens up if you find that your smart TV has a built-in camera. You can prevent it from watching you by covering the lens, but even after you painstakingly change settings to make your smart TV more private, you can’t shake the feeling that the tracking hasn’t really gone away.
5
Fitness trackers and smartwatches
When wearable tech first appeared, the pitch was that they’d help us live healthier lives. And in a way, they do. These gadgets know when you wake up, when you fall asleep, how well you sleep, how often your heart skips a beat, and whether you’ve been lazy for three days in a row. They even know your location every time you go for a jog. However, all of that doesn’t just sit on your wrist; it gets sent to cloud servers run by companies that are more than happy to share or sell the data.
Jerome Thomas / MakeUseOfJerome Thomas / MakeUseOf
For example, in 2018, the fitness app Polar accidentally revealed sensitive details about soldiers, including their names and exact military base locations, just through their fitness data. That’s how precise and intrusive this tracking can be.
4
Smart home devices
Every smart gadget you add to your home creates another data point. Your thermostat knows when you’re home or away, your smart lights know when you go to bed, and your doorbell camera knows who comes to your house. Even your security camera, which is meant to keep you safe, can just as easily keep tabs on you. Hackers have slipped into those systems before, sometimes even speaking to children through hijacked baby monitors.
Brent Dirks / MakeUseOfBrent Dirks / MakeUseOf
Again, all this information funnels straight into cloud servers where companies stitch together a round-the-clock portrait of your household. They can infer when you usually cook, what groceries you’re likely to buy, even how often you run the vacuum. It sounds absurd until you realize this is the level of granularity they’re after.
The hardest part is, once you’ve handed over that data, there’s no getting it back.
3
Devices with voice assistants
Scan through different forums, and you will see people talking about how Alexa recorded them snoring or Siri chiming in on their conversation out of the blue. It’s funny on the surface, but the reality isn’t so amusing. Voice assistants are always on standby, and their microphones are tuned to detect wake words like “OK Google” or “Hey Siri.” Supposedly, nothing is transmitted until you activate it. Supposedly.
Author Generated Image – Matt L. HallMatt L. Hall / MakeUseOf
However, in practice, “accidental activations” are real, sometimes capturing personal conversations by mistake. In a 2019 Time article, it was reported that Amazon employees listened to a portion of Alexa recordings to “improve service.” That means real people—absolute strangers—were listening in on private conversations, kids yelling, couples arguing, and everything in between.
Even when it works as advertised, it’s still creepy. Every command you give is stored, analyzed, and tied back to your profile. The more you use it, the more it learns about you, from your music preferences to your shopping habits and routines.
2
Bluetooth trackers
On the surface, Bluetooth trackers like Apple AirTags or Tile seem like lifesavers. You can use them in many ingenious ways, including finding your lost keys or luggage. But the story changes the moment these supposedly harmless gadgets are flipped on their heads.
Take AirTags, for instance. Stalkers have already weaponized them to track people without their knowledge. Apple had to scramble to add safety features after reports (like the ones Cosmopolitan highlighted) started piling up of women finding hidden AirTags tucked into purses, cars, or even coat pockets.
Original Image by Aryan Surendranath/MakeUseOfAryan Surendranath/MakeUseOf
And even if no one’s slipping one into your bag, those trackers are still chatting away. Every little ping between your device and a nearby iPhone is quietly feeding Apple’s enormous location database. Well, even though the manufacturer claims it’s “anonymous” and “encrypted,” trusting a trillion-dollar tech empire not to squeeze profit out of a goldmine of location data requires a leap of faith not everyone’s willing to make.
1
Smartphone
If there’s a single gadget that takes the gold medal for spying, it’s your smartphone. It contains more information about you than your family, friends, and probably even you yourself.
Think about it: your phone knows everywhere you’ve been, thanks to GPS, Wi-Fi, and cell towers. It knows what you search, what you watch, who you talk to, and how often. Every app you install is another surveillance pipeline. Some apps track your location even when you’re not using them. Others scrape your contacts, your photos, your microphone, your accelerometer—yes, even how fast you’re walking.
Yash Wate / MakeUseOfYash Wate / MakeUseOf
And don’t think adjusting a few settings saves you. Phones are designed to track. The operating system, the carrier, the apps—they all want a slice of your life. That’s why I laugh when people say, “I’ve got nothing to hide.” Because, realistically, you couldn’t hide much even if you tried.
Yet, year after year, we queue up for the newest model, grinning as we carry around what is essentially a state-of-the-art tracking device—one we paid for ourselves.
The strangest part is how normal all of this feels now. It’s not that companies are twirling their mustaches in some dark room, plotting against us—it’s that we always click or tap “Agree.” Buried inside those endless terms of service, consent hides in paragraphs of legalese most of us either skim or skip entirely. We just want our gadgets to work, to stay updated, and to “improve.” So we shrug, stick with the defaults, and keep moving. The alternative, of course, is to walk away from these devices altogether. In the end, it’s really your call either way.
VPNs are a must-have today if you need genuine privacy protection. They provide unrestricted access, especially where governments are cracking down on what you can access online. However, some VPNs have such a shady history, and using them can be jumping out of the frying pan and into the fire.
4
Kape Technologies–owned VPNs
Private Internet Access, ExpressVPN, CyberGhost, ZenMate
I have grouped these VPNs into the same category because they share the same issue: ownership. Kape Technologies acquired CyberGhost in 2017, ZenMate in 2018, Private Internet Access in 2019, and finally, ExpressVPN in 2021.
This raises two concerns. First, it could allow user information to be aggregated across the services, which increases privacy risks. Second, it gives users a false sense of choice, since the same vision, culture, and product drive the different brands.
The issue goes even deeper. Kape Technologies was once known as Crossrider. According to an extensive analysis by Monthly Review, Crossrider had ties to shady apps and was once strongly linked to malware distribution, with the Crossrider Adware believed to have ties to the company.
These apps allowed developers to inject ads into software, hijack browsing sessions, and automatically change search engines to maximize revenue. The primary purpose of a VPN is to hand over your traffic to a service that conceals your activity from your ISP. A company with such a background would concern me if it had access to my information.
3
Hola VPN
Free is never free with VPNs
Whenever I encounter a free VPN, I avoid it. This applies to Hola VPN, as well as many other free VPNs available. A free VPN typically monetizes your connection. In the case of Hola VPN, it operates as a peer-to-peer network, which means that users’ bandwidth may be sold and routed through other users’ connections.
The bigger problem is that, because other people’s traffic is routed through your IP, you can be implicated in any misuse of it. In 2015, the BBC reported that over 47 million users were drawn into a network of computers used for criminal activity.
It goes deeper. Hola VPN has a history of logging user data, which the Hola privacy policy openly acknowledges. This includes data points like timestamps, IP addresses, device information, and websites visited. Because data stored by Hola VPN is not encrypted, your privacy and data are vulnerable to an attacker.
To make matters worse, Hola VPN gathers as much data from you as possible, yet bears no responsibility for how it is protected or stored, as it clearly admits in its privacy policy.
Notwithstanding anything else in this Policy, we are not responsible for the accuracy, correctness, and security of any of the information we gather, store, and disclose to you or to anyone else.
2
PureVPN
A no-logs claim that still produced logs
Marketing can be very flattering, and some VPNs flat-out lie in the name of promotion. PureVPN marketed itself as having a no-logs policy, meaning it does not keep or retain your data. However, in 2017, a Department of Justice complaint revealed that, at the request of the FBI, it had revealed data logs relating to a specific customer. It’s ironic that, to this day, part of Pure VPN’s privacy policy still reads:
You are invisible—even we can’t see what you do online.
Another reason PureVPN is a hard pass is its use of in-app third-party trackers to monitor users. A 2021 Hide Me report identified Pure VPN as hiding trackers in its software. While it is not uncommon for apps to include trackers, for a VPN provider, it is a huge red flag. You expect your VPN to shield your traffic rather than hand over your behavioral patterns to third-party websites.
When a privacy company lies about how it handles sensitive information or actively tracks your online behavior, it becomes unwise to trust or continue using their service.
1
IPVanish
A VPN subject to Five Eyes jurisdiction
IPVanish is another example of a VPN with a mismatch between marketing and actions. The company claims to have a no-logs policy.However, according to Cyberinsider, in 2016, at the request of the Department of Homeland Security, it submitted detailed connection logs of itsusers. These included names, email addresses, actual IP addresses, connection timestamps, and VPN activity. This was clear evidence that a significant amount of user data was being logged.
Another issue highlighted by this scandal is the jurisdiction risk faced by companies based within the Five Eyes surveillance alliance. They may be compelled to submit user information and have no way to object. This is why I generally avoid VPNs based in the United States.
It is worth noting that IPVanish changed ownership after the 2016 user log scandal. The company was sold to StackPath in 2017, later acquired by J2 Global, and is currently owned by Ziff Davis. While a change in ownership can indicate a fresh start and a new direction, I remain skeptical. It may appear to be a public relations strategy aimed at gaining sympathy, while underlying issues may remain unchanged.
All I have done is share my thoughts, point to verifiable past incidents, and highlight a few VPN red flags. Ultimately, effective PR often masks numerous flaws in popular VPNs. What I am more curious about is what happens after the hype has died down. Do you feel comfortable using any of the VPNs I have mentioned? Are past incidents and history overrated?
Many common household problems can be easily fixed with basic hand tools and a little know-how, saving both time and money. You can confidently tackle simple fixes without ever needing to plug in a power tool.
Remove your home’s tiny annoyances
I’m not good with tools. In fact, the tools I have in my home are limited to a few wrenches and screwdrivers. The only power tool I have is an inexpensive drill my father bought me as a Christmas gift a few years ago, because he was tired of being asked to do minor repairs.
Not too long ago, I figured out a simple truth: you don’t need power tools to perform basic tasks. Instead, items like everyday cooking spray, wood glue, and yes, screwdrivers will get these types of jobs accomplished. Though if you’re still interested in buying power tools for your home, there are several types of essential power tools to consider.
5
Silence a squeaky door hinge
My home is over 45 years old, so I’m always making minor repairs to what I consider small, annoying problems. At the top of this list are door hinges that like to sing. Months ago, those high-pitched cries I heard every time my daughter opened and closed her bedroom door were causing me great pain.
Luckily, there’s a quick solution to this problem. To silence a noise-making door hinge, spray it with WD-40, a multipurpose spray that’s been around for homeowners since the 1950s. You can buy it at any hardware or big-box store.
After you spray the WD-40 on the door hinges a few times, use a soft cloth to wipe it away so the residue doesn’t drip onto the floor. Move the door back and forth to see if that resolves the problem. If it doesn’t, add more WD-40 and try again.
If you don’t have time to get WD-40, you can also use cooking spray or vegetable oil to accomplish the task. Both work great as instant lubricant for squeaky hinges. Better still, these aren’t toxic, so you can use them on lower door hinges where children and pets might be roaming around.
4
Fixing a running toilet
Sometimes, when you flush a toilet, it continues to run for no apparent reason. Not only is this annoying, but over time, will also lead to a higher water bill. Often, simply moving the handle back and forth a few times resolves this issue. If the handle doesn’t go back to its default position when flushing, spray some WD-40 inside to make sure it can turn freely. If this doesn’t work, you’ll need to put on a pair of rubber gloves and take a closer look.
When your toilet won’t stop running, remove the lid from the tank, then flush it and observe the result. Most of the time, a running toilet is caused by either a flapper that isn’t sealed correctly, or a water level that’s too high. Your toilet’s flapper is most likely made of rubber or silicone, though it may also be plastic. The color is usually black, gray, or red.
The flapper’s main purpose is to open and close the barrier that moves water from the tank to the toilet bowl. When it’s not properly sealed, the toilet will continue to run. This object is attached to a metal chain that connects to the back of the flush handle.
Bryan M. Wolfe / MakeUseOf
For whatever reason, this chain may have become loose and needs to be adjusted to seal the flapper more effectively. Through trial and error, you should be able to find the perfect length, thereby ensuring the flapper seals properly.
Over time, the flapper can become brittle or warped, which might also be the cause of the issue. If you touch the flapper and pieces flake off, it’s time to replace it. You can find flappers at stores like Walmart, as well as universal flappers on Amazon.
If the flapper appears to be working fine, the running toilet may be caused by excessive water flowing in and out of the tank. Most likely, this is because the water is rising above the tank’s overflow tube. A vertical fill valve and adjacent floater or cup control the flow of water inside the tank.
A floater, which is found in older toilets, can be adjusted by gently bending its metal arms downward. This causes the ball to sit lower, thereby turning off the water sooner. On newer toilets with cups, adjusting requires a slight modification to the screw or clip that secures the fill valve. Use a screwdriver to carefully turn the screw clockwise, or squeeze the clip to slide the float cup down a little further on the valve.
3
Unclog a slow drain
Clogged drains are never fun, whether it’s the sink in your kitchen or a toilet that won’t flush properly. A plunger or a drain snake should resolve these types of issues. If you’re unclogging a toilet, be sure to buy a bellows plunger, which will do the job much better than the usual cup plungers you see in restrooms.
To unclog a drain with a plunger, place it over the clog and push it up and down. Changing the water pressure continuously should dislodge whatever’s causing the problems. A drain clog remover stick is a good choice for tub or sink drains where hair, makeup, and other debris can create clogs.
For more serious issues, you might need a drain snake or toilet auger. Using these involves forcing them up through the drain and piping to displace whatever objects are there.
If you still have a clog, I suggest adding a small amount of everyday detergent to the sink or toilet and letting it sit there for a while, as some detergents can break up the clog. In this case, reuse the plunger or snake after adding the detergent and observe the results. If you still have a problem, it’s time to call a plumber.
2
Tighten a loose cabinet or drawer pull
Cabinets and drawers are designed to open and close multiple times throughout the day. Eventually, a screw on one of the pulls may need to be tightened due to all this movement. In this case, you need to use a screwdriver to drive it back into place. Finding the right screwdriver may require some trial and error, so it’s helpful to have screwdrivers of multiple sizes.
Bryan M. Wolfe / MakeUseOf
If you aren’t sure, start with the smallest one you have and adjust it from there until you find one that fits best inside the edges of the top of the screw. Then, turn it clockwise to tighten.
1
Patch a small drywall hole
Most homes in the U.S. have walls made of drywall and with good reason: they are easy to repair. If there’s a hole in your wall, it can be quickly patched, or entire sheets can be replaced.
When you’re dealing with a minor issue with your wall, all you need is a putty knife, a little bit of spackle, and fine-grit sandpaper. All of these can be found at your favorite hardware store and are sometimes sold as a bundle.
Spackle is a white, putty-like substance used to fill small holes or cracks in walls, ceilings, and other surfaces. All you need to do is place a small amount of the paste in the hole in the wall, then use the putty knife to smooth it out. After the spackle dries, use sandpaper to smooth it down so it matches the rest of the wall.
Assuming the spackle isn’t the same color as the wall, you’ll also need to paint the finished spot to match. Or you can do what I do: hang something over the spot and get on with your day.
Minor problems around your home can usually be solved using items that you either already have or that can be easily purchased. None of these are costly power tools, so you can save more of your hard-earned money while also dealing with common issues. Next, why not use a few tricks to get your floors properly cleaned?
You’ve used SUM for years. It adds numbers, does its job, and you probably don’t think twice about it. But while you’ve been clicking through filters and building messy helper columns, Excel has been holding out for you.
There’s a smarter function, hidden in plain sight, that can do the heavy lifting for you.
Why SUM alone isn’t enough
SUM is the spreadsheet equivalent of an open invite: it welcomes everything into the total, whether it belongs there or not. That’s perfect when you just need a quick column total, but in real-world work, you’re rarely adding everything.
Let’s imagine you’re a school administrator staring at a massive Excel sheet of thousands of student records. You want the total score for a single student, say John, across every test. With SUM alone, that means manually finding every row where John appears, adding his scores one by one, and hoping you don’t miss a cell.
=SUM(C2,C4,C6,...)
It’s tedious, it’s error-prone, and it gets worse the larger your dataset grows.
SUM doesn’t know whether a column is a name, a department, or a product line; it just happily adds whatever numbers you throw at it. That’s fine for simple lists, but the moment you want to distinguish John’s results from Sarah’s, or filter out everything except one department, SUM falls short.
In contrast, SUMIFS is designed for this. Instead of totaling everything in sight, it asks you which numbers belong in the total. A SUMIFS formula looks like this:
=SUMIFS(C2:C10,A2:A10,"John")
Screenshot by Ada
In plain English, this tells Excel to look at the names in column A, find every row that says ‘John,’ and then add the matching scores from column C. You wouldn’t need filtering, manual scanning, or helper columns—just one formula.
And it’s not just for student data. Imagine tracking project expenses by department, analyzing sales by region, or calculating commissions by sales rep and territory. SUM will force you into messy workarounds, but SUMIFS gives you totals based on the conditions you specify.
Now think about when your criteria change, which they always do. Maybe you don’t want this quarter’s totals anymore; you need last month’s. Maybe you want to exclude a certain product line, or only include orders over a certain value. With SUM, you’d be back to filtering and re-selecting ranges all over again. With SUMIFS, you just change the condition, and the formula adjusts automatically.
SUMIFS are smarter for real work
The syntax for the SUMIFS function is designed to handle multiple conditions at once and total only the values that meet all of them:
At first glance, it looks a bit intimidating. But when you break it down, it’s actually straightforward: you’re asking Excel to add up the numbers in your specified sum_range, but only where criteria1 is true in criteria_range1, and where criteria2 is true in criteria_range2, and so on.
There’s also SUMIF, which works the exact same way but only allows a single condition. I tend to stick with SUMIFS, even for one condition, because if I ever need to add another later, I don’t have to rewrite the formula.
Here’s a practical example of SUMIFS with sales data:
Basically, this formula tells Excel to go through the revenue column (in L2:L100) and add up the values, but only if the region (in A2:A100) is Asia, the sales channel (in D2:D100) is online, and the price (in J2:J100) is greater than $500.
Screenshot by Ada
You can keep stacking on more conditions—country, date, sales rep, order priority, product line—and Excel will check each one. Only the rows that meet every condition are included in the total. SUMIFS can juggle up to 127 criteria, which is more than enough for even the most complex reports.
The best part is that the formula isn’t static. If your data changes, say a row now meets the conditions, the formula updates automatically. That makes it invaluable for tracking sales by region, summarizing expenses by category, or monitoring inventory by product type.
And just in case you’re wondering, dates are no problem for SUMIFS. You can use it to calculate totals after (or before) specific dates with a simple formula, like this:
=SUMIFS (Revenue, Order Date, ">=1/1/2016")
=SUMIFS(N2:N100,F2:F100,">=1/1/2016")
The only detail to look out for is that when your criteria isn’t a number—like a date or text—you need to wrap it in quotation marks.
SUMIFS works across all modern versions of Excel, starting with Excel 2007, and runs consistently whether you’re using the desktop app, Excel Online, or even the mobile app. It’s also fully supported in Google Sheets, if you prefer it over Excel, both on the web and in its mobile app.
No matter where you’re working, SUMIFS is a reliable upgrade over plain old SUM.
While most people replace their tech every few years, my 2015 iPad Pro keeps proving its worth. Even though I own the newest model, I find myself reaching for this aging tablet more often than you’d expect.
Why I haven’t retired my ancient iPad Pro
My iPad collection is simple: there’s the original Pro 12.9-inch beast (A1584) with laughably tiny 32GB storage, plus my current iPad Pro 2TB powerhouse. Logic says I should’ve donated the old one years ago. But here’s the thing—I use that first-gen iPad Pro several times a week, and it’s earned its permanent spot in my tech lineup.
The original iPad Pro in 2015 was Apple’s bold statement that tablets could be serious productivity machines. Nearly a decade later, mine’s still making that case—just with a few more battle scars and significantly less available storage.
My go-to second monitor setup
Jonathon Jachura / MUO
The biggest reason I keep reaching for my old iPad Pro is that it’s the perfect second display for my Intel MacBook Pro. Using Sidecar, it becomes an instant extended desktop. You can connect wirelessly or with a cord—I prefer connecting it with a cable because it’s a more stable connection and provides pass-through charging.
That 12.9-inch display is perfect for keeping reference docs open, monitoring Slack, or attending meetings while I’m working on the laptop.
Could I get a standalone portable monitor instead? Sure, but at just over a pound, the 12.9-inch iPad Pro disappears into my bag next to the laptop. Plus, Sidecar means zero setup—it connects instantly without any driver nonsense.
Why this beats “cheaper” portable monitor alternatives
I learned this lesson when I borrowed my friend’s portable monitor, which he got from Amazon. It had thousands of five-star reviews and cost about $200, so I figured I’d check it out.
It ended up being a total letdown. With the brightness all the way up, it looked terrible next to my old iPad. The text wasn’t crisp, the colors seemed drained, and after five minutes of reading, I wanted to stop. The real kicker? That monitor’s battery completely gave up after maybe five months.
In contrast, my 2015 iPad is still going strong on the original battery. Apple knew what it was doing back then.
The perfect kitchen companion
When I’m cooking, I grab the older iPad without hesitation. It’s the ideal size for propping up on the counter to display recipes, and I don’t have to worry about splashing sauce on my newer $2,000+ iPad Pro. It powers through long cooking sessions without needing a charge, and the size works perfectly propped against my splashback.
Jonathon Jachura / MUO
Carrying it from counter to counter never feels awkward, and I can read everything clearly from across the kitchen. Try pulling that off with a 6-inch phone screen when your hands are sticky with flour from kneading bread.
A guilt-free device for the kids
My 2-year-old and 4-year-old have discovered the joy of trying to guess my passcode. It’s like they’re competing to see who can trigger the longest security lockout period. Their current record is somewhere around 307 minutes, which actually impressed me more than it frustrated me.
This illustrates another great use for an old iPad: I don’t mind if they touch the older device because I’m not stressing about every bump and scratch. Inevitable drops and grubby fingerprints don’t send me into panic mode like they would with my expensive model. It could actually become their gateway into using real tech responsibly.
It still does what most people need
App compatibility is still surprisingly solid on such an old device. All my regular apps work just fine—Netflix, YouTube, Safari, Notes, and more. Is it blazingly fast? Nope. But for reading articles, watching videos, and handling basic work tasks, it’s totally adequate.
Here’s what really struck me: most tablet users aren’t pushing their devices to the limit anyway. Email, web pages, and YouTube—the usual tablet activities work without complaint.
The trade-offs of keeping old tech
Jonathon Jachura / MUO
However, let’s be real—the decade-old device is definitely showing its age. Jumping between my two iPad Pros makes the speed difference painfully obvious. Apps take their sweet time loading, scrolling gets choppy with heavy content, and multitasking requires actual patience.
Charging takes forever compared to modern devices. I usually plug it in overnight because trying to top it off quickly during the day is futile.
That Lightning port is absolutely maddening now. All my other Apple gear has switched to USB-C, which means keeping one stupid Lightning cable around just for this device. Such a minor issue, but it gets annoying fast.
Storage management is my biggest headache. With only 32GB total and iOS taking up a chunk of that, I never add any extra apps to it besides my current streaming, reading, and recipe applications.
Why selling doesn’t make sense
Looking at eBay, similar 32GB models are going for $100-$150 at most, if they’re pristine. Mine’s got a few dings and scratches, but everything works fine.
For what I’d get out of selling it, keeping the iPad Pro as a backup device, dedicated second monitor, and kitchen tablet makes more sense. The peace of mind alone is worth more than whatever I’d pocket from a sale.
Plus, there’s something satisfying about getting maximum value from a device. This iPad Pro has logged likely thousands of hours of use across multiple roles, and it’s still going strong.
This 2015 iPad Pro taught me that well-built hardware can outlast every marketing campaign trying to get you to upgrade. It’s not winning any speed contests, but it doesn’t have to. The best tech often isn’t the flashiest—it’s whatever gets your actual work done reliably. You’ll know when it’s really time to upgrade your iPad.
Google Chrome may be the most popular browser in the world, but it’s far from being the most feature-laden. I’ve been trying new browsers for a while, but after using Perplexity’s AI-powered Comet browser, I don’t think I can go back to Chrome.
4
A homepage that’s actually useful
One of the biggest differences between Perplexity’s Comet and Google Chrome right out of the box is the homepage. The default Google Chrome homepage has a Google search bar and some bookmarks or recently visited tabs. It’s helpful if you need to do a quick Google search or revisit a tab, but that’s about it.
Comet, on the other hand, packs a lot more functionality into its homepage. When you open the browser, you’re greeted with the Perplexity AI search bar with some helpful widgets right underneath. These widgets are customizable and can show you the time, selected stocks, weather, recent websites, and more.
The homepage is also contextually aware. It means that it tracks your browsing patterns and can suggest relevant content, remind you of what you were working on, and even surface information based on your current workload. In a time when modern browsers are dropping this iconic feature, I’m really happy that Comet has turned around the traditional approach to browser homepages.
3
Comet does your browsing for you
Comet also has an agentic AI that can perform tasks on your behalf. This works while you’re away from the tab as well. You can tell the browser to do something for you, switch to another tab, and work on something more important while Comet takes care of the mundane tasks for you.
The agentic AI is also contextually aware, so you can tell it to do all sorts of tasks. Got too many browser tabs open? Ask Comet to analyze all tabs, provide summaries, and suggest which ones to close. It will literally go through every tab and close any unnecessary ones for you. Not only does this help avoid a cluttered browser, it also helps keep resource usage down as you’re actively closing unwanted tabs.
Screenshot by Yadullah Abidi | No Attribution Required.
Comet also understands context from open tabs and can group or close similar tabs together. This way, you can have all your shopping carts, unread emails, articles, or more grouped into clusters, which are far easier to manage with a single command.
Additionally, it can also carry out more complex tasks for you. For example, the browser has a built-in assistant example where it takes over your browser to help find hotels and flights for a vacation within specific dates.
Just enter any command, and watch as Comet navigates multiple websites, pop-ups, and any other interactions required to get you the information you need. Sure, you can use a genius Google Calendar shortcut to create meetings quickly, but having Comet take care of them still saves you time and hassle.
This AI assistant is neatly tucked away in a sidebar that can be accessed via the Assistant button in the top-right of the browser toolbar. You’ll also find buttons for voice mode, where you can just talk to the browser and tell it what to do, and a handy web page summary button that gives you a summary of the open tab.
The voice mode works fine as a conversational assistant, but if you’re doing more complicated tasks like the example above, it’s stick to the text assistant. Comet is still in beta, so this experience might improve later, but my testing so far has been hit and miss. It’d be a great feature once it’s ready, but it’s more of a fun gimmick at the time of writing.
2
It’s the fastest way to search the internet
Remember how Comet bakes in Perplextiy’s search box on the homepage? Well, that makes for excellent web searches as you no longer have to be extremely specific or use keywords for your searches. Instead of returning a list of links like your usual Google search, Comet gives you an answer with clearly cited sources.
How effective this approach is for you depends on how you search the internet. If the first thing you do after opening a browser is head to Google and type in a search query, this approach is going to be significantly faster and will likely give you more information for far less effort. Since Comet also cites its sources, you can quickly verify any suspicious facts or figures as well.
Screenshot by Yadullah Abidi | No Attribution Required.
The feature seems geared towards making searching the web and researching more conversational. You can have the browser summarize lengthy articles or web pages, ask follow-ups, or simply make it break down complicated topics into an easy-to-understand explanation. For students or professionals dealing with a ton of information and running on short deadlines, this feature is a Godsend.
In summary, if you’re looking for a quick and easy-to-understand answer, Comet’s the way to go. Although it will clutter your Perplexity history, as every search is essentially a new Perplexity conversation. On the bright side, this means Comet can remember context and bring up relevant information from previous searches. Yes, the approach does make you use Perplexity significantly more and gets you to replace your search engine, but I don’t see that being a problem for most people.
1
Performance without overloading your PC
Chrome’s terrible performance and memory management have been a pain for just about every user. Regardless of how well-equipped your computer is, Chrome will start hogging system resources just a few tabs in. If you don’t have RAM to spare, this could affect your entire PC.
Comet is based on Chromium, the same engine powering Google Chrome. However, much like other Chromium-based browsers like Edge and Brave, it manages to deliver functionality without rendering your computer useless.
The ability to summarize and close unwanted tabs with AI helps quite a bit in achieving this. But even with over a dozen tabs open, the browser showed no signs of slowing down itself or my PC. Additionally, you also get a Memory Saver feature similar to most browsers that unloads inactive tabs, an Energy Saver feature that limits background activity and visual effects to save power, and a page preloading feature that automatically loads some of your most visited sites in the browser’s memory.
The browser landscape is changing quickly, and as I found out in my quest to find the perfect browser, no single browser can be labelled as a clear winner. However, if you’re sticking with Chrome, Comet and several other browsers are great alternatives that you must try out.
Some default iPhone behaviors can be more frustrating than helpful. But there’s no need to put up with them. A few quick adjustments in Settings are all it takes to remove those annoyances and make your iPhone far more enjoyable to use.
7
Too many control center pages
By default, the iPhone’s Control Center stretches across three pages. This seems handy, as you get extra space for quick toggles and shortcuts to features you might need occasionally. In reality, though, I’ve realized that most of us only need one page, and that is enough to hold everything that actually matters.
Also, the multipage setup has its own headaches. For instance, swiping through pages to reach the toggle you want can be frustrating. To simplify things, I’ve trimmed my Control Center down to a single page. This way, all my essential toggles are right there, ready to use.
Screenshot by Pankil Shah — No attribution required
Screenshot by Pankil Shah — No attribution required
Screenshot by Pankil Shah — No attribution required
6
Type to Siri keeps popping up
Siri is supposed to make life easier, but sometimes it feels like an overenthusiastic assistant who won’t take a hint. I often found myself accidentally triggering the Type to Siri feature when all I was trying to do was swipe up from the bottom.
To turn it off, go to Settings > Apple Intelligence & Siri > Talk & Type to Siri, then turn off Type to Siri. Personally, I prefer talking to Siri anyway, since it’s faster and feels more natural. Once I made this change, my swipes stopped triggering unwanted pop-ups, and my iPhone finally started behaving.
Screenshot by Pankil Shah — No attribution required
Screenshot by Pankil Shah — No attribution required
Screenshot by Pankil Shah — No attribution required
5
Screen keeps sliding down
Another default behavior that drove me nuts was Reachability. Swiping down on the bottom edge brings the top of the screen within the thumb’s reach. This is surely helpful for anyone who has a Pro Max model and likes using the one-handed mode.
In reality, though, this is another feature that’s easy to trigger. To turn it off, go to Settings > Accessibility > Touch and turn off Reachability. Once I did this, my screen stopped jumping around unexpectedly.
Screenshot by Pankil Shah — No attribution required
Screenshot by Pankil Shah — No attribution required
4
Notifications keep lighting up the screen
Lock screen notifications are useful as they alert you to important things even when you’re not actively using your iPhone. The problem is that every single one of them lights up the screen. This means a late-night email, a random app alert, or even a calendar reminder can suddenly flash your phone awake and demand your attention.
Unfortunately, iOS doesn’t offer a direct setting to stop the screen from lighting up. There are workarounds, though. One option is to enable Do Not Disturb, but that means missing all notifications. A better option is to disable lock screen notifications for apps that don’t really need your immediate attention.
Go to Settings > Notifications, select the app, and untick Lock Screen. With this change, only the truly important alerts will wake your phone, while everything else stays quietly in the background.
Screenshot by Pankil Shah — No attribution required
Screenshot by Pankil Shah — No attribution required
Screenshot by Pankil Shah — No attribution required
3
App settings are buried
Accessing an app’s settings is usually something you want to do while you’re actually using it. Take the Camera app, for example. You might want to enable or disable the grid, switch capture formats, or tweak other options.
On Android, you can often adjust these settings right inside the app. On an iPhone, though, you have to back out, head to Settings > Apps, scroll down, and then find Camera.
This behavior is the same across all apps, including App Store, Maps, Phone, and others. It’s not very intuitive. The good news is there’s a quicker way to access app settings. Swipe down on the home screen, type the app’s name, scroll down to the Settings section, and tap the app’s settings icon. This works for all apps, including third-party ones.
Screenshot by Pankil Shah — No attribution required
Screenshot by Pankil Shah — No attribution required
2
Distracting notification badges
Those little red badges sitting on app icons are meant to be helpful reminders. However, when every other app on your home screen is showing a glaring red circle, it can get annoying really fast. Instead of nudging you to check something important, badges often become a constant distraction.
The problem is more common in apps like Messages, Mail, and YouTube. Go to Settings > Notifications, pick an app, and toggle off Badges.
You’ll still get alerts in your Notification Center, but your home screen won’t be littered with red dots demanding constant attention. Once I turned off badges for apps like Mail and social media, my home screen felt calmer and far less distracting.
Screenshot by Pankil Shah — No attribution required
Screenshot by Pankil Shah — No attribution required
Screenshot by Pankil Shah — No attribution required
1
Camera shutter sound
Every time you snap a photo on your iPhone, it plays that classic shutter click. It’s meant to mimic the feel of a real camera, but the sound can be distracting sometimes. Maybe you want to capture a quiet moment, like taking a photo of a sleeping baby, without drawing attention.
The easiest way to silence the iPhone camera sound is by enabling the Silent mode using the Ring/Silent switch or Action button on the side of your iPhone. But if you don’t want your phone in silent mode all the time, there’s another option: enable Live Photos. With Live Photos turned on, the shutter sound is automatically muted, so you can take photos in peace.
Screenshot by Pankil Shah — No attribution required
Screenshot by Pankil Shah — No attribution required
Coming from Android, I expected some adjustment time with the iPhone. What I didn’t expect was how many little default settings would get in the way. After making the changes above, many of my biggest annoyances disappeared, and the iPhone became far easier to live with.
People love Dexter because, while he’s a serial killer, he is also an antihero. The original series fell off in the later seasons, and the revival mini-series made things worse. But with Dexter being resurrected, maybe the third time’s the charm.
In 2006, Showtime aired Dexter, where the titular character (played by Michael C. Hall) works for the Miami Metro Police Department as a blood spatter analyst by day. But when nighttime comes around, he is a serial killer the media later dubs “The Bay Harbor Butcher.” Dexter is no ordinary serial killer, though, since he hunts others of his kind using a personal code to judge his victims.
Each season (except season two) usually introduced a primary antagonist in the form of a serial killer that Dexter needed to hunt to satisfy his urge. Don’t get me wrong: Dexter is a very bad person, sometimes the worst. But he was written in a likable way that you couldn’t help but root for him, even against people trying to catch him.
Seasons 1-4 were peak Dexter, as they masterfully explored Dexter’s psyche—particularly, his serial killer side he personally calls “The Dark Passenger.” It was the perfect blend of dark humor, suspense, moral complexity, and character development. And, along the way, innocents died and lives were destroyed, all for Dexter to keep his secret and continue satisfying his urge.
Season 5 is when things start becoming unfocused and convoluted, and the less we talk about a certain romantic twist, the better. By the time season eight, the final one, came around, Dexter was unlikable, and the show lost its brilliance. The final nail in the coffin came when Dexter didn’t face any world-shattering consequences for his actions.
In New Blood, Dexter works at a local outfitter and sporting goods store in Iron Lake, a fictional small town in upstate New York. He now goes by the name Jim Lindsay to distance himself from the past and has successfully kept his urges in check for years. However, they come rushing back when he finds someone he really needs to kill, and with the appearance of someone from his past, leading to Dexter killing again.
Soon, this leads to Dexter needing to kill more, catching the attention of the local police chief, Angela Bishop (Julia Jones), whom he is also dating. As usual, there is also some big, bad serial killer actively working in the area who only Dexter can find and stop.
New Blood started in a captivating manner, with its new and engaging storylines. However, the narrow scope, slow pace, and darker tone were too much of a stark contrast to the original. Furthermore, the rushed ending resolved very little when it came to the original’s lingering plot threads, leaving the conclusion feeling unconvincing and unsatisfying.
Dexter: Resurrection picks up right where New Blood left off, with Dexter now working for a fictional rideshare company called UCar in New York City. He does this to earn money, but, more importantly, there is a serial killer called “The Dark Passenger” who is murdering UCar drivers in a gruesome way—Dexter can’t have that. In pursuit of The Dark Passenger, he comes across a gathering of serial killers that is hosted annually, and this is like a buffet being handed right into his hands.
The premise of this serial killer gathering sounds silly, but watching it is a whole different thing. What made the original great is back, but with different social dynamics, as Dexter openly interacts with like-minded individuals. This is a bold direction, but one that is compelling, and it perfectly repositions Dexter as the antihero vigilante we’ve come to know and somewhat love.
A very important character from the original show makes a major appearance, evoking deep emotions while enhancing nostalgia. They are pursuing Dexter and are so sure he is the Bay Harbor Butcher responsible for so much pain back in Miami. The show is trying to tell us that Dexter is not free from the consequences of his past actions and could get his comeuppance, which intensifies the tension.
It’s clear that Dexter: Resurrection is The Dark Passenger’s return that fans, including me, have been hoping for. When you consider its record-high streaming numbers and the positive critical and fan reception, it will most likely be around for a few more seasons. I hope it doesn’t fall off again.
Screenshot by Chifundo Kasiya—No attribution required
It would be strange to end this article without acknowledging the existence of the prequel series: Dexter: Original Sin. It tells the story of how Dexter transitioned from being a medical student to a vigilante serial killer with a code.
I don’t care much about prequels and find them pointless in the grand scheme of things. Although word of mouth was good, Showtime canceled it after one season. I plan to watch it at some point, considering the revival has resurrected my love for Dexter.
Tech is full of half-truths, clever marketing lines, and myths that just refuse to die. Some of them sound logical, companies push some to sell you products you don’t need, and others are just plain outdated. Whatever the source, they end up draining people’s wallets.
7
Expensive cables improve quality
Walk into a big-box store, and you’ll see cables (HDMI, audio, you name it) lined up for five to thousands of dollars. The salesperson’s pitch is likely to be that the pricier ones promise a “superior” picture and sound. This is not true at all.
A solid HDMI cable in the $5–$10 range, as long as it meets the specifications and runs a reasonable distance (say, one to five meters), will deliver the exact same picture and sound as a $100 version of the same length. That’s because digital signals don’t care about prestige pricing. They’re binary—either the ones and zeros make it across intact, or they don’t. There’s no middle ground where an expensive cable somehow makes your picture look as expensive as the cable.
Hannah Stryker / MakeUseOf
The only times it makes sense to spend more are for durability or special cases. If you’re constantly plugging and unplugging gear, a sturdier connector might save you headaches. And if you’re trying to push a signal over 50 feet, better shielding or active cabling might be necessary. However, for everyday home use, any certified HDMI cable that meets the standard will perform exactly the same as one that costs ten times more.
6
More megapixels means a better camera
I’ve lost count of how many times I’ve heard some of my friends brag about their phone’s “200-megapixel camera” like it’s the holy grail of photography. But the truth is, megapixels mostly determine image size, not quality. A 12-megapixel camera with a large sensor and good software will beat a 64-megapixel one with a cheap lens any day. Apple knows this, which is why they stuck to 12MP cameras for years while still producing some of the best shots.
People waste money upgrading to phones or cameras simply because the megapixel number went up. But unless you’re printing billboard-sized posters or cropping aggressively, you won’t even notice the difference. What matters far more is sensor size, lens quality, and image processing software.
5
Bigger TVs always mean better viewing quality
The “bigger is better” mentality has packed living rooms with giant TVs, but sheer size doesn’t guarantee a better picture. In fact, it can sometimes make things worse. Manufacturers love this misconception, of course, because bigger screens mean bigger margins, and plenty of buyers assume that more inches automatically equals a superior viewing experience.
A massive display can certainly feel cinematic, but true comfort comes from more than raw dimensions. Picture quality is shaped by where you sit, the screen’s resolution, the room’s lighting, and the panel technology behind it, such as OLED, QLED, QNED, or Mini-LED. If you sit too close to an oversized, lower-resolution screen, instead of immersion, you’ll end up with pixels becoming visible, and your eyes will strain.
Andrew Heinzman / MakeUseOf
The Society of Motion Picture and Television Engineers even has a more precise guideline: your screen should cover about 30° of your field of vision, which works out to sitting at about 1.2–1.6 times the diagonal. So, for a 55–65 inch 4K TV, the sweet spot is usually seven to ten feet away, which happens to match the average distance from couch to TV in many homes. If you go much larger than 65 inches, unless you have a very spacious living room, you’ll either need to sit uncomfortably far back or risk seeing picture flaws.
4
Antivirus software is a must for every device
When Windows first made antivirus software a must-have, somehow, people got the idea that every device needed pricey security software. But times have changed. Nowadays, operating systems like macOS, Windows 10/11, and even many Linux flavors already come with strong built-in defenses like sandboxing, regular security updates, and behavior monitoring. For most folks who stick to good habits, such as avoiding shady internet browsing and downloads, spotting phishing attempts, and maybe running an ad-blocker in the browser, those native protections are more than enough.
Screenshot by Oluwademilade Afolabi — No attribution required
Paying for extra antivirus software often just duplicates what your OS or browser is already doing, and in some cases, it can actually drag your system down with unnecessary bloat. That said, there are scenarios where an extra layer makes sense, such as households with kids, less tech-savvy users, or big enterprise setups where the stakes are higher. But for the average user, those expensive antivirus subscriptions usually just repackage what you already have for free.
3
Brand-new tech is always better
There’s a strange obsession with buying the newest gadget the moment it drops, as if last year’s tech suddenly turned to dust. Companies love this myth because it fuels the upgrade treadmill, but it’s rarely true.
Last year’s flagship phone will usually run circles around this year’s midrange model, and a laptop that’s two or three years old can still handle everyday tasks just as well as one fresh out of the box, straight from the factory. Upgrading just for the sake of “new” is like trading in your perfectly good car every year just because the dealership unveiled a shinier one. It probably looks better aesthetically, but it doesn’t necessarily perform any better when you actually use it.
The smarter play is often to grab slightly older models at a discount. You pocket the savings, and in most cases, you’re not giving up much, if anything at all. But as long as people equate “new” with “better,” companies will keep happily cashing in.
2
Expensive gaming PCs and gear equal instant pro performance
This myth always cracks me up, because it assumes skill comes in the box. Spending $5,000 on a rig or springing for the “highest-end” PC peripherals doesn’t magically make you good at gaming. If your aim is off or your reflexes are slow, some kid with a bargain setup will still wipe the floor with you.
High-end hardware can definitely improve graphics and frame rates, but gameplay itself doesn’t transform. There’s a sweet spot for performance that doesn’t require bleeding your bank account dry. If you’re going to spend, put it toward the things that actually matter. Like stable framerates (stable 144fps matters more than inconsistent 240fps), a low-latency monitor (low input lag beats maximum resolution), peripherals that feel right in your hands, and an internet connection that won’t betray you mid-match.
1
Extended warranties are always worth it
Extended warranties always sound like a good idea because tech breaks, right? However, most devices we buy (phones, laptops, TVs) already come with a manufacturer’s warranty baked in. Even though it won’t cover every mishap, it still covers most, if not all, factory defects you’d worry about. If something really does go wrong, you can usually find a solid repair shop that fixes it for a fraction of what you’d have shelled out for an extended plan.
If you’re the type who upgrades every couple of years or simply takes good care of your gear, the odds of ever needing an expensive post-warranty repair are slim. And from what I’ve seen, paying for the occasional repair as it comes up almost always costs less than pouring money into coverage you’ll probably never use.
Tech doesn’t have to be a splurge. All too often, our instincts nudge us toward bigger numbers, flashier packaging, or pricier assurances, none of which guarantee a better experience. By cutting through these myths, you can make smarter choices that align with real value. So, save your wallet, stay savvy, and invest in what actually matters.
Sometimes the best trailers don’t come from Hollywood studios. Fans with editing skills and a wild sense of imagination have been cutting their own trailers for years. The best fan-made trailers aren’t just patchworks but love letters to movies, like some of the ones here.
12
Green Lantern (2009)
Two years before Ryan Reynolds officially suited up as the Green Lantern, this fan trailer made the internet believe that a big-screen version could actually happen. The editing was slick for its time, combining footage from Halo 3, Serenity, and Star Trek with clever effects that sold the illusion. Who knew that the charismatic Nathan Fillion would finally wear the ring in the latest Superman flick.
11
The Shining Recut (2006)
It takes a serious buff to turn Stanley Kubrick’s terrifying The Shining into a heartwarming family comedy (called Shining). By dropping in Peter Gabriel’s Solsbury Hill and using lighthearted narration, the horror classic is suddenly a feel-good drama. It’s a masterclass in how music and editing alone can change a film’s entire meaning.
10
Harry Potter as a Teen Comedy (2011)
As a Harry Potter fan, I couldn’t resist choosing two fan trailers from the franchise. Both are chalk and cheese. In this one, imagine Harry Potter like a cheesy early-2000s teen rom-com, complete with pop music and awkward high school tropes. The fan edits highlight the friendships, crushes, and goofy moments at Hogwarts rather than the darker magic.
9
Deadpool Kills the Marvel Universe (2016)
This one goes hard. Inspired by the dark comic storyline, the trailer cuts together Marvel footage to show Deadpool hunting down the entire superhero roster. The tone and brutal “kills” make it feel like an R-rated spin-off that Marvel would never actually release. Never mind that the actual Deadpool films are R-rated with lots of violence.
8
Solo, With the “I’m Han Solo” Soundtrack (2018)
Is it a fan trailer or is it a meme? I don’t mind either way. This fan edit replaces the soundtrack of the official trailer for Solo: A Star Wars Story with the absurd “I’m Han Solo” dance track from the Star Wars Kinect video game. The song itself is a parody of Jason Derulo’s “Ridin’ Solo.” The clash between the serious visuals and the goofy music is perfect for a laugh.
7
The Last of Us (2020)
Before HBO’s official adaptation arrived, fans were already imagining The Last of Us as a live-action series. This concept trailer, stitched together from other shows and movies, nails the bleak atmosphere of the game. Seeing Pedro Pascal and Bella Ramsey as Joel and Ellie seems perfect now. But the trailer’s reimagining with Nikolaj Coster-Waldau and Kaitlyn Dever isn’t too bad either.
6
Harry Potter and the Cursed Child (2025)
Rumors swirled about a movie version of The Cursed Child adapted from the play of the same name. Then, this concept trailer gave fans more hope. Using AI-generated legacy characters, it scratches the itch for Harry’s story as an adult.
5
Stargate Reimagined (2025)
This trailer uses AI to reimagine a modern blockbuster version of Stargate, complete with sweeping battle scenes. The pacing is what really stands out (and of course, the star-studded cast); it feels like a real studio teaser for a reboot that has never happened. As someone who grew up on Stargate SG-1, seeing this fan cut made me instantly wish for a proper reboot with today’s technology. It’s one show every sci-fi and tech lover should watch at least once.
4
Dexter’s Laboratory (2025)
What if Cartoon Network’s classic Dexter’s Laboratory was reimagined as a live-action Netflix thriller? That’s the question this fan trailer answers. The eerie vibe and shadowy lab shots turn the goofy cartoon into something straight out of Stranger Things. It’s ridiculous, but I’d absolutely binge this show on Netflix.
3
Rambo: First Blood (2025)
This fan-made “reboot” of First Blood imagines a modern version of Rambo’s story, and it’s surprisingly interesting. Tom Hardy as John Rambo doesn’t look as raw as Stallone, but I would still watch the film if it came out. The footage blends AI with Stallone’s classic moments and a new cast of characters. Considering Rambo hasn’t been rebooted, it makes one think.
A measuring tape is one of those tools that always seems to be missing when you need it most. What you do have, though, is your phone, and its camera can actually serve as a handy substitute for a tape measure.
How AR measurement works on your phone
AR measurement, short for augmented reality measurement, allows your phone to calculate the dimensions of real-world objects and spaces with the help of the camera. The way it works is quite genius.
When you point your camera at a room, table, or even a bookshelf, your phone starts analyzing the scene. It looks for flat surfaces such as floors, walls, and tables. Once these surfaces are detected, the tool can measure distances between points to create an accurate three-dimensional representation of the environment in real time.
Image Credit: Pankil ShahPankil Shah/MakeUseOf
Besides the camera, your phone relies on a combination of sensors and spatial mapping to deliver accurate results. For instance, the accelerometer detects movement, while the gyroscope tracks the device’s orientation.
By combining visual information from the camera with data from these sensors, your phone can determine not only the size of objects but also their position in the surrounding space.
AR measurement is available on most mid-range and flagship Android and iPhone models. So, unless your phone is entry-level, you should be good to go.
On the iPhone, the Measure app comes pre-installed, so you can open it and start measuring instantly. If you once dismissed it as just another useless built-in app from Apple and uninstalled it, you can reinstall it from the App Store.
Similar to Apple, Google used to provide its own free Measure app, but it was discontinued in 2021 due to accuracy and stability issues. However, if you have a Galaxy phone, you can download Samsung’s Quick Measure app from the Play Store or Galaxy Store.
Image Credit: Pankil ShahPankil Shah/MakeUseOf
On Android, third-party apps also fill the gap. A popular choice is the AR Ruler app, which you can download from the Play Store. It is also available on iOS if you want more advanced features. It goes beyond basic length and height checks and offers volume measurement, path scanning, and angle detection.
Download: AR Ruler for Android | iOS (Free, in-app purchases available)
Once you’ve got the right app on your phone, using AR measurement is surprisingly simple. Open the app and point your camera at the object or space you want to measure. The app will usually guide you with on-screen prompts, such as asking you to move your phone slowly so it can scan the area.
The app will first identify flat surfaces in view, like the top of a table or the floor in your living room. Once the surface is recognized, you’ll see a dot or crosshair appear on the screen. This acts as your starting point.
From there, you tap to mark one point, then move your phone to the next spot and tap again. The app calculates the distance between the two points to give you a precise measurement. You can use this to measure objects, check room dimensions, or even estimate someone’s height.
Most measuring apps can also detect shapes automatically. If the app detects a square, rectangle, or circle, it will display the measurements without you having to trace each side manually. This makes tasks like checking if a new piece of furniture will fit in a space almost effortless.
Screenshot by Pankil Shah — No attribution required
Screenshot by Pankil Shah — No attribution required
Screenshot by Pankil Shah — No attribution required
Samsung’s Quick Measure includes a handy feature that calculates the distance between the camera and an object. This is particularly useful when you want to estimate how far your TV, a wall, or any object is from where you’re standing.
To keep a record, you can capture the measurement with the shutter button, which saves it as a photo. Apple’s Measure app also includes a history tab where all your measurements are stored, so you can revisit them later if needed.
Screenshot by Pankil Shah — No attribution required
Screenshot by Pankil Shah — No attribution required
Screenshot by Pankil Shah — No attribution required
The accuracy of these measurements
With all this talk about turning your phone into a digital tape measure, it’s obvious to wonder how much you can actually rely on the results. The short answer is that AR measurement is impressively accurate for casual use, but it still has its limits.
In most cases, the margin of error is usually within a couple of centimeters. That means if you’re checking whether a new chair will fit through a doorway or estimating the size of a rug, the readings are trustworthy enough.
For example, I measured my 55-inch TV and got 56 inches, which is close enough. However, measuring from a slightly different angle gave 59 inches, so accuracy can vary depending on how you position your phone.
Screenshot by Pankil Shah — No attribution required
Screenshot by Pankil Shah — No attribution required
Your phone’s camera can be useful for a lot of things besides taking photos and videos. AR measurement is one of those handy extras. While it won’t replace a tape measure or professional laser tools, it’s accurate enough for most everyday tasks like checking furniture dimensions or estimating space.
Apple offers essential apps for its CarPlay system, but third-party options for navigation, audio, and utility can enhance safety and convenience while driving. This article reviews the best third-party apps for CarPlay in key categories.
6
Waze
Despite being acquired by Google in 2013, Waze remains a separate app (from Google Maps) in the App Store, although many of its features are also now integrated into the main Google Maps app. What makes Waze a continued winner is its deep integration with crowdsourcing, which brings a certain level of intimacy that’s lacking in other map apps. This integration makes it relatively easy to alert fellow drivers to things like road hazards, police sightings, and speed traps.
Waze also does a terrific job of offering real-time re-routes based on changing road conditions. For example, if there are reports of an accident 25 miles ahead on your journey, the CarPlay display will explain the situation and suggest alternative routes. It’s a slick process that works seamlessly.
NAR by Bryan W
Another nice touch is Waze’s customization options. You can change the voice of the Waze assistant, adjust the look of icons, and more. This adds some uniqueness that’s missing from other map apps.
Waze certainly isn’t for everything. Google Maps, for example, still does a better job at helping you find a business. It’s also the app I use when there are multiple stops on my journey. Google Maps simply does things like this better. But, overall, I find myself using Waze much more than Google Maps and Apple Maps.
There are several different ways to listen to podcasts in the car. One of my favorite apps for this purpose is Overcast. While most of its features are available for free, a premium subscription offers additional bonus features, and you can also opt to hide the occasional ads that come with the free version.
Overcast rightly advertises its two best features: Smart Speed and Voice Boost. The former dynamically shortens silences in podcasts, thereby cutting down the total time. It works brilliantly since it does this without distortion, thereby keeping the talk natural-sounding.
NAR by Bryan W
The app’s other great feature, Voice Boost, elevates every sound to the same level, even when going between podcasts. This essentially removes the need to adjust the volume in places like your car, where there might be other people listening (and talking) while your favorite show is playing.
When it comes to listening to audiobooks, there’s Audible and everyone else. The Amazon title offers several features that other options, such as Apple Books, do not. For one, Audible offers a subscription-based service that allows you to purchase a set number of book titles each month at a discounted price.
Perhaps the best Audible feature is Whispersync for Voice. This allows you to seamlessly switch between a Kindle eBook and the corresponding audiobook, regardless of your device. Often, when I’m in the car, I will pick up the audiobook where I left off on my iPad.
NAR by Bryan W
Audible isn’t necessarily for everyone. If you don’t read a lot of audiobooks, getting a subscription might not be worth it. In that case, the differences between Audible, Apple Books, and others are much less noticeable.
If you like to borrow and listen to audiobooks from your local library, there’s Libby. The free app enables you to borrow and read e-books, listen to audiobooks, and access digital magazines. To listen to a new audiobook, you must first download it onto your iPhone; from there, it will show up in the Libby app on the CarPlay display.
NAR by Bryan W
Libby says it offers over 45,000 free audiobook titles, which should allow you to drive back and forth between the coasts of the U.S. at least a few times.
There are heaps of excellent weather apps on the App Store. The Weather on the Way app differs in that it focuses on providing a forecast for every location along your specific route. In other words, you can see a timeline of the weather you’re expected to encounter on your way in real-time.
NAR by Bryan W
Weather on the Way is a terrific tool for anyone planning to travel long distances in the coming days, such as truckers, vacationers, and long-distance commuters. The free version of the app offers a limited number of features. With a yearly subscription, all the features are unlocked.
All cars have one thing in common: they require fuel, whether it is gasoline or electricity. Not surprisingly, numerous CarPlay-enabled apps can help you get to your next fill-up.
For EV owners, there’s PlugShare. The free app’s primary function is to help drivers find available charging stations using an interactive map. You can sort this information by plug type, charging speed, and network. PlugShare is recognized for its ever-growing community of users who check in to stations on the app and share reviews, photos, and general tips. This information is beneficial to both new and long-time EV drivers.
NAR by Bryan W
If your car still takes gas, finding a filling station on CarPlay is much easier. Most national gas stations have apps that make it pain-free to find the nearest location from your CarPlay screen. Additionally, retailers like Walmart also show filling stations in their apps.
Apple CarPlay allows you to access your iPhone’s features through your car’s display using a simple, hands-free interface. Each CarPlay-compatible app, including those mentioned earlier, is designed to operate safely during driving while reducing driver distractions.
We’ve somehow arrived at this strange cultural reflex where the word upgrade is practically synonymous with progress. The assumption is that newer must be better, and if you dare to question that, you risk sounding like some curmudgeon still pining for the days of rotary phones. But honestly, the truth feels a lot less flattering.
7
“Smart” features everywhere
Not everything needs Wi-Fi. Yet here we are, living in a world where your oven might refuse to heat because it’s in the middle of a software update. That’s the core problem with these so-called smart gadgets. They’re loaded with gimmicky features nobody actually wanted, and every one of those features is just another potential failure point.
Image by Jayric Maning –no attributions requiredJayric Maning / MUO
A fridge doesn’t need a touchscreen that shows me my Google Calendar, and a washer doesn’t need to email me when a cycle is finished. The buzzer worked just fine for decades, and if you didn’t even have a buzzer, you knew it was done when the noise stopped.
Worse still, most of these devices are just surveillance machines in disguise. Smart TVs track your viewing habits and stuff ads into menus. Even toothbrushes, of all things, try to funnel you into downloading an app, registering an email, and surrendering yet another slice of your privacy.
The irony is that the “dumb” versions of these appliances, the ones with simple dials and no internet connectivity, usually last longer. They don’t demand updates. They don’t break when a server shuts down. They just work, day in and day out, until you replace them because they’re old, not because the software bricked itself.
QR code menus made sense during the COVID-19 pandemic. You just had to scan a little square to skip touching a sticky, overused menu. Fine. But now, years later, plenty of restaurants are still clinging to them, and honestly, it’s starting to feel more like a downgrade.
A printed physical menu has weight and presence. You can toss it on the table, flip it open, and slide it across to your friend without breaking stride. A QR menu, on the other hand, drags you right back into your phone, the very device you probably came to dinner hoping to ignore for a while. One second you’re scrolling through appetizers, the next you’ve fallen into the gravitational pull of email, notifications, or Instagram Reels. Now, the simple act of choosing food turns into another fractured, semi-distracted moment, rather than a shared one.
The part that really grates me is that QR menus are the perfect excuse for restaurants to tweak prices whenever they feel like it, with no reprints necessary. At least when something was printed in ink, it felt grounded, stable, and final for a long while.
5
Killing the disc drive
It wasn’t long ago that laptops typically came with disc drives. You could slide in a DVD, install some software, or dust off that stack of burned CDs without thinking twice. Then, manufacturers became obsessed with shaving millimeters off the chassis, making the drive disappear.
Now, if you’ve got physical media, you’re forced to buy some clunky external drive that hogs desk space and feels like a punishment for daring to live in the pre-streaming generation. And if you don’t bother, your choices are depressingly limited. You either hunt for a sketchy rip online, buy the same content again in digital form, or cross your fingers that it happens to be floating around on whatever subscription service you’re currently paying for.
My biggest pain point about this upgrade is that installing software, which used to be as easy as dropping in a disc, has been rerouted through the cloud. Now I have to deal with endless downloads, bloated installers, and a fast drain on both precious storage and bandwidth. All that hassle just so my laptop could be a few millimeters thinner in my bag serves me less.
4
AI in search engines
Not that long ago—say, five or so years—searching the internet actually felt like a process. You typed in what you were curious about, hit enter, and got a stack of links to dig through. It wasn’t always efficient, but there was this sense that you were the one unearthing the answer. Now, with AI baked into search engines (and yes, I’m mainly pointing at Google here), that whole experience has been flattened into these so-called “AI overviews.” Instead of a buffet of perspectives, you get one authoritative-sounding blurb perched at the top of the page, as if the machine has spoken and that’s that.
Of course, it’s not perfect, which is how we ended up with Google’s AI telling people to put glue on pizza. Just one of the many surreal and hilarious moments where AI chatbots hallucinate their way into nonsense.
Aside from that, the whole internet increasingly resembles a tug-of-war between you and ads, algorithms, and dark patterns designed to funnel you into whatever lines companies’ pockets. Just try looking up a product on Amazon, and you’ll find that the actual thing you want is buried under a landfill of “sponsored” garbage.
3
The subscription creep
Subscriptions used to feel reasonable. You paid for your magazine, your cable TV package, maybe Netflix, and that was that. But somewhere along the line, the whole model mutated into something borderline ridiculous. These days, it feels like every corner of tech is scheming to carve out yet another monthly fee for features that, not too long ago, were simply included.
Take apps, for instance. Even the most barebones utilities now have the audacity to demand a subscription. I once saw an alarm clock app charging five bucks a month for premium. Premium what—waking me up with extra enthusiasm? A digital slap in the face?
Games haven’t escaped the racket either. The big three console makers all slap a toll on online play, something that used to be free territory. Think about it: you’ve already bought the console, the game, and you’re paying for your internet service. Yet somehow, you’re still expected to cough up more just for the privilege of joining a multiplayer lobby.
And then the car industry, never one to miss a money-making trend, decided to leap onto the bandwagon. BMW, Mercedes, and others actually toyed with subscriptions for heated seats and horsepower—features that are physically inside the car you already own. So much for an upgrade!
2
Reels and algorithmic feeds
Social media used to be where you followed people, and—radical thought—you actually saw their posts. You really owned your feed. Now, the feeds feel more like algorithmic labyrinths, engineered less for connection and more for engagement metrics. You don’t really decide what shows up anymore, but the machine does.
Reels are the clearest culprit. These bite-sized, hyper-addictive videos get shoved into your feed whether you asked for them or not. The platforms like to dress it up as “discovery,” but in reality, it’s basically a slot machine designed to keep you pulling the lever. Before you know it, you’ve waded through an endless tide of viral fluff while the friends and communities you actually wanted to hear from get buried at the bottom.
1
Touchscreens in cars
Car makers can’t resist flaunting their sleek, screen-heavy dashboards. They photograph beautifully in brochures and make vehicles look futuristic in showrooms. But on the road, they’re a menace. A simple knob lets you adjust the temperature or crank the volume with a quick flick without looking. A touchscreen, on the other hand, demands your eyes, your focus, and just a little too much patience.
And it’s not just me being cranky about it. I found several reports that show it can take drivers up to 20 seconds to complete a basic task, such as changing the AC settings on a touchscreen. That’s 20 seconds of effectively driving blind. Honestly, it’s not far off the danger level of driving after a few drinks.
The good news is that the tide seems to be turning. Starting in 2026, Euro NCAP will only give top safety ratings to cars that have physical controls for essentials like indicators, hazard lights, and wipers. And if you peek into online forums, you’ll see plenty of drivers saying the same thing: give us the knobs back.
A Google Pixel is usually the smartest phone in the room. Most of that smartness goes into making sure you get great photos and can edit the not-so-great ones. I’ve started editing my selfies with my Pixel’s AI, and you should too.
Why I Decided to Test Pixel’s AI on Selfies
Generally, before I upload a photo, it goes through Lightroom on my PC. While this workflow is fine for images taken on my DSLR, moving photos back and forth between my phone and PC for editing becomes a hassle. Lightroom does have an Android app, which retains a lot of functionality from the desktop one, but it can still be a pain adjusting all those sliders on a small screen.
I had already given up on carrying my DSLR everywhere with me when I first switched to a Pixel—that’s one of the reasons why I can’t go back to a non-Pixel Android phone. So if the Pixel AI is good enough to shelve my professional-grade camera, it’s good enough to edit those photos as well.
Besides, not everyone knows how to edit a photo in advanced editing programs. An editor where you can simply type out your edits and the image turns out to be the way you want sounds a lot more accessible and, honestly, enjoyable to use. That’s exactly what Google’s Magic Editor offers.
The editor is quite well integrated into the Google Photos app. You can go from browsing photos to editing them within a few taps, and the entire process is much faster (and simpler) than fiddling with apps like Lightroom or Snapseed.
The Magic Editor Experience
I took a selfie from my phone’s wireless charging stand at a rather challenging time of the day. As you can see, I have direct sunlight exposing part of my frame while the rest of the image remains relatively dark.
Now there are a few things wrong with this image that would take a lot of work to fix, even on the desktop version of Lightroom. I want to get rid of some of the shadows on my face, get rid of the ceiling fan, add background blur, and move the subject (or myself) a bit more to the left.
Getting rid of the ceiling fan is simple enough. Just head over to the Tools section, select the Magic Eraser option, and circle the fan. It does leave some artefacting behind, but since we’re adding background blur, it’s not going to be visible.
Next, I added the background blur, or depth of field, using the Blur option. The feature gives you two options: Blur and Depth. The former lets you pick your focus point, and the latter adds the depth of field. These settings will automatically populate based on your focus point, but you can adjust them to get the desired effect.
The Portrait Light feature is meant for adding an extra light source to your image to better illuminate faces. You get an Add light option that adds an extra light source, and use the Balance light option to balance the overall lighting over faces.
Now it’s time to switch to Magic Editor to get me in the middle of the frame. Google Photos requires you to save any changes made outside of the Magic Editor before proceeding, so getting the image right here is important.
Repositioning the subject is just a matter of tapping and dragging around until you’re happy with the placement. When you’re done, the Magic Editor will give you several options, and you can choose which one works best for you. You can erase or replace any other part of the image by tapping or circling it. The erase option works a lot like the Magic Eraser, but Reimagine lets you replace these selections based on your prompts.
Screenshot by Yadullah Abidi | No Attribution Required.
Screenshot by Yadullah Abidi | No Attribution Required.
Screenshot by Yadullah Abidi | No Attribution Required.
You can also change the entire background of an image, which I did end up doing for fun. I replaced my office in the background with a library, and the result was great. It even managed to get the direction of the lighting right.
You also get the Auto frame and Portrait options. Auto frame is great at fixing composition issues and can even generate horizontal versions of vertical images and vice versa. Portrait seems to do the same thing as Portrait Light, although you’ll have better luck doing it yourself in Google Photos.
The Results: Before vs. After
A couple of minutes and one prompt later, I now have two images that are entirely different from the original selfie I started with. You can see the comparison in the usual selfie and one where I swapped the background for a wooden bookshelf.
You no longer have to stress over slider values, adjustment layers, and color accuracy. This is also one of the easiest Pixel-exclusive features that can be ported to other Android devices. All you need is a Google One subscription, and you’re good to go.
Regardless, if you’ve got a Pixel, your phone’s AI-powered editing tools already know how to best frame, light, and clean up your selfies. It doesn’t matter if they were taken on your Pixel or have been in your gallery for years—a few taps and prompts are all it takes to bring them back to life.
I thought I was having a quick chat with ChatGPT about my computer setup, but I accidentally shared my Windows PIN and other deeply personal info.
How I Accidentally Handed My PIN to an AI
When ChatGPT finally made the advanced voice feature available on my phone, I immediately set it as my default voice assistant. Amused at how human the assistant sounded, I never thought twice about using it for answering technical questions and several other applications that used ChatGPT’s live voice and vision. Plus, I’ve always liked that I didn’t have to type or stop to think about how to phrase things when using a voice assistant.
During one of these sessions, I remember venting about a persistent Windows Hello problem. My computer kept losing my PIN setup after every system update, forcing me to recreate it repeatedly. After going through yet another irritating PIN reset cycle, I finally decided to change my PIN. And since the conversation was flowing so naturally, I casually asked ChatGPT to save my PIN in case I forgot it.
I was so used to using Google Assistant (now retired) that I completely forgot I had switched to ChatGPT a few days earlier. Not that sharing a PIN with Google Assistant would have been a good idea, but sharing such data with ChatGPT and its Memory feature just ensured that my PIN was stored indefinitely. In my mind, I was asking my usual assistant to store some information for convenience, the same way I might save a reminder or note.
A Deeper Investigation Showed Me How Vulnerable I Was
I’m pretty open about letting people use my PC for quick tasks. But knowing and understanding the capabilities of ChatGPT’s Memory feature and what it entailed made me anxious. What if someone had checked the Memory logs and found my PIN? What if they had asked questions about my past conversations? The thought made me immediately dive into ChatGPT’s Memory to see exactly what was stored.
Screenshot by Jayric Maning –no attributions required
ChatGPT had logged far more than just my PIN. It remembered details I’d completely forgotten sharing, like the places I usually visit, that I use my Windows PC for online banking, that I often step away from my computer without locking it during short breaks, and other personal information I wouldn’t want to share with anyone.
The Memory feature painted a detailed picture of my digital life and habits. Although ChatGPT has measures to filter out sensitive data, we can still inadvertently store personal information because we are so accustomed to using AI chatbots and assistants that we often forget to be cautious. Looking through the saved memories made me realize how much we casually share with AI assistants. Even small details can build into a comprehensive profile that could be risky in the wrong hands.
How My PIN Could Have Potentially Connected to My Passwords
The real danger became clear when I started thinking like a hacker. My Windows PIN wasn’t just a number for unlocking my screen. It was the key to everything on my most trusted device.
Windows PINs create a false sense of security because they seem device-specific, but they actually unlock far more than people realize. Once someone has access to your Windows machine through your PIN, they can potentially access saved passwords in browsers, password managers that use Windows Hello integration, and any applications that rely on Windows authentication.
Screenshot by Jayric Maning –no attributions required
My computer had become my personal vault. Chrome stored dozens of work and personal passwords that autofilled with just Windows authentication. The most concerning realization was that my Windows PC served as one of my primary two-factor authentication devices. I had set up several accounts to send 2FA codes to Microsoft Authenticator on that same machine. I also used Windows Hello to approve authentication requests for various services.
An attacker with my PIN could potentially access my computer, extract saved passwords, intercept 2FA codes, and even approve authentication requests for other services. That simple four-digit code could cascade into complete account takeovers.
What I Do Now to Protect Myself
My accidental AI disclosure forced me to rethink how I interact with AI systems completely. The experience taught me that protecting myself requires both immediate damage control and smarter prevention habits.
First, I changed my Windows PIN immediately and separated critical passwords into a standalone password manager requiring manual entry. Important accounts now use hardware security keys instead of device-based authentication.
Then I immediately audited ChatGPT’s Memory by going to Settings > Personalization > Memory and selecting Manage to delete entries that you don’t want stored. This option effectively erases all the sensitive info about me.
Screenshot by Jayric Maning –no attributions required
Now I use ChatGPT’s Temporary Chat feature for any technical discussions. This “incognito mode” doesn’t save conversations, use Memory, or contribute to training. I click the “Tempor”ry” butto” before discussing anything potentially sensitive.
Screenshot by Jayric Maning –no attributions required
There are many ways to prevent your data from being logged into ChatGPTChatGPT’s, but auditing Memory logs and using Temporary Chat are among the more proactive ways to protect your data from possibly leaking from these services.
Overall, this experience taught me that modern security isn’t jisn’tbout strong passwords and good software updates. It’s alIt’sbout understanding how different systems connect and where casual information sharing can create unexpected vulnerabilities. AI memory features are incredibly useful, but they require the same careful consideration we give to any other system that stores our personal data.
I live overseas, and I often find myself missing my favorite TV shows from back home. Thankfully, there are several ways to install regional apps, allowing me to enjoy local news, homegrown programs, and regional sports channels.
How to Change Your Smart TV’s Region
The most direct method I tried was simply changing my TV’s region settings. The steps will vary depending on your TV brand, but the principle remains the same: reset or reconfigure your TV to the country whose services you want.
Image by Jack Mitchell – no attribution required.Jack Mitchell/MakeUseOf
Reset or reconfigure your TV: On my Samsung TV, I performed a factory reset, then selected a different country when prompted during setup. Some brands allow you to switch regions directly from the settings menu.
Refresh the app store: Once I confirmed the new region, the TV automatically refreshed its app store. Now, upon searching, the missing regional apps appeared.
Install preferred apps: I quickly downloaded these before making any other changes.
Obviously, resetting your smart TV will lose any saved information, so be cautious of doing this if you have important saved logins or other information that you may not be able to restore or recover.
Furthermore, when changing your TV’s region, you may lose access to certain apps that were available in your original region. For example, when I switched from the US to the UK, MAX was no longer available.
You might also need a new account, as some app stores require signing in with a profile that matches your region. Additionally, you may need to use a VPN (Virtual Private Network) to redirect your IP address at the router level for uninterrupted playback.
Using Alternative App Stores
As it turned out, changing regions via the TV settings menu didn’t work for me, as it was too permanent, and I wanted to use apps from various locations. There was, however, another option: sideloading apps through alternative app stores.
Screenshot by Pankil Shah — No attribution required
Enable developer mode (on Android TV, Fire TV, or Fire TV Stick): This allows you to install apps from outside the official store.
Install APKs manually: Download app installation files (APKs) from trusted sites and install them using a USB thumb drive or through a downloader app.
Explore third-party app stores: Some external platforms, such as Aptoide, offer a wide selection of region-locked apps that can be installed on compatible TVs and devices.
Downloading from unofficial sources carries the risk of malware. Ensure you only use reputable providers to avoid security issues.
Unlike with the official app store, updates aren’t automatic, so you’ll need to update sideloaded apps manually. Also, not all apps will work properly. Some use region-specific servers, and your login credentials may still be rejected.
Using a VPN Service
I needed a compromise that would allow me to use both local and regional apps on my TV, and using alternative app stores seemed too much of a hassle. I therefore decided to go down the VPN route. Thankfully, I was already subscribed to ExpressVPN, which allows for installation across multiple devices.
Screenshot by Jack Mitchell – no attribution required.
VPN Options for Smart TVs
VPN-capable router: Since some smart TVs don’t support VPN apps directly, one option is to install a VPN on your Wi-Fi router. This way, every device connected to your network, including your TV, appears to be browsing from the VPN server’s selected country.
Smart DNS alternative: Some VPNs offer Smart DNS services, which are easier to set up directly in the TV’s network settings.
TV streaming stick: I ended up buying a Fire TV Stick on Amazon, which, unlike my Samsung Smart TV, supports VPN apps. Once this was configured, not only did the app store open up more options, but services like Netflix, Disney+, and BBC iPlayer showed content that was only available in my chosen region.
Poor-quality VPNs are easily detected and blocked by streaming platforms, so it’s worth testing a few providers to find one that works reliably. I have found that both ExpressVPN and NordVPN are effective platforms for streaming TV shows and movies overseas.
Keep in mind that speeds can vary, and if the VPN server is located far away, buffering may become an issue. Also, a VPN differs from changing your TV’s region or using alternative app stores in that you’ll also be required to pay an ongoing subscription cost.
What’s the Best Option to Get Regional Apps on Your Smart TV?
Ultimately, the right approach for installing regional apps depends on your unique preferences. Suppose you are looking for a permanent solution. In that case, changing your TV’s region may be the best option for you, especially if you have relocated and are only interested in one specific market.
If customization is important to you, sideloading apps gives you plenty of freedom to install and view whatever you like. However, this option should be approached with caution and requires more maintenance when keeping apps up to date.
If you value flexibility above all else, a VPN allows you to toggle between regions with ease and enables you to unlock multiple content libraries. When used with a TV streaming device, such as a Chromecast or Fire TV Stick, it also becomes portable for use while traveling.
Unlocking regional apps has revolutionized the way I stream content, and it has granted me many familiar home comforts that I wasn’t even aware that I was missing. However, the process isn’t without its compromises. It’s possible to lose access to some familiar apps, be unable to stream content you were halfway through watching, or experience frustration due to slower connections.
Having weighed my options and chosen a plug-and-play option that best suits my needs, I feel like I’ve taken control of my TV’s regional restrictions, and I’m finally getting the maximum bang for my streaming subscription bucks.
When it comes to Windows, it’s always handy to know a couple of tricks for those moments your computer starts acting out. This exact scenario happened to me recently, and I brought my machine back to life with this super simple startup trick—it can be the difference between pulling your hair out and getting back up and running immediately.
The Windows Startup Trick That Saved Me
I’ve been lucky in recent years. My Windows 10 PC has been working fine and without issue. But with the end of Windows 10 support looming large, it’s almost like my machine knows what’s coming—and I started encountering issues.
When my PC refused to boot normally, I didn’t panic. I knew about Windows’ fallback startup options, and in my case, booting into Safe Mode gave me the access I needed to restore my system.
Safe Mode isn’t flashy. It strips Windows down to the bare minimum—just the essential drivers and processes needed to run. That makes it a perfect environment for troubleshooting, uninstalling problematic programs, or running malware scans.
And if Safe Mode isn’t enough, you can go one step further: boot from a USB recovery drive. This bypasses your broken Windows installation entirely and lets you load a fresh copy of Windows or access built-in recovery tools.
How to Boot Into Safe Mode
Safe Mode has been part of Windows for decades, and it’s still one of the best first-line defenses when your computer misbehaves. There are a couple of ways to boot into Safe Mode.
Use the Restart Shortcut
If you still have access to the Windows desktop (or the login screen), you can use the restart shortcut. It’s the easiest method to access Safe Mode.
Gavin Phillips / MakeUseOf
From either the login screen or the power settings in the Start menu, hold Shift and press Restart.
Now, your PC will reboot into the Windows Recovery Environment.
On the next screen, you can choose either Safe Mode or Safe Mode with Networking.
If you’re unsure about what’s causing your Windows machine issues, I’d advise booting without internet access.
Use System Configuration (MSConfig)
Another option, again, if you still have access to the desktop, you can use the Windows System Configuration tool to boot into Safe Mode. MSConfig is a Windows system utility built into the operating system that you can use to manage drivers, services, and more.
NAR by Gavin
Press Win + R to open the Run dialog.
Type msconfig and press Enter.
Under the Boot tab, select Safe boot.
When your computer reboots, it’ll be in Safe Mode.
In both cases, once your machine boots into Safe Mode, you can begin to clean out any nasty malware lurking on your device. There are some very handy free antivirus and antimalware tools you can use to remove malware.
How to Boot From a USB Drive
Safe Mode is great, but sometimes your Windows installation is too far gone. That’s when a bootable USB drive comes to the rescue.
Booting from a USB drive is super useful for a few reasons:
It lets you start Windows from a clean environment, separate from your potentially infected or broken system.
You can reinstall Windows if needed, repair boot files, or access advanced recovery tools.
Some bootable USBs even allow offline malware scans before Windows ever loads. These special rescue USBs are super handy to keep around, as they can be used whenever your machine begins to show signs of strain, malware, or otherwise.
However, with that said, I’ve detailed how to use a Microsoft installation USB to revive your machine below. Having a bootable Windows USB around is always a great idea, as it can be used on effectively any Windows machine.
How to Create a Bootable USB
A bootable USB is a handy option, as you can create it on another PC and then use it on your own.
Run the tool and choose Create installation media for another PC.
Insert a USB drive (at least 8GB) and select it as the target.
The tool will download Windows and make the USB bootable.
Once the Media Creation Tool finishes the USB creation process, you can use it to boot from.
Gavin Phillips / MakeUseOf
Insert the USB drive into the affected PC.
Restart and enter your BIOS/UEFI settings (commonly by pressing F2, Del, Esc, or F12 during startup).
Set the USB drive as the primary boot device. The process for this varies depending on your motherboard manufacturer, so you may have to look this up on a separate device.
Save the changes and reboot—your PC will load from the USB.
Now, head to Troubleshoot > Advanced Options > Startup Repair.
Let the process complete, and then you should be able to access Windows once again.
As before, once you access Windows, run your antivirus or antimalware tool and start repairing your machine.
Now, you don’t want to be preparing a recovery USB drive when your computer is already dead in the water. Do it now, while things are running smoothly. This one Windows startup trick has saved me from disaster, and it could save you, too. The next time your computer refuses to cooperate, you’ll know exactly how to fight back.
After switching to Spark Mail, I’ve been using its various features to improve my email workflow. One feature that is worth mentioning is Smart Folders. This tool has genuinely helped me manage my inbox more efficiently than other email clients.
I Use Spark Mail’s Smart Folders
Smart Folders are automated folders in Spark Mail that organize emails based on defined criteria such as sender, subject keywords, and flags. These are different from Gmail’s label system or traditional inbox rules because Smart Folders dynamically display matching emails without moving them out of the main inbox.
The feature works by scanning your inbox for emails that meet certain parameters. While Spark filters emails using metadata and keywords, it does not perform deep content scanning or AI-based content recognition.
Screenshot by Yasir Mahmood
Smart Folders is a premium feature that requires a subscription, which costs $4.99 per month when billed annually.
What makes this particularly useful is that emails can appear in multiple Smart Folders simultaneously. For example, a message from the team lead about a project deadline could show up in both the “Team Lead” folder and “Urgent” folder, depending on how I’ve structured my filters.
After I ditched Gmail’s app for Spark Mail, I noticed this feature addressed one of my biggest email pain points. Instead of manually sorting through hundreds of messages, the Smart Folders do the heavy lifting. It also helps in maintaining inbox zero effectively. Rather than leaving emails in my primary inbox or manually filing them away, Smart Folders create organized views without requiring constant maintenance from me.
How I Set Up My Smart Folders
Setting up Smart Folders requires some initial planning, but the process is straightforward. I started by identifying the types of emails that consumed most of my time and attention.
My first Smart Folder targets project deadlines from my team lead. This folder automatically captures emails containing keywords like “deadline,” “due date,” or “urgent,” specifically from my team lead’s email address. It’s saved me from missing important project timelines buried in daily email noise.
Here’s how to create a Smart Folder in Spark Mail:
Open Spark Mail and tap the three lines in the sidebar.
Scroll down and select More under Folders.
Tap the + (plus) icon next to Smart Folders to create a new folder.
Name your folder and set your criteria using the available filters (sender, subject, keywords, etc.).
Tap Save to activate the folder.
Screenshot by Yasir Mahmood
For my project deadlines folder, I combined multiple search operators to capture the right messages. I used from: [email protected] to target emails specifically from my team lead, then added subject: urgent to catch time-sensitive communications. The folder also includes has: attachments since project briefs often come with supporting documents.
My second folder focuses on client communications. It filters emails from a specific domain using sender rules—most people don’t use this email rule, but they should. This folder captures all messages from client email addresses, regardless of the specific sender.
It relies on domain-based filtering. I set up from: @clientdomain.com to capture all emails from that organization, regardless of the specific sender. I also added cc: [email protected] since our finance team gets copied on most client correspondence, helping me track billing-related discussions.
The most complex folder I’ve created combines multiple criteria for high-priority emails. It includes messages from C-level executives, emails marked as urgent, and messages containing budget-related keywords. This folder uses the “any condition” setting, meaning emails only need to match one criterion to appear.
It requires the use of the broadest range of criteria. It includes from: [email protected], subject: budget, is: unread, and since: last week to ensure I’m seeing recent, important communications. I also added with: documents to catch emails containing contracts or proposals that typically require immediate attention.
Screenshot by Yasir Mahmood
Each Smart Folder appears in the sidebar with a badge showing unread message counts. You can also set custom notifications for specific folders, ensuring you never miss emails that matter most to your workflow.
Smart Folders Beat Traditional Email Rules
Unlike Gmail’s label system, which can automatically categorize emails, Spark’s Smart Folders provide a centralized, dynamic view without applying multiple labels. Both systems have strengths depending on your workflow. Gmail rules often move emails out of your inbox entirely, making them harder to track. Spark’s Smart Folders keep emails visible in your main inbox while simultaneously organizing them into relevant categories.
Spark also lets you combine multiple email accounts into a single Smart Folder. If you manage both work and personal accounts, you can create one “Bills” folder that captures financial emails from all your accounts simultaneously.
Modifying Smart Folders is also simple compared to managing inboxes with Outlook rules, which have a little more complex conditional logic. Change one criterion in a Smart Folder, and the entire folder updates instantly.
Smart Folders eliminate the mental overhead of deciding whether to archive, label, or leave emails in your inbox. Everything stays accessible while automatically organizing itself based on your workflow needs rather than arbitrary filing systems. Hence, you focus better on what types of information you need to track.
Technology has always shaped the stories we tell, and some of the best movies and shows put it right at the center. These picks capture the thrill and the warning signs of our digital age.
Think about the apps, gadgets, and screens you already use every day. Black Mirror takes those same ideas and pushes them just far enough to feel disturbing. Each episode tells a standalone story, often set in a world that looks familiar but with one technological twist that changes everything. From rating people in everyday life to re-creating loved ones through AI, the stories feel close because they grow out of technology we already recognize.
Because every episode stands on its own, you can start anywhere. Some, like San Junipero, show technology as a way to bring comfort and even give people a second chance at love, while others, like Nosedive or Be Right Back, highlight its risks in painfully human ways. And as you watch, the real chill comes from imagining what it would be like if these worlds became part of daily life, because they don’t feel far off.
Before Facebook became part of daily life, it was a messy project born in a Harvard dorm room. The Social Network shows how a late-night idea slowly grew into a platform that began changing how people connected on campus and beyond.
Jesse Eisenberg (Mark Zuckerberg) plays a student who first builds Facemash to compare classmates, then shifts his focus to Thefacebook. The project takes off faster than he imagined, and soon the strain begins to show in his closest friendships.
A large part of the story is told through depositions, where Zuckerberg faces his co-founders and classmates who accuse him of stealing their ideas. Andrew Garfield (Eduardo Saverin) is a supportive friend who initially funds the site, only to see his shares diluted later.
Justin Timberlake (Sean Parker) shows up with confidence, convincing Zuckerberg to expand into Silicon Valley and deepening the rift with Eduardo. Watching it, you can see how success can turn partners into opponents, and how ambition comes with a hefty price tag.
Hacking is often shown as green code flying across the screen, but Mr. Robot goes another way. Rami Malek (Elliot Alderson) plays a socially withdrawn cybersecurity engineer who also works as a vigilante hacker. His life shifts when he meets Mr. Robot, played by Christian Slater, who leads a group set on taking down a massive corporation.
The show feels real. The hacks draw on actual methods, from phishing and social engineering to targeted exploits, and the tension comes from the choices Elliot makes rather than flashy visuals. His struggles with paranoia, trust, and identity keep the story personal even when the stakes are huge.
Falling in love with an AI might sound far-fetched, but Her makes it feel startlingly real. Joaquin Phoenix (Theodore Twombly) plays a lonely writer who buys a new operating system and finds himself drawn to its voice assistant, Samantha, voiced by Scarlett Johansson.
At first, their conversations are light and supportive, but over time, they grow into something deeply personal. Theodore shares his fears and longings with Samantha, and the bond between them feels as real as any human relationship—the kind you usually see in feel-good movies.
Her isn’t really about machines; it’s about connection, loneliness, and how fragile emotions can become when technology takes the role of a partner. It leaves you wondering where the line between real and artificial love truly lies.
Where Her explores the emotional side of AI, Ex Machina looks at its dangerous side. Caleb (Domhnall Gleeson) is a young programmer chosen through a company contest to spend a week with Nathan (Oscar Isaac), the secretive CEO of his firm. Nathan lives in a remote, high-tech house, where Caleb meets Ava (Alicia Vikander), a humanoid robot with a clear faceplate and visible circuitry. Caleb is asked to judge whether she shows human-like intelligence.
The longer he stays, the more unsettling the environment becomes. Power cuts shut down the glass-walled rooms without warning, and locked doors remind Caleb he isn’t free to move as he wants. His talks with Ava grow more personal each day, but Nathan’s manipulative behavior keeps him off balance, leaving him unsure of whom to trust.
Rather than a big sci-fi spectacle, Ex Machina unfolds like a psychological game of trust and control. Caleb wants to believe Ava is more than a machine, yet every step is shaped by Nathan’s secrecy. The tension isn’t about what Ava can do, but how far people will go when technology and power are in their hands.
What if someone could plant an idea in your mind so deeply that you believed it was your own? That question sits at the center of Inception, a sci-fi thriller that turns the dream world into a place where ideas can be stolen or planted. Dom Cobb (Leonardo DiCaprio) is a thief who breaks into people’s subconscious to steal secrets.
His work earns him a reputation few can match, but it also leaves him isolated from his family and haunted by his past.
Cobb is offered the chance to return to his family if he can pull off one last job. To do this, he gathers a team that includes Arthur (Joseph Gordon-Levitt), Ariadne (Elliot Page), and Eames (Tom Hardy). Together they design layered dreamscapes where time slows, cities fold in on themselves, and reality bends until you are no longer sure what is real.
These are some movies and shows every tech lover should watch at least once. Each one brings something different, and together they show how closely technology mirrors the world we’re living in. And if you’re looking for more discoveries beyond tech, you’ll find plenty of surprises in underrated Netflix movies that deserve a spot on your watchlist.
Everyone says Linux is the natural replacement for Windows, but between software headaches and endless tweaking, Linux always felt like work. This OS, though, just lets me use my computer without fighting it. It wasn’t the switch I planned, but it’s the one that finally stuck. Yes, I’m talking about macOS.
4
App Support Is Miles Better on macOS
Before you start comparing features, it’s worth asking whether the apps you rely on will even run on your operating system. That’s where Linux stumbles, since a lot of everyday workflows break down due to limited app support.
For example, Microsoft Office and Adobe’s Creative Suite aren’t available, and while alternatives like LibreOffice or DaVinci Resolve exist, they’re not true replacements. For people like me who have been using the same apps for years, relearning software just to get work done is a dealbreaker.
Image by RaghavRaghav Sethi/MakeUseOf
The reality is that most industry-standard apps are available on macOS or Windows, and since I’m trying to move away from the latter, a Mac is my only real option. With macOS, I don’t need to worry about whether the tools I use will run or not, because the answer is almost always yes.
To Linux’s credit, it is actually miles better than macOS at gaming. I remember trying to game on Ubuntu years ago, and it was a complete disaster, but these days I run SteamOS on my Asus ROG Ally, and it suprisingly performs better than Windows in most games. I just wish the same effort that went into making games work flawlessly also went into broader app compatibility, because that’s still where Linux falls short.
3
Linux Still Has a Huge Learning Curve
There are tons of distros Windows users can try out to get started, but I’ve had to open the terminal every single time to get something working. I don’t mind it personally, since I’m a developer, and I’m comfortable typing out commands, but I can’t imagine telling an average user to do the same.
Like it or not, the terminal is still a necessity in pretty much every Linux distro, and that alone makes the learning curve steeper than most people would be willing to deal with. With so many distributions, package managers, and desktop environments, it’s often difficult to even find the right solution to a problem. A quick Google search might point you to instructions that are completely irrelevant to your setup, leaving you stuck and wasting time.
Image by Jayric Maning –no attributions requiredJayric Maning / MakeUseOf
Apple, on the other hand, is the complete opposite. Because it controls both the hardware and the software, macOS doesn’t suffer from the same fragmentation issues. You do give up the freedom Linux offers, but in exchange you get a system where things usually just work.
In fact, I’d say that out of the three major operating system families, macOS offers the best out-of-the-box experience. If someone asked me to recommend a laptop today, my default choice would be the MacBook Air for most people.
2
Hardware Support Can Be Very Hit or Miss
I’ve installed Linux on countless devices at this point and I have run into hardware issues almost every single time. As I mentioned earlier, I usually end up opening the terminal just to get basic functionality working.
A great example of this would be my secondary laptop which would refuse to boot Linux on a fairly standard Western Digital M.2 SSD. It took me hours of searching around on Google to figure out a solution, which was to add a specific boot argument in the bootloader. Even though I was able to fix this, I would never expect an average user to be able to figure it out.
Even secondary things like fingerprint readers or printers can be very hit-or-miss, and you might have to settle for living without hardware that you have already paid for.
Zarif Ali / MakeUseOf
That’s exactly why Macs stand out. macOS is built for Apple’s hardware, and the second I boot it up for the first time, everything just works. There is no need to go through forums and typing out weird commands just to get basic stuff working.
Unless more devices like the Steam Deck start showing up, where Linux comes preinstalled and already tuned for the hardware, this is always going to be a massive headache.
1
Most People Don’t Want to Install Another OS
The truth is most people don’t want to bother with installing another operating system. Creating a bootable USB, wiping their drive, and digging into the BIOS might sound simple enough to someone who has been using Linux for a while, but for the average person, even getting into the BIOS feels uncomfortable.
Image by Raghav Sethi – no attribution requiredRaghav Sethi/MakeUseOf
Even the creator of Linux has admitted this is one of the main reasons Linux has struggled to gain market share on desktops. It rarely comes preinstalled on devices, and that alone puts it out of reach for most people.
Most users are not looking to tinker with their computers. They just want something that turns on and works right away. And as long as Linux continues to rely on people installing it themselves, it is always going to feel like a niche option.
Even though I use a Mac as my daily driver, I have ditched Windows on all my other devices in favor of Linux and I still believe it is a much better choice than staying on Windows.
Linux still has plenty of flaws for most average users, but if your workflow works well on it, I would definitely encourage you to stick with it because you also get the benefits of the freedom that Linux provides that isn’t there on macOS.
The truth is, even the most powerful Windows 11 system can slow down if you don’t give it some attention. From clearing temporary files to keeping software up to date, there are simple and effective ways to keep your PC running like it did the day you got it.
7
Scan for Corrupt System Files
Your PC relies on certain system files to run smoothly, and if any of these files become corrupt, it can impact performance. Unexpected errors, crashes, or slowdowns often occur due to damaged system files that quietly disrupt Windows behind the scenes.
Windows 11 comes with a built-in tool called System File Checker (SFC) that can help with this. Running it with administrative privileges allows Windows to scan critical system files and repair them automatically.
For more complex problems, the Deployment Image Servicing and Management (DISM) tool can be helpful. It can repair the system image itself and ensure all core files are intact.
Screenshot by Pankil Shah — No attribution required
Similarly, you can run the Check Disk scan to examine every sector of your hard drive or SSD. If it detects errors or bad sectors, it will try to repair them and prevent future slowdowns or data loss. Running these scans regularly is like giving your PC a health check-up, so make sure you don’t skip them.
6
Clear Temporary Files
Think of your computer like a kitchen. You might be able to cook amazing meals, but if you never take out the trash, it’s only a matter of time before things get messy. Temporary files on Windows 11 are exactly that for your PC: digital trash.
These files keep piling on in the background every time you install software, browse the web, or even just update your system. Deleting temporary files is one of the easiest yet most effective ways to keep your PC running well.
Windows provides a built-in tool called Disk Cleanup that makes this process simple. All you have to do is run it every few weeks, and you’ll free up space you didn’t even know was missing.
Screenshot by Pankil Shah — No attribution required
You can also enable the Storage Sense feature to let Windows handle this for you. This way, Windows will clean temporary files at regular intervals, and you don’t have to worry about managing them manually.
5
Regularly Free Up Storage Space
Your PC could have the best specifications, but even the fastest processor and biggest RAM won’t save performance if your storage is nearly full. As your personal files, downloads, and apps pile up, Windows 11 has less breathing room to work, which can slow everything down.
That’s why keeping your PC’s storage in check is essential. Freeing up space regularly ensures Windows can run apps, install updates, and perform background tasks without slowdowns or unexpected errors.
Screenshot by John Awa-abuon
The good news is that reclaiming storage on your PC doesn’t mean losing anything important. Simple steps like emptying the Recycle Bin, removing old restore points, and deleting duplicate files can make a noticeable difference. Deleting unused user accounts and compressing large files can also free up space.
If you’re looking for a more long-term solution, though, you can move some of your less frequently used files to an external drive or back them up to the cloud. This will keep your main storage clear and also keep your data accessible in case you need them.
4
Clean Browser Cache
Between all the things we do on our PCs, it’s easy to overlook one app we rely on the most: the browser. Whether it’s streaming videos, shopping online, or logging into accounts, most of our daily activity happens there—so keeping it running smoothly is important.
One of the simplest ways to do that is by clearing its cache regularly. Although cached data is meant to help pages load faster, it can build up over time and slow things down. Clearing it will not only improve your browsing experience but also ensure websites display correctly.
Screenshot by Digvijay Kumar – No attribution
While you’re at it, make sure you review your installed browser extensions. Removing the ones you don’t use will free up system resources. Also, watch out for extensions that are no longer updated, as they can pose security risks.
Using extensions is a great way to add extra functionality, but keeping only the essential, trusted ones will ensure your browser remains fast and secure.
Even if you have a strong antivirus running on your PC, it’s still a good idea to run manual virus scans from time to time. Automated protection is great, but manual scans help you catch threats that might have slipped through.
With Windows 11, you don’t need a third-party antivirus to run manual scans. Windows Security makes it quick and easy. You can choose a quick scan to check the most vulnerable areas of your system, or a full scan for a more thorough inspection of every file and folder.
Screenshot by Pankil Shah — No attribution required
It’s best to run these scans when your PC isn’t busy with other demanding tasks. This way, the scan can run efficiently without affecting your system’s performance.
2
Keep Your Software and Drivers Up to Date
Even a well-maintained PC can run into slowdowns or errors if you’re running an outdated version of Windows. Software updates are not all about new features. Often, they include crucial performance improvements, bug fixes, and security patches that keep Windows 11 running in top shape.
Getting update prompts every few weeks can feel annoying, but you should not ignore them. If you don’t want updates interrupting you at the wrong time, you can set Active Hours on Windows, which prevents automatic restarts during the times you typically use your PC.
Screenshot by Pankil Shah — No attribution required
Keeping your system up to date isn’t just about Windows updates. Drivers, which enable your hardware to communicate properly with Windows, also need regular updates. Outdated drivers can often cause crashes or compatibility problems with apps and connected devices.
The same goes for your browser, apps, and other software. Regularly updating them is one of the simplest ways to prevent performance problems, boost system stability, and improve security.
1
Dust Off Your Hardware to Prevent Overheating
It’s not only the software that needs care—your PC’s hardware also needs some attention. Even a powerful Windows PC can struggle with everyday tasks if it overheats. Dust and debris can build up inside your computer, blocking fans, vents, and heatsinks. This can end up restricting the airflow and causing the internal temperatures to rise.
If you ignore it, overheating can also reduce the lifespan of your PC’s internal components. Regularly cleaning vents and fans helps maintain proper airflow and keeps your system running efficiently.
A soft brush and a can of compressed air work well for removing dust from fans, vents, and hard-to-reach areas. If you’re comfortable, you can also remove the panels to reach hidden areas and give your PC a thorough clean. Make sure the PC is powered off and unplugged before doing this.
Ideally, as long as you’re running Windows 11 on supported hardware, you shouldn’t run into performance issues. However, that’s usually not the reality. The good news is that keeping your system running fast doesn’t have to be complicated.
Performing all the above steps regularly might not be exciting, but the results are well worth it. Plus, keeping up with these maintenance tasks doesn’t take much time. Stick to them, and you’ll enjoy a Windows 11 experience that is smooth, secure, and hassle-free every day.
Adam Sandler is not one of my favorite actors, and the original Happy Gilmore has never been one of my favorite films. And yet, the newly released Netflix sequel, Happy Gilmore 2, worked for me.
There are spoilers regarding the Happy Gilmore 2 plot below.
Another Sequel?
Arriving 29 years after the original film, Happy Gilmore 2 once again features Sandler as a hockey player who became a successful golfer. However, this is not the same Happy Gilmore that we last saw at the end of the original. This one is an out-of-shape alcoholic and decidedly ex-golfer who continues to spiral after the death of his beloved wife, Virginia.
The movie centers on Happy Gilmore slowly picking himself up with the help of his kids and many of the beloved characters from the first movie. Along the way, he runs into a new nemesis or two, who try to wreak havoc in interesting, sometimes funny ways.
Call Me Skeptical
Movie sequels either succeed or fail. It’s been my experience that they are often big misses for a multitude of reasons. Most of the time, the stories in sequels are either tired rehashes of the original or ones that make no sense. Most sequels also tend to have a supporting cast that’s not as good as the one in the original movie, or worse, there’s a new star.
The first official trailer for Happy Gilmore 2 was released on Netflix’s YouTube channel, as well as on other platforms. My reaction was mixed. On the positive side, it was nice to see so many familiar faces from the original. Besides Sandler, this included Ben Stiller, Christopher McDonald, and Dennis Dugan. Julie Bowen, who was Gilmore’s love interest in the first film, Virginia, was also featured in the clip.
On the negative side, I quickly realized that several other cast members from the first film weren’t included in the trailer for an important reason: they had passed away. This included Carl Weathers, Bob Barker, Joe Flaherty, Richard Kiel, and, as Gilmore’s beloved grandma, Frances Bay.
Like the first film, Happy Gilmore 2 also included real-life golfers. In the trailer, seeing these folks left me flat, although I wanted to know whether the world’s number one player, Scottie Scheffler, could act.
Additionally, I was also unimpressed with the premise of the second film, as it was presented in the trailer. It was clear that something bad had happened in Gilmore’s life, and the sequel would spend a considerable amount of time showing him slowly recovering. This setup is often used in films, and it wasn’t something I was excited to see.
In the end, though I didn’t find Happy Gilmore 2 as inspiring as some of Netflix’s other films, it was a fun ride nonetheless.
Happy Gilmore 2 Mostly Worked
My plan was never to watch Happy Gilmore 2 based solely on my opinion of the trailer. And yet, on a quiet Sunday afternoon, my daughter and I decided to watch it. After all, it’s films like this that Netflix offers to justify its ever-rising monthly subscription price.
Almost immediately, I was surprised by the reason Sandler’s character was in such a bad state. It seems Virginia, who became Gilmore’s beloved wife off-screen, had died. She didn’t just die, however; a golf ball hit by Gilmore at a tournament did her in. The death scene (shown in a flashback) was one of those scenes only someone like Sandler could pull off. It was sad and funny all rolled into one.
Although it was unfortunate that Virginia’s death meant less screen time for Bowen, it set up a much better story than I had envisioned. With her death, Gilmore was left to raise five kids, the oldest of whom was hoping to go to college the following year. The problem? Gilmore was broke. Hence began a journey that saw Gilmore rise, and in doing so, become a better father, family man, and someone with a renewed love of the game of golf.
To get there, viewers had plenty of reasons to laugh, smile, and feel nostalgic throughout the journey. It was great seeing Sandler once again share the screen with people like Stiller and McDonald, as well as with newcomers like Bad Bunny, Benny Safdie, and Haley Joel Osment, who played the Gilmore universe’s new villain. The chemistry between Sandler and his real-life daughter, Sunny, also made for a fascinating story that had a lot of heart. And sure, new cameos by golfers like Scheffler, Jack Nicklaus, Rory McIlroy, and Nelly Korda sometimes felt forced, but they were fun nevertheless. I was also happy to see 86-year-old golf legend Lee Trevino return. And Travis Kelce’s cameo as a goofy waiter was also fun. The nicest addition was a scene near the end of the film when stars from the first who died were remembered through nostalgic clips. Well done.
Not everything about the sequel clicked. For example, though I enjoyed seeing Osment as a bad guy, little about the film’s big crescendo worked for me. The setup featured Gilmore and other real-life golfers competing against non-golfers in a fictional outdoor game called Maxi Golf, an exaggerated form of the game that incorporated elements of extreme sports and mini-golf. These scenes were mostly stupid, even though the payoff was rewarding enough to make them bearable.
I was pleasantly surprised to find that Happy Gilmore 2 worked for me, despite my initial skepticism. The sequel successfully avoided the pitfalls of many follow-ups by crafting a fresh, heartfelt story that felt both new and nostalgic. It was a movie that made me laugh, smile, and feel something for the characters again. The film ultimately succeeded because it was more than just a rehash of the original; it was a touching continuation of a beloved character’s journey. It’s definitely a feel-good movie worth watching.
My watchlist goes up and down, depending on the week and month. This week, I have some absolute corkers to get stuck into on Disney+—none of which you’ll want to miss.
Amanda Knox’s part in the murder of Meredith Kercher enraptured global news outlets in 2007; it didn’t end when she was (wrongfully) convicted alongside her then boyfriend, Raffaele Sollecito, in 2009. And even after Knox and Sollecito were acquitted once, retried, convicted again, and then pardoned, the story still didn’t end.
That’s what this eight-part true-crime miniseries explores: a dramatized set of events surrounding Knox, Sollecito, her trial, and eventual wrongful conviction. The series is co-produced by Knox and Monica Lewinsky (yes, that Monica Lewinsky), and it dives into coercive interrogations, media sensationalism, and judicial missteps.
Critics have praised the performance of Grace Van Patten (who plays Knox), and I’m interested to see how this series handles an emotionally charged story that was swamped by media at the time.
The Amateur slipped me by earlier in 2025, but it’s my kind of perfect background noise, Saturday evening film when playing board games or similar.
It features Rami Malek as a CIA operative who goes rogue in an attempt to avenge the death of his wife. So far, so normal. Through some coercion, he manages to become a highly-trained assassin with the help of Laurence Fishburn, who plays Colonel Henderson.
The Amateur has all the hallmarks of a classic action-thriller, packed with murders, personal grief, and the lust for retribution.
This three-part docuseries recounts the 2017 murders of two teenage girls in Delphi, Indiana. Using archival footage, interviews with victims’ families, and local officials, it paints an intimate portrait of a crime that haunted a community and the long road to justice.
I’d not heard about this horrific crime until this series appeared on Disney+, but the story’s central pillar—the haunting phone footage captured by one of the young victims—is a really sobering yet intriguing part of the story.
I know; we’re on a bit of a dark bent this week, but I promise it gets better next.
The Simpsons Season 37 is just around the corner, launching in September 2025. So, what better time for me to get back up to speed with what’s going on down in Springfield and catch up with one of America’s favorite families?
Like many of us, I started watching The Simpsons when I was very young. I also carried on for a long time, even after the quality of the show began its slow demise after Season 15, popping up with the odd 8.x rating here and there.
The first episode of Season 36 I watched, Bart’s Birthday, is one of the best in recent years, and one that was well-received by long-time fans of The Simpsons. But I must admit, I haven’t watched more than that yet, so I’m eager to get stuck into the rest of the series.
Hopefully, it has more than this one highlight and the traditional Treehouse of Horror spectacular.
See—I told you that we’d be ending the weekend with a slightly calmer focus. Ryan Reynolds narrates Underdogs, a series focusing on the “weird and unsung heroes of the animal kingdom.”
It’s packed full of amazing cinematography with Reynolds’ trademark sarcasm, though it adds in a considerable amount of toilet humor (with some veering into really rude) that makes it unsuitable for really young children. In that, Underdogs has a very mixed set of age reviews on Common Sense Media, ranging from 18+ down to 8+ (it’s rated 16+ on UK Disney+).
So, yes, while Underdogs definitely bring some comedy to the nature documentary genre, it’s not one you’ll be sitting down to watch with your smallest kids—unless you want to field some rather interesting questions based on Reynolds’ commentary. Don’t say you haven’t been warned!
Spreadsheet data never arrives clean. Between missing values, inconsistent formatting, and merged cells, I used to spend hours wrestling with messy datasets. Then I stumbled into Power Query, and suddenly those boring cleanup tasks felt less like punishment and more like flipping switches.
Power Query Makes Data Cleaning Effortless
Power Query is Excel’s built-in data transformation engine that automates tedious data tasks. Instead of manually cleaning each cell, you teach Power Query what you want once, and it applies those same steps to any dataset. You can remove duplicates, split columns, change data types, and handle missing values with just a few clicks.
It has a step-by-step approach and a visual interface, which makes it easy to follow. Every action that you perform is recorded as a step that can be modified or deleted later. Mainly, you’re manipulating data, not writing code—though it generates M code behind the scenes if you’re curious.
Power Query connects to virtually any data source, including Excel files, CSV documents, databases, web pages, and even cloud services. Simply add a file to the same folder, and Power Query will automatically fetch and tidy up that messy Excel sheet.
How to Set Up PowerQuery in Excel
Power Query comes built into Excel 2016 and later versions. So you don’t need a separate installation.
Take a look at the following products’ sales spreadsheet—it’s a mess. It has mixed date formats, inconsistent product names, missing values, and extra spaces everywhere. This is the kind of dataset that makes me want to quit Excel altogether.
Screenshot by Yasir Mahmood
But it’s easy to fix it with Power Query. Here’s how to set up your first transformation:
Select your data range or click anywhere within your dataset.
Go to Data, then click From Table/Range.
Excel will detect your data boundaries and create a table.
Click OK to open the Power Query Editor.
Make your transformations using the ribbon tools.
Click Close & Load to apply changes back to Excel.
The Power Query Editor opens in a separate window. This isolated environment lets you experiment without affecting your original data—think of it as a sandbox for data cleanup.
Your transformations get saved as queries in the Queries panel. These queries are reusable and refreshable. When new data arrives, simply right-click and select Refresh to apply the same cleaning steps automatically.
I find this automation handy when building lightning-fast lookup formulas, as clean, consistent data makes table relationships work well instead of breaking on minor formatting differences.
These Cleaning Steps Handle Most Data Problems
After loading the data into the Power Query Editor, the next step is to clean it. Let’s tackle the Sales Data file using Power Query’s transformations. The following steps solve 90% of common data issues.
Merged headers break everything. Power Query can’t properly detect column types with “SALES INFORMATION” spanning multiple columns. Follow these steps to fix it.
Select the merged header row in Power Query Editor.
Right-click and choose Remove Rows > Remove Top Rows.
Enter 1 to delete the merged header row.
Click OK. Now your real column headers are properly positioned.
Screenshot by Yasir Mahmood
Step 2: Standardize Date Formats
Our spreadsheet has eight different date formats, including problematic entries like “16/01/2024”. Power Query defaults to US date format (MM/DD/YYYY), so “16/01/2024” triggers an error since 16 can’t be a valid month. Unfortunately, you’ll have to replace these values manually or use Excel Date functions.
To standardize the dates:
Select the Date column.
Go to Transform > Data Type > Date.
Power Query detects most formats automatically—including “January 15, 2024” and “15-Jan-24”.
Check the preview to confirm all dates converted correctly.
When dealing with mixed international date formats, always preview your transformations. Power Query’s automatic detection works well for unambiguous formats but fails on DD/MM/YYYY when day values exceed 12.
To properly handle international date formats in Power Query, you must explicitly set the data type with the correct locale (e.g., English (United Kingdom) for DD/MM/YYYY) when changing the column type.
You can do this by right-clicking the column, selecting Change Type > Using Locale, then choosing Date and the desired locale. This is more precise than just during “initial data import.”
Step 3: Clean Up Text Inconsistencies
Product names like “surface laptop” need to be capitalized, and “iPhone 15,” “iphone15,” and “iPhone-15” need standardization. That is where Power Query really shines:
Select the Product Name column.
Go to Transform > Formatand select the proper case to fix capitalization.
Then again, click Transform > Replace Values to standardize variations.
Screenshot by Yasir Mahmood
Those leading and trailing spaces in sales rep names create lookup failures—one of those Excel blunders that can cost you time during analysis. To fix that:
Select the Sales Rep column.
Go to Transform > Format > Trim.
The spaces disappear from entries like ” sarah johnson ” and ” Emma Taylor”. This single click fixes spacing issues that would otherwise break pivot tables and VLOOKUP formulas.
Step 5: Handle Missing Values Intelligently
Empty cells in the Category and Units Sold columns need attention. Power Query offers several approaches.
For Categories:
Select the Category column.
Then go to Transform > Replace Values.
Replace null values with “Uncategorized” or leave blank for manual review.
Screenshot by Yasir Mahmood
For numeric columns like Units Sold, replacing nulls with zero might skew averages. Consider marking these as “Data Missing” instead.
Step 6: Standardize Currency Formats
Revenue values appear as “$1,200,” “1200,” and “$1.2K”—each requires different handling.
Select the Revenue column.
Use Replace Values to convert “$1.2K” to “1200”.
Then go to Transform > Data Type > Currency, which automatically handles dollar signs and commas.
Preview the results to ensure proper conversion.
Screenshot by Yasir Mahmood
The “K” abbreviation needs manual replacement since Power Query doesn’t automatically recognize this notation.
Step 7: Create Consistent Categories
“Electronics,” “electronics,” and “ELECTRONICS” should be identical. Power Query’s text functions solve this quickly.
Select the Category column.
Click Transform > Format and select the proper case to fix capitalization.
These seven steps handle the majority of data cleaning scenarios. These transformations become repeatable steps. You just have to apply the same process to next month’s messy sales data with a single refresh.
Each transformation appears in the Applied Steps panel. You can modify, delete, or reorder steps without starting over. This flexibility makes Power Query forgiving when you need to adjust your cleaning process.
Power Query won’t solve every data problem you encounter, but it handles most of the repetitive cleanup tasks that consume hours of manual work. Sure, the learning curve exists if you work on complex worksheets, yet the time savings become apparent quickly. Whether you’re dealing with monthly reports or one-off datasets, these transformation techniques provide a solid foundation for cleaner, more reliable data analysis.
At first, AirPods seem just like any other true wireless earbuds. And that was my impression too, until I discovered a couple of little-known features. Notably, Conversation Awareness and Live Listen have become game-changers in my daily routine.
Stay Aware of Conversations Without Removing AirPods
When you have your AirPods on, you probably just want to enjoy your music or podcast without being disturbed by the surrounding noise. The noise cancellation feature surely helps with that. However, there are times when you need to be aware of what’s happening around you.
Perhaps you want to have a quick chat with someone, or you’re at the airport and don’t want to miss announcements. In such cases, you don’t need to remove your AirPods or keep pausing the media playback repeatedly.
Enabling the Transparency mode on your AirPods lets outside sounds in while keeping your audio playing. This way, you can stay aware of your surroundings without giving up your listening experience.
For instance, if someone calls your name from across the room or an announcement comes over the loudspeaker, you’ll hear it right away without fumbling to remove your AirPods.
Switching to Transparency mode is easy, and you don’t even have to pull out your iPhone for this. Simply press and hold the force sensor on the stem of either AirPod, and it will toggle between Active Noise Cancellation and Transparency mode.
Mahnoor Faisal/MakeUseOfMahnoor Faisal/MakeUseOf
While Transparency mode is great for staying aware of conversations, you may not find it ideal for enjoying your music or podcast, especially in places where there’s too much noise. The Conversation Awareness feature on AirPods can solve that.
This mode automatically lowers the volume of your media and amplifies nearby voices when you start speaking to someone. And it does this while reducing other background noise. Once you stop talking, it automatically switches your media back to the previous volume. You can enable Conversation Awareness by heading to AirPods settings on your iPhone.
Screenshot by Pankil Shah — No attribution required
Screenshot by Pankil Shah — No attribution required
Conversation Awareness is only available on AirPods Pro (2nd generation) and AirPods 4 (with Active Noise Cancellation).
The convenience of Conversation Awareness is quite remarkable. Imagine waiting in line at a coffee shop. When it’s your turn, you can give your order without pausing your music or removing your AirPods.
Turn Your iPhone and AirPods Into a Makeshift Baby Monitor
AirPods are great for music and calls, but that’s not all they can do. One clever use I’ve found is turning them into a baby monitor. It might sound unconventional, but it works—and, as other parents will know, quality baby monitors don’t come cheap.
When you have a little one napping in another room, you don’t have to stick nearby to make sure they’re okay. With just your iPhone and AirPods, you can keep an ear out while still going about your day. For this, you’ll need the Live Listen feature on your AirPods.
The way it works is simple. Your iPhone’s microphone picks up sounds and streams them directly to your AirPods in real time. To use it as a baby monitor, all you need to do is place your iPhone near your baby’s crib, connect your AirPods, and then enable the Live Listen feature. For the last part, you’ll need to use the Control Center on your iPhone.
Open Control Center by swiping down from the top right corner of your iPhone’s screen.
Tap the plus button in the top left corner and choose Add a Control.
Go to the Hearing Accessibility section and tap Live Listen.
Now, with your AirPods in your ears, tap the Live Listen button in the Control Center to start listening. You’ll hear everything picked up by your iPhone’s microphone, loud and clear. Make sure your iPhone’s volume is turned all the way up.
Screenshot by Pankil Shah — No attribution required
Screenshot by Pankil Shah — No attribution required
Screenshot by Pankil Shah — No attribution required
You can even monitor your headphone audio levels in real time while listening. This feature doesn’t record the audio, but if you happen to miss something, there’s an option to replay the last ten seconds of audio. Live Listen also works when your iPhone is connected to an external wired microphone.
When I first got my AirPods, I had no idea the Live Listen feature even existed. Discovering it has been a game-changer. Now, I can move around the house, finish chores, or read my books, all while keeping an ear on my little one. It’s amazing how a simple feature can add such peace of mind.
It’s important to use the Live Listen feature responsibly. It’s designed to be helpful, not for spying or eavesdropping.
At a glance, most earbuds look the same and get the job done, but inexpensive ones often leave out extra features. If you’ve invested in a pair of AirPods, the real deal isn’t just in the sound quality. Knowing about its hidden features can transform how you use them every single day.
Conversation Awareness and Live Listen are just a couple of examples. AirPods pack in plenty of other features, from spatial audio to built-in hearing tests, that are worth checking out.
I use Firefox primarily because I have always believed it’s the gold standard for privacy. This is more than an assumption—it’s how the browser markets itself. However, after many years of using the browser, I quit. It took some deep digging, but honestly, beyond the surface, the cracks begin to show.
3
Firefox Enhanced Tracker Protection is a Myth
Once you’re connected to the internet, websites use cookies, scripts, and pixels to track you. With these elements, websites and advertisers can follow your activity across the internet. What makes this scary for any privacy-conscious person is that a high level of information is gathered without consent. Your location, browsing habits, and other inferred personal traits become game in someone else’s hands.
Browsers can be a potent defense against this type of intrusive tracking. This is exactly what I expected from the Firefox Enhanced Tracker Protection, but its effectiveness is limited at best.
I ran the Browser Leaks Content Filters test on Firefox. This test shows if privacy-enhancing tools modify the browsing experience on a given browser. On Firefox, there was a conspicuous lack of privacy-enhancing tools: no Tor letterboxing, no canvas protection, no ad-blocking subscriptions.
Next, I ran the Cover Your Tracks fingerprinting test. This test by the Electronic Frontier Foundation (EFF) tells you if your browser is actively preventing fingerprinting across websites. Here, I got a unique fingerprint, proving that Firefox is not protecting me from being fingerprinted across the internet.
A randomized fingerprint is the ideal option for privacy. It implies that you do not stand out and can not be told apart from the next person using the same browser.
By default, Firefox was offering very weak privacy out of the box. For a privacy browser, it’s not doing the barest minimum. There may be many reasons to use Firefox, but privacy is not one of them, and that was the one factor that meant the most to me.
The Problem With Hardening a Browser
I know it’s possible to harden Firefox, but most people simply download a browser and start using it as it comes. I have used hardened Firefox and it really does well in many privacy tests; however, if this were to be the case, Firefox should have marketed the browser as a great data privacy option only after user hardening.
The second problem with tweaking your browser, especially for privacy or anonymity’s sake, is that the more hardening you do, the more you stand out. This is horrible because you become fingerprintable across the web and lose the benefits of going through the internet without sticking out like a sore thumb.
Do Any Other Browsers Perform Better Than Firefox in Privacy Tests?
If this abysmal privacy level is consistent across all browsers, there is no need to complain. So, I ran two browsers through some of the same privacy tests. The first was Librewolf.
On the Browser Leaks Content Filter test, Librewolf did better than Firefox. The test revealed adblock filters where Firefox had none. It also revealed that Librewolf was equipped with canvas protection, where Firefox again, had none.
The second browser I put to the test was Mullvad. This is a more recent browser, but just like Firefox, it’s marketed as a great privacy option. The results here were almost identical to Librewolf. The main difference was that, in addition to canvas protection, it also offers Tor letterboxing, which is additional protection against fingerprinting attacks.
At least now I have two alternatives that offer better privacy out of the box without the need for any hardening.
2
The Updated Terms of Use Was the Straw That Broke the Camel’s Back
If the lack of basic privacy enhancements were not enough to make me quit, Mozilla’s updated privacy notice was the final straw.
With regard to collected user data, part of the terms of use read:
…you hereby grant us a nonexclusive, royalty-free, worldwide license to use that information to help you navigate, experience, and interact with online content as you indicate with your use of Firefox.
For a company that claims not to be big tech, this update feels very much like what you would expect from big tech. Of course, there was a lot of backlash. So much so that they swiftly updated and deleted the part of the terms of use quoted above.
It’s too little, too late. Firefox is free and open-source but this level of control over my data is a price too steep to pay. I was not willing to grant Mozilla a nonexclusive, royalty-free, worldwide license to use my information.
1
The Firefox Warning Signs Had Always Been There
When the cracks start showing, you realize there is a lot you had overlooked. The wording of the terms of use made me realize that there is a lot I had ignored. They became more glaring and a reminder that Firefox was not the privacy browser I loved.
The now-discontinued Pocket Integration is an example. It included recommendation tracking, involved a third-party, and connected to external servers without consent. This should have raised red flags for anyone who values privacy over convenience.
Another thing that should have bothered me is its search deal with Google, Mozilla’s largest revenue source. Google is one of the biggest data harvesters—these kinds of collaborations are a conflict of interest.
To me, Firefox now feels like a regular browser, not one built for privacy. It boasts some great convenience features that rival those of Chrome or Edge. However, that is where it now truly belongs: the class of convenient, sleek browsers, with limited privacy options.
So yes, I quit using Firefox, but am I telling you to do the same? Not at all. It still serves a purpose, but if you are seeking true privacy, you should explore Mullvad or Librewolf. These are options that come with real privacy defaults out of the box.
Switching to Samsung felt like opening a box of hidden treasures. And while the default setup was good, a few quick settings tweaks turned my phone into one I can’t put down.
7
Unlock Crisp Visuals Using QHD+ Resolution
The first aspect I noticed when switching to a Samsung phone was the display. It already looked sharp and bright, but later I learned it wasn’t even showing its highest resolution. By default, your Galaxy lowers the resolution to save battery.
Switching to the higher-quality option feels like wiping smudges off the glass; everything looks crisper and clearer. To try it, open Settings, tap Display, then choose Screen resolution. Set it to QHD+ (on some models, it may show as WQHD+).
Digvijay Kumar / MakeUseOf
Digvijay Kumar / MakeUseOf
Digvijay Kumar / MakeUseOf
If you want more control, you can also adjust Screen zoom and Font size so text and icons fit exactly the way you like.
6
Enable Fast Charging for Quick Power
We’ve all had mornings where the battery sits in the red just as you’re about to leave. Plugging it in feels like a lost cause, but that’s when Samsung’s fast charging proves itself.
To make sure it’s active, open Settings, go to Battery, and tap Charging settings. You’ll see switches for Fast charging and, if you use it, Fast wireless charging. Once enabled, your phone automatically pulls at the fastest speed it can with the charger and cable you’re using.
Digvijay Kumar / MakeUseOf
Digvijay Kumar / MakeUseOf
Digvijay Kumar / MakeUseOf
The difference shows most with Samsung’s official adapters. A 25W charger fills up quickly, but a 45W charger takes it further: roughly 50% in a little over 20 minutes, and close to full in about an hour, depending on heat and background use.
If you’ve ever wondered why not all chargers are equal, it comes down to how much power they can deliver and how your phone manages it.
Digvijay Kumar / MakeUseOf
Digvijay Kumar / MakeUseOf
While you’re already on the Battery menu, look for Battery protection. On One UI 7, you’ll find options like Basic, Adaptive, or Maximum. Adaptive pauses charging at 80% overnight and finishes up before you wake up, while Maximum lets you cap charging at a percentage you choose. Both help keep your battery healthy in the long run without you having to do anything special.
5
Make Every Swipe Smoother Using Adaptive Motion
Samsung phones have a setting called Motion smoothness, which controls how responsive the screen feels. Even though higher refresh rates are common on budget phones now, it’s still worth checking that this option is enabled.
Open Settings, go to Display, then tap Motion smoothness. You’ll see two choices: Standard (a fixed refresh rate of 60Hz) and Adaptive. The latter can raise the refresh rate to your phone’s maximum (usually 120Hz) while you’re scrolling or gaming, and lower it again when the content is static to save power.
Digvijay Kumar / MakeUseOf
Digvijay Kumar / MakeUseOf
Digvijay Kumar / MakeUseOf
Adaptive gives you a smoother experience, while Standard is better if you want to stretch your battery life. Beyond that, there are settings that make your phone run faster if you need an extra boost.
If you’d like the interface to feel even quicker, you can reduce the animations. Navigate to Settings > Accessibility > Vision enhancements, then toggle on Reduce animations. This doesn’t change the refresh rate, but it shortens transitions so apps open and close faster. It pairs well with Adaptive.
Digvijay Kumar / MakeUseOf
Digvijay Kumar / MakeUseOf
Digvijay Kumar / MakeUseOf
4
Stay Fresh With Scheduled Restarts
Phones, like any other device, perform better with an occasional restart. Doing so clears temporary files, frees up memory, and prevents small slowdowns that build up over time. Samsung includes a feature that can restart your phone automatically at a time you choose.
Go to Settings, open Device care, then Auto optimization. Tap Auto restart, toggle Restart on schedule, and pick the day and time that suits you.
I set mine for early Sunday at 3AM. The phone restarts while I’m asleep, so it feels fresh and ready to use when I pick it up later.
The restart won’t happen if the battery is too low or you’re actively using the phone. It usually runs within an hour of the time you set, once the phone is idle.
3
Mute Your Phone With a Quick Hand Gesture
Ever had your phone ring in the middle of a meeting or buzz on the nightstand when you’re half-asleep? In those moments, scrambling for buttons feels clumsy. Samsung solves this with a gesture-based mute that uses built-in sensors to detect quick motions, so you don’t even have to touch the screen.
To turn it on, open Settings, tap Advanced features, then go to Motions and gestures. Toggle on Mute with gestures. Once it’s enabled, place your palm over the screen or flip the phone face down to silence calls or alarms. I use it most when I’m groggy and don’t want to fumble with buttons.
Digvijay Kumar / MakeUseOf
Digvijay Kumar / MakeUseOf
Digvijay Kumar / MakeUseOf
Make sure the sensors aren’t blocked by a bulky case or thick screen protector; otherwise, they may not register as smoothly.
2
Reply Faster With Suggested Responses
Sometimes you need to fire off a quick reply without breaking your flow. Samsung Keyboard makes this easier by suggesting short responses right above the keys where you’re typing.
For example, if someone texts you “Dinner at 8?”, you might see options like Sureor Sounds good appear above the keyboard. A single tap, and your reply is sent. To turn this on, open Settings, go to Advanced features, then pick Labs. Inside, select Suggested replies and turn it on.
For it to work, the Samsung Keyboard must be your default keyboard. Check this in Settings > General management > Keyboard list and default > Default keyboard. If you’re using another keyboard, the suggestions won’t appear inside chat apps.
You can also bring the same convenience to your notifications, so you don’t even have to open the conversation to reply. To do this, head to Settings, tap Notifications, then Advanced settings, and enable Suggest actions and replies for notifications. Once on, suggested replies appear right below incoming message notifications.
Digvijay Kumar / MakeUseOf
Digvijay Kumar / MakeUseOf
Digvijay Kumar / MakeUseOf
Now, when someone asks “Are you on your way?”, you might see replies like Yes or Be there soon right in the notification shade. Tap once, and the reply is sent without breaking what you’re doing.
1
Track Dismissed Alerts in Notification History
I’ve lost count of how many times I’ve swiped away a notification too quickly and then spent the next few minutes wondering what I missed. With Notification History on, those moments aren’t a worry anymore. The phone keeps a rolling 24-hour log of your alerts, so if you accidentally dismiss something, you can scroll back and check it.
To turn it on, open Settings, tap Notifications, then Advanced settings, and toggle Notification history on. From that point, your phone keeps track of alerts from up to the previous day. You can tap an entry to jump into the app it came from, which feels like rewinding your notification panel.
While in the same menu, you can also enable the Show snoozebutton option. Snooze lets you hide a notification and bring it back later, which helps when you don’t want to deal with something immediately but don’t want to lose track of it either.
These are some settings I tweaked to turn my Samsung device from a good phone to one that fits me. If you’ve just switched or have never dug into the menus, give them a try and see how much smoother your daily use becomes. And if you’re still curious, there are plenty of other hidden Samsung settings you should explore.
Not all memory cards are created equal. Buy the wrong one, and you risk slow performance, lost files, or wasted money.
5
Storage Capacity Isn’t Everything
When most people shop for a new memory card, their eyes go straight to the capacity—128GB, 256GB, or even 1TB. You can even pick up 2TB microSD cards. But more storage doesn’t always mean better.
If your device is older, it might not support higher-capacity cards like SDXC (more on this in a moment). You could spend extra on space you’ll never be able to use. More capacity is often the best option; you don’t want to have to constantly transfer your data.
nar by Gavin
The right choice depends on your device and how you’re using it. A professional photographer will be rocking cards of at least 512GB, if not more. In fairness, someone adding games to their Nintendo Switch might use the same, depending on their library size.
Note that the Nintendo Switch 2 uses a new SD card format, microSD Express, which is much faster than the older formats.
4
Card Type and Format Are Also Very Important
Beyond size, you need to know what type of card your device supports. The most common are SD and microSD, with microSD cards often shipped with adapters to fit full-size SD slots. But beyond the shape, SD and microSD cards share the same standards.
But that’s not all. Remember “SDXC” from the previous section? That stands for Secure Digital eXtended Capacity, and it refers to a specific SD card format. There are multiple SD card formats, defining the capacity range of the card. And when it comes to SD cards, you’ll want to check the device you’re using before buying, as some devices only work with certain formats.
Type / Format
Capacity Range
microSD/SD (Secure Digital)
Up to 2GB
microSDHC/SDHC (Secure Digital High Capacity)
4GB – 32GB
microSDXC/SDXC (Secure Digital eXtended Capacity)
64GB – 2TB
microSDUC/SDUC (Secure Digital Ultra Capacity)
2TB – 128TB (rare)
Seems simple enough, right?
Unfortunately, it’s not all clean sailing, as some of those formats aren’t compatible with one another. For example, where an older microSD card will work in basically any microSD card slot, a microSDUC is incompatible with microSD, microSDHC, and microSDXC-only devices. So while the cards are similar in size, they’re not all plug-and-play.
Works In
Does NOT Work In
SD (Secure Digital)
SD, SDHC, SDXC slots
Devices that only support SDHC/SDXC features
SDHC (Secure Digital High Capacity)
SDHC, SDXC slots
SD-only devices
SDXC (Secure Digital eXtended Capacity)
SDXC slots
SD-only or SDHC-only devices
SDUC (Secure Digital Ultra Capacity)
SDUC slots
Any device without SDUC support
microSD
microSD, microSDHC, microSDXC slots
—
microSDHC
microSDHC, microSDXC slots
microSD-only devices
microSDXC
microSDXC slots
microSD-only or microSDHC-only devices
microSDUC
microSDUC slots
Any device without microSDUC support
In short: newer cards don’t work in older devices, but older cards usually work in newer devices.
3
Speed Ratings and Classes Are Vital
Speed ratings are one of the most misunderstood features of memory cards, but they’re critical. You’ll usually see a jumble of numbers and letters printed on the card.
Standard
Class / Rating
Minimum Write Speed
Typical Use Case
Speed Class
C2
2 MB/s
Basic still photos, SD video
C4
4 MB/s
Entry-level HD video
C6
6 MB/s
Standard HD video recording
C10
10 MB/s
Full HD video, fast photo capture
UHS Speed Class
U1
10 MB/s
Full HD video, light 4K
U3
30 MB/s
4K video, burst photography
Video Speed Class
V6
6 MB/s
SD / HD video
V10
10 MB/s
Full HD video
V30
30 MB/s
4K video (most common)
V60
60 MB/s
4K/6K video, high-bitrate
V90
90 MB/s
8K video, pro workflows
The system has been updated a few times over the years to add more information for specific users. For example, the original rating system, Speed Class, only indicated the minimum write speeds of the card, whereas newer rating systems like Video Speed Class specifically reference capturing 4K footage.
The difference becomes most notable for high-capacity data transfers, like capturing footage, transferring large files, and so on.
2
Double-Check the Read and Write Speeds
The read and write speeds are one area manufacturers love to push the biggest numbers possible, but they don’t always highlight the most important number.
In that, you’ll often see a huge headline for the read speeds, which affect how fast you can copy files from the card to your computer. Don’t get me wrong; more is better in this camp. Who doesn’t want to transfer their files faster?
But the more important number is write speeds, which detail how quickly you can save files to the SD card. If the write speed can’t keep up with the device you’re using, you’ll end up bottlenecked by your memory card.
When shopping, look for cards that clearly list both read and write speeds, and make sure the write speed matches your workload.
1
Brand, Authenticity, and Counterfeits
One of the biggest risks when buying memory cards is counterfeits. Fake cards are rampant on marketplaces like Amazon or eBay, often sold at too-good-to-be-true prices. They may look identical to the real thing but fail after minimal use, losing your files.
There are several ways you can spot fake microSD cards before buying them. The ultra-dodgy microSD card listings are usually a giveaway, but you need to know what you’re looking for to begin with.
I’d generally advise steering clear of buying memory cards on the big discount sites such as Wish and Temu. And when shopping on Amazon, try to shop on the official brand stores rather than no-name, bunch-of-letters-and-numbers outlets. Stick to trusted brands like SanDisk, Samsung, Lexar, and Kingston.
The final point is that the most expensive card isn’t always the best. You may end up paying a premium for high-end features you don’t need or use. Don’t just focus on size or price—check the card type, speed ratings, write speeds, durability, and authenticity.
You don’t need a massive workshop full of fancy gear to tackle most home projects. With just a few well-chosen power tools, you can handle repairs, upgrades, and creative projects on your own like a pro.
5
Router
The Unexpected Key to Craftsmanship
If you’ve ever struggled to make perfectly flush edges or wanted to create detailed woodworking without hiring a pro, the router (a wood router, not a new wireless router!) is your answer. It requires a bit of learning, but the results are instantly rewarding.
Tyler Fyock/MakeUseOf
A router may not be the first power tool you imagine owning, but once it’s in your arsenal, it transforms your woodworking capabilities. This tool isn’t just for professionals; it’s a versatile machine that shapes edges, carves grooves, and even crafts complex joints.
Think of a router as your go-to for adding personality and precision to wood. You can create smooth, rounded edges on a homemade shelf, or cut grooves for drawer bottoms with a router bit. Beyond aesthetics, it helps build structural strength through clean joinery. Plus, it’s excellent for trimming laminate or cutting decorative inlays.
Tyler Fyock/MakeUseOf
A good router offers variable speed control, letting you dial down for delicate finishes or ramp up for heavier cuts. My CRAFTSMAN V20 Cordless Router makes height adjustment simple and intuitive, and even comes with a sturdy edge guide to keep a uniform cutting depth.
Many homeowners overlook the router, instead focusing on drills and saws, but this tool bridges the gap between basic carpentry and craftsmanship. Whether handheld or mounted on a table, it becomes indispensable for cabinetry, furniture restoration, or making custom trim work that fits your home’s unique style.
4
Jigsaw
Your Tool for Curves, Cutouts, and Creativity
When your project calls for something less linear, the jigsaw comes into play. Unlike circular or miter saws, which excel at straight cuts, the jigsaw’s narrow blade dances through dense materials with fluid curves and tight turns. It’s the tool you reach for when making custom cutouts—think cut-in holes for sinks, intricate shapes in plywood, or fitting flooring around corners.
Tyler Fyock/MakeUseOf
What makes the jigsaw invaluable is its maneuverability and control. It allows you to create shapes that are impossible with other saws, opening up creative possibilities without sacrificing precision. Its compact design lets you work comfortably on smaller projects or awkward angles without losing power.
Tyler Fyock/MakeUseOf
For a homeowner, this means no need to outsource odd-shaped cuts or special fixtures. Certain jigsaws, like my CRAFTSMAN V20 RP Cordless Jig Saw, will easily handle plunge cuts, so you can start cutting mid-board without drilling pilot holes. Variable speed settings let you adjust the blade’s pace for different materials, preventing splintering or burn marks.
Tyler Fyock/MakeUseOf
Though it can’t replace a circular saw for long, straight cuts, the jigsaw’s specialty is in that unique flexibility. Its blades come in a variety of teeth per inch, tailored for metal, wood, or plastic, which keeps it versatile. And while you should keep your toolkit close at hand, be aware that storing it under the sink is a big mistake.
3
Mouse Sander (Detail/Orbital Sander)
Finishing With Precision
Sanding might sound like a chore, but it’s the difference between a project that looks amateur and one that’s polished and professional. The mouse sander—a small, electric orbital or detail sander—is designed for precision in tight spots and edges where larger tools simply won’t fit.
This type of sander fits perfectly in your hand, allowing you to smooth window sills, furniture legs, and corners without leaving swirl marks or uneven surfaces. It’s great for prepping surfaces before painting or refinishing, making your work crisp and clean.
Tyler Fyock/MakeUseOf
Unlike the larger orbital sander that covers broad surfaces quickly, the mouse sander lets you navigate intricate shapes and awkward spots. It’s also perfect for removing old paint or smoothing out imperfections without over-sanding. For woodworkers and renovators, it’s a finishing touch tool that improves results dramatically.
Tyler Fyock/MakeUseOf
My Warrior Detail Sander comes with a dust collection port, which allows for a cleaner workspace, especially indoors. Swapping sanding pads is quick with its hook and loop fastener, and the variety of grit options lets me go from rough sanding to ultra-smooth finishing in no time.
The mouse sander turns tedious manual sanding into something much faster and less exhausting. If you enjoy tackling restoration projects, furniture upgrades, or simply want a smoother look to your home, this tool will save you the headache.
2
Circular Saw
The Essential Cutting Powerhouse
Few tools are as fundamental as the circular saw. This handheld workhorse is as intimidating as it is essential, allowing you to cut lumber, plywood, and other materials anywhere you need. It’s the backbone of framing, flooring, and general carpentry projects because of its unmatched versatility and mobility.
Tyler Fyock/MakeUseOf
Unlike stationary saws, the circular saw lets you take your work wherever the job demands. Need to cut plywood sheets outside? No problem. Want to trim boards to length on the spot? Easy. Its adjustable blade depth lets you slice through materials precisely without wasting wood.
The circular saw excels at both rip cuts (along the grain) and crosscuts (across the grain). This dual capability makes it perfect for everything from framing walls to building furniture. Most models, like my CRAFTSMAN V20 Cordless Circular Saw, allow you to adjust the bevel angle of the blade to create a slope on the edge of your material.
Tyler Fyock/MakeUseOf
You’ll want to invest in a good-quality blade; carbide-tipped blades tend to last longer and produce cleaner cuts. Cordless models give you the freedom to work anywhere without worrying about extension cords, though corded saws usually pack more of a punch for tough jobs.
Tyler Fyock/MakeUseOf
If you’re buying only one saw for your home, the circular saw is the clear winner. It’s the machine that tackles nearly any cutting task efficiently and with confidence. Plus, mastering it opens the door to larger projects that would otherwise be out of reach.
1
Cordless Drill and Impact Driver Combo
The Cornerstone of Every Project
If you had to choose just one set of tools to get started with, a cordless drill and impact driver combo is the one. These are the most versatile tools within every homeowner’s toolkit, powering everything from simple hanging tasks to serious construction.
Tyler Fyock/MakeUseOf
The cordless drill handles most drilling and driving needs: drilling pilot holes, hanging drywall, or assembling furniture. Its adjustable clutch protects screws from stripping and helps you control torque perfectly. The freedom of cordless means you won’t be tethered by cords in cramped spaces or outdoors.
The impact driver complements the drill perfectly by delivering more torque and power for driving long screws or bolts into tough materials, such as hardwood studs or even concrete. It uses rapid bursts of rotational force, so it’s easier on your wrists and much more efficient for heavy-duty fastening.
Tyler Fyock/MakeUseOf
Together, these tools will be used in 90% of the home improvement projects you’ll encounter. They’re indispensable for more ambitious projects, like building a deck or assembling cabinetry. But you’ll find them just as useful for basic maintenance, like tightening loose door hinges or installing shelves.
With newer brushless models, like my Milwaukee M18 Fuel Combo Kit, you’ll maintain more power and a longer battery life with a significantly more efficient motor. Brushless motors also tend to run cooler and last longer in general, giving you more bang for your buck.
Tyler Fyock/MakeUseOf
Over time, you’ll accumulate bits and attachments that expand what these tools are capable of. Starting with this combo empowers you to take on projects with confidence, speed, and precision. No other power tools get used as often or in as many different ways, making them the true foundation of your tool collection.
Tyler Fyock/MakeUseOf
Owning these tools means having the freedom to fix, create, and customize without calling in help for every project. They also save money long-term, giving you the skills to tackle new challenges as they arise.
With practice, these power tools will feel second nature to you, making projects faster, cleaner, and more satisfying. Dive in and watch your home improve with every project you cut, sand, or drill through. Your home deserves tools that work as hard as you do.
Once upon a time, I thought SD and microSD cards were the safest places for my files. They are tiny, portable, and easy to pop into a camera, smartphone, or laptop—what could go wrong? However, experience has taught me that trusting a memory card with your only copy is a gamble you’ll eventually lose.
Physical Fragility
Memory cards are marketed as rugged, portable storage with many even claiming to be waterproof, shockproof, and X-ray-proof. And yes, those things might help if you drop one into a puddle or pass it through airport security. But in everyday life, memory cards have one glaring weakness: they’re small, thin pieces of plastic.
I’ve seen cards snap while being removed from devices. I’ve had one slip out of my fingers, fall onto a hard floor, and refuse to read afterward. I’ve had another vanish entirely into the mysterious pocket universe where lost socks and USB caps go.
Even if you’re careful, the tiny contacts on the back can get scratched or worn down over time, leading to read errors. They’re also surprisingly easy to bend if they’re not stored in a protective case.
And while some cards can survive a quick wash cycle in your jeans pocket, others will simply stop working after the smallest bit of moisture exposure. I’ve learned that “waterproof,” one of the tech buzzwords that is just marketing hype, often means “might survive if you dunk it for two seconds and get really lucky,” not “safe in all real-world scenarios.”
Compatibility and Counterfeit Issues
The memory card world is a bit of a Wild West. You’d think buying a card with a big brand name would be enough to guarantee quality, but even that’s not foolproof. Counterfeit cards are everywhere, especially from sketchy online sellers. They often have misleading labels claiming huge capacities (512GB or even 1TB), but in reality, the card has far less space. Once you exceed the real capacity, the card simply starts overwriting existing data, which is as disastrous as it sounds.
Even with genuine cards, compatibility issues can strike. Some older cameras and devices can’t handle newer, high-capacity SDXC cards, leading to read or write errors. Others format the card in a way that’s only partly compatible with other devices, so moving it between gadgets becomes a gamble. Sometimes it’s hard to know whether the problem lies with the card, the card reader, the cable, or the device itself, which can lead to wasted hours troubleshooting. There are a few ways you can avoid buying a fake SD card to begin with; some folks refuse to buy micro SD cards on Amazon for this reason!
Silent Failures Are the Worst Kind
There are warning signs your hard drive will give when it’s failing, like strange noises, slower performance, and maybe even an ominous clicking sound that sends shivers down your spine. Memory cards, on the other hand, usually fail in complete silence. They’ll sit there inside your device, acting perfectly fine while quietly corrupting your files in the background. It might affect only a handful of files, and you won’t know which ones until you need them.
Worse still, some cards will let you keep adding new files even as old ones quietly go bad. This false sense of security can lead to weeks or months of lost memories or work before you even realize anything’s wrong.
I Rely on More Dependable Options
These days, I only use memory cards for temporary, low-risk storage—things I can afford to lose, like transferring files from one device to another. For anything important, any of the best cloud storage services is now my first choice. Google Drive, Dropbox, and OneDrive all offer redundancy, meaning your files live on multiple servers in multiple locations. If one fails, your data doesn’t disappear with it. The biggest advantage is accessibility: I can get to my files from any device, anywhere, without carrying around a fragile piece of plastic.
For large files or offline backups, I rely on external SSDs. They’re faster, sturdier, and have far better longevity than memory cards. I also keep a couple of high-quality USB flash drives from reputable brands for quick transfers that I know will work on almost any computer without compatibility headaches.
I’ve also gotten into the habit of keeping multiple backups in different formats. For example, I’ll store photos in the cloud, on an SSD, and on my main computer. That way, even if one storage method fails, I still have at least two other copies.
This might sound like overkill, but it’s saved me more than once. Losing files you care about is a sickening feeling, and after you’ve been through it, you’ll do whatever it takes to avoid it happening again.
I haven’t banned memory cards entirely from my life. They still have their uses, and I’m not about to throw away the ones I own. But I treat them like a convenience, not a vault. If I’m carrying a single copy of something irreplaceable, you can bet it’s not going on an SD card.
Carrying your entire OS around on a flash drive can come in handy, especially if you don’t have a laptop. But don’t think this functionality is limited to Linux distros—it’s time to try cloning your Windows setup.
Get to Know WinToUSB
Hasleo’s WinToUSB isn’t just a USB formatting tool. Apart from letting you make bootable USB drives to install Windows, the tool can also clone your entire Windows installation onto practically any USB storage device. When you boot using one of these cloned installations, instead of installing Windows on the connected PC, you can access your setup just like on your own system. It’s an identical concept to live-booting Linux installations, except with persistence.
This is based on a technology called Windows To Go. Microsoft originally developed this feature for enterprise use before discontinuing it. WinToUSB fills that gap and expands on Microsoft’s original offering by extending support to all Windows editions.
WinToUSB gives you a lot of options for making portable installations. The most popular and easy-to-use methods are using an ISO file to create a fresh installation or simply cloning your existing one. The free tool is limited in features, though. The Professional and Enterprise versions offer extras like BitLocker encryption, faster clone speeds, and free technical support, among others listed on WinToUSB’s website.
For what it does, WinToUSB is easy to use. It’s a simple three-step process where you select what you want to do, choose an installation source, confirm the USB drive you want to use, and WinToUSB takes care of the rest. The interface is beginner-friendly and clearly laid out, so you’ll know what each option does at a glance. Hasleo also has an official WinToUSB user guide that explains the program’s basic functions.
Why a Portable Windows Installation Can Come in Handy
If you’re wondering why you’d ever need a portable Windows installation, consider the advantages that accessing your own computer setup on public or shared computers provides.
You’re using your own environment, programs, shortcuts, customizations, browsers, and everything else, regardless of the computer you’re using. This convenience means you can work from any computer while maintaining your exact workflow, shortcuts, and preferences. This is a much more lightweight and cost-effective method of carrying your workstation around with you, instead of dropping thousands on a capable laptop.
The next biggest advantage is the increased security and privacy benefits that a portable installation brings. When using a public or shared computer like the ones found in public libraries or hotel business centers, you no longer need to log into your online accounts on machines that could be potentially compromised.
You also aren’t leaving any traces of your activity. Once you’re done, simply unplug your bootable drive, and the PC goes back to how it was before you touched it. For professionals handling sensitive information, this level of control over your data is invaluable. You maintain complete oversight of your data without relying on the security settings or practices of whatever computer you’re using.
A portable Windows installation will also come in handy in case your primary work machine runs into serious issues or even stops working entirely. Instead of struggling to set up another machine—that is, if you even have access to one—you simply plug your copied OS setup into another PC and you’re all set.
Portable Windows setups also make a perfect testing environment. You can experiment with new software, test configurations, or troubleshoot issues without affecting your main system. It’s also perfect for providing technical support or making demonstrations—this is a use case I often rely on in my freelance development contracts.
The main problem, however, is performance. Not every PC will have the hardware capability of running the programs you require, especially if you’re a media professional who relies on hardware-intensive programs like photo and video editors. Apart from that, thanks to how fast modern external SSDs are, performance shouldn’t be too much of a worry.
How to Create Your Own Portable Windows Environment
As mentioned before, using WinToUSB to create portable Windows environments is easy. Start by downloading WinToUSB’s free edition from the official website. Installation is relatively straightforward, as you simply have to follow the Windows installer prompts.
Next, you need a suitable USB drive. WinToUSB will work with any USB storage drive that has enough storage capacity (which will depend on the setup you’re cloning). However, I recommend you use the fastest external SSD you can for this purpose, with at least the same capacity as your Windows partition. Windows needs to perform thousands of read/write operations, meaning that using cheap, slow USB drives will make your portable installation painfully slow.
Once you’re good to go with the drive, plug it in, fire up WinToUSB, and follow these steps:
On the first screen, select the Windows To Go USB option to proceed.
Click the Select installation source dropdown and select Current Windows OS.
Your destination drive should automatically be selected. If not, click the Select destination drive dropdown and select the USB drive you want to use.
Selecting the right Partition scheme is important, as it could render your installation incompatible with some systems. Use GPT for UEFI for compatibility with most modern systems. MBR for BIOS and UEFI is best for compatibility, but isn’t available in the free version.
For the Installation mode setting, Legacy works best for external SSDs. The VHD/VHDX mode works better for USB flash drives.
Click Proceed when ready.
Before cloning your Windows installation, WinToUSB will ask which partition you want to format on your selected USB drive. It’s best if your USB drive only has one big partition; otherwise, you’ll have to manage the partitions by merging them before using the drive with WinToUSB.
Once you’ve selected your partition, leave the other settings untouched and click OK. This will start the cloning process, which can take some time depending on the speed of your USB drive and overall system configuration.
Running Portable Windows for the First Time
When the drive is ready, use it by booting into the computer’s BIOS and selecting the drive from the boot priority order. You can enter the BIOS on Windows 11 and 10 PCs via either the Recovery settings in the Windows Settings app or by using a dedicated key assigned to the BIOS at boot. These keys vary by manufacturer; a quick Google search will get you the answer if you’re not sure.
Any required drivers will be installed automatically, although you can pre-install these with Windows by selecting the right driver folder before cloning your installation. I don’t recommend doing that, as it can be confusing to manually handle drivers unless you know what you’re doing.
Lastly, it’s recommended that you enable BitLocker encryption on your drive. If you forget your drive somewhere, anyone will be able to boot into your Windows environment and have access to your files, online accounts, and any other data saved on the drive. That said, BitLocker isn’t supported on the free version of WinToUSB, so you’ll have to shell out for a Professional or Enterprise license priced at $29.95 or $299.95, respectively.
Cloning my Windows setup to an SSD means I now only have to carry one drive with me wherever I go. Regardless of whether I forget my laptop or it runs out of charge, I can simply plug in the SSD and have my Windows installation up and running on any computer in no time.
While average file sizes continue to get larger, free cloud storage hasn’t kept up. Most cloud storage services include as much, or even less, free space than when they launched over a decade ago. Thankfully, with a bit of clever planning, you can get around this.
My History With Cloud Storage
I’m lucky enough to have started using cloud storage in the golden age, back when providers were more generous. I signed up for a lot of my accounts in 2012; back then, most cloud services offered ways to permanently increase your free storage. These included taking a tour of features, posting about the service on social media, performing security checkups, and using the then-new camera upload features.
Screenshot by Ben Stegner; no attribution required
Unfortunately, these have all faded away in modern times. Some Chromebook and Pixel devices come with a limited period of extra storage, but this is a trial for a subscription, not a permanent increase.
Here’s how much space I have in my cloud accounts now from free methods, compared to the base:
Dropbox: 11.9GB, up from 2GB
Google Drive: 19GB, up from 15GB
OneDrive: 30GB, up from the grandfathered 15GB
I also use iCloud, but to my knowledge, it’s never had promotions that permanently increase your storage.
I’ve toyed with other cloud accounts over the years, but these three have consistently been my main ones. The only one I used for a length of time is SugarSync, which I stopped using when its free plan was discontinued in 2014.
How Much Storage Can You Get for Free Now?
While I’ve increased my free storage well beyond the baselines, don’t feel bad if you missed these chances. You can still stack several free cloud storage services to get a nice chunk of space for no cost.
Here’s a sampling of what’s available now, with a mix of popular and lesser-known cloud services:
Google Drive: 15GB (shared with Google Photos and Gmail)
With a few new accounts, app downloads, and quick tutorials, that’s 75GB (plus another 10GB from MEGA for your first year). Not bad, considering paid cloud plans usually start at 100GB.
I recommend skipping Dropbox, as the paltry 2GB of space isn’t worth adding another service to your setup. The service still offers free storage for referrals (500MB each), but given how long Dropbox has been around, it’s hard to find someone who isn’t already using it.
This isn’t an exhaustive list of cloud storage providers, but it will get you started with a solid amount of storage without splitting it among too many services.
You’ll find other underrated cloud storage providers that might work for you. In particular, TeraBox offers 1TB for free, but the experience is rough. Don’t trust any old provider without vetting it, though.
A Multi-Cloud Management Strategy
Now that you have all this free storage, the fun part is deciding how to use it. To start, make sure you download the apps for each of these services on your computer and sign in, so everything syncs.
Screenshot by Ben Stegner; no attribution required
While I’ve become messier with my organization over time, what I used to do is split files by type across services. For example, I kept documents in Dropbox, images in Google Drive, and videos/music in OneDrive. That way, I’d know where to go depending on what I was looking for.
You don’t have to be that rigid, though. A simple option is to create folders as you normally would, roughly split up by how much space you think they’ll take. Then pin them to Quick Access in File Explorer so you can jump right to them, without having to think about which folder lives on which cloud service.
To go further, try adjusting the Windows Libraries feature to include your folders across all services. This lets you choose folders, no matter where they are in your file hierarchy, that all become part of base groups like Documents or Pictures. You can even create your own libraries if that’s not enough.
Get started by right-clicking any folder and choosing Include in library, followed by the applicable one. Then, when you open this library, you’ll see files and folders from everywhere in one location.
Screenshot by Ben Stegner; no attribution required
Managing Multiple Cloud Accounts
Third-party Windows apps allow you to access all your cloud storage in File Explorer, which is super handy when you’re juggling so many. MultCloud is another tool that facilitates managing several cloud accounts in one place.
When working with limited space, be cognizant of what you’re storing in each one. Documents you reference regularly, treasured photos, and the like are better cloud fits than giant videos. If you need to store a lot of huge files, an external storage drive is a better investment.
Cloud storage is part of my multi-layer backup solution, which is another way I recommend putting it to use. I keep almost all my regularly-used files in cloud storage, so if anything happens to my computer, I can quickly access them on another device.
I also use Backblaze for a proper off-site backup, in case I get locked out of one of my cloud accounts, a corrupted file gets synced, or similar. Finally, I use File History on Windows to have a local copy of files on a secondary storage drive.
Paying a Little Can Get You a Lot
If you don’t have a lot of large files, stacking free cloud storage like this is a viable solution. You can always add another 5-10GB to the pile by signing up for another service, if you run low. However, if splitting accounts up like this becomes too tedious, don’t dismiss the idea of paying for cloud storage.
I currently pay $20/year for 100GB of Google Drive space through Google One, which is well worth it, plus $3/month for 200GB of iCloud storage. Google Photos is my primary photo backup service; I also share the Google storage space with my wife so she doesn’t worry about running out.
I primarily pay for iCloud to store my iPhone backups; with the extra space, I also back up my photos to iCloud for redundancy since photos are the most precious data we keep on our phones.
Screenshot by Ben Stegner; no attribution required
My thinking on this is similar to ad-free streaming services compared to those with ads. Yes, ad-supported streaming services are cheaper (or free, in some cases). But your time is worth a lot. With streaming, spending a few extra dollars is much preferred to wasting hours watching ads every month. And with cloud services, paying a small amount means you don’t have to deal with the hassle of managing multiple accounts, several apps syncing on your PC at the same time, and similar.
If you’re thinking about upgrading, a few dollars a month is worth eliminating the hassle of juggling files across accounts. The cheapest cloud storage providers start around $20/year for 100GB, which is a good starting point.
Even though free cloud storage hasn’t kept up with the times, you can get plenty of space at no cost with patience and a proper setup. It should provide enough to keep your essential files accessible anywhere you go, which forms a key part of backing up everything without any subscriptions.
One of the most disorganized places in most people’s homes is the junk drawer. I finally said “enough”, and have some recommendations for replacing it if you’re in the same spot.
Enough Was Enough
It’s hard to say when it happened, but at one point, the junk drawer in my home was born. While it was once somewhat organized, over time, this space became a disorganized mess. Items such as pens, tangled cables for my iPhone 16 Plus (our review), outdated appliance manuals, and other miscellaneous items accumulated and became unmanageable.
Searching for a screwdriver, for example, became a challenging task because I had to sift through multiple items. Looking for AA batteries that worked required the same level of effort as conducting an archaeological dig. It was time for a change.
The Replacements
That change meant sorting the items in the drawer and finding new places for them. Notice I said places, not a single location. I found that spreading everything out was the key to adding much-needed organization to my home.
A Dedicated Tool Drawer
My dad is handy with tools and has a variety of them for both big and small jobs around his home. In my household, the only tools I have are a variety of screwdrivers and Allen wrenches of different sizes, which require little storage space.
Bryan M. Wolfe / MakeUseOf
That space is now a shallow drawer inside a living room table. Joining the tools in the new location are a measuring tape, a ruler, a pocket knife, and nail clippers. The new tool drawer is also where we store loose screws and nails, as well as separate boxes for each type.
Battery Station
There are four types of batteries we use in our home: AA, AAA, 9V, and CR2032 coin batteries for Apple AirTags. For whatever reason, the junk drawer had become a repository for mixing new and old batteries. This meant needing a fresh one was always a challenge.
Bryan M. Wolfe / MakeUseOf
Now, the batteries are separated and placed in a small, lidded container, which is stored in what was once the junk drawer. Old batteries are now separated every time they are replaced, then placed in our recycling bin far away from the newer batteries.
This new battery station is also where we store fully charged portable chargers for our mobile devices, as well as a collection of cables and electrical plugs. Before I added these, I went around the house and found the ones we had, separating the good from the bad. There were numerous frayed cables, outdated plugs, and chargers that no longer functioned. Gone, they went.
Pen and Stationery Location
Improving what I called the pen situation in our household was another reason the junk drawer had to go. Previously, because the drawer was so full of other items, working pens rarely made their way back to it. Instead, much like the charging cables, they were found in multiple locations around the home. Of course, I could never recall those locations when I needed a pen.
Bryan M. Wolfe / MakeUseOf
Now, I store pens and pencils in a decorative ceramic cup that sits above the drawer we use for stationery and takeout menus. The house rule is that the pens are tested before they’re returned to the new location. If they no longer work, they’re discarded.
Additionally, that paper drawer is where we now store other “office” items, including sticky notes, paper clips, rubber bands, stamps, and envelopes. Many of these had also once been stored in the dreaded junk drawer.
One Place for Coins
Our family doesn’t collect coins in the traditional sense, but they do “collect” incidentally. We always seem to have stray coins scattered all over the house, including in the once-junk drawer. Now, we separate and deposit our coins into two ceramic bowls stored in a cabinet in our kitchen, one for pennies and the other for larger, more useful denominations.
It’s incredible how quickly the coins are piling up now that they’re all stored in the same location.
More Ways to Organize
Clearing out and removing the junk drawer led me to make other changes in my home to make it more organized.
New Keys Location
This started by installing a key hook in the kitchen. Previously, keys had no official location, although they sometimes ended up in the junk drawer. There’s now a hook for everyone’s car and house keys.
In the same kitchen cabinet where our coins are stored is another bowl where we put less frequently used items. This combination makes finding the keys much easier, although it’s not a perfect system. I still tend to lay my car keys on the kitchen table, which is less than ideal, but I’m making an effort to improve.
Bryan M. Wolfe / MakeUseOf
Device Charging Station
In addition to finding a new home for charging cables and other gadgets like iPhones, iPads, and smartwatches, I also designated a separate location in our living room for charging our devices. This setup reduces the likelihood of cords going missing and ensures the devices are easier to find.
Next to the device charging station is also room for small earbuds and headphones. Organizing my mess of tech gadgets has removed a lot of the stress around them.
First-Aid Kit
During this process, I also realized we didn’t have an actual first-aid kit at home. Instead, bandages, antiseptic wipes, and other items were thrown haphazardly in different places. Now, there are fully stocked first-aid kits in each of our bathrooms—located under the sink, making them easier to find.
The area under the bathroom sinks is also where our flashlights are now stored, alongside a fresh set of batteries. In the event of an emergency, it’s much easier to find both items, whereas before, with the junk drawer, it was much more difficult. Lighters and candles are also stored in these locations.
In homes with small children, it’s best to move both of these items to cabinets higher off the ground.
Clearing and eliminating the junk drawer in my home served to establish both functional organization and reduce household stress. The ability to locate everyday items much more quickly has eliminated both time waste and feelings of frustration.
The initial work of decluttering and organizing required effort, but the lasting advantages of an efficient and organized space have proven valuable. Our home now features a system that replaced the former junk drawer, creating an organized and efficient daily routine.
With AI now, the back-to-school season feels a lot different than it used to, in the best way possible. There are a bunch of free AI tools out there that you should be using for studying smarter, and there’s no better time to start exploring them than right now.
5
NotebookLM
My favorite AI tool that I rely on heavily for college is Google’s AI-powered research assistant, NotebookLM. The tool is packed with features that make understanding complex topics and revising way easier, and I simply can’t imagine beginning the school year without it.
Amir Bohlooli / MUO
For instance, how many times have you had to sit through lengthy readings? Sure, there are a lot of AI tools out there that can summarize content, but which tool can convert that content into an AI-generated podcast?
Well, NotebookLM’s Audio Overviews feature does exactly that. It takes your sources and turns them into short, engaging audio explainers you can listen to on the go.
NotebookLM also recently got a new Video Overviews feature, which can turn your sources into visually engaging, bite-sized explainers. Think of them as Khan Academy-like videos, but made specifically from your own materials.
Amir Bohlooli / NAN
Another feature that’s invaluable for students is NotebookLM’s Mind Maps. Sometimes, when you’re dealing with a lot of content at once, it helps to visualize how all the concepts connect to each other. That’s exactly what NotebookLM helps with. It pulls key points from your notes and lays them out in a visual web, showing how everything ties together.
Now, you might find other AI tools that have all the features I just mentioned. But what makes NotebookLM stand out from the vast majority of them is its source-grounded nature. What this essentially means is that NotebookLM only references the material you feed it. This solves a huge problem most AI tools suffer from: AI hallucinations.
NotebookLM doesn’t make things up or pull random information from the internet. Instead, it sticks strictly to the sources you’ve uploaded. So when it gives you an answer, you know exactly where it came from.
Though NotebookLM has a paid tier too, I’ve been using its free version since day one, and honestly, it’s more than enough for what I need as a student.
4
Perplexity
As a student, you can’t run away from researching. It’s a huge part of academic life. Whether it’s for an assignment, a paper, or even just understanding a tough concept, you’re constantly looking things up. While there was once a time when I’d Google everything and open ten tabs hoping one of them had what I needed, Perplexity is one tool that’s completely changed the game, and I can’t recommend it enough.
Perplexity is an AI-powered web search engine that uses AI to search the web in real time for you. Unlike most AI tools that just generate responses based on past data, Perplexity actually pulls information from live sources and cites them right there in the answer.
A lot of times, I have a question in mind but don’t really know how to phrase it the right way. In those situations, Google is pretty hit or miss. But with Perplexity, it’s different. You can type out your question however it naturally comes to you, and it still manages to understand what you mean. What’s great is that it gives you a well-rounded response and provides citations to all the sources it used.
Additionally, if you struggle to figure out how to dive deeper into a topic, Perplexity suggests follow-up questions related to what you’re researching that help guide you. This has helped me identify sub-topics I missed multiple times, and it’s the best way to figure out what angles or areas I should be looking into next. Similar to NotebookLM, Perplexity’s free version is more than powerful enough for the typical student.
3
StudyAnything
One of the biggest things I struggle with as a student is trying to recall information during exams. I have the memory of a goldfish, and I forget answers to questions as soon as I memorize them. Given that I have a lot of memorization-heavy courses every semester, I can’t just not memorize and hope for the best. I needed a way to make the information actually stick.
For the most part, I rely on creating flashcards. When I realized how much time I spend creating them, I turned to AI-powered flashcard tools instead, and that worked well. But if you’ve studied with flashcards before, you’re likely familiar with how boring revision can get sometimes. So, I started to look for a free tool that could help me gamify actively learning something, and I found StudyAnything.
All you need to do is create an account, create a course you’re studying, and upload the files you’d like to learn from. For instance, I uploaded my lecture slides. StudyAnything will then process them and prompt you to select the exact sub-topics you want to be tested on. Within minutes, a detailed quiz focused on the topics you chose will be generated.
You can use StudyAnything to track your progress over time and repeat the quiz to target your weak areas. The tool is currently in beta, and I couldn’t find any information about a premium plan. So, for now, it’s completely free.
2
ChatGPT
ChatGPT needs no introduction. Ironically, a couple of days ago, I’d have hesitated to recommend it as a go-to tool for students. There are just better AI tools out there, but ChatGPT’s simply the most well-known. That said, OpenAI recently added a Study Mode to it and that just flipped the script big-time.
If you’ve used ChatGPT to study a new concept or even do an assignment (or any AI chatbot, for that matter), you might’ve noticed that the AI’s intent has always primarily been to quickly give you the answer. Sure, that’s helpful when you’re in a rush and just trying to wrap up that one assignment due at 11:59 p.m. But when you’re actually trying to learn, that approach isn’t helpful at all. That’s exactly where Study Mode comes in.
Instead of simply giving you the final answer, ChatGPT walks you through how to get to the answer by giving you bite-sized, Socratic-like steps. It won’t tell you the answer even if you ask.
For instance, I switched to ChatGPT’s Study Mode to learn how to solve a trigonometric equation. With the standard model, the AI would give me the entire solution and answer in one go. With Study Mode though, ChatGPT explained the first step to me and asked me to do it myself. It moved on to the next step once I shared my answer. It’s like having an interactive tutor that’s determined to help you succeed.
screenshot by mahnoor faisal | no attribution required
ChatGPT’s Study Mode is powered by custom system instructions and was built in collaboration with teachers, scientists, and pedagogy experts. In addition to solving questions, you can use ChatGPT’s Study Mode to learn a topic from scratch. It’ll ask you a series of questions to assess your current skill level and tailor the learning experience.
What’s great about Study Mode is that it isn’t only limited to ChatGPT’s paid Plus, Pro, and Team accounts. All free users can benefit from it too.
1
Speechify
When you have six courses a semester, exams and quizzes every week, and assignment deadlines always lurking around the corner, finding the time to sit down and read through lengthy readings and assignment briefs can be a struggle. NotebookLM’s Audio Overviews feature I mentioned above can certainly help with that, but only to an extent. It gives you a podcast-style summary, not a full audio version of the actual text.
That’s where Speechify comes in. It reads documents as-is, so you can listen to your readings word-for-word. Though Speechify’s premium plans are a lot more powerful, the free plan is decent enough. You can upload different file formats like PDFs, DOC, DOCX, TXT, EPUB, and even paste web links. Within seconds, you’ll be able to start listening to the content without needing to read a single line yourself.
ss by mahnoor faisal | no attribution required
I find it super helpful when my eyes are tired, or I just need to multitask. I’ve also used it to listen to essays I’ve written for assignments to catch awkward phrasing or small mistakes I might’ve missed while reading silently. It’s a simple trick, but hearing your own work read back to you can make a big difference.
On the free version, you can listen to the text-to-speech audio at up to 1.2x speed and choose from 10 voices. Unfortunately, all the voices are robotic-sounding, which I’m not the biggest fan of. To get access to “high quality, natural voices,” you need to upgrade to the premium plan. Speechify’s paid plans also unlock advanced features beyond text-to-speech, like AI summaries and chat, but you can do the same thing with NotebookLM for free, without spending a penny.
All the AI tools listed above helped me tremendously with my last few semesters, and I can’t recommend them enough. None of them lock their best features being paywalls either, so you don’t need to worry about messing up your budget just to get good grades!
You don’t need a lot of space to grow edible plants. With some easy-to-grow plants and a bit of care, you can harvest fruits, vegetables, and herbs right from your balcony or windowsill.
6
Tomatoes
Tomatoes come in all sizes and shapes, from tiny and perfectly round cherry tomatoes to big and oddly shaped heirloom tomatoes. They are easy to grow and can provide you with a plentiful harvest throughout the summer. All you have to do is cut a slice of your favorite tomato, dry the seeds, and plant them in the spring. You’ll have new tomato seedlings in a week or so.
This method of growing works best with non-hybrid varieties.
If you’re unsure about this method, buy seedlings from the nursery. Transfer them to a bigger pot (at least 12 inches in diameter) so they can grow big and bear fruit. You can also buy seeds from a store and plant them according to the instructions on the package.
To keep your tomato plants happy, give them full sunlight for about six to eight hours a day. Choose well-drained soil and water regularly to keep them moist.
Aarthi Arunkumar/MUO
The key point to remember when planting tomatoes is that they can grow tall—up to five feet or more. A stake is crucial to support the plants and keep them upright. They are otherwise low-maintenance. Just check for diseases or pests, and opt for organic pest control methods. And don’t forget to pick the delicious ripe tomatoes and enjoy them!
5
Green Onions
Nothing is easier than growing green onions. To get started, you don’t even have to worry about finding a pot or soil; you just need some fresh green onions from the grocery store. Cut them about an inch above the root, and place them upright in a cup with just enough water to submerge the roots. Change the water every two days.
Once new growth starts to emerge, plant the green onions in a pot that’s at least six inches deep and has drainage holes. Use a high-quality potting mix and keep the plants in a sunny area. They are fine indoors or outdoors, as long as they get full sun. Regular watering is essential; the soil must be moist, but not soggy.
Aarthi Arunkumar/MUO
The flavorful green onions are ready to harvest once they’re six inches tall. You can gently cut them one or two inches above the soil to allow them to regrow. Plus, a cool benefit of growing green onions is that the same plant will give you multiple harvests.
4
Chili Peppers
I never thought growing chili peppers would be easy until I tried it. The plant almost takes care of itself, as long as you do the bare minimum. Like the above two plants, chili peppers prefer full sunlight and good-quality soil. The pot size will depend on the type of chili; it should typically be between six and eight inches in diameter. Some chili plants may need a stake to avoid toppling over.
My plants are full of chilies and have provided us with abundant fruit throughout the growing season. They are bursting with tiny white flowers every morning and show no signs of slowing down yet. Chilies prefer a hot climate, so hot summers are ideal for their growth.
Aarthi Arunkumar/MUO
I’ve planted my tomatoes and chilies together in the same pot, and they seem to be okay with the arrangement. As they’re from the same nightshade family, they have similar growing needs, so you can grow them together to save space.
3
Rosemary
Rosemary is a fragrant and hardy plant to grow, as long as you give it enough sunlight and high-quality soil to thrive. You should buy rosemary plants from the garden center, because they’re difficult to grow from seeds. Start with a small six-inch pot.
As a drought-resistant plant, rosemary can handle extended periods without water. Overwatering can cause root rot, which can prevent the roots from absorbing nutrients. Water only if the soil is dry, and ensure the pot has drainage holes for the excess water to flow out.
When the tips of the plant start to droop, it’s the right time to water.
I recommend growing rosemary outdoors on a balcony or patio, as it needs ample sunlight to flourish. Check the USDA plant hardiness zone map; if you live in zone 6 or below, you can bring the rosemary plant indoors for wintering. Place it in an area with bright light, but away from the cold.
Aarthi Arunkumar/MUO
The versatile herb is not only for flavoring meats and potatoes; it can be dried and used in tea, for pest control, and in your potpourri. Also, if you use the thick branches as a skewer, your meats will burst with rosemary flavor. Remember, the plants can grow bushy, so prune them often to keep them in good shape.
2
Strawberries
You’ll be amazed to know that you can grow plump, juicy strawberries right in your backyard or even on a balcony. Many people think strawberries are complicated plants suited only for greenhouses—but that’s not true. If you know the basics of growing plants successfully, then strawberries will surprise you.
The roots of strawberry plants are short, so a shallow, wide pot (like a barrel planter) is excellent for them. You can grow them along the edge of the planter, so the berries hang over the rim and don’t lie on the soil and rot. There are also special strawberry planters with small pockets to plant.
A layer of straw mulch on the soil also helps keep the berries clean.
Strawberry plants love the sun, so you can place your pot in the sunniest part of your balcony without any worry. Water them well without going overboard, and soon you’ll reap those ripe berries.
Aarthi Arunkumar/MUO
But you’re not the only one eyeing those berries—birds will try to get them even if the plants are on a high-rise balcony. Consider adding a garden net over your plants to save your berries.
1
Cilantro
Cilantro is another herb I’ve found success with. I usually grow them from culinary coriander seeds bought from the grocery store, since this saves me a trip to the nursery. If you gently break the seeds in a mortar and pestle and plant them, they germinate quickly.
Unlike the other plants above, cilantro likes cooler weather and will thrive indoors. The ideal temperature is between 18 and 21 degrees Celsius (approx. 64 to 70 Fahrenheit). You still have to give them indirect sunlight a few hours a day, and water them often so the soil doesn’t get too dry.
Aarthi Arunkumar/MUO
One potential issue with growing cilantro is bolting, where the plant focuses on producing seeds instead of leaves. Bolting generally happens when the weather gets hot. If you want to grow them outdoors in a garden, spring and fall are the best times. But you can keep cilantro indoors throughout the seasons.
When you harvest, make sure you gather only the leaves and leave the roots intact. If you’re also growing tomatoes and chilies, now is a perfect time to make salsa. Enjoy your harvest with some crunchy nachos.
I hope this gives you the confidence to start your edible garden now. Successful planting begins with knowing the basics, like finding the correct location with their preferred lighting, choosing appropriate soil, and watering them just right. Start slow with easy plants, pay close attention to their needs, and be patient. Soon, your plants will reward you with fresh, homegrown produce.
Staying focused during exam prep felt impossible until I started using these tools. They help me lock in, pace myself, and actually retain what I study without burning out.
5
Notion
If you’re a student, I’m pretty sure you already know about Notion. But if you don’t, you’re really missing out.
Notion is basically an all-in-one app where you can take notes, organize your schedule, track your habits, and plan out your entire week. It’s super flexible, and that’s what makes it so good for students. You can set it up however you want. It could be something simple like your to-do list, or even something more complex like a full-on study dashboard.
For example, if you’re a computer science student, you could have separate pages for each subject, with lecture notes, important concepts, and even practice questions all in one place categorized neatly. You could even add code snippets or link pages together to make it easier to revise later. This setup saves me a lot of time since I don’t have to dig through my entire file manager every time I need to find something.
I use Notion for pretty much running my entire life. It’s where I keep all my notes, deadlines, and revision plans. I’ve even built my own templates for tracking topics I’ve studied and what I still need to work on. Since everything is in one place, I don’t have to switch between apps or open a browser, which really helps me stay focused.
If you’ve never used a Pomodoro timer before, the idea is pretty simple. You work for a set amount of time, usually 25 minutes, then take a short break before starting the next session. After a few cycles, you take a longer break. This method works well because your brain tends to stay more focused when it knows a break is coming soon. It’s just long enough to get into a flow, but not so long that you burn out.
Pomofocus is a clean and easy-to-use Pomodoro timer that runs right in your browser. You can quickly start a 25-minute work session with a 5-minute break, or switch to longer sessions depending on how much you want to get done. It’s perfect for study blocks or revision marathons.
I usually use the tasks section in Pomofocus to jot down everything I want to finish during a study session. Then I just let the timer run, take a break when it tells me to, and repeat the process until I’m done with everything. It keeps me from feeling overwhelmed since I’m only focusing on one chunk at a time.
You also get basic stats to track how many sessions you’ve completed, and there’s even a weekly leaderboard if a bit of friendly competition helps you stay motivated.
I know this sounds kind of odd, but Discord is actually a pretty excellent study app in two ways.
First, there are some great study-focused servers out there, like the Study Together server. You can join a public voice chat where everyone’s either sharing their screen or has their camera on while studying.
The idea is to create a sense of accountability—you’re only allowed to do something productive while you’re in the VC, and everyone stays muted and deafened, so there are no distractions. It’s surprisingly effective if you struggle with staying on task.
There’s even a full ranking system based on how many hours you’ve studied, and you can check your personal stats too. If you’re stuck on a topic, you can ask for help on the server. It’s a pretty big community, and usually someone’s around to lend a hand.
The second way I use Discord is by creating a private server with just me in it. I set up separate channels for different subjects or topics, and just message myself whenever I come across a doubt or question. It’s quicker than opening Notion sometimes, and it acts like a searchable, running log of things I want to come back to.
I usually prefer writing down my daily tasks on paper since it helps me stay grounded, but when I’m working on something more complex—like prepping for finals, managing multiple assignments, or handling a long-term project—paper just doesn’t cut it. That’s where Todoist really shines.
The Projects feature is my go-to. It lets you create a dedicated space for each subject or task, and then break that down into subtasks with deadlines, labels, and priorities. It’s especially useful when you want a clear view of everything that needs to be done without feeling overwhelmed by one giant to-do list.
When I’m deep into a study phase, Todoist becomes my project manager; it keeps me accountable, organized, and a lot less stressed.
Listening to white noise helps me focus a lot better, and I’ve noticed that I actually get some of my best work done on flights. There’s something about that constant background hum that keeps my brain from drifting off. That’s why I use Dark Noise.
It’s an app that lets you generate different types of ambient sounds to help you stay calm, focused, and locked in while studying.
You can technically generate white noise using the built-in options on your iPhone or Mac, but Dark Noise offers way more variety and control. I’ve been using it for years now, and it’s been super reliable throughout. It’s one of those apps I always have running in the background during long study sessions.
The only downside is that Dark Noise is limited to macOS and iPadOS. But if you’re on Windows, there’s an app called White Noise on the Microsoft Store that works pretty well (very subtle name, I know). Or you can always turn to YouTube, which has an endless supply of white noise and ambient mixes to choose from.
Download: Dark Noise (Free, in-app purchases available)
There are plenty of other methods that can help you focus while studying—what matters most is finding what actually works for you. With that said, best of luck with your study sessions; you’ve got this!
Scary movies in the fall make sense, but horror has roots in the summer, too. How about Friday the 13th and I Know What You Did Last Summer? In some of my favorite horror movies, you can’t help but feel the heat of summer.
8
Midsommar
Watch Midsommar on Amazon Prime Video
Midsommar might be the first time I saw Florence Pugh on screen, and what a first impression it was. What was meant to be, more or less, an opportunity to heal after the death of her parents, Dani (Florence Pugh) witnesses the strange traditions and horrors of Midsummer, a real Swedish festival. Meanwhile, Dani is constantly struggling with her trauma and emotionally distant boyfriend (played by Jack Reynor).
Of course, the festival isn’t like that in real life, but Midsommar crafts visceral scenes that call on ancient pagan rituals and folklore. And I particularly love that, throughout the movie, you feel like this was all some elaborate trap. As soon as Midsommar came out on Blu-ray, I had to have it for the Plex server I run on my old laptop!
I’ve read about the tragic death of John Jones in Nutty Putty Cave and Floyd Collins in Mammoth Cave—they’re chilling, frightening, and get under my skin. So, naturally, a movie like The Descent has a particular effect on me. If the movie had just been about cave divers getting stuck, that would’ve been spooky enough, but then it was made worse (and by worse, I mean better).
As it turns out, they aren’t alone in the caves, but are being hunted by cave-dwelling creatures. You could say the survivors are stuck between a rock and a hard place, creating incredibly tense scenes as they try to navigate around the crawler’s poor eyesight.
Does Mike Flanagan ever miss? I know Gerald’s Game is from the mind of Stephen King, so I’m not surprised that a good book turned into a good movie, but it’s not always the case. It’s so intense and frightening and nerve-racking watching Jessie try to break free of her bondage.
To layer on the fear, Jessie’s lack of food and water only leads to apparent hallucinations and suppressed trauma floating to the surface. Worst of all, she’s seemingly being watched by the “Moonlight Man,” and now that I said his name, I won’t sleep tonight. I highly recommend giving this a watch with your significant other!
5
Army of Darkness
Watch Army of Darkness on Amazon Prime Video
You can feel the heat of summer the moment Army of Darkness starts—a portal opens up and Ash finds himself in the middle of a dry, arid, apparent wasteland. Soon after, he’s picked up by medieval knights, shackled to slaves, and forced to endure a hot march back to Lord Arthur. What we have here is a movie that teeters perfectly between comedy and horror, with a nice serving of action.
I absolutely love the shots and transitions in Army of Darkness. It has the kind of creative signature you point to when you say, “That is so [insert director name].” It’s what makes deadites, these otherwise grotesque undead, so scary. Sam Raimi gets up close and personal with the characters and monsters, and it always puts a smile on my face.
Maybe I’m primed for it already, but I make an effort to watch the background in horror movies. There’s a good chance something is happening back there you didn’t notice the first time. It Follows preys on that feeling with an incredibly unique premise, and it goes like this: a shape-shifting creature hunts down its cursed victim, without stopping, unless they pass on the curse through intercourse.
Unfortunately, that information isn’t known to Jay, the main character, who is now the victim of the curse. You start going crazy watching the movie because you’re suspicious of everyone in the background who merely appears like they’re heading in Jay’s direction. At the same time, they’re trying to stop a creature whose persistence is only matched by Michael Myers.
I’m about 90% sure Jaws is the reason I’m both fascinated and terrified of the open oceans, given that I was exposed to the movie at a young age. But you know what, I think that’s the sign of a great horror film—something that has such a profound effect on you, it instills a fear you might carry later into life, like an illogical fear of something grabbing your leg on the way up from the basement.
Jaws is also a great example of taking a mundane idea—a shark attack—and turning it into an engaging modern (I use that term loosely) monster movie by way of memorable dialogue and superb performances. The shock on Martin’s face (Roy Scheider) after coming face-to-face with the shark, only uttering in a deadpan fashion, “You’re gonna need a bigger boat,” is perfect. If that doesn’t convince you, I’ll put it this way: Jaws is one reason why collecting physical media is still worth it.
I love that Tucker & Dale vs. Evil turns the hillbilly trope on its head into a goldmine of jokes and laughs. It’s both funny and horrifying watching the victims meet their untimely and accidental death, while Tucker and Dale (Alan Tudyk and Tyler Labine, respectively) helplessly watch on the sidelines.
To be fair, it subverts a lot of horror tropes—not for the sake of subversion, but because of its execution. For example, the college kids just immediately assume Tucker and Dale are trying to kill them, despite giving none of those vibes. Or Tucker looking like a maniac with a chainsaw when he gets attacked by bees.
I felt the heat of summer just as soon as The Lost Boys transitioned to California. And what a perfect time to set a vampire movie! Seeing so many people out and about is like walking into a free buffet for a vampire. More importantly, I love that the movie blends the hallmarks of the 1980s—the hair, the clothing, the attitude—and blends it with vampires.
Kiefer Sutherland’s fit as David is particularly good at capturing 80s punk, which is further solidified by his hairstyle being inspired by Billy Idol. And when the lighting dims, and their faces are revealed, Sutherland’s vampiric visage is striking, if not terrifying.
I hereby declare the summer Honorary Horror Season! It’s not just because there are a lot of great horror movies set in the blistering heat, but because several are cornerstones of the genre, like Jaws, Midsommar, and Army of Darkness. If you’d rather watch something uplifting, there are numerous feel-good movies that are actually good!
Shopping for a laptop for school shouldn’t drain your bank account, but it’s easy to get overwhelmed by flashy specs and sales pitches. Most students don’t need the expensive options—just the right one for their specific needs and budget.
5
Specs That Actually Matter for Students
Students buying laptops often focus on the wrong things. RAM is your priority, and 16GB+ is the sweet spot for Windows devices for most students. You’ll have multiple browser tabs open, documents running, and some apps that students use daily, all at once.
If you don’t multitask a lot, 8GB can work, but less than that means constant slowdowns. However, more than 16GB is overkill unless you’re in engineering, computer science, or media production. Don’t let sales reps convince you otherwise because it’s often just an expensive upsell.
Jayric Manning/Shutterstock
The processor is equally important. For processors, focus on efficiency over raw power. Modern Intel Core Ultra 5 or AMD Ryzen 5 chips handle everything from research to video calls without breaking a sweat. You don’t need the latest Core Ultra 7 or 9 for taking notes and writing papers.
One common mistake many students make is with storage choices. An NVMe M.2 SSD beats its SATA counterpart every time, helping your laptop boot in a few seconds and open files nearly instantly. 512GB of storage is usually enough, as you can always use cloud storage or external drives for extra space.
The display is another area where students often overspend. Don’t obsess over display resolution. A 1080p display is good enough for a 13 to 15-inch screen. 4K sounds impressive, but drains battery life faster and costs more. Instead, you can focus on good color accuracy and brightness.
Speaking of battery life, it should get you through a full day of classes. Look for at least eight hours of real-world use, not the inflated numbers manufacturers claim.
Graphics cards are unnecessary unless you’re in specific programs like architecture, game design, or working with video-intensive projects. Integrated graphics handle everything else students need, and dedicated graphics cards also add cost and reduce battery life.
Don’t blow your entire savings on a laptop you don’t need. Laptop manufacturers don’t want you to know that you can get almost everything done with a $400-600 laptop. That covers note-taking, research, streaming, and productivity tasks without any issues.
Don’t forget that your laptop isn’t your only expense. Factor in accessories from the start. You’ll need a mouse ($15-40), a laptop bag ($25-100), and probably external storage ($30-80). Software costs add up, too, though many schools provide free access to Microsoft Office and other essentials.
Premium laptops over $1,000 are only worth it in specific situations. If you’re in engineering, computer science, architecture, or media production, the extra power pays off. For everyone else, it’s just an expensive way to browse the internet and write papers. So, before you decide to splurge on a laptop, honestly assess what your coursework actually requires.
Financing can help spread costs, but be careful with the terms. Many retailers offer 0% financing for 12-18 months, which is fine if you can pay it off on time. Avoid interest plans—they turn a reasonable purchase into an expensive mistake that follows you long after graduation.
3
Choose the Right Type of Laptop for Your Lifestyle
Your daily routine should dictate your laptop choice, not the other way around. Traditional clamshell laptops work for most students. They’re reliable, affordable, and handle everything. If you’re spending most of your time at a desk or in the library, a 15-inch screen gives you more workspace for research and writing.
Yadullah Abidi / MakeUseOf
Don’t overlook port selection when choosing your laptop, though. Having multiple USB-C ports plus at least one USB-A port gives you flexibility for different situations. If you frequently present or work in various locations, you might need USB-C ports on both sides to make your life easier.
If you’re always on the move, ultrabooks make more sense. They’re typically under 3 pounds and are perfect for back-to-back classes across campus. The trade-off is usually a smaller 13-inch screen and a higher price.
Another option is 2-in-1 convertibles, which seem appealing but have real limitations. The tablet mode sounds useful for note-taking, but typing on a touchscreen gets old fast. The hinges also tend to wear out faster than traditional laptops, and you’re paying extra for flexibility you might not use.
Chromebooks deserve consideration if your school uses Google Workspace heavily. They’re cheap, secure, and boot instantly. But there are downsides to Chromebooks, as you’re limited to web apps and Android apps, which don’t work for every major.
Weight matters because carrying an extra pound or two in your backpack adds up over a full day of classes. If you’re frequently moving around campus, prioritize portability over screen size.
2
Make Your Laptop Last All Four Years of School
Four years is a long time in laptop years, but it’s doable with the right approach. Physical protection comes first. You should get a padded laptop sleeve or case, because your backpack isn’t enough protection against the daily grind of campus life. Books, water bottles, and other factors can create a hostile environment for electronics.
Mahnoor Faisal/MakeUseOf
Also, heat is your laptop’s biggest enemy over time. Keep vents clear and avoid using your laptop on soft surfaces that block airflow. Don’t use it outside on sunny days for extended periods either—direct sunlight overheats components and makes screens difficult to see anyway.
Another important thing here is battery care, which extends your laptop’s useful life significantly. Right charging habits include not leaving it plugged in 24/7, but don’t let it die completely either. Laptop batteries stay healthy between 20% and 80% charge. If you’re using it plugged in most of the time, unplug it occasionally to cycle the battery, which also helps improve your laptop’s charging speed.
Software maintenance also matters. That requires keeping the OS updated and running regular virus scans. You also need to manage storage to prevent major headaches. Keep at least 15-20% of your hard drive free since full drives can cause crashes.
You also need to check and plan for repairs before they are needed. Extended warranties through your school or manufacturer cost extra upfront, but pay off when something breaks in junior year. Most laptops need at least one repair during a four-year lifespan, so budgeting for minor fixes is still cheaper than buying a new machine every two years.
1
Buy Where You Can Pick Up a Great Student Laptop Deal
Where you buy matters as much as what you buy. Because getting a great laptop from the wrong retailer can turn into a headache when you need support or returns.
You should start with your school’s computer store. Most universities have partnerships with major manufacturers and offer genuine student discounts. These aren’t the fake “student deals” you see online—we’re talking 10-15% off plus extended warranties. The downside is limited selection and sometimes higher base prices.
Amazon and Best Buy dominate online laptop sales for good reasons. Amazon’s return policy is unbeatable, and Prime shipping gets your laptop fast. Best Buy combines online convenience with physical stores for hands-on testing, plus their Geek Squad support can be helpful if you’re a little less tech-savvy.
Buying directly from manufacturers often gets you the best customization options. Also, Dell, HP, Lenovo, and Apple run student discounts that beat third-party retailers. You can also configure exactly what you need without paying for unwanted upgrades.
Speaking of manufacturer outlets, don’t overlook refurbished options. These are typically returned or lightly used machines with full warranties. Just avoid third-party refurbishers with questionable return policies.
Costco and Sam’s Club deserve consideration if you’re already a member. Their laptop selection is limited, but their return policies are generous. Plus, they extend manufacturer warranties automatically on many electronics.
Timing your purchase can save serious money. Back-to-school sales in July and August offer the best deals, but Black Friday and post-holiday clearances work too if you can wait.
Carrying a USB stick loaded with portable Windows tools is like having a digital Swiss Army knife. No matter where I am or which computer I’m using, I’ve got everything I need to work, troubleshoot, and stay productive.
8
Everything
Windows search has come a long way, but it still has a reputation for being slow and occasionally frustrating. Waiting for the index to update or staring at the spinning wheel of doom is the last thing you want when you’re trying to find a crucial file.
Everything is a small yet powerful search tool that makes finding files almost instantaneous. Unlike Windows search, it skips scanning the contents of files and instead only focuses on building an index of all file and folder names. This allows it to display results the moment you start typing, much like Google search suggestions.
Everything isn’t limited to basic file searches. It offers advanced tools like filtering by file type or modification date, exporting search results for later use, and customizable search syntax to fine-tune queries with precision.
It runs efficiently without draining system resources and is perfectly suited to run directly from a USB stick. I don’t keep it installed on every laptop I use, but it’s my go-to when the built-in Windows search falls short.
When it comes to monitoring your computer’s hardware performance, HWiNFO64 is one of the most popular tools. Unlike the built-in system utilities on your PC that offer only a brief overview, HWiNFO64 provides a complete breakdown of every component—from CPU and GPU specifications to motherboard details, sensors, and more.
It tracks temperatures, voltages, fan speeds, and power usage with precision, so you can get a quick overview of system health. You can double-click any of the sections in the left pane to view all the data related to that specific hardware.
All of this makes HWiNFO64 a useful diagnostic tool for testing your PC’s hardware and troubleshooting problems like overheating, hardware malfunctions, or sudden system instability.
Keeping an eye on the health of SSD is crucial, and CrystalDiskInfo makes that task effortless. Once you open the app, it instantly shows the health status and temperature of your drives as a percentage.
The interface uses simple color codes and icons to make drive conditions easy to read: blue means excellent, green indicates good health, yellow signals caution, orange points to potential problems, and red calls for immediate attention. In other words, you don’t need to be a geek to check your hard drive’s status.
CrystalDiskInfo also highlights key S.M.A.R.T. attributes like read error rate, spin-up time, and reallocated sectors. These numbers can also help you spot early signs of drive failure before it’s too late.
Uninstalling unwanted apps and software from your PC is simple, but often the removed program leaves behind leftover files and registry entries that clutter your system and take up unnecessary space.
Unlike the standard Windows uninstaller, Revo Uninstaller digs deeper. It first runs the program’s built-in uninstaller, then scans your system for leftover files, folders, and registry entries that might otherwise remain. This thorough cleanup ensures the software is completely removed without leaving any traces behind.
That’s not all, though. Revo Uninstaller also comes in handy when you’re dealing with stubborn apps that refuse to uninstall or when you want to remove multiple programs in one go. It’s a powerful cleanup tool that’s worth keeping around for those times when you need to clear out unused software quickly and thoroughly.
Accidentally deleting a file and instantly regretting it is something most people have experienced at some point. And if you’re like me and use Shift + Delete out of habit, those files skip the Recycle Bin entirely. That’s where Recuva (from the makers of CCleaner) comes in to save the day.
Recuva specializes in recovering lost files not only from local hard drives but also from USB sticks, memory cards, and other storage devices. Even if you’re dealing with a corrupted SD card or a damaged drive, this tool can come through by running deep scans to detect traces of deleted files that might otherwise seem gone for good.
On the flip side, if the goal is to delete something permanently without leaving a trace, Recuva can do that too. This combination of recovery and secure deletion makes it a versatile, must-have tool.
When a PC is hit with stubborn malware, sometimes the best approach is to fight back using portable, specialized tools. The Emsisoft Emergency Kit is designed exactly for that purpose.
This tool comes with a dual-engine scanner capable of detecting viruses, trojans, spyware, adware, worms, and other malicious software. Since it can run directly from a USB drive to an infected PC, it’s especially valuable when your installed antivirus is disabled or compromised.
While it’s not the most feature-rich solution—and certainly not a replacement for your default antivirus software—Emsisoft Emergency Kit can be a useful, no-install rescue option.
Windows’ built-in antivirus protection is generally reliable, but certain malware can still slip past. When that happens, the standard offline scan in the Windows Security app may not be an option, especially if the system is already compromised.
Windows Defender Offline solves this problem by running outside the regular Windows environment. The tool can be downloaded onto a clean computer, then set up on a USB stick using simple on-screen prompts to create a bootable drive. Plug the bootable media into the infected PC, start from it, and the offline scanner takes over.
Because it operates independently from Windows, Windows Defender Offline can detect and remove persistent threats like rootkits, advanced malware, and other stubborn malicious software that real-time protection might miss. Scanning from this clean, trusted environment ensures even deeply embedded infections can be eliminated without interference.
TeamViewer is one of those popular tools that doesn’t need much introduction. For anyone managing multiple PCs in different locations, it provides a secure and reliable way to connect to another computer anywhere in the world. It’s perfect for offering or receiving tech support, accessing files remotely, or managing a system without being physically present.
Setting it up is straightforward. Once TeamViewer is running, it generates a unique ID and password that you can share with the person connecting. The remote user can then control the desktop as if they were sitting right in front of it, with features like file transfers, chat, and even clipboard sharing.
TeamViewer also supports cross-platform access, so it’s possible to connect from a smartphone or tablet to a desktop, or the other way around. Whether you need a remote desktop tool for troubleshooting, collaboration, or retrieving that one file left on a home computer, TeamViewer is one of the best tools you can get.
Download:TeamViewer (Free, premium version available)
Having portable versions of my favorite apps and programs on a USB drive is incredibly convenient. It keeps my PC free from rarely used software while letting me run the same trusted tools on any computer without repeated installations.
Besides the tools listed above, there are plenty of other great portable apps to keep handy too, like Chrome for browsing, LibreOffice for documents, VLC for media playback, and GIMP for image editing.
Your student laptop should power through packed days, hectic commutes, and those urgent dashes across campus. Forget the marketing hype—choose the laptop specs that let you get things done, hassle-free.
5
Lightweight and Portable
A laptop you can actually carry all day makes a big difference. When you add schoolbooks, notepads, water bottles, and chargers, even a small computer can start to feel heavy. Look for anything between 2 and 3.5 pounds. Devices in this range slip easily into bags, sometimes barely noticed until you need them.
Justin Duino / MakeUseOf
In terms of size, something around 13–14 inches makes the most sense. They fit on crowded desks or in snug backpacks but are still big enough that web-browsing, essays, and split-screen work feel easy on your eyes. If you choose a bigger and heavier model, you’ll enjoy the extra size until you start to realize you have to carry it everywhere you go.
Portability comes from more than just the machine. When your laptop fits your bag and routine, you can always grab it to write notes, finish assignments, or squeeze in research before the next class. Choosing light and compact saves you from tired shoulders and frustration later on.
4
A Full HD Display
A clear, sharp screen helps to prevent your eyes from squinting and your shoulders from hunching over during long study sessions. A Full HD display, with its 1920×1080 resolution, offers a crisp and comfortable view of your windows, tabs, and documents side-by-side without making text or images look tiny or washed out.
Gavin Phillips / MakeUseOf
Anything lower than 1080p turns into an annoyance. Blurry text and cramped workspace slow you down long before the savings seem worth it. Save yourself from squinting and pick Full HD for a genuine productivity boost. While most laptops today come with 1080p displays, a few budget models still use 720p panels, so keep an eye out.
For those wanting displays with 4k-resolution at high refresh rates, remember, these features will greatly reduce your laptop’s battery life. You may want to settle for something with a QHD (2560 x 1440) display if you really can’t do 1080p.
You’ll also want to consider brightness. Around 300 nits of brightness works fine, but if you like studying outside or being near windows, start with something that has at least 400 nits peak brightness.
3
USB-C/Thunderbolt Charging
Charging with USB-C is now the normal way to power up. Most new laptops, tablets, and even phones use it. That means you need fewer cables in your bag, and you can almost always borrow a charger from a friend if you forget your own.
Choose models with at least 45W USB-C charging. You’ll refill your battery quickly enough that study breaks can actually charge your device to last your next few classes. If you need even more flexibility, Thunderbolt ports let you add extra storage, plug in a big monitor, or move files in a flash—all with just one connector. Note that not all USB-C ports are Thunderbolt-capable. Always check if the port has a Thunderbolt icon beside the USB-C port.
With USB-C/Thunderbolt ports, you’ll gain peace of mind knowing you’ll find charging connection options almost everywhere on campus. If you get in a pinch, even a phone charger will help keep your laptop running until your next class wraps up.
2
All-Day Battery Life
Battery life is the first thing you should check on any laptop. Most students don’t park themselves near a wall outlet from morning to night. You want your laptop to last the whole day on campus. Aim for eight to ten hours of normal use. Don’t trust the numbers in ads. Those come from controlled lab settings. In the real world, every browser tab open, every file syncing in the background, and every video call uses more battery than you might expect.
A battery of around 70Wh or higher lets you run further without worry, but many smartly designed laptops with a 50Wh pack should power you through a school day, based on my experience.
Go for a laptop with a recent Intel Core or AMD Ryzen chip, as they squeeze out even more time with improved power management. If you’re looking for a MacBook, any of the M-series chips all have excellent power efficiency due to the use of ARM instead of x86 processors.
Also, be careful about picking extras like gaming graphics or ultra-high-resolution screens. They drain your battery much faster, and you won’t see a big difference for most schoolwork.
1
Wi-Fi 7 (Or, at Least Wi-Fi 6/6E)
Wi-Fi isn’t just about speed. On campus, where hundreds of students crowd the same network, modern Wi-Fi can mean the difference between a smooth streaming session and staring at a loading bar. Wi-Fi 6 (also called 802.11ax) manages busy networks better, offers faster data transfer, and helps your laptop battery last that much longer.
IEEE Standard
Wi-Fi Alliance Name
Year Released
Frequency
Maximum Data Rate
802.11ac
Wi-Fi 5
2014
2.4GHz & 5GHz
1.3Gbps
802.11ax
Wi-Fi 6
2019
2.4GHz & 5GHz
10-12Gbps
802.11ax-2021
Wi-Fi 6E
2021
2.4GHz, 5GHz, & 6GHz
10-12Gbps
801.11be
Wi-Fi 7
2024/2025
2.4GHz, 5GHz, & 6GHz
40Gbps
If you can, get a laptop with Wi-Fi 6E or even the newest Wi-Fi 7. They open up more wireless space, so your computer stays responsive and connected even when things get busy. Many colleges have already installed this kind of infrastructure, and more campuses plan to update soon. Having the newest Wi-Fi means you’ll get the best connections, less lag, and faster upload speeds.
Laptop makers often want you to get caught up in extras or novelty features. Fancy graphics, enormous screens, lengthy spec lists—they may sound good in theory, but rarely make your campus life easier. Stay focused on what you’ll really notice: reliable battery, manageable weight, a readable screen, modern charging, and fast Wi-Fi. Invest in these basics and enjoy your studies without headaches.
I don’t unquestioningly trust default settings when it comes to privacy. Windows 11 is no exception, as it often oversteps by collecting data. However, these specific tools can effectively restrict Windows telemetry without breaking functionality.
3
O&O ShutUp10++
Disable Hidden Telemetry Settings
You won’t find Windows privacy options only on the surface. It also has registry-level telemetry that runs in the background. O&O ShutUp10++ exposes these registry settings that Windows keeps buried.
It’s a portable application that provides access to 100+ privacy controls, and categorizes them as Recommended, Limited, or No based on potential system impact.
The interface shows how extensively Windows monitors user activity. You’ll see it in App Privacy settings, which include diagnostic data collection and account information sharing, showing that Windows 11 won’t respect your privacy by default. Each setting includes basic explanations, though some remain technical.
Follow these steps to use O&O ShutUp10++ safely:
Run the downloaded executable file with administrator privileges.
Select Current User or Local Machine scope.
Accept the system restore point prompt (recommended for safety).
The Recommended category disables common tracking methods without breaking core features. It includes Windows AI, Windows Spotlight content, diagnostic data transmission, privacy, and user behavior collection. The settings under the Limited category are more aggressive but may interfere with Windows functionality or other features.
However, the tool isn’t foolproof. Some settings may cause unexpected issues with specific applications or workflows. Therefore, you should create a restore point before making any changes, as you may need to revert them when functionality breaks.
O&O ShutUp10++ provides broader control than Windows’ standard privacy options, but it requires more technical skill to make sure you aren’t making changes with side effects.
2
Use a VPN
Hide Your Location From Microsoft Services
We can disable location in O&O ShutUp10++, but sometimes that’s not the best option, as other services benefit from it. Microsoft services collect that location data through IP geolocation. Every Windows Update check, OneDrive sync, and Microsoft Store connection reveals your approximate location to its servers.
To avoid that, you should use a VPN. This does not stop Windows telemetry data collection itself, but it masks your real IP address by routing traffic through remote servers. This creates a geographic disconnect between your actual location and what Microsoft’s telemetry systems record.
Your free VPN is just fine for basic privacy needs, though paid services typically offer better server infrastructure and connection speeds. The key consideration isn’t cost but rather the provider’s data handling policies and technical implementation.
Windows Update servers sometimes reject connections from known VPN IP ranges. This forces you to temporarily disconnect for system updates, creating brief moments where real location data gets transmitted to Microsoft.
It is also important to note that DNS-over-HTTPS settings in browsers can bypass VPN DNS protection if configured incorrectly. The reason is that Microsoft Edge, by default, uses Cloudflare’s DNS servers regardless of VPN settings, potentially exposing browsing patterns.
The most effective approach is combinging VPN usage with proper DNS configuration and selective disconnection for essential Windows services that require direct connectivity.
1
Spybot Anti-Beacon
Block Telemetry Hosts
This tool blocks telemetry at the network level by preventing Windows from contacting specific Microsoft data collection servers. It modifies your system’s hosts file to redirect telemetry requests to localhost addresses.
When Windows tries to send diagnostic data to telemetry.microsoft.com or similar endpoints, those requests get blocked before leaving your computer. This creates a more comprehensive barrier than registry tweaks alone.
Spybot Anti-Beacon targets over 100 known Microsoft telemetry hosts. The blocking happens transparently; Windows continues attempting to send data, but the connections fail. It prevents telemetry transmission without breaking core system functionality, like updates or activation.
Follow these steps to configure Spybot Anti-Beacon:
Run the installer with administrator privileges.
After installing, review the list of hosts that you want to block in the main interface.
Click Apply to activate telemetry blocking.
Restart your system to ensure the hosts file changes take effect.
The interface shows which telemetry endpoints are currently blocked and allows selective unblocking if needed. If you experience issues with specific Microsoft services after enabling all blocks, the tool provides granular control to resolve these conflicts.
One limitation involves Windows Update behavior. Microsoft occasionally changes telemetry server addresses, requiring Anti-Beacon updates to maintain effectiveness. The tool includes an update mechanism, but there’s typically a delay between new telemetry servers going live and blocking rules catching up.
These tools won’t eliminate every privacy concern, but they create meaningful barriers against Windows 11’s data collection. Microsoft finds new ways to gather your information, so using such tools is one of your limited options to fight back against it.
If you’re a student, you’re sitting on a goldmine of tech discounts since major brands slash prices just for you. Take full advantage while you can, because most of these perks expire after graduation or are only offered for a limited period.
Spotify is one of the best music streaming services around, and it offers students a discounted rate on its Premium plan. For just $5.99/month, eligible college students get full access to Spotify Premium with its ad-free listening, on-demand playback, offline downloads, higher-quality playback, and unlimited skips.
Spotify sweetens the deal by including an ad-supported Hulu plan at no extra cost, which is typically $9.99/month. This bundle makes it incredibly affordable to stream your favorite music, binge TV shows, and access a wealth of movies. Whether you’re studying, commuting, or simply unwinding, Spotify Premium Student provides top entertainment without draining your budget.
To qualify, you must be enrolled at a US Title IV-accredited college or university and verify your student status through SheerID. Once verified, you can enjoy the discounted rate for up to four years, provided you re-verify annually. If you can’t get through the SheerID verification, you can try other ways to get Spotify Premium for less.
YouTube Premium Student gives eligible students an ad-free, uninterrupted viewing experience for just $7.99/month—almost half the regular price of $13.99/month. With this subscription, you can watch YouTube without ads, download videos for offline viewing, and enjoy background play while using other apps. The plan also includes access to YouTube Music Premium, allowing you to stream and download music without interruptions.
To qualify, you must verify your student status through SheerID. You can then enjoy the discounted rate for up to four years, provided you complete annual reverification. If you rely on YouTube for learning, entertainment, or music, the student plan is a great deal.
Apple Music also has a special discounted plan for students, simply called Apple Music Student. It gives you access to Apple Music for just $5.99/month, which is nearly half off the $10.99/month Individual plan. This includes access to lossless audio, curated playlists, and up to four years of discounted pricing with annual verification through UNiDAYS or SheerID. A key requirement is that you must be enrolled in a degree-granting institution.
The plan also includes a one-month free trial and offers free Apple TV+ access, typically valued at $9.99/month. After the four-year period elapses, or you graduate, you’ll need to reverify your student status to continue enjoying the discounted rate. If you don’t reverify, Apple Music will automatically transition you to the full Individual plan rate of $10.99/month.
Amazon’s Prime for Young Adults (formerly Prime Student) offers major perks for students and anyone aged 18–24. At just $7.49/month or $69/year, which is about 50% off the standard Prime cost ($14.99/month or $139/year), you enjoy all of Prime’s benefits. These include free two‑day, one‑day, or same‑day shipping, Prime Video, Prime Music, Prime Reading, Prime Gaming, and more—along with early access to Prime Day deals.
And if you’re a new member, you’ll receive a six-month free trial. After the trial, you receive up to four years of discounted membership, or until graduation, while non-students aged 18–24 are covered until they turn 25.
Microsoft offers eligible US college and university students a discounted Microsoft 365 Personal (formerly Office 365) subscription for just $4.99/month. That’s a great savings compared to the standard rate of $9.99/month or $99.99/year. Plus, you receive a three-month free trial upon your first signup before you start paying the discounted rate.
This plan includes offline desktop applications like Word, Excel, and PowerPoint, as well as 1TB of OneDrive storage.
However, the offer is only available to students enrolled in a Title IV-accredited US institution. Plus, like most offers, you must verify your current enrollment through your school’s email account or provide documentation, such as your student ID. Like most student discounts, you’ll need to reverify your student status annually to maintain the discounted price.
Notion gives students one of the best productivity deals on the web—completely free access to its Plus plan, which usually costs $12/month or $120/year. To sign up, you will need a valid school email address. Once you’re verified, you get unlimited collaborative blocks, unlimited charts, unlimited file uploads, a 30-day version history, and the ability to collaborate with up to 100 guests. It includes almost all the perks of Notion Plus, at no cost.
Additionally, you can qualify for a 50% discount on Notion AI for up to one year. This includes features like writing assistance, auto-fill in databases, translation tools, chatting with Notion AI, Notion AI access in Notion Mail, and AI-powered blocks.
Setting it up is straightforward, but you need to do it via Notion for desktop or Notion for web. Ensure that you’re using your education email (you can change this if you signed up using a personal email), your Notion account is on the Free plan (you can’t downgrade from a paid plan to the Education Plus plan), and your workspace has only one member.
Even better, unlike other student discounts, Notion won’t deactivate your plan once you graduate. As long as you still have access to your school email address, you’ll continue to use the Plus plan for free.
Adobe offers a discounted Creative Cloud Pro plan for $29.99/month for the first year, followed by $39.99 per month thereafter. It might not sound like a great deal at first since it isn’t constant, but even after the first year, you’ll still pay about 42% less than the regular price of $69.99/month.
The price you pay for Creative Cloud Pro is per month, but you’re signing up for a yearly contract. If you want to cancel the plan after 14 days of purchase but before the end of the year, Adobe will charge you half of the remaining contract balance as an early termination fee.
Creative Cloud Pro provides access to Adobe’s professional-grade tools for creativity, design, video, photography, and more, at student-friendly pricing. Adobe also offers a free trial that allows you to try the service before committing to it.
The plan includes full access to more than 20 Adobe apps: Photoshop, Illustrator, InDesign, Premiere Pro, After Effects, Acrobat Pro, and more. It also gives you 4,000 monthly credits for Adobe Firefly creative AI, which generates images, video, and audio. You’ll also get 100GB of cloud storage.
To redeem this offer, you must be at least 13 years old and enrolled in either a university, college, accredited primary or secondary school, or be homeschooled. You’ll need a school-issued email address to verify eligibility or other necessary documentation.
1
Movie and TV Show Streaming Service Discounts
Various streaming services also offer student discounts, enabling you to watch shows and movies for less. Nearly all the streaming services worth paying for have a discount for students. For example, Hulu offers an 80% student discount on its Hulu (With Ads) plan—normally $9.99/month, it’s just $1.99/month for those in school.
Paramount Plus is available for $3.99/month for students, instead of $7.99/month, and HBO Max for students is priced at $4.99/month. You can also get Peacock at a discounted rate of $2.99/month, down from $7.99/month.
However, these discounts only apply to the lowest tiers, which tend to include ads. Regardless, they cost less than paying full price for an ad-free experience, which can be as high as $20/month. These constant price hikes are one of the ways streaming platforms have become worse.
Being a student often comes with financial challenges. Thankfully, you don’t have to pay full price for these services that offer incredible student discounts. As online service providers continue to raise their prices and introduce more annoying subscriptions, take every student discount you can get to save some cash.
Switching from iPhone to Android usually means losing access to Apple’s exclusive features. Despite this, I’ve found a way to enjoy iMessage (one of the best parts of the Apple ecosystem) without giving up my Android phone.
OpenBubbles Is the Answer You’ve Been Looking For
Sending texts via RCS on an iPhone isn’t perfect, so the blue bubble vs. green bubble gap still exists. Some people continue to use iMessage exclusively, so group chats can feel awkward if everyone has to switch to green bubbles just because of you.
OpenBubbles offers a way around this. It uses the hardware code of an Apple device you already own to send and receive iMessages on your Android phone. Once you set it up with a Mac or an old iPhone, that device acts as a relay, and your messages appear directly in the OpenBubbles app on your Android phone.
Raghav Sethi/MakeUseOf
This setup does not rely on any third-party cloud service. Everything runs through your own device, which makes it easier to trust from a privacy standpoint. If you don’t have an Apple device to spare, OpenBubbles also offers dedicated hardware that can act as a relay. However, there is currently a waitlist for this, and using it means giving up some of the privacy benefits while also paying a monthly fee.
You can technically use an iPhone as the relay device, but it’s very unreliable and only works if the iPhone is running iOS 17.0 or earlier. You can go through OpenBubbles’ guide for setting it up, but using a Mac as the relay is the much more dependable option.
It also supports FaceTime, and the experience is far better than using FaceTime on an Android device via a web browser. With this method, you can also initiate calls, unlike the official browser option.
First, install the OpenBubbles app on your Android phone via the Play Store. Once that’s done, head over to OpenBubbles’ self-hosting page and download the QR code generator app for your Mac. Open the app like you would any other app on your Mac, and it will display a QR code on the screen.
On your Android phone, launch the OpenBubbles app, then tap Next to get through the onboarding menus. Select the Self-hosted option, then choose Scan Code to scan the QR code displayed on your Mac.
If you can’t scan the code for some reason, select Copy Activation Code on your Mac and manually enter that code in the OpenBubbles app. You might wish to use a messaging app or shared clipboard so you can copy and paste the code, as it’s quite long.
Next, you’ll be prompted to enter your Apple Account’s credentials. Your password is sent directly to Apple’s servers, so OpenBubbles never has access to it.
Once the setup is complete, you can start sending iMessages right away. Tap the send message icon in the bottom-right corner, choose a contact, and type your message.
This is only the beginning, though. OpenBubbles can do much more than send and receive iMessages, and setting it up unlocks several other useful features.
Get FaceTime, iMessage Games, and More Working Flawlessly
OpenBubbles is not only about sending and receiving iMessages. It also brings over several other Apple-exclusive features that work just as well on Android. One of the biggest ones is FaceTime; you can place FaceTime calls directly from within the app by opening a conversation and tapping the video icon in the top-right corner.
Incoming FaceTime calls also show up like a regular call on your phone, so you can answer without having to fumble through extra menus or links.
Sharing media works exactly as it does on an iPhone. You can send full-resolution photos and videos by tapping the plus (+) icon in the chat and choosing the attachment option you need. The layout will feel familiar if you have used iMessage before, with only a few small UI differences compared to iOS.
OpenBubbles also includes iMessage games via an add-on app called OpenPiegon. After downloading the app, which integrates directly with OpenBubbles, you can play most iMessage games just like you would on an iPhone. Not every single game is supported, but the majority work without issues.
Once OpenPiegon is installed, you don’t need to open it separately. Head into an iMessage chat, tap the plus (+) icon, select OpenPiegon, and pick the game you want to play.
You can also track your Apple devices through a built-in map feature. Tap the three dots in the top-right corner and select Map to see their locations. Keep in mind that this only shows where your devices are; you won’t be able to ping them or mark them as lost.
You can also view shared albums from the same menu, but you can’t upload photos to them. In my experience, this feature has been a bit buggy, so you shouldn’t depend on it too much.
Switching from an iPhone to Android comes with its fair share of compromises, but OpenBubbles has been one of the standout apps that made the mobile OS transition much smoother for me.
I went into it expecting a makeshift workaround that I’d only use occasionally, but it turned out to be one of the most useful apps I’ve ever tried on my Samsung phone.
Buying a laptop for school is a big decision. While Apple devices may seem like the obvious choice, there are a few factors worth thinking about before you commit to a purchase.
5
You’ll Most Likely Run Into Compatibility Issues
Before you buy a Mac or iPad for college, it’s a good idea to first check your coursework and see what kind of software you’ll need. A lot of majors, especially in fields like engineering or design, still rely on older or Windows-only programs that don’t run well on macOS.
I’ve seen people spend $2,000 on a MacBook for their design course, only to find out that SolidWorks, one of the key tools they needed, doesn’t have a macOS version. Despite trying a bunch of workarounds, it was a mid-semester disaster.
Zarif Ali / MakeUseOf
I faced a similar issue during my computer science course. I had to set up a Windows virtual machine using Parallels just to run a few apps. It technically worked, but the experience was frustrating. Since Apple Silicon Macs only support the ARM version of Windows via virtualization, I kept running into apps that still wouldn’t launch at all.
iPads aren’t much better. iPadOS 26 adds some great features to make the platform feel more like a proper computer, but limitations still come from the apps. If your work mostly involves writing papers or making presentations, you’ll be fine. But for anything more technical, like programming or using niche tools, an iPad will just get in the way. You’ll spend more time finding workarounds than actually doing your work.
The best advice I can give is to find out what software your course depends on before buying an Apple device. I managed to get by, but it was way more effort than it needed to be.
4
You Can’t Upgrade Anything Down the Road
Once you buy a Mac or an iPad, you’re stuck with whatever configuration you chose at checkout. Unlike many Windows laptops, there’s no option to upgrade the RAM or storage down the line.
Apple uses a different type of RAM called Unified Memory that’s soldered onto the motherboard, so there’s no way to add more RAM if your needs increase. Storage is no different. Even though Apple’s SSDs are just standard drives in terms of performance, they’re integrated into the system with no way to replace or expand them afterward.
Jowi Morales / MakeUseOf
I bought an M1 MacBook Air with 8GB of RAM back in 2021, and while the chip still performs great in 2025, that memory limit has become a real issue. I can’t multitask the way I used to, and apps slow down often.
What’s frustrating is that everything else about the laptop still works perfectly, but because I didn’t pay for the 16GB model back then, I’m now being punished by having to buy an entirely new machine. That’s especially true when you consider…
3
You’re Paying More for Less Hardware
Adding to the fact that you’re locked into whatever configuration you choose, Apple also charges an absurd premium for basic upgrades. Going beyond the base model really shouldn’t cost as much as it does.
Take Macs, for example. Most entry-level models come with just 256GB of storage. If you want to bump that up to 512GB, Apple charges you $200. For context, you can buy a faster NVMe SSD, with the same amount of storage, for around $50.
It’s the same story with Unified Memory. Apple asks for another $200 just to go from 8GB to 16GB of RAM, even though the actual hardware cost is much lower (often around $30). That’s absurd to consider when you can buy 16GB of high-quality desktop RAM for $50. These markups are hard to justify, but Apple knows you either pay now or end up replacing the entire device a few years down the line.
The same overpriced upgrade path applies to the iPad, but the situation gets even worse when you factor in accessories. If you’re a student considering an iPad, chances are you’ll want an Apple Pencil and a Magic Keyboard. Once you add those in, the base $999 iPad Pro suddenly costs $1,427. Third-party accessories are an option, thankfully, but they often aren’t cheap either.
2
Repairs Are a Nightmare
One of the biggest downsides to Apple hardware is how tightly everything is packed together. Almost every major component—storage, memory, even ports—is built directly into the Logic Board. This means even small issues can make your entire device unusable.
Take storage, for example. If the SSD fails and you take it to Apple, the technician won’t just replace the drive. Instead, they’ll replace the entire Logic Board, which also includes the CPU, GPU, and RAM. That kind of repair can cost nearly as much as a brand-new device.
It’s the same with other parts. If your keyboard stops working or the display connector goes bad, there’s a good chance the fix will involve replacing large parts of the system instead of only the faulty component. This all adds up to expensive, time-consuming repairs for what should be simple issues.
For students, that’s a huge problem. If your device breaks during a busy semester, you could be stuck without a laptop for days—or worse, be forced to pay hundreds to get it working again.
1
Windows Laptops Are Just More Versatile
As someone who prefers macOS for most traditional laptop tasks, I’ll admit that Apple nails the day-to-day experience. But even then, I can’t help but feel like Windows laptops are more flexible overall.
There have been so many times when I wished my Mac had a touchscreen. Whether it was during a lecture or while preparing for exams, I really wanted the ability to jot down notes with a stylus. A lot of Windows laptops offer that through 2-in-1 designs, and they do it pretty well.
Gavin Phillips / MakeUseOf
The same goes for gaming. It’s practically non-existent on macOS unless you’re only into casual titles. Meanwhile, a lot of thin-and-light Windows laptops have gotten so good that they can run a decent range of games comfortably. Of course, gaming isn’t your priority when you’re in school, but it’s still a good way to relax when you have time.
At the end of the day, when you’re in school, you want to be smart with your spending. Ideally, part of that means having one device that can do it all. As polished as MacBooks and iPads are, they often fall short in that “one device for everything” category.
Windows laptops might lag a bit in battery life or thermals, but they make up for it by letting you do a lot more without restrictions. While I prefer macOS for most tasks, Apple needs to better consider the realities of student life. When one device has to do it all, versatility and value matter a lot more than an ecosystem of devices.
System Restore is a valuable safety feature, but it doesn’t need to take over your hard drive. By checking how much space it’s using, deleting old restore points, and setting a reasonable storage limit, you can keep it under control without giving up the protection it provides.
Check How Much Space System Restore Is Wasting
The System Restore feature on Windows comes in handy when something goes wrong. It quietly works in the background and takes snapshots of your system, often before software installations, driver updates, or other major changes. You can then use restore points to easily revert Windows to its previous state if necessary.
All of that sounds incredibly helpful, and it actually is, but every restore point Windows creates takes up storage space. Sometimes a lot of it. Depending on the size of your system and the amount of data involved, a single restore point can consume several gigabytes. Multiply that over weeks or months, and you may find a significant portion of your hard drive reserved for these backups.
By default, Windows reserves a portion of your drive for these restore point snapshots, and if you’ve never checked, it might be more than you expect. Fortunately, it’s easy to find out how much space System Restore is using on your PC.
Press Win + S to open the search menu.
Type create a restore point in the text box and hit Enter.
Under the System Protection tab, click the Configure button.
Check the storage next to Current Usage to see the amount of storage being used by restore points.
If your PC is short on storage, deleting old restore points could be an easy way to reclaim some space on your PC without deleting anything important.
Delete All but the Most Recent Restore Point
Deleting old restore points on your PC is surprisingly straightforward. Windows includes a built-in option that removes all previous restore points while keeping the most recent one intact. This way, you can free up storage space without completely giving up your safety net.
But before you clear them out, make sure you won’t need those older restore points. For instance, if you’ve recently experienced system issues or made major changes—like driver updates, software removals, or critical setting tweaks—it might be a good idea to keep those restore points a little longer.
To view all the available restore points, press Win + R to open Run, type rstrui.exe, and click OK to open System Restore. Then, click Next to see all the available restore points along with their date and descriptions. If you’re confident your system is stable, and you don’t need the older ones, you can use the Disk Cleanup tool to safely remove them at once.
Open the search menu, type Disk Cleanup in the text box and press Enter.
Select your system drive and click OK.
In the Disk Cleanup window, click Clean up system files.
Select the drive again if prompted, then switch to the More Options tab.
Under System Restore and Shadow Copies, click the Clean up button.
Hit Delete to confirm.
And that’s about it. All your older restore points will be gone except the most recent one in case you need to roll back.
Set a Space Limit for System Restore
While deleting restore points is a quick way to free up disk space, it’s not something you should have to remember to do regularly. You also don’t need to disable System Restore altogether and give up the safety net it provides. There’s a better way to keep things in check.
Windows gives you the option to set a custom space limit for System Restore. This controls how much of your drive is allowed to be used for storing restore points. Once that limit is reached, Windows will automatically remove older restore points to make room for new ones.
Press Win + S and type create a restore point, then press Enter.
In the System Properties window, under the System Protection tab, select your system drive (usually C:) and click Configure.
Use the slider next to Disk Space Usage to set how much of your drive you want to allocate for restore points.
Click Apply, then OK to confirm the changes.
The more space you allow, the more restore points Windows can keep on hand. If you are someone who often experiments with settings, installs beta updates, or tests new software on your PC, a higher limit—around 10% of your total storage—is a good idea. But if you’re low on space or rarely rely on System Restore, setting the limit to around 5-7% should be more than enough.
While there are plenty of ways to free up storage space on a Windows PC, you may sometimes need to look beyond the usual suspects, like the Downloads folder, Recycle Bin, or temporary files. As helpful as System Restore is, it can consume a significant amount of disk space if left unchecked. Fortunately, Windows makes it easy to reclaim that space and stay in control.
While shows like Ted Lasso and Severance get most of the buzz, that’s just scratching the surface. Don’t get me wrong, they’re amazing shows, but Apple TV+ has a catalog full of hidden gems waiting to be discovered.
Solving a murder is the central theme of each of the two seasons of the comedy, The Afterparty. In the first, a pop star is murdered after his high school reunion. In the second, it’s a groom who faces an untimely demise immediately following his wedding. Both seasons star Tiffany Haddish as a crime-solving detective who interviews a new suspect each week.
Bryan M. Wolfe / MakeUseOf
The Afterparty is filled with unexpected twists and turns, making the revelation of the murderer in each season quite surprising. However, what truly sets this series apart is not just the mystery of “who killed whom,” but rather the journey to uncover the truth and the diverse cast of characters you encounter along the way. Besides Haddish, each season was led by Sam Richardson and Zoë Chao. The first season also includes actors like Ike Barinholtz, Ben Schwartz, and Dave Franco, while the second season features John Cho, Paul Walter Hauser, Elizabeth Perkins, and Zach Woods, among others.
In total, there are 18 episodes of The Afterparty, eight in the first season and 10 in the second.
For anyone obsessed with TV series that include more than one timeline, there’s Acapulco. The bilingual comedy-drama tells the “rags-to-riches” story of Máximo Gallardo, who learned many of life’s lessons in 1984 as a cabana boy at an Acapulco resort. The story alternates between scenes set in the past at the resort and the present day.
Bryan M. Wolfe / MakeUseOf
Feel-good and heartwarming, Acapulco is a fun watch that isn’t too serious about itself. And you can’t help but love the cast, headed by Enrique Arrizon as the younger Máximo and Eugenio Derbez as the modern-day older version and narrator of the story.
Unlike The Afterparty, Acapulco is still airing new episodes, at least for a little longer. The final season is currently airing. When finished, Acapulco will consist of four 10-episode seasons. This is another one of those great comfort shows that are perfect to binge.
Seth Rogen is currently starring in one of the most popular series ever to air on Apple TV+, The Studio. And yet, that’s not the show we’re highlighting here. Rogen’s other show on the streaming service, Platonic, is also looking to make you laugh, and it will do just that every single episode.
Bryan M. Wolfe / MakeUseOf
Platonic stars Rogen and Rose Byrne as Will and Silvia, two best friends from college who have reconnected following a five-year friendship breakup. Back together again after Will suffered a divorce, the twosome pick up right where they left off, having a close relationship many of their friends and family members don’t quite understand. As they navigate their way into humorous situations in Los Angeles, the besties question relationships, marriage, and dating, all while each of them experiences a midlife crisis.
This is a hilarious comedy that currently consists of 20 episodes over two seasons. Hopefully, it will be back for a third episode, because it deserves it.
In this psychological thriller, based on the novel of the same name by Renée Knight, an intense story unfolds, exploring themes such as revenge, grief, and the multifaceted nature of truth. It stars Academy Award-winning actress Cate Blanchett, who plays Catherine Ravenscroft, a woman whose life, as she knows it, has been shattered by events that occurred decades ago.
Bryan M. Wolfe / MakeUseOf
However, all is not necessarily as it seems. What some people thought they knew about Ravenscroft’s vacation 20 years ago in Italy turns out to be incorrect, or at least appears very different from what they thought, depending on the perspective. By the time the series ends, what you think about many of the show’s characters will completely change, and not for the better.
Disclaimer also stars Kevin Kline, Sacha Baron Cohen, Kodi Smit-McPhee, Leila George, and Louis Partridge. The one-season miniseries includes seven episodes.
In the quirky workplace comedy Loot, Molly Wells, portrayed by Maya Rudolph, experiences a whirlwind transformation after her unexpected divorce leaves her a staggering $87 billion richer. This sudden windfall has her shifting between excess and altruism as she’s trying to come to terms with her new life. Along the way, there are lots of laughs.
Bryan M. Wolfe / MakeUseOf
The ensemble cast shines brightly with Michaela Jaé Rodriguez, Joel Kim Booster, Nat Faxon, and Ron Funches joining Rudolph. Collectively, Loot presents a story that strikes a careful balance between the hilarity of the absurd and the touching moments of human connection. The result is a fun comedy that’s worth your time.
Loot’s third season is set to launch later this year. The first two seasons totaled 20 episodes.
It’s the 1950s, and Elizabeth Zott (Academy Award winner Brie Larson) is trying to make her way through life as a single mother following a tragedy. However, instead of giving way to the patriarchal society of the time, she becomes a trailblazer for homemakers everywhere.
Bryan M. Wolfe / MakeUseOf
Based on the bestselling book of the same name by Bonnie Garmus, Lessons in Chemistry sees Zott, a brilliant chemist, forced out of her job. Her only recourse is to become the host of a television cooking show called “Supper at Six.” However, she doesn’t just make meatloaf, Chicken à la King, and other sometimes drab family meals of the time. She also teaches homemakers on the principles of chemistry, challenging the societal norms that confine women to the domestic sphere.
Lessons in Chemistry explores a range of themes across its eight episodes, including heartbreak, perseverance, romance, and feminism. In the end, however, it’s just a story of someone trying to make their way through an uncertain world one day at a time.
When you’re in need of a new series to start, you can’t go wrong with any of the dramas and comedies mentioned above; you might even find that these are the best shows to watch this summer.
Even if you’ve been using a computer mouse for years, you might be missing out on some of its most useful features. From arranging windows and auto-scrolling pages to selecting files and managing tabs, the humble mouse is packed with hidden tricks you’ll wish you’d discovered sooner.
8
Snap Windows by Dragging Them
Snap Layouts is one of the best multitasking features on Windows. But you don’t have to rely on hovering over the maximize button or using keyboard shortcuts to access them. You can also simply drag app windows with your mouse to quickly snap them into position.
To do this, grab the title bar of any open window and drag it to the left or right edge of the screen. As your cursor touches the edge, a translucent outline will appear, previewing the snapped position. Release the mouse button, and the window will instantly dock to that side, filling half the screen. Then, simply select another open window to fill the other half.
If you want to access all available Snap Layouts, drag the window to the top center of the screen, and a layout grid will appear. Hover over your preferred layout option, then release the window to snap it into place. From there, you can select the remaining windows one by one to complete the layout.
By default, when you drag and drop a file with the left mouse button on Windows, it moves it to the new location. But what if you want to copy the file instead or create a shortcut? If so, there’s no need to copy and paste the item or right-click it and select Send to > Desktop (create shortcut).
Instead, use the right mouse button to drag the file. When you release it over the desired location, a small menu will appear with options like Copy here, Move here, and Create shortcut. If you’ve installed compression tools like 7-Zip or WinRAR, those will also appear on the list.
You can also select multiple items and drag them all at once with the right mouse button. I find this method quite useful when creating desktop shortcuts for several apps and programs at once.
The right-click menu in Windows 11 has improved quite a bit since it first launched (or maybe I’ve gotten used to it). Still, there are times when you need to access the full classic context menu on your PC.
For instance, you might need to use options like Create shortcut, Scan with Microsoft Defender, or certain third-party app actions tucked away under Show more options.
If you’re tired of making that extra click every time, simply hold down the Shift key and then right-click the file or folder. This instantly opens the full classic context menu. This way, you can access both the old and new right-click options on Windows.
The need to scroll sideways doesn’t come up often—until it does. Maybe you’re working on a massive Excel spreadsheet, editing a timeline in a video editor, or viewing a zoomed-in webpage that spills off the edge.
In such instances, there’s no need to go search for the scroll bar. Instead, hold down the Shift key and scroll the mouse wheel. Scrolling down moves the content from left to right; scrolling up shifts it back. This trick works in most apps and browsers that support horizontal scrolling.
4
Ctrl + Click or Shift + Click to Select Multiple Files
Selecting multiple files on your PC doesn’t have to be a hassle. Windows provides two handy shortcuts that make managing batches of files quick and painless.
Ctrl + Click is useful when you need to handpick individual files. Hold down the Ctrl key and click on each file you want to select. If you accidentally include the wrong one, click it again (while still holding Ctrl) to deselect it. This method is perfect for choosing non-consecutive items or skipping over files you don’t need.
Shift + Click, on the other hand, is ideal when selecting a group of files in a row. Click the first file, hold Shift, then click the last file in the group. Windows will automatically highlight everything in between.
Once you’ve made your selection, it’s easy to move, copy, delete, or drag the group to a new location. Besides File Explorer, these mouse shortcuts also work on most apps, browsers, and even cloud services like OneDrive or Google Drive.
3
Middle-Click to Open and Close Tabs Quickly
Tabs in File Explorer are a game-changer, but if you often right-click on a folder and choose Open in new tab, there’s a quicker way. Press the scroll wheel (that’s your middle-click) on any folder in File Explorer, and it will instantly open in a new tab. And if you want to close an existing tab, middle-click on its title bar.
This trick isn’t limited to File Explorer. In most web browsers, middle-clicking a link opens it in a new tab instantly—no need to hold Ctrl or right-click. And when your tab bar gets cluttered, you can middle-click on any tab title to close it, one by one. It’s a small habit that can speed things up significantly.
2
Middle-Click to Auto-Scroll Pages
Scrolling through long web pages or documents with the mouse wheel can get tiring really fast. But there’s a fix for that.
Instead of endlessly spinning the wheel, press the scroll wheel (middle-click) anywhere on the page. A small circular icon will appear, and your cursor will change to indicate auto-scroll is active.
Now, move the mouse slightly up or down, and the page will begin to scroll automatically in that direction. The farther you move the cursor from the icon, the faster the scroll.
This trick comes in handy when you want to read long documents or browse without wearing out your finger or the scroll wheel. When you’re done, click the scroll wheel again to exit auto scroll. This handy trick works in most web browsers, PDF readers, and even applications like Microsoft Word.
I prefer using auto-scroll over the read aloud option. It’s one of those features that, once you start using it, you wonder how you ever scrolled without it.
1
Customize Mouse Buttons
If you’ve splurged on a high-end mouse like the Logitech MX Master, it likely came with its own customization software. And if it did, you’re sitting on a goldmine of productivity potential.
With tools like Logitech Options, Razer Synapse, or Corsair iCUE, you can remap buttons, assign custom shortcuts, and even create app-specific profiles that change how your mouse behaves depending on what you’re doing.
For example, a side button can be set to launch your favorite app, switch virtual desktops, paste text, or mute your mic during a video call. And it gets even better if you have a mouse with extra buttons.
But even if you’re using a regular, no-frills mouse, you’re not out of luck. You can download a tool called X-Mouse Button Control (XMBC). It’s a free app that lets you remap buttons, assign keyboard functions, and create per-app profiles.
Unlike a keyboard, which offers plenty of useful shortcuts, a mouse might seem limited. In reality, though, it offers far more than just pointing and clicking. Once you get familiar with the tricks above, you’ll see how much untapped potential your mouse really has. And with customization software, it’s all about tailoring your setup to match the way you work.
Although I love adding more of my physical media to my Plex server, sometimes I just want to kick back and watch television. With over a thousand live TV channels on Plex, only a handful come out on top.
10
At the Movies
While I hesitate to call myself a film buff, I do watch a ton of movies, paying close attention to older ones released between the 70s and 90s. I consider those decades to be some of the best years for film. As luck would have it, Plex has At the Movies, a TV channel that broadcasts movies from said decades.
At the Movies mainly focuses on classic films, but lesser-known titles and even box office bombs do show up from time to time, like Deep Cover, One Crazy Summer, Drop Dead Gorgeous, and The Hudsucker Proxy. Either way, you’re going to find some underrated gems here, though there are numerous sites with free movie streaming that are worth checking out, too.
9
Hit Sitcoms
Hit Sitcoms is a TV channel that delivers exactly what it says on the tin—constant reruns of popular sitcoms from the past couple of decades, like Perfect Strangers and The Drew Carey Show. However, it’s limited to sitcoms produced by Warner Bros., which isn’t much of a limitation since Warner Bros. is probably responsible for your favorite sitcom, too.
The way Hit Sitcoms works is by running a string of episodes from just a few sitcoms, making it really easy to find a comfy spot on the couch and enjoy a sitcom you like. It’ll then alternate to a different sitcom, then rinse and repeat for the next few days.
8
BBC Earth
BBC Earth produces many of the best documentaries about our planet to date, and I cannot get enough of them. The product quality alone is worth a look, but it’s the beautiful shots they capture of animals in their natural habitats that I enjoy the most. More importantly, BBC Earth being free on Plex (and ad-supported) means you don’t have to add yet another subscription to your bill.
Perhaps not every documentary will interest you, but I highly recommend catching David Attenborough’s Natural Curiosities, Wild Japan, and Amazon Abyss. Additionally, there are documentaries about global warming, and those are always worth watching to stay informed. If you’d like a choice in the matter, try streaming services with dedicated documentary libraries.
7
Miramax
While At the Movies is much more focused on a handful of decades, Miramax doesn’t have that limitation, and it’s what I turn to when I want to step out of the 70s, 80s, and 90s. You’ll find a wide variety of genres, too. I caught the tail end of True Grit before it when hundreds of years into the future with the immediate start of Star Trek VI: The Undiscovered Country. That was then followed up with The Hunt for Red October.
Miramax gets pretty cozy with blockbusters, so I can usually count on there being some exceptional movies, or at least a part of something that interests me enough to look for it on streaming. If you have a good media setup, maybe even a projector, Miramax is a great channel for movie night!
6
National Lampoon
Self-described as knowing “comedy from A to Z,” National Lampoon delivers comedy of all shapes and sizes. It truly is an expansive library of slapstick and sophisticated comedies. One night I went from Cheech and Chone: Still Smokin’ to Tommy Boy to Tropic Thunder, so the channel doesn’t just stay in one decade.
Beyond the decades the movies were released, you’ll also notice, like I did, there is a good mix of popular hits and cult classics, long recurring actors. For example, I see Will Ferrell, Adam Sandler, and Paul Rudd show up frequently, and that’s to be expected when they’ve been in numerous well-known comedies.
5
CW Forever
The CW is home to quite a number of great dramas, whether it’s a movie or series—Veronica Mars, Smallville, and Supernatural, to name a few. My personal favorite is Charmed, which I can no longer watch since I cut cable many, many years ago.
To my surprise, I discovered CW Forever gives you the best of two worlds. On one hand, you could watch newer CW dramas like Wild Cards and Good Cop/Bad Cop or take a stroll down memory lane and watch reruns of Charmed.
4
Scares by Shudder
As a streaming service, Shudder is a paradise for horror fans, myself included, with a library that includes just about every facet of the genre. Not even comedy is left out. If you were ever on the fence about the service—or hesitant over adding another streaming service to your bill—check out Scares by Shudder on Plex instead.
What you’re essentially getting is Shudder’s library in TV format, so content you see broadcast on live TV is likely to be on the platform, too. With that said, Scares by Shudder is completely fine on its own, because it has the same ratio of slashers, thrillers, and bloody spectacle.
3
FilmRise: Sci-Fi
When I considered the kind of live TV channels I wanted to put front and center on my Plex server, sci-fi was one of the first to come to mind. Luckily for me, FilmRise has multiple channels dedicated to specific genres, and in this case, it’s the FilmRise: Sci-Fi channel.
Now, the channel isn’t like Miramax, where movies are usually well-known classics and blockbusters—FilmRise: Sci-Fi is equally likely to have something good, like I’ll Follow You Down or a stinker, like Alien Siege. And when you aren’t in the mood for a movie, you might even get to catch an episode of Beyond Belief: Fact or Fiction.
2
Amasian TV: Anime 24/7
Having a TV channel dedicated to anime every single day is like putting my childhood on repeat, though I do admit I was only able to catch shows that were popular on TV channels like Toonami. Once streaming took off (especially with Crunchyroll), that’s when the world of anime opened up more for me. The reason that matters is because Anime 24/7 mostly focuses on well-known anime, like Hunter x Hunter.
Sure, you do miss out on more obscure anime, but it does mean your Plex server will have the best content right from the word go. FilmRise: Anime and RetroCrush are solid alternatives if it’s classic anime you’re after, but Anime 24/7 will still cast the widest net.
1
Non-Stop ’90s
I am of the opinion that the 90s are one of the golden decades of film—a lot of phenomenal movies that artists cite to this day as inspiration come from that era. Think Jurassic Park, Toy Story, and The Shawshank Redemption. I could go on and on! The Non-Stop 90s channel plays 90s content exclusively.
It’ll also have reruns of 90s television series, like the drama Silk Stalkings, but the channel also has series from outside the U.S. For example, the Non-Stop 90s channel has reruns of ReBoot, which is a really weird Canadian animated show with incredibly shiny and dated CGI.
It was a tough battle, but these TV channels have been consistently good to me, and you can enjoy them too, once you’ve enabled live TV channels on your Plex server. You don’t even need a Plex Pass. If it’s content you want to expand, I’ve managed to grow my Plex library for cheap.
Whether it’s bringing a dead PC to life or getting rid of Windows, there are now more reasons than ever to switch to Linux. However, the switch does come with surprises that can catch you off guard, just like they did for me.
5
Troubleshooting Issues Is Vastly Different
If you’re used to Windows’ troubleshooter tools and overall point-and-click approach to troubleshooting, fixing issues in Linux will feel much different. Perhaps for the first time, you’ll be forced to read through log files and command-line outputs to figure out what’s going on.
When something breaks in Linux, the system logs (generally found in /var/log/) will usually tell you exactly what went wrong and where. These error messages are also far more detailed than the confusing error codes that Windows throws at your face.
Jayric Maning / MakeUseOf
Instead of clicking through menus and Google error codes, I ended up learning commands like journalctl, dmesg, and tail to examine system logs. Before you realize it, the terminal will become an essential tool for diagnosing issues and much more; it’s not just an optional power-user tool.
This approach to solving problems will help you over time. Instead of randomly changing settings or running automated troubleshooters that never seem to do anything, you’ll learn to follow logical diagnostic steps. You’ll check logs, verify configurations, and test individual components. In the process, you gain a much better understanding of the underlying systems that power your OS.
The learning curve is steep, and the entire process can seem overwhelming at first. This is especially the case if you’re trying to diagnose a simple task like getting your Wi-Fi to work or your printer to be recognized. However, the technical expertise you’ll gain from the process is well worth the effort.
4
RGB Peripherals Will Be Difficult to Customize
Linux isn’t the OS for you if you’re into proprietary software; nothing will be hit harder by this than your RGB peripherals. All my peripherals with their intricate RGB effects became much harder to control in Linux, simply because the proprietary software required by manufacturers like Corsair, Razer, and Logitech doesn’t exist for Linux.
Your RGB peripherals will still work, but you’ll lose the ability to control them or create program-specific lighting profiles. At least, this is the case initially. Thanks to the open-source community, several third-party programs can restore this functionality.
OpenRGB is the absolute hero of RGB control on Linux, with support for hundreds of peripherals from various manufacturers. It won’t replace the manufacturer-provided program for your peripherals entirely, but you do get basic color and effect controls.
Yadullah AbidiMakeUseOf
You can use Piper for configuring Logitech gaming mice, including handling DPI settings, button remapping, and lighting control. Razer users can try out OpenRazer with Polychromatic to configure their peripherals. If you own a piece of RGB tech that doesn’t fall into the categories above, I still recommend trying these programs out as they’ll likely work with your peripherals anyway.
One problem that’s bigger than RGB control is device compatibility. These programs are often much slower to provide support for newer devices compared to manufacturer software, so your flashy new RGB mouse might not be configurable on Linux for a while.
A possible workaround to this issue is to create lighting profiles for your devices on Windows (perhaps via dual-booting), then save them to the peripheral’s onboard memory. This way, you’ll be able to move your button assignments and RGB profiles over to Linux (and other systems) without requiring any programs.
3
You’ll Need Alternative Programs
This is one of the most common issues when switching to Linux, but I didn’t realize just how many alternative programs I would have to look for. Adobe’s creative suite, Microsoft Office, and that niche CAD program I use to make files for my 3D printer? All gone.
Thankfully, this is more a matter of finding worthy, and often free, alternatives that I never knew existed. Some of these alternatives can even be better than the programs you were using on Windows. GIMP, for example, can outperform Photoshop in several key areas.
Thankfully, the Linux ecosystem in 2025 offers mature alternatives for just about every Windows or macOS exclusive program. The challenge is finding tools that work for you, then adapting to a new workflow and interface. These tools have feature parity with their Windows/macOS alternatives in most cases, but you may have to spend time learning the ropes.
2
Gaming Becomes a Challenge
Gaming is the biggest hurdle in my attempts to start using Linux exclusively, and unfortunately, I don’t see myself getting over it anytime soon. Yes, Steam’s Proton compatibility layer has made Linux a significantly better platform for gaming compared to what it once was, but there are caveats you need to be aware of.
Most games still won’t run on Linux, period. The biggest troublemakers among these are games that require kernel-level anti-cheats programs like BattlEye and Easy Anti-Cheat. Even if you can run a game on Linux, if the anti-cheat software doesn’t work, you won’t be able to play the game online (or in some cases, even offline).
For this reason, popular multiplayer games like Valorant and Fortnite remain completely inaccessible on Linux. This has forced me to retain a Windows partition exclusively for gaming.
Picking a Linux gaming distro can help resolve these issues to some extent. However, unless gaming is a big deal for you, I’d recommend sticking to more beginner-friendly Linux distros as you get to grips with the new platform.
In general, though, gaming on Linux is now better than ever. When games work, they often run well—even close to native performance on Windows, depending on your hardware.
1
Get Comfortable With the Terminal
There’s a good chance you might never have used a terminal if you’re a Windows or macOS user switching to Linux. Even after the switch, you can do just about everything without needing to work with the Linux terminal. However, I recommend getting comfortable with the Linux terminal as soon as possible.
The learning curve is steep, for sure. Learning basic commands like ls, cd, cp, mv, grep, and many others will feel useless in the beginning, especially when there are visual tools for just about everything in modern Linux distros.
But Linux’s true power lies in the terminal. Package management, system configuration, file operations, and most of all, troubleshooting become far more efficient once you embrace the terminal. Not to mention that most Linux tutorials for installing or fixing something will require running terminal commands at some point.
Once you understand the underlying principles, you’ll realize that the terminal is extremely logical and consistent. The ability to write bash scripts and use tools like cron will supercharge your productivity with system-wide automations. Learning all this without visual cues will take time, especially if you’ve never used the command line before, but the system understanding you’ll gain is well worth the effort.
Switching to Linux can be exciting, especially if you’re doing so to learn more about computers or bring a dead PC back to life. Just make sure you’re prepared for the transition, so you don’t get caught off-guard by issues involved in making such a big move.
While I normally don’t binge shows, sometimes I get partway through a couple on Netflix, then suddenly spend an entire weekend watching the rest. And this weekend is shaping up to be strange, full of drama, and dinosaurs.
I have a confession: I’ve been wanting to watch The Sandman since it came out, and it wasn’t until this year that I finally watched the first season. Now I’m kicking myself because it is deliciously good. And if it’s this good as an adaptation, I can only imagine how good the comics are, which are now on my to-read list. What draws me in is this perfect mix of casting, story, and world-building—my personal favorite being Gwendoline Christie as Lucifer.
More than anything, I like seeing Morpheus struggle with his perceived functions. In fact, it seems every creature, no matter how high on the totem pole they are, seems to struggle with very human emotions, despite the Endless being higher beings above gods (small G). Even the beautiful Lucifer dreams of returning to the good graces of God. The stakes in the first season were high but still felt localized, so I can’t wait to see how it fits into the bigger picture in the second and final season. Maybe there really is something to Netflix’s two-season curse, after all.
As soon as I heard Steve Carell was starring in a new series, I had to check it out, only to be pleasantly surprised by the rest of the cast. You mean to tell me Tina Fey (Mean Girls, 30 Rock) and Will Forte (MacGruber, The Last Man on Earth) are in the show, too? I immediately knew The Four Seasons was going to be a good one, so I caught just a few episodes (I swear!), and now I’m hooked and ready to finish out the rest over the weekend.
The Four Seasons revolves around three couples taking vacations over the course of a year (hence, the title of the show). However, all the couples have problems that separate and define their relationships, threatening to undo their happiness. Anne and Nick’s marriage has fallen apart; Kate and Jack take passive-aggressive shots at one another; Danny and Claude struggle to communicate. I’m only halfway through the series, but I’m rooting for each and every one of them to overcome their vices and let their relationship’s virtues shine through.
After watching Sirens, I’ve been looking for another Netflix show that dissects the pageantry, drama, and selfishness of uber-wealthy families. It has a good cast, too—Nicole Kidman, Liev Schreiber, Dakota Fanning. And it seems Jack Reynor is back for round two of being the worst partner ever, after his stellar performance as Dani’s loser boyfriend in Midsommar.
I just love hating on pretentious rich folk, and The Perfect Couple is the perfect opportunity to indulge in some healthy cathartic release. I’m only an episode in, and I already have a seething hatred for these people. I’ll be rooting for their downfall every step of the way.
Beef is like watching a car accident in slow motion, which is a tad ironic considering the show starts with road rage between two people, Amy and Danny (Ali Wong and Steven Yeun, respectively). I’m on the fifth episode, and the feud between the two is escalating to the point I’m starting to wonder if Amy and Danny are going to make it out alive. The lengths they go to get the “last word” is very illegal, but also very psychotic and self-destructive.
Despite their chaotic natures, I find both of them oddly relatable, which is ultimately what makes Beef so gripping. I understand that feeling of being beaten down to your lowest, then kicked for good measure. And I recall on several occasions, like Amy and Danny, repeating the phrase: “There’s always something.” I hope they get an opportunity to connect and realize they aren’t that different, other than the obvious wealth disparity between them.
What can I say? I love dinosaurs, and so does my youngest son. We’ve been meaning to finish Jurassic World: Camp Cretaceous so we can move on to Jurassic World: Chaos Theory, since it’s the sequel. Although the show is meant for a younger audience, the characters and dinosaurs are treated rather well, and many of them show maturity and growth. Kenji, for example, seems like a careless jerk at first, but ends up bonding with Darius and ultimately takes their stay a lot more seriously.
The animation is also surprisingly good, with the dinosaurs looking the best. More importantly, the dinosaurs feel like a real threat, even going as far as to kill characters off-screen, minus the blood and gore (though you can hear the sound of crunching bones).
The good news is, even if you personally haven’t started any of these shows on Netflix, most can be watched start to finish in a single weekend. Beef has 10 episodes, while The Four Seasons has eight, and The Perfect Couple is a mere six. If you’re looking for a show with fewer stakes, there are numerous comfort shows to binge, as well as shows that only have one season!
OpenAI says GPT-5 is their “smartest, fastest, and most useful model yet.” If putting expert-level brains in everyone’s pocket was the goal, they might’ve just cracked it.
What Makes GPT-5 Different?
GPT-5 is much smarter across the board compared to its predecessors, especially in math, coding, visual perception, and health. OpenAI claims that it’s also “significantly better” at instruction following and doesn’t hallucinate as much.
It’s also more honest. GPT-5’s responses are 45% less likely to contain a factual error compared to GPT-4o. The model also communicates its actions and capabilities more clearly, especially for tasks that may be impossible or inadequately described.
Performance and intelligence improvements aside, GPT-5 is a unified platform that automatically decides how to best handle your queries. This avoids the hassle of picking the right AI model for a specific kind of task as GPT-5 uses a “real-time router” to make the choice for you. If you were confused about the differences between GPT-4, GPT-4o, and GPT-4o mini, GPT-5 takes care of that.
It’s currently available as three models—regular, mini, and nano. A deeper reasoning model dubbed GPT-5 thinking is used for harder problems, with a GPT-5 Pro version (replacing OpenAI o3‑pro) reserved for ChatGPT Pro subscribers.
It feels like GPT-5 has a more engineering-focused approach to problem-solving and tends to prioritize technical details more than the provided context. It not only understands the given data, but it’s actually able to use it in a better manner than previous GPT versions.
The difference in output won’t stand out right away, though. Instead of a dramatic difference, GPT-5’s output will have fewer mistakes and more nuance to it. Technical tasks like math problems or code generation will be more reliable, and creative tasks like writing will feel less AI-generated.
Yadullah Abidi / MakeUseOf
GPT-5 is also less agreeable, a problem that led to GPT-4o rolling back to a previous version. It also uses fewer unnecessary emojis and is more subtle and thoughtful in its follow-ups compared to GPT-4o. It also comes with four new preset personalities—Cynic, Robot, Listener, and Nerd—that can be toggled and adjusted anytime.
Who Can Use GPT-5?
In a first for OpenAI, GPT-5 is available to all ChatGPT users right away. The model has started rolling out to all ChatGPT Plus, Pro, Team, and Free users. Access for Enterprise and Edu users is coming next week. Going forward, GPT-5 is the new default in ChatGPT, replacing GPT‑4o, OpenAI o3, OpenAI o4-mini, GPT‑4.1, and GPT‑4.5 for signed-in users.
The difference between free and paid access to GPT-5 comes down to usage volume. ChatGPT Plus users get significantly higher usage limits compared to free users. ChatGPT Pro users have unlimited access to the model, in addition to the aforementioned GPT-5 Pro model.
However, ChatGPT seems to be confused about which model it’s currently running. When asked whether it was running on GPT-5 or GPT-4o on the free tier, the chatbot claimed that it was GPT-4o and GPT-5 hadn’t been publicly released.
This will likely be the case for a few days, if not weeks, as OpenAI slowly rolls out the new model for users around the world. Apart from that, GPT-5 is also available for Codex, OpenAI’s AI-based coding tool. Microsoft also announced that it’ll be launching GPT-5 across its ecosystem, including Office 365, Copilot, GitHub Copilot, and Azure AI.
Free two-factor authentication apps usually come with a catch. They have limited features, poor sync, or questionable security. But Proton Authenticator breaks this rule, and it’s better than most paid alternatives I’ve used.
I’ve used various two-factor authentication (2FA) apps over the years, but many—including Google’s—have a glaring flaw. The lack of secure, encrypted backups has always been a point of failure. Your 2FA codes get stored on Google’s servers without end-to-end encryption.
This single issue has been my biggest frustration with Google Authenticator, and therefore, I used 1Password instead.
Proton Authenticator solves this issue by encrypting everything before it leaves your device. It offers automatic, end-to-end encrypted backups and secure syncing across all your devices, including desktop.
Security Features That Actually Matter
Proton Authenticator covers the basic security features well, though some features work better than others in practice. App lock with biometric authentication prevents access to your codes if someone grabs your phone, and the fingerprint prompt works reliably.
It is open source, unlike any other mainstream authenticator. That means security researchers can audit how data is handled, which is usually one of the reasons why people prefer open-source software and apps. That’s genuinely useful since you’re not just trusting marketing claims about encryption.
If you want to add a code manually, the algorithm supports SHA1, SHA256, and SHA512 cryptographic hashes, plus both time-based one-time password (TOTP) and STEAM authentication types. Additionally, it offers the option to adjust the code length between six and eight digits and choose the time interval of 30 or 60 seconds. This flexibility helps when services use non-standard settings.
Offline functionality works as advertised. Your codes generate locally without needing internet connectivity. Most authenticator apps handle offline generation fine, but it’s still a crucial feature.
Besides, the automatic backup system creates encrypted snapshots by keeping only the last five backups. The restore process worked smoothly when I tested it.
The Import Process Is Painless
Switching authenticator apps doesn’t have to be tedious. Proton Authenticator handles imports better than expected. To import codes from other authenticators, go to Settings and select the authenticator that you have been using.
The import screen supports major authenticators, including Google Authenticator, Bitwarden Authenticator, LastPass Authenticator, and several others. I tested imports from both Google Authenticator and Bitwarden Authenticator—both worked without issues.
The process involves exporting from your current app and importing the file into Proton Authenticator. If you are switching from Google Authenticator, the export button creates a QR code that Proton Authenticator scans directly. However, you’ll see import warnings appear next to Authy and Microsoft Authenticator, indicating compatibility issues since they don’t allow direct TOTP exports.
You should verify that imported accounts work before deleting anything from your old authenticator, just to be safe.
The imported accounts retain their original names and issuers, so you won’t lose track of which code belongs to which service.
However, there’s a limitation that you can’t selectively import specific accounts. It’s all-or-nothing for each authenticator app, which might be inconvenient if you only want to migrate certain codes.
Cross-Platform Sync Finally Works the Way It Should
Most authenticator apps sync across platforms. Google Authenticator finally added cloud sync but without end-to-end encryption. Microsoft Authenticator syncs well, but ties you into their ecosystem.
Proton Authenticator handles sync across all major platforms—Android, iOS, Windows, macOS, and Linux. That’s more comprehensive platform coverage than Google or Microsoft Authenticator.
The sync setup requires a Proton account, which makes sense given the encryption requirements. Once enabled, your codes appear almost instantly on other devices. The encryption means your synced data remains private even from Proton’s servers. That’s the key difference from Google Authenticator’s approach, where your codes exist in plain text on Google’s infrastructure.
Desktop availability matters more than you might expect. When your phone battery dies or you’re working on a computer, having codes accessible without grabbing another device is genuinely convenient. Most authenticator apps skip the desktop entirely.
The sync toggle in settings shows which account handles your encrypted data, making it clear where your codes get stored.
You Don’t Need a Proton Account (But You Should Get One)
Proton Authenticator works even without creating a Proton account. You can generate codes, use offline functionality, and access all basic features without signing up for anything.
However, you’ll miss out on the main advantages, which are encrypted sync and automatic backups, both of which require a Proton account. Without one, you’re essentially using a local-only authenticator app, which defeats much of the purpose.
The real question is whether you want deeper integration with Proton’s ecosystem. If you want to use a security-focused email service like Proton Mail, ProtonVPN, or Proton Drive, adding the authenticator makes sense since everything works together better.
For most people, the free Proton account provides enough functionality to make the authenticator worthwhile without committing to their broader ecosystem.
Two-factor authentication apps have been disappointing, often with poor sync, closed source, or both. Proton Authenticator finally gets the fundamentals right, and it’s also free to use without any ads. That is why it’s recommended.
Sometimes, I can’t find my external hard drive when I need it most. After losing important files a few times, I found simple and reliable ways to back up everything, even when my hard drive isn’t available.
6
Email Myself Important Files
Whenever I need to back up Word documents, spreadsheets, or smaller PDFs, I just send them straight to my Gmail. It’s quick and fits right into my workflow, especially since Gmail is usually open in another tab while I’m working or doing research. I like that emails stick around for years, so I can easily search and recover old attachments if anything happens to the originals. This has saved me more than once when another backup let me down.
The main limit is attachment size. Most email providers cap files at about 25MB, so this method works best for smaller documents and photos. For anything larger, I’ll just upload it to cloud storage and email myself a link instead.
While I could save everything to Google Drive, I’ve found that a bunch of small files can really make it messy. Searching for an old document is just simpler in Gmail’s list view. That way, I don’t have to dig through endless folders.
5
Saving Files to Cloud Storage Services
Cloud storage has become my favorite backup solution for all the photos and videos that I take on my phone. Google Drive gives me plenty of free space for essentials. What’s great about using cloud storage is that I can grab my files from anywhere. At home, at a coffee shop, or halfway across the country, as long as I have internet access, I just log in and everything’s there.
Though I do have access to my DIY NAS, I love the auto-backup feature that Google Drive provides. When I take photos on my phone, it automatically takes a copy of that file to my cloud storage, allowing me to safely make room for more space on my phone when needed. Plus, I don’t have to remember to back up every time.
Though I don’t really store my work files in Google Drive, most cloud storage services also have a feature where you can keep older versions of files. So, in case you mess up or save something, it’s easy to roll back and recover those files. If you’re interested in making backups, saving one copy of your files in the cloud and two others on physically accessible media is often recommended. This is known as the 3-2-1 backup strategy, where you have three copies of your backup, stored on two different types of media, with one copy in the cloud or in an off-site location.
4
Saving Files to My NAS (Network-Attached Storage)
Besides relying on cloud storage, I always keep another copy of my files on my own DIY NAS. Building this homemade NAS from an old laptop was one of the most rewarding tech projects I’ve done. With TrueNAS installed, and my device plugged into my home network, I created a backup system that works just like private cloud storage, but without any monthly fees. This setup lets me easily back up big files and keep everything organized.
Jayric Maning / MakeUseOf
One of my favorite things about having a NAS is using it as a media hub. I set up Plex and Jellyfin, turning my NAS into a private streaming service for all my movies and shows that I kept throughout the years. It really feels like my own little Netflix, only with full control over my library. If you’re interested in just having a media library, you can actually just install Plex Media Library on your laptop and use it as your media backup server.
If you’re also interested in using a NAS and can’t bother building your own, there are plenty of pre-made NAS options online. These commercial NAS units often come with extra drive bays and built-in RAID support too. This extra function allows you to have redundancy on your NAS. So, if one drive fails, you still have another drive to keep serving you all your files.
Having my own NAS gives me more than just extra storage space. It lets me follow the 3-2-1 backup rule, adds an extra layer of protection, and turns my old hardware into something genuinely useful.
3
Using a USB Flash Drive or SD Card
When it comes to backing up small but important files on physical media, USB flash drives and SD cards are my tried and tested favorites. Today, they’re so affordable that you can just pick up a few and dedicate them as cheap archives for all sorts of data.
Jayric Maning / MakeUseOf
For every trip, family gathering, or special occasion, I just buy a new SD card for my camera. After transferring photos for editing, I keep all the original files on the card, label it for the event, and stash it somewhere safe. It’s an easy way to make sure I always have a non-cloud backup of my favorite moments.
Flash drives are incredibly portable. I usually have a USB drive on hand for quick transfers or emergency backups, especially if I’m heading out to work or just want to keep some files within easy reach. Since they’re so light, tossing one in my bag is second nature.
One thing I make a habit of, especially for archives, is giving my USBs and SD cards a little checkup once in a while. Flash memory can wear out or quietly lose data if it sits unused. About once or twice a year, I’ll plug my cards and drives into my computer just long enough for the system to recognize them, then disconnect. That quick “power up” helps extend their lifespan and keeps my files healthy without demanding too much attention.
2
Back Up to a Secondary Computer Using Thunderbolt
Backing up to a secondary computer isn’t my first choice, but it’s been surprisingly useful more than once. When I needed to hand down my old laptop to a family member, I found a ton of personal files still stored on the drive. Without enough time to sort everything out, I used a USB-C Thunderbolt cable so I could quickly move the entire drive to my desktop using Thunderbolt Share. The transfer was fast, and I didn’t have to worry about losing anything important.
Having extra computers (even older ones) gives you plenty of backup options. If you have an unused laptop, you can turn it into a backup machine pretty easily. A secondary computer becomes a dependable vault for those all-important files, especially when you want a simple backup solution that doesn’t need extra gear or cloud setups.
I used to think of social media as just a place to share life updates, but now YouTube and Facebook have quietly become part of my backup strategy for certain files. Whenever I think I’ve captured something funny or recorded a family event, I’ll sometimes upload it to YouTube and set it to Private or Unlisted. For photos, I create private albums on Facebook—after any trip or special moment, I tuck those memories away in an album set to “Only Me.” This keeps my favorite photos and videos safe online, no matter what happens to my devices at home.
One of the things I appreciate most about backing up to social media is how easy it is to share a video or album with someone. If a friend or family member asks for a copy, I just grab the link and send it over. There’s no need to deal with file size limits or complicated transfers.
That said, I always remind myself to upload only the files I’d be comfortable with others seeing—even with private settings, there’s always a small chance that accounts or platforms could be compromised.
You don’t need to buy another external hard drive to feel secure about your files. By mixing these backup strategies, you make sure your data stays protected no matter what happens. The smartest backup is the one that fits easily into your everyday routine. Once you get into the habit of spreading out your backups, you’ll stress less and enjoy knowing your most important files are always within reach.
When I started running out of money and space for physical books, my parents got me a Kindle. I used it for years, and then sold it when I got an iPad. Fast-forward to today, I use neither for reading. I’ve found something that fits my reading habits better than both.
I Use the Boox Note Air 4C—It’s the Best of Both Worlds
There was a time when I wouldn’t step out of the house without a book. I’d read multiple books in a single day and spend half my days in the local library. The more my reading addiction grew, the more I realized how expensive physical books are, and how much space they take up. I started running out of shelf space fast, and affording every book I wanted to read just wasn’t sustainable.
That’s when my parents got me a Kindle, and for years, it was the perfect solution. When I purchased my iPad, I thought it could easily replace my Kindle, so I ended up selling it.
Between the time I sold my Kindle and now, I’ve barely read any books. One of my goals for the year was to get back into reading. But instead of going back to a Kindle, I’ve been using Onyx Boox’s Note Air 4C, and it’s made all the difference.
It Runs Android, so I’m Not Limited to Only Reading Apps
The Boox Note Air 4C is essentially a combination of both the iPad and the Kindle. It has the E-Ink display of a Kindle, which means it isn’t as hard on my eyes, yet it runs Android 13 like a tablet. That gives me the best of both worlds: a distraction-free reading experience when I need it, and the flexibility to install any app I want when I don’t.
Mahnoor Faisal/MakeUseOf
It comes pre-installed with the Google Play Store, so you can download any app you want, just like you would on an Android tablet. And while the whole point of getting an eReader is to, well, read, the Boox device gives me the freedom to customize that experience however I like.
I can download all my reading-related apps directly onto the eReader itself, like Wattpad, Goodreads, and Fable (which is my favorite Goodreads alternative). I can even browse the web as I read, whether that’s to look up a word, check book reviews, or go on a research spiral without needing to switch devices.
This might not seem like a big deal, but for people like me who constantly get sidetracked on their phones when all they want to do is quickly check something, it makes a huge difference. Instead of picking up my phone and accidentally getting distracted by a text from a friend, I can stay in the reading zone.
Of course, you also have the freedom to download social media apps and anything else you’d typically use on a regular tablet, but I’ve personally chosen not to. I did that on my Boox Palma 2 when I was using it as my main device for a week, but I’ve since deleted them and kept both my Boox devices distraction-free so they stay a dedicated space just for reading.
A Non-Amazon Device Means I’m Not Trapped in the Kindle Ecosystem
One of the biggest gripes I had with the Kindle back when I had it was that I felt stuck in Amazon’s ecosystem. On Kindles (and most other eReaders), you can’t install third-party reading apps, and you’re essentially limited to Amazon’s own system whether that’s buying books from the Kindle Store, using its built-in reader, or relying on Amazon’s recommendation engine.
Jowi Morales / MakeUseOf
That’s not an issue with the Boox Note Air 4C, since it runs Android 13 as mentioned above. I’m not tied to any one store or format, and that freedom to read has been a total game-changer.
Admittedly, I’ve always been a fan of Kindle’s own reading app, especially since it syncs seamlessly with my iPhone. But the difference now is that I get to choose to use it — not because I have no other option, but because I actually prefer it. With the Boox Note Air 4C, I can still use the Kindle app when I want, but I also have access to alternatives like Libby, Kobo, and even Scribd.
The Stylus Support Makes It Great for Quick Notes and Highlights
Though I have the Palma 2 too, which is Boox’s palm-sized eReader, what makes the Note Air 4C the perfect middle ground between the iPad and the Kindle is that it has stylus support too. It comes with a stylus right out of the box and also has Boox’s default note-taking app, which is surprisingly packed with every feature you’d really need to take notes.
Jowi Morales / MakeUseOf
This means I can use the Note Air 4C as a full-fledged note-taking device to annotate books, journal, and even take notes for college (which is my primary use case for my iPad). Unlike the iPad, the Boox device also has a paper-like display, which makes it feel like I’m writing on actual paper rather than a glass screen.
All in all, using a Boox Note Air 4C instead of an iPad or Kindle to read books and even take notes has been one of the smartest swaps I’ve made in a while. It does exactly what I need, without pulling me into a rabbit hole of distractions. I only wish I had made the switch earlier!
Apple doesn’t make it easy for Android users to play nice with its ecosystem, and the Apple TV streaming box is no exception. However, despite Apple’s tight ecosystem, I’ve managed to turn my Android phone into a reliable remote for my Apple TV.
There’s No Official Apple TV Remote App for Android
One of the reasons I can’t love Apple TV as much as I want to is its lack of compatibility with Android devices. Apple doesn’t provide an official Apple TV Remote app for Android. The only official way to control an Apple TV is by using either the Siri Remote or an iPhone.
Thankfully, third-party developers have stepped in to fill the gap, and a couple of apps work surprisingly well. Of course, you won’t get the same tight integration as with iOS, but for basic navigation, playback, and volume control, some of these apps are more than good enough.
How to Control Your Apple TV Using Your Android Device
As with most app categories, there are many apps on the Google Play Store that let you control an Apple TV. I’ve tried most of them, and while it took some time to find one that came close to perfect, I believe I’ve finally found the best option.
The app I’ve been using is called Remote for Apple TV. It’s completely free (though it does include some ads) and offers both click-based and touchpad controls without locking basic features behind a paywall—something that can’t be said for most other Apple TV remote apps for Android.
Once you install the app, it connects automatically to your Apple TV over Wi-Fi. It’s a one-time pairing process—you just need to grant access on your TV once, and the app remembers your device for future sessions. The interface is clean and straightforward, with three tabs at the bottom.
The main Remote tab gives you basic controls: D-pad or swipe controls, a dedicated play/pause button, home and back buttons, and even a keyboard for easier text input, which makes typing into search bars far less frustrating. Below the media controls, you’ll see your three favorite apps for quickly launching them on Apple TV.
The Apps tab lists everything installed on your Apple TV, letting you open apps directly from your phone. The Settings tab lets you customize the experience with options like vibration feedback, tap sounds, and language.
Similar to Apple’s own remote app, this one can even wake your Apple TV without needing to press any physical buttons on the TV remote. This means even if your remote isn’t nearby, you can wake and control the Apple TV with just the app. Here’s how you can get the Remote for Apple TV app running on your Android phone:
Install and open the Remote for Apple TV app on your Android phone.
Tap Not connected at the top of the screen.
Select your Apple TV device from the list.
Enter the pairing code shown on your Apple TV screen.
And that’s it. Your phone is now ready to act as a fully functional remote. Just make sure both your phone and Apple TV are on the same Wi-Fi network, or the pairing will fail. Also, the app may take a moment to connect. If it fails, tap Not Connected again to retry the pairing process.
Use Your Phone’s IR Blaster (If Available)
Sanuj Bhatia / MakeUseOf
Alternatively, if you don’t want to use third-party apps due to ads or unintuitive user interfaces, you can try using an IR Blaster on your phone (if it supports one) to control your Apple TV.
Smartphones from brands like OnePlus, Oppo, Xiaomi, and Vivo offer built-in IR Blasters and come with native apps that can control devices like an Apple TV. However, mainstream phones like those by Google or Samsung don’t include IR Blasters, so you’ll need to rely on a third-party app instead.
You can check if your phone has an IR Blaster by looking at the top edge of the phone for a small extra sensor, or by visiting the manufacturer’s official specs page.
I used the Oppo Find N5’s built-in IR Blaster and IR Remote app to control my Apple TV, and it surprisingly worked well. While it doesn’t offer features like keyboard input or quick app launching, the best part is that it works without a Wi-Fi connection, so even if you’re offline, this feature still works.
All in all, while there’s no official way to control an Apple TV using an Android phone, there are still plenty of ways you can manage it using an Android device. And even though these unofficial methods work quite well, I do wish Apple would come up with an official solution soon—especially since the company already offers a few apps and services on Android.
This article is sponsored by Intuit. Product choices and opinions expressed are from the sponsor and do not reflect the views of MakeUseOf editorial staff.
The word “spreadsheet” is enough to send shivers up someone’s spine. Say it around a small-business owner and they’ll be conjuring up visions of tax write-off confusion, cash-flow woes, delayed invoices, and endless financial busy work that takes them away from their actual business. This is where Intuit QuickBooks shines.
The cloud-based financial management software has been a longtime staple in the small- and mid-sized business world, helping everyone from freelancers and bookkeepers to accountants and business owners. QuickBooks has always made financial management easier—invoicing, payroll, tax prep, expense tracking, and more—and now it’s evolving to meet the latest and greatest tech capabilities that AI has to offer.
Intuit QuickBooks’ new AI agents are like a virtual workforce—a team just for you—that’s always at the ready and working behind the scenes to streamline your business and make your life easier. This game-changing, foundational update to the already intuitive and powerful software will help users cut down on busywork and make smarter decisions while allowing their businesses to thrive.
“Intuit’s AI-driven expert platform is transforming how businesses run and grow with first-of-its-kind agentic AI experiences,” says Intuit CEO Sasan Goodarzi. “When our vast amounts of data and AI capabilities are combined with the power of trusted human experts, Intuit’s uniquely designed, integrated platform unlocks next-level efficiencies, profitability, and growth for businesses.”
Inside the New Intuit AI Agent Experience
The new AI agents debuted in the US on July 1, and so far, 78% of customers say that Intuit’s AI has made it easier for them to run their business. The introduction of Inuit’s AI agents isn’t just an update; it’s a holistic platform improvement that offers a completely new level of support.
The new QuickBooks experience begins with a fully redesigned and personalized homepage layout, featuring customizable widgets and a business feed showing real-time insights, recommendations, and a summary of the tasks completed by your AI agents. The mobile app has also been redesigned with a modern interface so that you can capitalize on the AI agents and access your business insights wherever you are.
The agents, together with trusted human experts, create a powerful virtual team that proactively manages tasks across accounting, payments, financial planning, and customer relationship management.
Formerly time-consuming tasks such as categorizing transactions, tracking invoices, and forecasting cash flow can now be delegated to the AI agents while you maintain full control over your data and all decision-making. The AI agents can make recommendations and execute on your behalf, but you’re still in the driver’s seat when it comes to pulling the trigger on business decisions.
It’s time to meet the new support team! These are the various specialized AI agents that will help you and your business every step of the way.
Payments Agent
The Payments Agent is there to keep your payments and invoices on track, ensuring that your business gets paid on time while helping to optimize and grow your cash flow. Inuit’s Beta testing found that when compared to businesses sending standard invoice reminders to the same customers, the businesses using the Payments Agent were paid an average of five days faster.
The Payments Agent can deliver tailored acceleration strategies that predict late payments, it can automate invoice tracking, plus it creates and sends invoices and reminders—just more busy work that’s taken off your plate.
Accounting Agent
If you struggle when you’re in the weeds with transaction categorization, bookkeeping, and reconciliation, the Accounting Agent will be your new best friend. The Accounting Agent’s specialty is improving accuracy and reducing human error, so you end up with cleaner, more accurate books.
While you focus on more important aspects of your business, the Accounting Agent can automate bookkeeping and transaction categorization, and assist in reconciliation.
Finance Agent
The Finance Agent is there to help your company achieve its financial goals. It can help you and your team with financial forecasting, making recommendations that will allow you to make smarter business decisions for the growth of your company.
It goes beyond basic reporting by delivering advanced tools for performance tracking, KPI analysis, peer benchmarking, and scenario planning, offering a comprehensive solution for managing the financial health of growing, mid-market businesses.
Customer Agent
Within the QuickBooks Customer Hub, the Customer Agent is ready to help you manage leads and track customer opportunities and interactions in the sales cycle. This powerful AI agent can automate and streamline the sales and customer relationship management process, including sourcing leads, drafting email responses, suggesting and scheduling meetings, and more.
This agent can transform how you track interactions in your sales pipelines while capitalizing on more opportunities.
Future Intuit AI Agents
Later this year, also within the QuickBooks Customer Hub, the Marketing Agent will be making its debut. This agent will focus on automating audience management and help drive customer acquisition and retention. The Marketing Agent will also assist with campaign execution by integrating with Mailchimp to deliver powerful marketing content.
Also coming later this year are two new agents that will be ideal for larger and growing businesses. The Payroll Agent and Project Management Agent will help tackle more complex tasks and boost productivity even further by collecting employee time and attendance data, running payroll at your command, plus managing project quotes, milestones, and budgets.
The Bigger Picture and Future of Intuit’s AI Agents
Intuit’s new AI agents represent a monumental shift for QuickBooks, going from a tool and software to a proactive, powerful business partner. They will work in tandem with AI-enabled human experts in QuickBooks Live to deliver a collaborative approach to running your business and providing expert advice.
Accountants and business owners are now empowered with more insight, and even more importantly, more time to focus on strategy rather than spreadsheets.
The feedback is already rolling in, and business owners are thrilled with the new features that will help take their businesses to the next level. “I need more time to be able to invest back into my business,” says business owner Kurtis Graham, founder of COSIGN Enterprises, LLC. “Intuit’s AI can help me save several hours a month and drive revenue for my business. That’s a win-win for my business.”
The future of QuickBooks holds even more: additional agents, more connectivity within the Intuit ecosystem of products and services, and integration with third-party apps. A new standard has been set for the power and capabilities of financial management. By combining automation, expert guidance, and smart forecasting, QuickBooks is helping entrepreneurs and finance teams focus less on admin and more on growth. The software tool is now your trusted teammate.
Can a show about what happens when 140 million people vanish overnight be uplifting? It can when it’s The Leftovers, a show I had been avoiding until recently, and now it’s one of my favorites.
Why I Skipped The Leftovers
When I’m looking for a new series to start, I always consider the yuck factor. What’s the yuck factor, you ask? It’s when I look at a promo for a new TV show and am immediately turned off by either the premise or, in some cases, who stars in it. Picking and choosing which new series to watch based on this unscientific finger-in-the-wind strategy usually works for me, until it doesn’t, of course.
In the case of The Leftovers, which aired on HBO over four seasons from 2014 to 2017, I was proven wrong. It took me nearly ten years to figure this out, but I eventually discovered the answer nonetheless.
The Leftovers revolves around a global event called the “Sudden Departure,” which occurred three years before the series’ events. This event saw 2% of the world’s population vanish into thin air. The story shows how those who remain are trying to pick up the pieces and get on with their lives.
A premise like the one presented here would typically be more than enough to pique my interest in a new show. Some of my favorite shows, both before and after The Leftovers originally aired, also featured unexplained disappearances or mysterious global events. These include shows like Lost, The OA, Yellowjackets, and even Severance.
So, what turned me off? One of the first trailers for the series featured a woman smiling at her baby in the car, only to have the infant vanish moments later, which freaked me out as a dad of a then-six-year-old. It also didn’t help that the same trailer continued and simply showed these poor people missing their loved ones. It was all too depressing.
The actors portraying these poor souls also didn’t do much for me. At the time, I only knew series star Justin Theroux as Jennifer Aniston’s then-husband. And, although I knew and liked Liv Tyler because of her time in The Lord of the Rings trilogy, it wasn’t enough for me to watch. This was years before Ann Dowd played the complex and often contradictory character of Aunt Lydia in The Handmaid’s Tale, a show I liked from day one.
Finally, early reviews for The Leftovers were mixed, which gave me another reason to bypass it.
Finally Taking the Plunge
Honestly, I can’t remember with certainty what led me to give The Leftovers a try. It was likely a combination of reasons. I do know it happened after The Handmaid’s Tale began, and Dowd was being universally praised for her portrayal of Aunt Lydia, for which she soon won an Emmy.
This was also about the time I started watching and mostly liking The Mosquito Coast, which starred Theroux. Perhaps more importantly, I heard from more than a few friends that The Leftovers, despite its many doom-laden elements, was a very uplifting series to watch.
After watching the first episode of The Leftovers, the initial yuck reaction I had from the trailer resurfaced. I kept going, however, and after a few more episodes, I finally got hooked.
Why The Leftovers Was Worth the Wait
Ultimately, the stories presented in The Leftovers moved beyond grief and loss. Yes, throughout the show’s four years, those two themes continued to play a central role in the storytelling. However, although they weren’t always necessarily positive, other themes emerged, and these were uplifting and layered, prompting you to think.
It also didn’t hurt that the characters in The Leftovers were each complex and flawed, as we all are in real life. In particular, I was quickly drawn to Coon’s Nora Durst character, who, when the series began, had lost everyone in her family. Ultimately, she found what can be best described as closure, albeit not happiness, and that journey was a powerful one.
Theroux’s Kevin Garvey was never one that I enjoyed. However, I did learn to appreciate what he was going through, even though many of his choices weren’t what I’d call sound.
The Leftovers also did a masterful job of presenting each character’s story, both as it developed and how their past influenced it. The series features numerous flashbacks, making it easier to relate to characters who are initially viewed in a decidedly negative light. In turn, you can’t help but wonder what you would do in similar situations.
One of the ways those behind The Leftovers were able to present captivating stories was by often focusing episodes on a single character. Much like Lost did years before, this technique gives the writers of the episode more time to flesh out a character.
In turn, we gain a better understanding of what drives them and why their flaws are as they are. These episodes don’t necessarily make you like the character more, which is also a slick storytelling device that I liked.
The Leftovers, like other HBO series, aired weekly. As such, I can see how these character-driven episodes might have caused some frustration, as they, in some instances, abruptly paused a storyline from the previous episode. Severance fans in 2025 are familiar with this feeling of annoyance as stories are paused.
However, because I binged The Leftovers, I didn’t have to wait, which probably allowed me to appreciate the series more than I would have had I watched the series as it originally aired.
Beyond the strong development of the characters, the stories in The Leftovers are elevated by the use of symbolism and metaphor. The continued use of water and the sighting of an occasional dove take the story to new levels that, as a viewer, one can appreciate.
And finally, the storytelling in The Leftovers is elevated by the ambiguity it leaves in place. Though many unanswered questions are resolved by the end of the series, many are not, including the biggest question of all: why did the 2% vanish? One of the show’s creators, Damon Lindelof, was also behind Lost, so the many non-resolutions shouldn’t come as much of a surprise.
Ambiguity at the end doesn’t always work for TV series because many of us naturally seek closure. However, this isn’t The Sopranos, where a fade to black forever taints an otherwise brilliant piece of television entertainment. The unanswered questions The Leftovers leaves don’t take away from the series. Instead, I’d suggest not knowing all the answers makes you, as the viewer, question things in the real world, and that’s not necessarily a bad thing.
Another reason The Leftovers is successful as a whole is the atmosphere it presents. Each episode combines elements of surrealism and melancholy, creating a sense of unease and tension, along with moments of levity and much more.
In many respects, I regret not watching The Leftovers when it aired. Through research, I have come to understand that, despite having a small audience throughout all four of its seasons, the show had a loyal and dedicated following that enjoyed discussing each episode online, as The Fandomentals noted at the time.
And there’s an element of excitement for any show that makes you wait at least a week between episodes. Binging, which Netflix began unleashing on us nearly two decades ago, has its appeal, but there’s nothing like the building excitement of waiting for a new episode of a favorite series to drop.
And yet, there are also ways I benefited from waiting to watch The Leftovers. There’s that binging aspect, of course. There’s also knowing when the story will end. I also appreciate many of the actors in the show much more than I probably would have years ago because I know more about them now.
Finally, the internet is a more diverse place today than it was a decade ago. As new people discover The Leftovers, more YouTube videos about it emerge, which leads to more questions, keeping the show fresh even though it ended eight years ago.
I strongly recommend The Leftovers for anyone looking to begin a TV series that will make you think. Expect the occasional tear, however, especially if you’re a parent, and understand that some episodes are much better than others. Otherwise, enjoy; you can thank me later.
All 28 episodes of The Leftovers are available to stream on HBO Max with a subscription. It’s also a great reason to subscribe to HBO Max if you’ve never done so before!
Windows has a built-in Credential Manager, but it’s not what you think—and certainly not a replacement for your password manager.
What Windows Credential Manager Actually Does
As the name suggests, Credential Manager is a built-in password manager, but one focused on system-level credentials. It stores usernames and passwords for things like network shares, Remote Desktop connections, and certain Windows apps.
It’s built for handling logins within the Windows environment, especially in workplace settings. But it’s not designed to manage the dozens of personal accounts most people use today, and its limitations make it unsuitable as a full-fledged password manager.
You can access the Credential Manager by typing Credential Manager into the Windows search bar and selecting the Best Match, or navigating via Control Panel > User Accounts > Credential Manager.
Why You Can’t Use the Credential Manager to Replace Your Password Manager
So, although the Windows Credential Manager sounds like an apt replacement for a password manager, there are several reasons why it can’t be used in the same way.
Weak Cross-Platform Compatibility
Whether you are using an open-source free password manager like KeePass or a paid service like Bitwarden or 1Password, most options today offer seamless syncing across platforms—Windows, macOS, Linux, iOS, Android, and browser extensions.
You can save a password on your phone while shopping online, and it syncs to your laptop before you’ve even put the phone down. This instant synchronisation happens through encrypted cloud services that work across every platform imaginable.
Justin Duino / MakeUseOf
The best password managers go even further. Apart from the usual native apps for different platforms, they also offer browser extensions for Chrome, Firefox, Safari, and Edge. You can even share a password with family members, and they’ll get a notification and secure access without you texting it to them.
Windows Credential Manager, on the other hand, is tightly integrated into Windows and doesn’t offer native support outside the Windows environment. It doesn’t have an app. You can’t sync your password or share it with anyone else.
Security Risks and a Single Point of Failure
Dedicated password managers operate on a zero-knowledge principle. This means that even if threat actors breach the company’s servers, your passwords remain safe because they’re encrypted with your master password, which is something only you know.
Good password managers also assume your device could be lost or compromised. That’s why they require you to enter your master password or use biometric authentication before showing any stored credentials. Some even offer a travel mode, which temporarily removes sensitive passwords from your devices when crossing borders.
Credential Manager’s security model is straightforward: if you’re logged into Windows, you have full access. Click any password, hit Show, and there it is in plain text. Yes, one-time authentication is required, but this provides little protection if someone already knows your login password.
Fewer Features Than Dedicated Managers
A dedicated password manager does more than just store and sync your passwords across devices securely. You can use it to generate strong passwords with one click, scan the dark web for your exposed credentials with automatic alerts for any breach, and even promote best security practices by flagging weak or reused passwords and prompting you to fix them.
Two-factor authentication support is built into nearly every dedicated password manager. Along with your logins, they can store TOTP codes, backup codes, and recovery keys—all in one encrypted vault. Many also flag phishing sites, securely autofill payment details, and let you save secure notes for things like Wi-Fi passwords, license keys, or other sensitive information.
Credential Manager stores passwords—and that’s about it. It doesn’t offer features like password generation, breach alerts, or security analysis. It won’t warn you if you’re using weak credentials like password123 for your bank account, and it can’t store or generate two-factor authentication codes either.
Basic Recovery Options
Redundancy is a core part of most dedicated password managers. If you lose your master password, you can use a recovery code or rely on an emergency contact to help you regain access.
If a device is stolen, you can revoke its access remotely from any browser. All your data is automatically backed up to encrypted cloud storage, so even if your primary fails, your passwords remain safe and accessible.
Password managers also make it easy to export your data. You can easily export your vault to a different password manager. You can also set up emergency access that activates after a waiting period.
Credential Manager stores your passwords locally and links them to your Windows account on that specific device. If you forget your Windows password or your computer fails, your saved credentials are likely lost. While you can use command-line tools to back up your credentials, the backup file is limited to Windows systems only.
Negligible Browser Integration and Autofill Capability
Any decent password manager should work smoothly with your browser, and autofill is a big part of that equation. It saves time by filling in usernames, passwords, payment details, and other form fields with a single click.
Password manager extensions also verify the site’s URL before filling in credentials, helping prevent phishing attacks. Some can generate and auto-fill temporary email addresses to protect your privacy, and others warn you if you’re entering passwords on an insecure HTTP page.
Credential Manager’s browser support is essentially non-existent. Even Microsoft Edge, the company’s own browser, doesn’t rely on it and uses its own password system. The only browser that really worked with Credential Manager was Internet Explorer, but it’s not supported in the latest version of Windows 11.
While Credential Manager is an essential part of the Windows operating system, it’s not a substitute for a dedicated password manager, nor does it claim to be. It was built for handling system-level authentication within Windows, not for managing the dozens of personal accounts we rely on every day.
If you care about convenience, cross-platform access, and stronger security, use a dedicated password manager that’s built for the modern web.
Freeing up storage on a Windows 11 PC doesn’t have to mean deleting or transferring your important files. Between temporary files, outdated backups, duplicate data, and unused apps, there are plenty of ways to reclaim space without touching your personal files.
8
Empty the Recycle Bin
Clearing out old files and downloads might feel productive, but if you don’t empty the Recycle Bin afterward, it’s like sweeping dust under a rug. Until you clear the Recycle Bin, those files aren’t truly gone and take up as much space as before.
Also, unlike cloud storage services or your smartphone, Windows 11 doesn’t automatically clear the Recycle Bin after a set period. To do that, you need to right-click the Recycle Bin icon and select Empty Recycle Bin.
You can set a storage limit for the Recycle Bin by right-clicking its icon and choosing Properties. For example, if you allocate 10GB, Windows will start deleting the oldest files to make room for new ones once that cap is reached.
7
Delete Temporary Files
As you continue to use Windows, the system generates various temporary files. Although they can be useful for short periods and are generally harmless, they tend to stick around longer than they should. Over time, these forgotten files can quietly snowball and end up hogging precious storage space.
Thankfully, Windows 11 makes it easy to sweep them away. Head to Settings > System > Storage, then click Temporary files and Windows will display a list of file types that can be safely removed.
This includes everything from copies of installed updates and thumbnail cache to system log files. Simply use the checkboxes to select the files you want to delete, then click the Remove files button at the top.
You can also automate this process by enabling the Storage Sense feature. This way, Windows will remove temporary files at regular intervals, and you’ll never run out of storage space on your PC.
6
Remove Old Restore Points
The System Restore feature can be a lifesaver when your PC runs into trouble. It lets you roll back to a previous working state without needing a full reset. To make this possible, Windows reserves a portion of your hard drive to keep restore points.
In most cases, though, only the most recent restore point is necessary. So, unless you have a specific restore point you plan to use, you can delete all the older ones.
To delete all but the most recent restore point, you can use the Disk Cleanup tool. Open it using the Start menu, then click the Clean up system files button. Now, go to the More Options tab, and click the Clean Up button under Restore Point and Shadow Copies. Finally, click Delete to confirm.
5
Uninstall Unused Apps
Unless you’ve already removed bloatware, your Windows 11 PC probably has several apps you don’t use—and may never need. Some come preinstalled by Microsoft, while others are bundled by the laptop manufacturer. And then there are apps you may have installed months ago and forgotten about.
All these apps take up space, and some even run background processes that can slow your system down. Uninstalling them is a quick way to free up storage. The best part is that Windows 11 makes it quite easy to track down apps you haven’t used in a while.
Head to Settings > System > Storage > Cleanup recommendations > Unused apps, and you’ll see a list of apps that you can safely remove. You can also go to Apps > Installed apps and sort by size to spot large apps that you no longer use. Once you find them, uninstall them one by one.
4
Get Rid of Duplicate Files
Duplicate files are some of the most obvious space-wasters on any device. Whether it’s the same photo saved in different folders, documents copied for backup (and forgotten), or downloads that ran more than once, these files can take up valuable storage.
Unlike temporary files or unused apps, Windows 11 doesn’t have an option to find duplicates. However, you can use Microsoft’s PC Manager app to find all the duplicate files on your computer.
Download the PC Manager app from the Microsoft Store, then open the app and navigate to Storage > Duplicate files. The app makes it easy to remove duplicate versions while keeping the originals intact. Also, since deleted duplicates are permanently removed, you don’t have to empty the Recycle Bin afterward.
3
Compress Files and Folders
Even after you’ve emptied the Recycle Bin, removed duplicate files, and uninstalled unused apps, there’s still more you can do. If your PC has large files, videos, or folders that you don’t access often, you can compress them to save space.
Windows 11 includes a built-in feature called NTFS compression that reduces the size of files and folders without turning them into ZIP archives. This way, the compressed content stays where it is, and can be opened or edited just like any other file.
To start, find the file or folder you want to compress, then right-click on it and choose Properties. Now, click Advanced, and check the Compress contents to save disk space checkbox. Then, hit Apply followed by OK. Depending on the size of your file or folder, Windows may take a few moments to apply compression.
You can apply this compression to files, folders, and even entire drives. That said, it’s best to avoid using this on apps, system files, or anything you access frequently, as compression can slightly impact performance.
2
Move Large Files to the Cloud
Another clever way to free up storage without losing access to important files is by moving them to the cloud. Services like OneDrive, Google Drive, and Dropbox offer several gigabytes of free space—and if that’s not enough, paid plans provide plenty of room for larger libraries.
To identify unused files, head to Settings > System > Storage > Cleanup recommendations > Large or unused files. You can also use the PC Manager app to find all the large files on your PC.
As long as you’re connected to the internet, you’ll still be able to access your cloud files through File Explorer, just like local data. Another benefit is that you’ll be able to access your cloud files on other devices like your phone, tablet, or another computer.
1
Delete Unwanted User Accounts
Each account on a Windows 11 PC has its own set of files, settings, and apps, all of which consume storage. If there are accounts you no longer need, removing them can help free up a surprising amount of space.
This is especially helpful on shared or family PCs, where guest profiles or old accounts may have been created and forgotten over time. Deleting an account erases everything tied to it, including documents, photos, downloads, and personalized settings.
To remove an account, go to Settings > Accounts > Other users. You’ll see a list of all the user profiles currently on the device. Find the one you want to delete, click the Remove button, and then select Delete account and data to confirm.
A lack of storage space can negatively impact your Windows 11 experience. The tips above should help you reclaim several gigabytes of space and give your system the breathing room it needs. But more importantly, they’ll do it without forcing you to sacrifice important files or apps.
When setting up a new iPhone, it helps to start with a strong foundation of great apps. These choices cover security, productivity, and travel; they’re all designed to make your phone more useful right from the beginning.
9
Bitwarden
If you only install one app from this list, make it Bitwarden. Passwords are the keys to your digital life, and reusing the same one—and/or writing them down—is practically an open invitation to online criminals.
Bitwarden is a free, open-source password manager that stores all your logins in one encrypted vault. It also generates strong, unique passwords for every account, so you only need to remember your master password.
It syncs across devices, autofills logins in Safari and apps, and even lets you share credentials securely with family or coworkers. Unlike many competitors, Bitwarden is generous with its free tier and fully transparent about how it works.
If you’re new to password managers, it might help to become familiar with some of the most common mistakes people make when setting up password managers so you can avoid them.
Now that your passwords are secure, let’s add another layer of protection: two-factor authentication (2FA). Instead of SMS-based 2FA, I recommend using an authenticator app. That’s where Authy comes in.
When you log into services like Gmail, Facebook, or your bank, 2FA asks for a second code (usually from your phone) to prove it’s really you. Authy generates those time-sensitive codes and keeps them all in one place.
Unlike some other authenticator apps, Authy backs up your codes (securely, of course) and syncs them across devices. So if you lose your phone or upgrade to a new one, you’re not locked out of everything. The interface is clean and easy to use, even if you’re totally new to 2FA.
Setting up 2FA might feel like a hassle at first, but once it’s running through Authy, it becomes a fast, silent shield against most common security breaches.
A potential downside to be aware of is that Authy lacks the option to export your secret codes. So if you ever choose to move to another 2FA app, you’ll have to manually disable 2FA and then re-enable it for every service again.
Apple’s native Photos app does a solid job of organizing your snapshots, but it hits a wall fast, especially when it comes to storage. You only get 5GB of free iCloud space, which has to cover not just your photos, but also backups, documents, and app data. It’s not long before that iCloud Storage Full alert starts popping up.
That’s where Google Photos comes in. Right out of the gate, it gives you 15GB of free cloud storage, tripling what Apple offers. And unlike iCloud, it’s just as great on non-Apple devices, so you can access your photos from any phone or computer with a browser.
Beyond the increased storage, Google Photos feels like adding a “smart mode” to your photo library. It automatically backs up your images in the background, organizes them by people, places, and subjects, and makes them searchable. Type “sunset,” “dog,” or “Blue 2018” and the app instantly pulls up matching shots.
There’s also a surprisingly powerful photo editor baked in. With just a few taps, you can tweak lighting and color, crop like a pro, or throw on filters that actually look good.
For getting from point A to point B, Apple Maps and Google Maps do a solid job. But if you want granular real-time traffic data—the kind that can help you dodge speed traps, road closures, and traffic jams—Waze is the app you’ll want guiding you.
Waze gathers data from other drivers to alert you to road hazards, speed traps, and traffic jams as they happen. The app constantly reroutes you based on current conditions and is especially helpful in busy cities or during rush hour.
Waze’s interface is clean and playful, offering voice customization and ETA sharing with friends. If you want to take your navigation up several notches, Waze is a must-have.
If your to-do lists are piling up but your day still feels chaotic, Structured offers a different way to get organized. Instead of just listing tasks, it helps you plan your time by turning your day into a simple timeline.
You add tasks, give them time slots, and Structured lays everything out in a clean, scrollable schedule. It’s like having a digital day planner that shows exactly what you’re doing and when. This makes it much easier to stay focused and avoid overbooking yourself.
What’s especially helpful is how user-friendly the app is. You can drag tasks around to change their time, color-code them by category, and even add recurring items. It also syncs with Apple Calendar and Reminders, so your existing events show up automatically.
Structured works well whether you’re juggling classes, meetings, chores, or just trying to get through the day with more intention. It’s simple, visually pleasing, and surprisingly calming to use.
If you love to read but don’t want to keep buying books, Libby is one of the best apps you can install. It connects you to your local library and gives you access to thousands of eBooks, audiobooks, and magazines—all for free.
All you need is a library card. Some libraries even let you sign up for one online, so it’s easy to get started. Once you’re signed in, you can browse the catalog, borrow titles, and start reading or listening right away.
The app is clean and simple to use. You can adjust the font size, change the background color, and send eBooks to your Kindle if that’s how you prefer to read. For audiobooks, you can download them for offline listening and control playback speed to match your pace.
Libby is perfect for quiet evenings, long commutes, or whenever you have a few minutes to spare. It saves money, reduces clutter, and makes it easy to enjoy books on your schedule.
If podcasts are part of your daily routine, Overcast is a must. It improves on Apple’s default app with standout features like Smart Speed (which removes awkward silences) and advanced playback speed control without distortion.
You can create custom playlists, set skip intervals, and get alerts for new episodes. Overcast’s clean interface makes it easy to find and enjoy new shows, and you can even share audio clips from your favorite moments.
The free version offers most of what you need, with a small optional subscription to remove the non-intrusive ads.
Air travel can be unpredictable, but Flighty helps bring order to the chaos. This sleek flight tracker is a must-have travel app that keeps you informed every step of the way, from the moment you book until you land.
What sets Flighty apart is how fast and detailed its updates are. You’ll often get notified about gate changes, delays, or cancellations even before the airline sends a text. It also tracks the inbound aircraft for your flight, which gives helpful context if the schedule starts running late.
The timeline view is especially useful. It lays out your entire trip in a single scroll, showing your flight path, weather conditions, delay predictions, and more. If you travel often, you can upgrade for extras like live tracking and calendar sync, but the free version covers all the essentials. Neatly, the Pro subscription is available week-to-week, so you can enjoy coverage for a trip without having to commit for an entire year.
Whether you fly once a year or every month, Flighty turns your phone into a powerful travel companion that keeps you one step ahead.
Once you’ve got your apps in place, Widgetsmith lets you make your iPhone feel more personal. It gives you control over how your home screen looks and works by letting you build custom widgets for time, weather, calendar events, reminders, and more.
Instead of being stuck with Apple’s default layout, Widgetsmith allows you to choose the size, style, font, and color of each widget. Want a minimalist calendar? A pastel weather forecast? A rotating photo album? It’s all possible. You can even set widgets to change throughout the day, so your screen looks different in the morning than it does at night.
Setup takes a few minutes, but once you’ve created your widgets, you can arrange them anywhere on your home screen alongside your apps. It’s a simple way to bring both function and personality to your phone.
If you’ve ever wished your iPhone looked less generic and more like your style, Widgetsmith is the place to start.
A new iPhone is a blank slate, and the apps you choose shape how useful it becomes. These picks cover essentials that make everyday tasks easier, more secure, and a little more enjoyable. And even if you’ve had your iPhone for years, you’ll find something to love.
Before the advent of streaming services, summer was a quiet time on the TV series front, but not anymore. Today, there are numerous new and returning series seeking viewers. These are the best of the bunch.
Season three of The Bear wasn’t exactly its best to date, even though it still picked up a boatload of awards. Though still critically acclaimed, the former Emmy winner for Outstanding Comedy Series suffered from storylines that didn’t move forward quickly enough and characters that received excessive airtime. In contrast, other characters were pushed to the background.
The latest season of The Bear is among us, and although it hasn’t received the near-universal praise that seasons one and two did, viewers mostly like it. And honestly, what’s not to love when you have Emmy winners Jeremy Allen White, Ayo Edebiri, Ebon Moss-Bachrach, and Liza Colón-Zayas back, along with the rest of the brilliant supporting cast.
Season four of The Bear consists of 10 episodes. The story will continue in a fifth season, which has been approved and is expected to air sometime in 2026.
The final batch of episodes for Squid Game dropped earlier this year, and yes, be prepared for more blood. The third and final season picks up right after the second, when Player 456, played by Emmy winner Lee Jung-jae, plans to end the game early were foiled in horrible ways.
Watching Squid Game has never been easy, and the final six episodes of the series are equally difficult to digest. But, there is a resolution; it will be up to you to decide whether it’s good or bad.
In total, there were 22 episodes of Squid Game. All are available to stream.
The current season of HBO’s The Gilded Age is still airing ahead of a planned fourth season. Set in New York City during the 1880s, the series once again stars Louisa Jacobson, Christine Baranski, and Cynthia Dixon, whose characters navigate a period of immense economic and social change.
Season four of The Gilded Age has been described as “transformative” by RogerEbert.com, with several broad themes once again explored. This includes the pursuit of power and ambition, the shift in social hierarchy, family dynamics, and a woman’s place within that family, among other factors.
The Gilded Age was created by Julian Fellowes, known for Downton Abbey. Besides its fascinating stories, the series has been noted for the lavish lifestyles it presents, complete with stunning costumes and opulent sets.
Twelve years after the original Dexter series ended, Michael C. Hall is back as the titular character in Dexter: Resurrection. The character’s return perhaps comes as a surprise given that he died in 2021’s Dexter: New Blood, but this is television, after all.
The new series picks up where the previous sequel left off. It finds Dexter waking up from a coma following his shooting and heading to New York City to find his missing son, Harrison, who Jack Alcott plays. In the Big Apple, Dexter meets up with a secret society of serial killers led by Leon Practer, played by Peter Dinklage (Game of Thrones).
Dexter: Resurrection consists of 10 episodes. There’s no word on whether there’ll be a second season.
What happens when you take an arson investigator and put him together with a police detective? Smoke, perhaps even fire. Smoke is a nine-episode limited series that stars Taron Egerton and Jurnee Smollett, who are forced together to stop two serial arsonists from wreaking havoc in the Pacific Northwest. Along the way, they uncover secrets, even ones about themselves.
Smoke is an action-packed drama that reveals in episode one a huge twist that you don’t want to miss. Besides the main characters, the drama stars Greg Kinnear, Rafe Spall, John Leguizamo, and Anna Chlumsky, among others.
This series comes from Dennis Lehane, who is also the creator behind Apple TV+’s well-received Black Bird, which also starred Egerton in the lead role.
Considered the conclusion of Phase Five of the Marvel Cinematic Universe (MCU), Ironheart follows the events of 2022’s Black Panther: Wakanda Forever. It follows Riri Williams (Dominique Thorne), a brilliant student inventor, as she returns to her hometown of Chicago. There, she encounters Parker Robbins, also known as The Hood (played by Anthony Ramos).
A lot is going on in Ironheart’s six episodes. Although the story primarily focuses on the interplay between technology and magic, it also explores common themes, such as personal grief, moral ambiguities, and, being in the MCU, the complexities of being a young hero.
There’s no word on whether Ironheart will lead to a second season, but there are enough cliffhangers and mid-credit nuggets that suggest the story will continue either on Disney+ in the series or on the big screen in a future motion picture.
One of the most talked-about psychological thriller books released in 2021, May Cobb’s The Hunting Wives, is now a series on Netflix. Told over eight episodes, the series stars Malin Akerman and Brittany Snow about envy, lust, and murder within a tight-knit Texas community.
Mainly garnishing mixed reviews, The Hunting Wives has been praised for staying close to the source material and its general themes. However, some reviewers have called the show polarizing and little more than a guilty pleasure, which isn’t necessarily a bad thing, especially in the dog days of summer.
Netflix hasn’t announced whether The Hunting Wives will see a second season. The first season ended on a cliffhanger, so there’s a high likelihood that a second season could eventually arrive, but it might be too early to expect any news on a possible renewal.
How and When Did Netflix Start? A Brief History of the Company
The breathtaking Yosemite National Park serves as the setting for Untamed, a crime thriller available on Netflix. The series follows Special Agent Kyle Turner (Eric Bana), who is investigating the mysterious death of a young woman who falls off El Capitan.
Told over just six episodes, Untamed does a great job of layering the fantastic beauty of Yosemite with a story that’s dark and sometimes unsettling. Though it’s not for everyone, this is the type of series for anyone who likes mystery stories set in magnificent locations.
Though originally advertised as a miniseries, Untamed has been renewed for a second season. That series will once again star Bana, but this time it will feature a different national park and a new mystery, according to Netflix.
Paying more doesn’t always mean getting more. Google One charges $99.99 a year for 2TB of storage, but plenty of cloud storage services offer better value for your money.
If you’re in the Microsoft ecosystem (Windows OS, Office apps, Outlook and OneDrive), nothing beats Microsoft 365 Personal/Family plans. For $69.99 annually, you get 1TB of storage plus the full Office suite—Word, Excel, PowerPoint, Outlook, and more. Compare that to Google One’s 2TB plan at $99.99 yearly, which only includes basic Google Workspace apps.
OneDrive has deeper integration with Windows machines. It syncs smoothly with File Explorer, letting you access cloud files like local ones. You can edit Office documents directly in the browser or desktop apps without downloading copies first. The Files On-Demand feature saves local disk space by showing all your files but only downloading them when needed.
Microsoft also throws in extras like ransomware detection and file recovery. If malware encrypts your files, OneDrive can restore them to a previous state. The Personal Vault adds another security layer for sensitive documents, requiring additional authentication to access.
For families, Microsoft 365 Family offers far better value—up to six people get their own 1TB of storage each, totaling 6TB for $99.99 per year. In contrast, Google One’s family plan shares the same 2TB pool across all members, offering far less individual storage for the same price.
If privacy is your top concern, Sync.com is a solid pick. It takes a security-first approach to cloud storage, offering strong syncing, easy file sharing, and zero-knowledge encryption. Your files are encrypted on your device before upload, so only you can access them—not even Sync.com can read your data.
The free tier gives you 5GB to start, with paid plans starting at $8 per month for 2TB. That matches Google One’s pricing but includes better privacy protection. File sharing becomes more secure, too—you can set passwords and expiration dates on shared links; features Google One reserves for workspace accounts.
Sync.com keeps version history for 180 days on paid plans so that you can recover accidentally deleted or changed files. The service works across Windows, Mac, iOS, and Android, with selective sync to manage which folders stay on each device.
For business use, Sync.com meets HIPAA requirements for healthcare data and offers data residency options for organizations needing to keep files within specific countries.
If you care more about having massive cloud storage space, privacy, and secure, flexible sharing than real-time document collaboration, MEGA is one of the best-value mainstream cloud platforms you can choose.
MEGA gives you more free storage than most. It starts with 20GB at no cost, beating Google’s 15GB and the typical 2–5GB from other providers. If you need some serious space, MEGA scales up to 20TB personal plans with a huge 240TB monthly transfer quota for $28.59/month. That crushes Google One’s 2TB maximum.
MEGA built its reputation on zero-knowledge encryption. Every file gets encrypted using your password-derived key before leaving your device, keeping your data completely private. This privacy-first approach extends to sharing, too. You control access with passwords, expiration dates, and download limits.
It also handles large files with ease, offering fast speeds and a simple drag-and-drop interface. The paid plans offer good value—400GB for $4.99 a month or 3TB for $9.53. Higher-tier plans bundle in extras like MEGA’s VPN, password manager, and even bundles secure chat and video calling for full privacy coverage.
Dropbox was one of the first to get cloud storage right, and despite cutting back on free storage, it remains one of the best in the cloud space. Syncing happens in an instant, and files appear on other devices within seconds of saving.
Dropbox has the lowest free tier among its peers, offering just 2GB—but its Plus plan delivers solid value despite the slight premium over Google One. For $9.99/month, you get 2TB of storage along with features like Smart Sync, which shows all your files in Explorer or Finder without using local space. The Rewind feature lets you roll back your entire account up to 30 days—handy if you ever delete something by mistake or get hit with ransomware.
Dropbox offers more than just storage. Its Paper feature gives you a simple way to work together on documents, while Capture makes it easy to record and annotate your screen. There’s also a basic password manager and built-in e-signature support through HelloSign.
If you work with design or media files, Dropbox handles previews well. You can view CAD files, Photoshop documents, and videos directly in your browser, and even add comments or annotations without needing to download them.
Box is a bit different from the conventional cloud storage services in this list because it focuses more on control and collaboration than just storage space. The Personal Pro plan costs $10 per month for 100GB, which may seem steep, but it includes enterprise-grade features that make it worthwhile for professional use. Although Box is built with business needs in mind, it still offers a generous 10GB free tier for individual use.
File permissions in Box beat Google One’s basic sharing options. You can set seven different access levels, track who viewed files, and require a login for access. Watermarking and download prevention help protect intellectual property when sharing with clients.
The Box Notes feature creates a shared workspace for real-time collaboration. Unlike Google Docs, it integrates directly with your stored files, so you can reference and embed content without switching apps.
If you need cloud storage to back up large amounts of data without the fancy collaboration features, it’s hard to beat iDrive. The service offers exceptional value with plans starting at just $2.95 per year for 100GB or $9.95 per year for 500GB—rates that cost less annually than most competitors charge monthly.
Even their premium personal plan provides 5TB for $69.50 annually—much less than Google One’s 2TB option. You can back up unlimited devices, including computers, phones, and tablets.
iDrive excels at automated backup. Set folders to monitor, and iDrive continuously protects new and changed files. Versioning keeps up to 30 previous versions, protecting against ransomware and accidental changes. The timeline view lets you restore your entire system to any previous date.
iDrive’s web interface works like traditional cloud storage for accessing files anywhere. You can also share links, include password protection, and set expiration dates. The mobile apps support photo backup and document scanning with OCR.
For an extra fee, iDrive Express ships you a physical drive for initial backup or recovery. If you have multiple terabytes of data to upload, you can request this service where iDrive sends you a temporary storage device, you copy your data to it, and return the drive for them to upload to your account. Google offers no comparable service for large-scale transfers.
NordLocker fits naturally into the Nord ecosystem, especially for those already using NordVPN. It comes bundled with the Complete and Ultra plans at no extra cost and includes 1TB of encrypted storage. NordLocker is also available as a standalone service if you only need secure cloud storage without the rest of the Nord bundle.
Like NordVPN, NordLocker puts security first with zero-knowledge encryption, ensuring your files are encrypted before leaving your device. You can access your storage through desktop and mobile apps or use the web interface. Just drop files into a locker to protect and sync them across devices instantly.
The free plan offers 3GB, but sharing encrypted files is only available on paid plans. If you’re buying storage separately, pricing starts at $2.99/month for 500GB, and 2TB costs $7.99/month when billed annually.
Better value means finding what truly fits your needs—not just sticking with what’s familiar. Google One works well if you’re deep into the Google ecosystem and need basic shared storage, but if you rely on cloud storage for productivity, privacy, or backups, other services offer a better fit. Most of these services offer free tiers, so you can test what works best before making the switch.
AI is creeping into more parts of the internet, answering search queries, recommending downloads, and even deciding what emails deserve your attention. But just because it sounds helpful doesn’t mean it always knows what it’s doing.
Gemini Linked Me to Download Sites Notorious for Spreading Malware
I was looking for apps to record my screen and thought, why not let Gemini handle the whole thing as an experiment. I let it suggest a few tools and link me to the downloads directly. It gave me a list that looked decent at first, but one of the download links pointed to Softonic.
If you’re not familiar with Softonic, it’s one of those sites that looks harmless but really isn’t. They’ve been around for years, and their whole thing is repackaging popular apps in their own installers, which often come bundled with adware, browser hijackers, or other unwanted software.
They use aggressive SEO to show up near the top of Google results, even though they’re widely known to be untrustworthy. Now, apparently, they’re also creeping into AI-generated answers.
I realized it pretty quickly because I’ve been on the internet long enough to know Softonic is a red flag. But if it were someone like my parents, or honestly even anyone else who just wanted a screen recording app, they probably wouldn’t think twice. They’d trust Gemini to provide safe links, click the first result, and unknowingly install junk on their computer.
That’s the part that worries me the most. These tools sound confident and official, and when you’re in a hurry or not super-familiar with tech, it’s really easy to get misled.
Google’s AI Overviews Don’t Make the Situation Better
Gavin Phillips/MakeUseOf
If you’ve searched for anything on Google recently, you’ve probably seen those big blocks of text at the top of the page that try to answer your question right away. Those are called AI Overviews. They’re automatically generated by an LLM, and they pull information from across the web to give you a summary—kind of like what Gemini would do, but built right into Google Search.
While it seems convenient, it’s not always a great idea to trust these results. There have been cases where the AI overview linked users to shady or completely fake websites. Some of these sites look like online stores or services but are just out to take your money or trick you into installing something malicious.
The bigger problem is that this isn’t happening on some random tool, it’s happening inside Google, which most people still trust completely. Unlike with LLMs where users are still a bit more cautious, many people don’t even realize that these top search results are being generated by AI, so they click on them without a second thought.
Thankfully, there are a few wonky workarounds if you want to disable AI Overviews, though they’re not the most straightforward. Still, it might be worth doing if you’d rather stick to actual links and sources instead of relying on something that could get it dangerously wrong.
It’s Not Just Gemini—Other AI Assistants Mess Up Too
Unfortunately, Google isn’t the only one struggling with these kinds of issues. I’ve already talked about how underwhelming Apple Intelligence is when it comes to features, but it turns out some of its functionality might actually be dangerous.
One example is the Priority Messages feature in the Mail app. It’s supposed to surface the most important alerts at the top of your stack so you don’t miss anything crucial.
But there have been cases where it highlighted phishing emails from fake banks, without doing any checks to see if the sender looked suspicious or if the message had any red flags. For something meant to make your life easier, that’s a huge oversight. This pretty much forced me to disable Apple Intelligence entirely on my parents’ iPhones.
The bigger concern is how much blind trust people put into features like this. If your phone says something is important, you’re going to believe it. And that trust can easily be exploited when these AI-driven tools can’t even catch the basics—like a clearly fake bank email. These mistakes might seem small, but they can have serious real-world consequences if not handled properly.
How You Can Avoid These Situations
The most important thing is to not blindly trust whatever link or response an AI gives you. Whether it’s Gemini, ChatGPT, or even something like Perplexity, treat every suggestion as a starting point, not the final answer.
Perplexity has definitely been better than most in my experience when it comes to citing sources and linking to credible sites, but it’s not bulletproof either.
Yadullah Abidi / MakeUseOf
If you’re searching for an app, always try to download it from the App Store, Play Store, or the official website instead of asking an AI assistant to find the download link for you. Similarly, if you’re shopping or looking up information that involves sensitive data, take an extra minute to check where you’re being redirected to, or better yet, try looking for the actual website yourself.
Also, make sure to know not to click the first thing that shows up just because it came from an AI. It might look trustworthy, but that doesn’t always mean it is.
There are still plenty of good uses for AI assistants, like getting quick overviews, organizing your thoughts, or helping with everyday questions. But when it comes to anything involving money, downloads, or personal information, it’s worth slowing down and double-checking for yourself.
Habit trackers wore me out. I replaced their streak anxiety with a three-step routine that tacks tiny habits onto things I already do, nudged by gentle tech cues. With time, I am reaping the benefits of stress-free consistency.
Why Habit Trackers Burned Me Out
There are many excellent habit trackers, but they may not work for you. I once chased perfect streaks on every habit app I could find. Colored bars, daily scores, and urgent pings made me feel busy, not better. Logging each glass of water soon took longer than drinking it. When I missed a day, the red crosses chided me. The occasional relapse pushed me to quit the very habits I wanted to keep.
The data I get from any digital device has never helped. For instance, there are benefits to using smartwatches for improving your physical health. But I abandoned my activity tracking after a few months for the same reason: the friction outweighs the reward. I decided to drop the friction for simplicity.
The Power of Micro-Habits and Habit Stacking
A micro-habit takes under a minute and needs almost no effort. One push-up, one mindful breath, or one Kindle page feels trivial, yet two forces make it work:
Momentum. Finishing something tiny gives me an instant win and energy for more.
Identity. Each repetition is a thumbs-up for the person I want to be. A single page instead of several still says, “I’m a reader.”
Habit stacking locks these micro moves in place. Using James Clear’s rule—After [CURRENT HABIT], I will [NEW HABIT]—I attach the new action to a routine I already run on autopilot. When the anchor fires, the next step feels natural.
My morning tea became my test lab. Mug in hand, I added a 30-second hip stretch before the first sip. Six days later, the stretch felt as natural as the tea’s aroma. The two acts merged.
Tech still matters, but only as a cue. A simple vibration, lock-screen note, or smart-speaker chime can nudge you at the right moment, then disappear. No dashboards, no tiresome tracking, but just a gentle tap on the shoulder.
My 3-Step “Stack & Cue” Method
Here’s the routine I follow, and you can set it up effortlessly tonight.
1. Pick a Rock-Solid Anchor
Choose something you never skip. Good anchors are those habits you don’t think twice about:
Switching on the gas
Brushing teeth
Locking the front door
Opening the laptop for work
A Pomodoro-timer break
Anchors must be specific. “Sometime before lunch” is vague. “Brushing after dinner” is clear.
2. Attach a 30-Second Micro-Habit
Shrink the new habit until skipping feels silly. I wanted to journal, so I wrote one sentence in an Apple Notes page titled “Small Wins”. A friend who hated planks started with ten seconds. Your micro-habit should finish before the anchor ends. If your tea-prep needs two minutes, pick an action under that limit. When the water in the kettle boils, you stop.
3. Add a One-Tap Tech Cue
Tech cues prompt; they never monitor. Here are ideas for three setups that work for me.
Widget Reminder. On iOS, I use a Reminders widget that shows one item, “Stretch while tea brews.” It appears between 6 a.m. and 7 a.m. When I tap it, it vanishes until tomorrow.
Pomodoro Timers. Follow up a focused 25-minute work session with a five-minute break. These five-minute Pomodoro breaks are ideal for building mindful habits.
Gratitude with the Journal app. Next, I am going to experiment with a scheduled reminder on the Journal app (iOS) to send a notification at 11 p.m., just before I hit the bed.
Positive Results After Two Weeks
I tested three stacks:
Tea > Hip-Flexor Stretch
Toothbrush > Three Slow Breaths
Laptop Lid Open > Read an anti-procrastination quote
Fourteen days later, I hit 92 percent completion. More importantly, I felt zero resistance. The stretch now happens without the reminder; the tea alone triggers it.
Design Your Micro-Habit Stacks With a 10-Minute Setup
Let’s summarize the simple habit system. Below are five easy steps to get started:
1
List three anchors you do every day without fail.
2
Write one micro-habit for each, under a minute if possible.
3
Choose one tech cue—widget, NFC tag, or smart-speaker routine. Make it appear only at the anchor and clear it after use with a tap.
4
Run the stack for a week or two before adding or enlarging anything.
5
After a few days, check how you feel, not how many routines you logged. If the action feels automatic, keep it. If not, adjust the anchor or shrink the habit.
I am still enticed by slick habit apps; I just don’t need them anymore. By grafting micro-habits onto solid anchors and letting tech nudge me once, I get the reliability trackers promised without the overheads they delivered. Start with one stack and see how far it takes you in two weeks.
Five years ago, I took a leap and got my first Pixel phone, not knowing if it was worth its price tag. After using three Pixels in a row, I know for a fact they are worth every penny.
5
Google Does Android Better Than Anyone
I was not a fan of Android taking over the smartphone world. The Android phones I saw growing up were all slow, sluggish, and riddled with bloatware. So when the time came for me to pick my first smartphone, I chose Windows Phone.
Fast-forward to 2017 when Microsoft officially discontinued Windows Phone, and I was forced to switch to Android. Guided by my past experiences, I chose a phone that gave as close to a stock Android experience as possible. I first went with Motorola phones running Android One, later upgrading to a Pixel 4a.
Yadullah Abidi / MakeUseOf
Most, if not all, Android smartphone manufacturers add their own launchers, apps, and features to Android. It’s what makes phones from a particular company stand out, but it also dilutes the overall Android experience, and the added features are rarely useful.
Google, on the other hand, provides a near-stock version of Android. The Pixel UI is intuitive and doesn’t get in the way of using your phone. It works the way you expect it to, and doesn’t confuse you with unwanted menus and duplicate functions.
This isn’t just about aesthetics. Apart from a clean look and useful features, this also contributes to better performance. Pixel phones consistently feel more responsive and fluid than other Android devices I’ve tested in the past, even with inferior Pixel hardware. Google has tightened its control over both hardware and software with the launch of its Tensor G lineup of custom chips, which work in perfect harmony with the software.
To be clear, the Android you see running on Pixels isn’t 100% stock. Pure stock Android is more of a starting point for manufacturers to start building their own device experiences—like the Chromium browser that so many companies build custom browsers from.
Related
What’s the Difference Between Samsung and Android Phones?
Samsung makes great phones, but how are they unique compared to other Android phones?
Android has come a long way since its inception, and other manufacturers have made improvements to their custom versions of Android that let them compete with Google. Regardless, I still feel stock Android (or as close to it as possible) is the best Android experience you can get.
4
They Have One of the Best Camera Experiences on Android
One of the first tests I did with my Pixel 4a was a biking trip to the mountains. This was done within hours of unboxing my phone, providing the perfect test ground for the Pixel 4a’s camera. The competition was an iPhone 11, an iPhone 12, and my Canon 200D Mk 1 DSLR with a 50mm lens.
The photos I took on that trip changed how I used my DSLR entirely. For nearly the entire duration of the trip, my DSLR remained in my backpack while I was testing Google’s photography and video software wizardry.
Yadullah Abidi / MakeUseOf
Not only did the Pixel 4a beat phones way above its class in terms of camera hardware, but it also made me realize that I didn’t need to carry my bulky DSLR everywhere with me. The biggest game changer was Night Sight, and I still believe that it gives the best low-light smartphone photos in 2025. The astrophotography mode made my life a lot easier, allowing me to take near professional-grade shots of the night sky without having to set up my camera in the freezing mountains and hoping to get the focus and exposure right.
Both my Pixel 7a and the latest 9a have stayed true to this pattern. The camera hardware has also improved since then, meaning the photos are better than ever. As you’d expect, my DSLR still takes photos that the Pixel (or any smartphone) can’t beat. However, the DSLR has a significantly larger sensor and much better optics. With the Pixel, you just point and shoot and can rest assured that the image will turn out well.
One complaint I have about the Pixel’s camera experience is that it’s not the greatest at video. iPhones still manage to beat Pixels when it comes to video, especially cinematic video. However, Google has made noticeable improvements to how Pixels shoot video since then, and this seems to be on the right track.
Yadullah Abidi / MakeUseOf
Then come all the AI features baked into Google’s camera and gallery apps. Apart from Night Mode, you get Magic Eraser, Add Me, Portrait Light, and tons of other features that can completely change your photos from “barely usable” to “perfectly shot”.
3
Pixel-Exclusive Features Are Actually Useful
When you buy a Pixel, you get a litany of Pixel-exclusive features that integrate themselves into your life. Before you know it, you can’t go back to a non-Pixel Android device.
Apart from the aforementioned Google Camera features, these include small quality of life bits like Now Playing, Call Screen, Hold For Me, Direct My Call, and Face and Photo unblur. You also get great software like the excellent Google Recorder and Pixel launcher. The ability to use your phone as a webcam on your PC is neat, too.
These are all small features that might not be something you use daily, but become tools you won’t want to do without once you get used to them.
Yadullah Abidi / MakeUseOf
You can try to port Pixel-exclusive features to any Android smartphone to counter this advantage, but the porting process often involves installing unofficial third-party APKs, manually handling processes, and even rooting your phone. Even then, the ported features won’t work with the same seamlessness as they do on Pixel hardware.
2
Unique Look and Hardware
Until the Pixel 5 lineup, Google’s smartphones had great software, but didn’t differentiate themselves much on the hardware and design front. With the launch of Google’s Tensor chip, both the hardware capabilities and design language have made improvements that lend Pixels the unique design you see today.
The camera bar (or visor) now gives Pixels a distinct look, and the build quality has been improving each generation. The Pixel a lineup, despite being the cheapest phones Google offers, reflects this with better materials, internal hardware, and overall design. This also translates to the ergonomics of the phones; I have no complaints about how good these phones feel in the hand.
On the Pixel 9, Google credits the new design language for making its latest phone twice as durable as the Pixel 8. I can say from experience that these benefits trickle down to Google’s budget phones as well.
Yadullah Abidi / MakeUseOf
No amount of design and hardware improvement is going to make a phone perfectly durable, though. I have cracked the screens on all my Pixel phones shortly after buying them, including cracking my Pixel 9a’s screen within a month of buying it (thanks to an accidental drop). However, they’ve all survived the screen breaking and continue to operate as usual with no repairs whatsoever.
As for the internal hardware, Google’s Tensor chips can’t match top performers in the Android space. If you’re going by benchmarks and performance figures, these aren’t exactly top-of-the-line chips. That said, they’re not far behind, and I highly doubt you’ll see any performance difference in day-to-day usage.
Some of it comes down to just how well-optimized Google’s software is—now more than ever, considering it’s using in-house silicon. Regardless, the hardware has wholistically improved over the years. From the camera, batteries, SoCs, and internal storage/memory, to the materials used in the phone’s construction, Pixels feel like flagship phones and can justify their price tags.
1
Long-Term Software Support
If you want your Android phone to last as long as it possibly can, buying a Pixel is your best bet. A Pixel 9 purchased today will get software updates until 2031.
Compared to most Android manufacturers, Google offers seven years of software support for Pixel 8 and newer devices. This includes Android updates, security patches, and new Pixel feature drops. You might not get the latest features released for the newest devices, but your phone will still be supported and secure. Even older devices such as the Pixel 6 and Pixel 7 series, launched in 2021 and 2022, respectively, are supported up to five years—an increase from the originally promised three years of support.
You will also be first in line to get these updates, whether security updates or a new version of Android. This keeps your phone fresh on the software side, with new features, improvements, and security updates regularly being added.
Justin Duino / MakeUseOf
Speaking of security updates, Google launches one every month. Android smartphones are a far more enticing target for attackers to hit, making these security updates often the only barrier standing between a hacker and your phone.
Google’s Pixel phones might be a more expensive buy upfront, but they’re an investment that justifies the cost. The software works wonders, the hardware is constantly improving, and the overall package is better than what you get from the vast majority of the Android ecosystem.
You can plug more than just Ethernet cables into the back of your router. Most modern routers have a USB port on the back, which can turn them into the ultimate backup hub for your home.
You Can Plug USB Storage Into Your Router
Depending on your router’s make and model, its USB port likely supports external USB flash drives or even hard drives, provided they’re using file systems such as FAT32, NTFS, or exFAT. While there are even more devices you can plug into your router’s USB port, USB storage is often the intended purpose.
Pankil Shah/MakeUseOf
Setup is simple. Simply plug the USB drive into the router’s USB port, head to your router’s admin page, and activate the feature (it may be under a heading like USB Application or similar). Your router’s firmware is generally accessible by entering the local IP address of the router, such as 192.168.1.1, into your browser’s address bar.
You’ll usually find the default login credentials and IP address on a label at the back of the router, though you should change these credentials for your security if you haven’t already. Our router beginner’s guide explains more if you need help logging in.
Once you’re set up, your drives should appear as a network drive on Windows or macOS. For Android, iPhone, and other devices, you can use a third-party FTP-compatible file explorer (like FTPManager on iPhone or Solid Explorer on Android) to access your files. You can even set up your router to let you access your drive over the internet, which will likely be an option in the same settings menu if available.
Is Using USB Storage With Your Router a Good Idea?
Depending on the kinds of files you want to share across your network and their size, turning your router into a basic NAS can save you a lot of time and money. Another method to avoid buying a NAS is to convert an old PC or laptop into one, but you won’t be able to use it for anything else without taking the NAS offline.
Your router, on the other hand, is up and running 24/7. This means your storage is also available all the time, without taking up space or hogging an otherwise good PC. If you want a simple but effective storage solution that’s accessible from any device that can connect to your router, using USB storage is the way to go.
Some routers even support scheduled or real-time backups of network shares to the attached USB drive. Your data is also protected since the network drive acts as your personal “cloud storage”, with all data staying on-premises without paying any subscription fees.
Jayric Maning / MakeUseOf
There are, however, drawbacks to this approach. Most routers have slow USB 2.0 ports, meaning data transfer speeds max out at 20 to 30 MB/s. You can get better speeds if your router has a USB 3.0 port, but they’ll never be the same as a dedicated NAS or directly plugging the drive into your PC or smartphone.
Additionally, transferring heavy files constantly across the network can drop the performance for other devices trying to access the storage. Router CPUs are generally optimized for networking, and USB storage is a secondary function. You can also face reliability issues with this approach. USB drives tend to pull more current than your router’s USB port might be able to provide under load, which could result in disconnections or even file corruption during data transfer.
Then there are file system limitations. Not all routers support every file system, so while FAT32, NTFS, and exFAT may be supported, more niche formats like Linux’s EXT3 or EXT4 may not work. This is often simply a matter of reformatting your drive in a compatible file system and won’t affect data transfers or drive visibility. We’ve got a detailed explainer on file systems to help you out if you’re stumped.
If you set up your drive to be accessible via the internet, you face the risk of a hacker invading your network. You can protect against these issues using a firewall, strong passwords, dedicated sharing accounts, and keeping your router updated. You need to confirm your home network is secure, even if you think it already is.
Related
You Only Need a USB Drive to Build a NAS—Here’s How I Did It
Your Wi-Fi router is hiding a secret that could unlock your network storage.
Finally, this makeshift “cloud storage” solution is not a proper off-site backup. If the only backup copy of files you have is the USB drive attached to your router, a disaster like a fire, flood, or theft could result in you losing both the original data and the backup. A true off-site backup needs to be located outside your home.
In summary, your router’s USB port is not a NAS replacement, but it’s good enough to share smaller files across devices. This isn’t necessarily a problem, as frequent backups keep file sizes to a minimum and resolve most of your storage woes. That said, you need to be aware of the limitations that come with this approach.
How to Turn Your Router Into a Backup Solution
To set up USB storage on your router, first format your storage drive in a supported file system. I would recommend using NTFS, as it works with drives of almost all sizes and most routers, but you can check your router’s manual for more information.
I’m using an 8GB USB flash drive formatted to NTFS with a TP-Link Archer C5 router. The exact steps can vary based on your router’s make and model, but the overall process remains the same:
Plug your USB drive into your router’s USB port and open the admin interface in your browser (for example, 192.168.0.1).
Once open, click the USB Sharing tab.
Under Device Settings, click the Scan button to ensure your router detects the USB drive.
Under Sharing Account, select the Use New Account option. Type the username and password for the new account and click Save. You can use the default account (same as your router’s login credentials) if you’re using the storage by yourself. But if you’re sharing this storage or intend to expose it to the internet, a dedicated account is recommended.
Under Sharing Settings, make sure Media Server, Network Neighborhood, and FTP Server are enabled. If you want the drive to be accessible over the internet, enable FTP (via internet) as well. You can also change the media server name by editing the Network/Media Server Name field.
Now your USB drive is accessible over your router’s Wi-Fi or Ethernet connection. There are multiple ways to access your drive, but I’ve found FTP to be the most reliable. If you’re on Windows, follow these steps:
Open File Explorer and click the Network option in the left-side panel.
You’ll be prompted to enable Network discovery and file sharing. Click the prompt to do so.
Head back to This PC, right-click any empty space, and select Add a network location.
Click Next on the Add Network Location wizard.
Select Choose a custom network location. Click Next to proceed.
Enter the drive address, which you’ll find under the sharing settings in your router’s admin interface. By default, this is the local IP address of your router followed by the FTP port. If you haven’t changed this, following our example, your drive address should be ftp://192.168.0.1:21.
On the next screen, uncheck the Log on anonymously option and enter the username you created for the sharing account on your router.
Type a name for the drive and click Next. Click Finish on the next screen.
You should now be able to access the drive without any issues. If prompted, enter your password and you’re good to go.
Using the USB port on your router to make a storage drive accessible to all devices in your home is a quick and convenient way of replicating a NAS, whether it’s for file sharing or making backups. It might not be the fastest way of sharing files over a network, but it’s easy to set up, doesn’t require you to spend extra on hardware, and can work wonders for quick backups.
After Arc’s slow fade into maintenance mode, I was curious to see what The Browser Company would do next. I was hoping for the next great browser, but what I got instead was something far less exciting.
What Is Dia?
Dia is the brand-new Chromium-based browser from the same people who built Arc, and it’s supposed to be the next big thing in browsers. But instead of focusing on productivity and slick design like Arc did, Dia has jumped headfirst onto the AI hype train. This time around, The Browser Company wants your browser to be less about organization and more about conversation.
The main positive Dia has going for it is how you talk to the browser. No matter what you’re looking at, Dia tries to understand the context and lets you ask questions about it through an AI sidebar. It uses a large language model (LLM) to answer questions about your current tab—or even multiple tabs at once. You can also upload documents from your computer, which Dia can use to add more context to its responses or help you generate new content based on what you’re working on.
There’s also a feature called Skills, which are essentially community-created prompts you can add to Dia to customize what the LLM can do. If you’re curious, check out Dia’s Skills page to see some examples.
It can also detect when you’re performing a search, then determines whether your query is better answered by a traditional search engine or an AI assistant. You’ll see results from either Google or the LLM accordingly.
There are also ways to fine-tune the AI’s personality: you can tell Dia how you want it to write for you, or what kind of tone and formatting you prefer. If you’re generating code in your browser’s sidebar (for some reason), you can set preferences for that too.
You get the vibe—this is a browser built entirely around generative AI. And that’s precisely where it starts to crumble, because beyond the AI, there isn’t much else going on.
Related
One of the Best Chrome Alternatives Is Dead, but You Have Other Options
Arc was bold and full of promise—until it wasn’t.
Dia Offers Nothing That Made Arc So Good
As someone who has been using Arc since its beta days and fell in love with it the moment I tried it, Dia is frustrating. It’s completely devoid of the magic that made me stick with Arc. It feels stripped of almost every single element that made Arc the perfect browser for me. There are so many Arc features that other browsers should copy, and Dia has none of those.
The biggest loss is the sidebar, because Arc’s sidebar was easily its best feature. You could pin tabs, create folders, organize everything neatly, and switch between spaces and profiles effortlessly. It was the smartest and most fluid take on a vertical tab system I’ve ever used. But Dia threw it all away.
Yes, Dia technically does have a sidebar if you prefer vertical tabs, but it’s just a plain list of open tabs. Nothing like Arc’s thoughtful and flexible layout; it might as well be Safari at that point.
And that’s just the beginning. Little Arc, the separate mini window that opened when you clicked links from other apps, is gone. The way Arc let you search without losing your current tab is gone. All those subtle, delightful touches that made browsing better have simply vanished.
In return, you get Dia’s AI suite. But every one of these features could have been integrated into Arc. There was no need to build a whole new browser just to showcase them.
The most confusing part is that Arc already had great AI features! It automatically organized your tabs into categories, suggested cleanup actions, and performed all kinds of other useful tasks.
Yet somehow, none of that carried over into the new “AI-first” browser. They tossed out genuinely helpful AI tools and replaced them with… an LLM wrapper? Generative AI is already ruining social media, and now it’s here to make the entire internet worse.
Related
I Tried Vertical Browser Tabs but Am Going Back to Horizontal: Here’s Why
Vertical tabs are useful, and I want them to work. But ultimately, I’m heading back to the tried-and-tested horizontal tabs.
I’d Rather Just Use Safari (or Any Other Browser)
Unfortunately, as much as I want to keep using Arc, it doesn’t make sense to anymore. It’s only getting basic maintenance and Chromium updates, and over time, it has become noticeably slower. I often run into performance issues, so it’s time for me to move on to something else.
But that something else is definitely not going to be Dia. In the big picture, it doesn’t offer much. Even though it performs slightly better than Arc, it still lags behind other browsers like Safari or even Chrome, which is already known for being heavy on memory.
Mahnoor Faisal/MakeUseOf
Dia’s entire idea and direction feel unstable. The Browser Company is stepping away from the productivity niche and trying to compete directly with tech giants like Microsoft and Google. That’s a tough sell. Microsoft has already announced Copilot Mode in Edge, which basically accomplishes the same goal Dia is aiming for. I wouldn’t be surprised if Chrome adds something similar with Gemini.
The heavy focus on LLMs also raises another concern. These models are expensive to run, so I won’t be surprised if Dia ends up locking features behind a subscription down the road.
More than anything, I don’t trust The Browser Company anymore. Even if Dia was the perfect browser, I have no confidence that the team would stick with it long-term. They could just as easily abandon it like Arc the moment the next trend in tech shows up.
If you’re in the same boat as me, I’d suggest giving Zen a try because it’s probably the closest alternative to Arc right now. That said, I haven’t fully switched to it myself since streaming DRM-protected content doesn’t always work.
Needless to say, I’m pretty disappointed, and it’s time for me to start looking for a new browser. For now, I’m planning to stick with Safari, but it still feels like a step down from what Arc used to offer.
OLED laptops look gorgeous, but all that visual fidelity comes at a cost. OLED burn-in can hit your laptop hard, so it’s best to take preventive action before your panel kicks the bucket.
What Is OLED Burn-In and Why You Should Care
Unlike LCD panels that require a backlight, OLED or Organic Light-Emitting Diode panels illuminate each pixel individually. This yields near-infinite contrast and much better color reproduction, but these individual pixels degrade over time, especially when displaying the same high-contrast colors for extended periods.
When certain pixels on your display panel show the same, high-contrast image elements such as static UI, logos, toolbars, or more, they degrade faster than surrounding pixels. This results in a faint but permanent shift in the pixel’s colors, leaving behind what seems like a ghost of a static image called OLED burn-in. If you want a more detailed explanation, I’d recommend reading our detailed OLED burn-in explainer.
Zarif Ali / MakeUseOf
While burn-in won’t stop your panel from working, having a constant static overlay will render your display practically useless, as color reproduction and brightness will suffer. Additionally, this can also cause visibility issues if the problem is too severe.
Burn-in isn’t reversible either. Once the organic compounds in the pixels degrade unevenly, no amount of refresh cycles will restore them to their original luminance. Laptop manufacturers rate OLED display lifespans at tens of thousands of hours, but under varied use. When displaying static UIs and images for extended periods—a likely event in daily use—burn-in accelerates significantly.
Burn-in doesn’t kick in suddenly. Instead, it slowly creeps in, sometimes over hundreds of hours of usage. You might not notice signs of burn-in during daily usage like browsing the web, editing documents, or streaming, but even subtle image retention can deteriorate your display panel over time.
How to Prevent OLED Burn-In on Your Laptop
If you’ve never checked your OLED display for burn-in, I’d recommend doing so right away. Tons of YouTube videos and websites show test patterns or solid colors, which can reveal any image retention patterns on your display. FixBurnIN and Black Screen Test have some easy-to-use OLED burn-in tests you can try out.
Yadullah Abidi / MakeUseOf
As for preventing burn-in, there are quite a few simple methods you can use to protect your display. For starters, resist the urge to crank up the brightness. I know bright, colorful OLED panels look great, but that high brightness can accelerate pixel degradation.
1. Lower the Screen Brightness
It’s recommended that you keep the display brightness between 40 to 60% or enable any auto or adaptive brightness features your laptop might have. I use my laptop’s display at 60% brightness most of the time, and it’s yet to show any signs of burn-in even after nearly a year of heavy use.
2. Turn On Dark Mode
Next up, switch to dark mode. Apart from easing the strain on your eyes, using dark mode in your OS or applications can also reduce the workload on your display pixels. When backgrounds and menus use deeper shades, fewer pixels light up with high intensity, slowing organic degradation that eventually leads to burn-in.
3. Avoid Static Images
The longer your display shows a static image, the higher the risk of burn-in. It’s best to keep your display moving and reduce idle time as much as possible. This involves auto-hiding your taskbar and docks in your OS, using a dynamic screen saver that kicks in within a few minutes of idle time, and rearranging desktop icons and shortcuts every few weeks so a single region of pixels doesn’t get overworked.
4. Keep Your Laptop Cool
You also need to keep your panel, and by extension, your laptop cool. Apart from thermal throttling your CPU/GPU and reducing performance, internal heat from your laptop can also speed up OLED burn-in.
With laptop internals regularly getting more powerful, laptops are running hotter than ever. However, this problem is relatively easy to solve. Just make sure your fan vents are nice and clean, your laptop gets good airflow, use a cooling pad if required, and adjust settings to keep your laptop cool.
5. Run Pixel Refresh Tools
Last but not least, laptops with OLED displays often come with vendor utilities designed to run calibration cycles that redistribute pixel wear. This doesn’t fix or reverse burn-in, but makes its effects less visible. You can also use third-party tools such as OLED Guard Pro or OLEDShift, but their effectiveness can vary.
The OLED Burn-In Protection Checklist
Changing how you use your laptop to make sure your display doesn’t get damaged can be challenging. Most OLED burn-in preventions are small things that you may often forget, or even prefer not to do. Here’s a quick OLED burn-in protection checklist to help you ensure you’re doing all you can to protect your display:
Protective Measure
Action
Keep Brightness Reasonable
Keep display brightness between 40 to 60% and enable auto brightness if available.
Use Dark Mode
Use dark mode in your OS and programs to reduce pixel power draw.
Keep Content Moving
Frequently shift windows and toolbars, avoid static windows or HUDs on screen for extended durations.
Auto-Hide Static UI
Enable auto-hide for any OS taskbars, docks, and menu bars to avoid persistent pixels being illuminated.
Use Dynamic Screen Savers
Choose moving screensavers and set them to start within 2 to 5 minutes of screen inactivity. Alternatively, use animated wallpapers.
Use OLED Calibration Apps
Using vendor-provided or third-party OLED calibration apps can reduce the effects of burn-in and prevent it from happening.
Keep the Panel Cool
Heat can accelerate burn-in. Keep your laptop cool and work on firm surfaces to ensure good airflow.
Items like auto-hiding OS elements, and using dark mode might not align with your personal preferences. On relatively newer panels, the risk of burn-in is less, so you can stick with some of your visual preferences. However, it’s best if you stick to as many burn-in preventions as you can.
OLED burn-in can be an expensive issue to fix, especially on laptops, which are more susceptible and far less repairable. Thankfully, sticking to a few simple preventions can ensure your display runs long without losing its colors.
Apple has unveiled a new plan, called AppleCare One, which extends AppleCare+ coverage. If you’re invested in Apple’s ecosystem, AppleCare One is worth checking out—especially if you tend to break your devices.
What Is AppleCare One?
AppleCare One is Apple’s all-in-one subscription plan that combines multiple AppleCare+ coverages into a single, convenient package. Instead of managing separate protection plans for your iPhone, Mac, iPad, and other Apple devices, AppleCare One bundles them into one streamlined monthly payment. As such, it makes it easier for those deeply invested in the Apple ecosystem to stay protected.
Traditionally, AppleCare+ has been offered as individual coverage for each device. It provides extended warranty support, accidental damage protection, 24/7 priority access to Apple Support, and theft and loss protection (only for iPhone).
Related
Apple One Is the Best Entertainment Package You’re Not Using
It’s seriously good.
AppleCare One covers up to three devices under a single plan and saves money compared to buying separate AppleCare+ plans for each product. It costs $19.99 per month, which averages to about $6.67 per device—regardless of whether it’s an Apple Watch, iPhone, Mac, or iPad.
If you’re in the US, you can sign up for AppleCare One on your iPhone, iPad, or Mac right now by navigating to Settings > General > AppleCare & Warranty. Alternatively, you can visit the nearest Apple Store to sign up for AppleCare One.
How This Compares to Traditional AppleCare+
AppleCare One builds on the foundation of AppleCare+ but offers more flexibility, convenience, and value. AppleCare+ is purchased individually for each device, typically within 60 days of buying it, and each plan has its own cost based on the product type and model.
For example, as of this writing, you need to pay $13.99/month (or $139.99/year) to get AppleCare+ for an iPhone 16 Pro Max. For the iPhone 16e or 16, it costs $9.99/month ($99.99/year) or $11.99/month ($119.99/year), respectively. The pricing also varies for other product types, such as Mac and Apple Watch, based on the model.
Related
AppleCare+ Explained: How Much Does It Cost and Is It Worth the Price?
AppleCare+ protects your Apple device, but is it worth the cost?
AppleCare One simplifies that entire process. For a flat fee of $19.99/month, you can cover up to three devices, regardless of type or model. If you need more coverage, each additional device costs $5.99/month. And when needed, you can remove products from the plan at any time. This all saves you money if you have several devices you used to cover under individual AppleCare+ plans.
It also introduces the ability to add devices already owned—those up to four years old—as long as they’re in good condition. This is a significant improvement over the strict 60-day window required by AppleCare+. Thanks to this, you no longer need to purchase a warranty when you buy an iPhone or another Apple device; you can also add coverage to older devices after taking some time to think about it.
Both plans offer unlimited accidental damage repairs, battery coverage, and priority access to Apple support. However, AppleCare One expands theft and loss protection to the iPad and Apple Watch, whereas AppleCare+ only offered it for the iPhone.
Another major change is how the plan handles device upgrades. If you trade in a covered device at Apple, AppleCare One will automatically transfer the coverage to the new device—no need to manually cancel or repurchase coverage like with AppleCare+.
Get AppleCare One if You’re Deep in the Apple Ecosystem
If you own multiple Apple devices, AppleCare One is practically a no-brainer. Whether it’s an iPhone, iPad, Apple Watch, or Mac that you’ve held onto for the last four years, AppleCare One gives you a single, affordable plan to keep them all protected. Instead of paying for separate AppleCare+ plans—with different billing cycles and rules—you get unified coverage starting at $19.99 per month for up to three devices.
If you’ve already paid for AppleCare+ for multiple devices you own, it’s wise to cancel them and switch to AppleCare One right away. However, if you only own one device or only one of your devices is eligible for coverage, you shouldn’t pay for AppleCare One because you’ll likely be paying more than if you just subscribed to AppleCare+ for the device.
AppleCare One is a user-friendly and cost-effective protection plan for anyone with multiple Apple devices. By combining the benefits of AppleCare+ into a single, flexible subscription, it eliminates the hassle of managing separate plans. There are also added perks, including expanded theft and loss protection for iPad and Apple Watch, and the option to cover older devices. Depending on how often you break your devices or run into trouble, AppleCare One could be a great way to bring peace of mind without spending a fortune.
After feeling disconnected from most modern games, I decided to bring back a piece of my childhood. So I built a retro gaming setup on my PC that finally feels like home again
I Built a Retro Console With RetroArch
I grew up playing the PlayStation 2, PSP, and Game Boy Advance, and I still find myself going back to games from those consoles even today. I even emulate older Pokémon games on my Android phone from time to time.
The only issue is convenience. Setting up separate consoles every time I want to play something gets tiring pretty quickly. Between switching inputs, dealing with old cables and adapters, or just the general clutter, it’s not exactly the best experience. I wanted a cleaner, easier way to play everything I loved without giving up that retro feel.
Raghav Sethi / MUO
That’s where RetroArch came in. It’s a free emulator frontend that supports a ton of different systems, and it runs on Windows, macOS, Linux, Android, iOS, and more. Everything launches from one place, and it instantly made my PC feel like a proper retro gaming setup. Once I got it working, it felt like I had built the perfect console for myself.
Related
This App Lets You Play PSP Classics on Your iPhone: Here’s How
Your iPhone can emulate all the PSP games you played in your childhood.
Installing and Setting Up RetroArch
To set up RetroArch on your PC, just download the setup from the official RetroArch website and install it like any other app. When you open it for the first time, you’ll see a fairly minimal desktop UI. It doesn’t look like much at first, but once you start loading it up with cores and games, it starts to feel more like a proper console frontend.
RetroArch doesn’t actually emulate anything on its own—it uses “cores” to do that. A core is basically an emulator for a specific system, and you can download them directly from inside the app. Go to Load Core > Download a Core and pick the consoles you want to emulate. Once you’ve downloaded a few, you can load them through Main Menu > Load Core.
You’ll also notice that some systems have multiple cores available. For example, the GBA has both mGBA and VBA-M. If you’re not sure which one to pick, try loading the same game in both and see which one performs better. You can switch between cores anytime, so there’s no pressure to choose the “right” one up front.
I plugged in an Xbox controller and it worked automatically. If you want to customize controls, head to Settings > Input. You can remap buttons, set custom layouts, and even save profiles for specific games or systems.
Adding Games and BIOS Files
Once you’ve got RetroArch up and running, the next step is to organize your games. I made a dedicated “Retro Games” folder on my PC and created subfolders inside it for each system, like GBA, NES, and so on. It just makes things easier to manage, especially when you start building out your library with different file types like ROMs or ISO files.
Once your games are sorted, you can scan your library by going to Main Menu > Import Content > Scan Directory and selecting the folder that contains your ROMs. RetroArch will automatically add them to your playlist, complete with box art and metadata if it recognizes the files.
For most older systems, all you need is the game file. But for some cores, especially for consoles like the PlayStation, you will need the BIOS files too. A BIOS is essentially the firmware that ran on the original console, and some games won’t boot without it. The process of getting a BIOS file legally involves extracting it from your own hardware.
It’s a bit technical and varies depending on the system, but generally involves running a tool on your console to dump the BIOS file, then transferring it to your PC. RetroArch looks for these in the system folder, which you’ll find inside its install directory.
To play a game, just select the console you want to emulate in the main menu, pick the title, and choose a core when prompted, and the game will start running.
Related
How to Play Emulated Games on Your Steam Deck With EmuDeck
EmuDeck is a user-friendly option for those who want to emulate games on their Steam Deck.
Making RetroArch Feel More Like a Console
For starters, if you want your games to look the way they did on the original consoles, you can use RetroArch’s shaders to make them feel like you’re playing on an old CRT TV. If you’re using your setup as a couch console connected to a TV, the default RetroArch interface isn’t great for that kind of experience.
It’s more suited to a keyboard and mouse, and it doesn’t feel all that intuitive with a controller. You’ll probably want cover art for your games too, especially if you plan to scroll through your library using a controller.
To add box art automatically, go to Main Menu > Online Updater > Thumbnails Updater and select the system you want artwork for. It pulls in cover art and game metadata for most recognized titles. Just make sure your games have already been scanned and added to your library beforehand, otherwise the art might not work properly.
To switch to a more console-like interface, go to Settings > Drivers > Menu and change the menu driver to xmb. This gives you the same crossbar layout that the PS3 had. I grew up on PlayStations, so this layout feels natural to me, but I get that it might not be everyone’s thing.
If you are still looking for something with a more retro-focused theme, I also recommend EmulationStation. It’s a separate frontend that sits on top of RetroArch and gives you a fully themed dashboard that works well for big-screen setups.
If you’re on an iPhone and want something simpler, there are plenty of great emulators for iOS as well. For most people though, I’d still recommend sticking with RetroArch as it does pretty much everything you’d need.
You already use the Play Store on your Android phone or tablet—but it’s not just for browsing and installing apps. It’s packed with powerful features that let you share digital purchases with family, free up storage easily, and keep your device secure.
8
Keep Your Device Safe With Play Protect
Downloading apps from the Play Store is generally safe, as Google regularly checks every listed app and game to ensure they meet its security standards. But even when you venture outside the Play Store (like by sideloading an Android app to install an older version or something not available in your region), the Play Store still has your back.
It offers a Play Protect feature that’s enabled by default and runs regular scans of your apps to detect anything that might put your device at risk. If it finds something suspicious, you’ll receive a notification. Otherwise, it quietly works in the background.
If you ever suspect that your phone might be infected, you can run a manual scan. Tap your profile icon in the Play Store, select Play Protect, and tap Scan.
The Play Protect settings menu includes a useful option called Permissions for unused apps. It shows you which apps you haven’t opened in the past six months. Aside from helping you remove permissions from apps you don’t need anymore, it provides a great place to start if your phone’s storage is running low.
7
Sync Apps Across All Your Devices
If you own multiple Android devices, such as a watch, tablet, TV, or Chromebook, there’s a good chance you use many of the same apps across them. The good news is that you don’t have to install those apps manually on each device every time. As long as you’re signed in with the same Google account on all your Android devices, you can set the Play Store to automatically sync apps between them.
On the Play Store, tap your profile icon in the top-right corner and go to Manage apps & device > Sync apps to devices. You’ll see a list of all Android devices connected to your account. Simply check the boxes next to the devices you want to sync with, and you’re all set.
6
Uninstall Apps in Bulk to Clean Up Fast
Clearing out apps and games you no longer use is a great way to free up space on your Android phone. While uninstalling individual apps is easy, the Play Store offers an even quicker way to clean up multiple apps at once when you’re ready for a full-on cleanup.
Tap your profile icon in the top-right corner and go to Manage apps & device. Then, switch to the Manage tab to view a list of all your installed apps. From here, you can sort by size or last used to easily spot the low-hanging fruit.
Finally, tick the check boxes next to the ones you no longer need, hit the trash icon in the top-right corner, and select Uninstall to confirm.
5
Save Space With Auto-App Archiving
You don’t have to uninstall apps and games manually to free up storage space. The Play Store offers a handy auto-app archiving feature that can save space without fully removing your apps.
To take advantage of this, tap your profile picture on the Play Store and go to Settings > General and enable Automatically archive apps. Once activated, the Play Store takes care of the rest.
Google Play will now automatically remove parts of unused apps from your device when storage is running low. This doesn’t affect any of the app data, and the app icon remains on your home screen, grayed out. If you ever want to use the app again, tap it, and it will re-download right where you left off.
4
Install Apps Remotely
You don’t need to have your Android phone or tablet in hand to install an app on it. The Google Play Store lets you remotely install apps to any of your connected Android devices, be it your phone, tablet, or smartwatch.
As long as you’re signed into the same Google account used on your phone, you can open the Play Store in a web browser on any device and sign in. Search for the app you want, then click the Install button on its page. Then, select the device and click Install again.
This feature also works in the Play Store app on your phone or tablet. On the app or game page, tap the arrow next to the Install button, select the device you want to install it on, and then tap Install again.
3
Get a Refund When You’re Unsatisfied
While the Google Play Store is packed with free apps and games across every category, you might make a purchase every once in a while. And thankfully, Google understands that not every paid app or game may live up to expectations.
If you spend money on something that doesn’t live up to the hype, you can request a refund directly from the Play Store. You’ll need to act quickly, though—refunds for apps and in-app purchases must be requested within 48 hours of purchase. For movies, TV shows, eBooks, and audiobooks, you have up to seven days to request a refund, provided you haven’t downloaded or streamed the content.
To get a refund, all you have to do is search for the app or game on the Play Store to open its page. If you’re within the eligible window, you’ll see a Refund button. Tap it, and you should receive an email confirmation shortly after.
For in-app purchases, the process is slightly different. Tap your profile picture in the top-right corner, go to Payments & subscriptions > Budget & history. Find the item you want a refund for and tap View to open the transaction details. Then, select Report a problem, select a reason from the dropdown menu, and hit Submit.
2
Share Apps, Games, and Movies via Family Library
For purchases you decide to keep, you can share them with up to five family members. To do so, you’ll need to set up Google Play Family Library, which lets you share your paid Android apps, games, movies, TV shows, eBooks, and even audiobooks.
Head to Play Store Settings > Family > Sign up for Family Library and follow the on-screen instructions to create your family group and invite members. You can choose to share items individually or set all eligible purchases to be shared automatically. Your family members will then be able to download and enjoy that content on their own devices, without needing to buy it themselves.
Not every item is eligible for sharing, though. To check whether an app, game, or piece of media can be added to your Family Library, look for the Family Library icon on the content’s details page.
1
Earn and Use Google Play Points
Every time you make a purchase on the Play Store, you could be missing out if you’re not earning Google Play Points. This rewards program lets you collect points for nearly every dollar you spend.
To get started, tap your profile icon in the Play Store, go to Play Points, and join the program for free. Once done, you’ll earn points automatically with every eligible purchase. The more you spend, the higher your level can climb—from Bronze up to Silver, Gold, and Platinum—each offering increasing benefits like bonus point events and special discounts.
These points aren’t just for show. You can redeem them for Google Play credit, use them to score discounts on in-app items, or even donate them to select charities.
You might not need the above Play Store features every day, but knowing they’re available can save you time, money, and storage space when it counts. So take a moment to get familiar with what the Play Store can really do—you’ll thank yourself later.
Writing means facing creative blocks constantly. I write a lot, so I know the feeling. Obsidian is my go-to for all of it, and with a few tweaks, it actually makes me want to write more.
Where You Write Matters
I use two Obsidian vaults: one dedicated to university work and another for everything else, including personal and professional writing. My university vault involves mostly scientific or technical notes, so eloquence isn’t necessary.
My second vault demands a completely different mindset because the writing is creative and expressive. Consequently, and paradoxically, this makes writing in the second vault twice as hard.
I’ve learned over time that my work environment has a great influence on my productivity and creativity. A welcoming environment encourages me to start writing and makes it easier to stay engaged. Since Obsidian essentially serves as my writing workplace, it needed to feel inviting and comfortable.
Related
Templates Are the Best Obsidian Workflow Hack You’re Not Using
Unleash the power of templates to transform your note-taking routine.
I tried using templates in Obsidian to make writing easier. I’ve tried AI workflows and a pile of plugins, but nothing stuck. It wasn’t until I stumbled onto a setup that was almost ridiculously simple that things finally clicked.
The Typewriter Experience in Obsidian
To me, writing with a pencil on paper provides unmatched tactile feedback. Feeling each letter form beneath my fingertips is satisfying. However, I’m considerably faster at typing than writing by hand, so reverting to paper wasn’t practical. What’s the next best thing to a pencil that offers a similarly tactile experience?
A typewriter, of course! I can’t realistically use a vintage typewriter today—it’s impractical and expensive—but I can certainly emulate one. Thankfully, Obsidian offered the next best thing.
The core of this setup is Obsidian’s Typewriter Scroll plugin. This plugin automatically scrolls your note down with every new line, always keeping your current line centered, similar to how traditional typewriters advance the paper with each keystroke.
The plugin also offers a Zen Mode, which I’ve activated. Zen Mode highlights only the current paragraph and fades the paragraphs above. This simple effect helps me focus solely on the words I’m typing, not what I’ve typed before.
To really sell the typewriter vibe, I installed the Typewriter theme. It makes Obsidian actually look and feel like a vintage typewriter. The theme does offer a dark mode, and normally, I’m all for dark mode in everything, but the theme’s default white-paper look works better here. Paper, after all, isn’t typically black.
Of course, aside from what’s on your computer, the physical environment also affects your work. For some reason, I churn out words much faster at a café than I do at home. Even stranger, my writing at the café somehow ends up sounding more academic.
Real typewriters don’t have sidebars, tab switchers, word counters, or menus. At first, I used Obsidian’s built-in full-screen mode (F11) to manually hide the sidebars. But buttons and other visual elements were still visible. My writing experience still wasn’t pure enough.
Predictably, there was an Obsidian plugin to handle this as well: the Fullscreen Focus Mode plugin. It takes the minimalist aesthetic even further by hiding almost every element save for the note you’re writing. It’s not completely distraction-free; elements like the note directory and scrollbar remain, but it’s still a significant improvement.
The Fullscreen mode plugin doesn’t add a button to the interface. You can use it by either setting up a hotkey for it or by calling it from the command palette.
Less Really Is More
Whenever I open my vault, I now genuinely feel the urge to write. If you’ve ever struggled to begin writing, you’ll understand how significant this change can be.
Obsidian offers a simple canvas by default, but allows you to create a sophisticated, fully customized workspace. This brings the constant feeling of having to improve your Obsidian workflow to use every plugin and feature you can. But, sophistication isn’t inherently better. Sometimes, less is more, and for me, this setup is what’s been working.
Related
6 Reasons Why Obsidian Is My Go-To App for Deep Research Projects
Deep research feels lighter with Obsidian on hand.
While I’m very happy with my minimalist Obsidian setup, I know that sometimes tranquility alone won’t be enough. In those moments, I turn to The Most Dangerous Writing App. This app stimulates creativity through a very different method–a perfect complement when minimalism alone doesn’t suffice.
I’m genuinely happy with my minimal Obsidian setup, but there are days when tranquility isn’t sufficient to spark creativity. For moments when I need adrenaline rather than calm, I switch to The Most Dangerous Writing App—it does the same but through very different means.
Setting up my soundbar was relatively straightforward: I simply connected it to the TV via Bluetooth, and it worked right away. However, to achieve the best sound, I found that it needed to be optimized to suit my TV—and one setting is especially crucial.
The One Setting That’s Affecting Your Soundbar Audio Quality
Jack Mitchell/MakeUseOf
Soundbars typically support various audio formats, so if your TV sends a signal that the soundbar doesn’t handle well, it can cause issues such as latency (a lag in sound and dialogue), missing sound effects, or poor audio quality. It can also cause improper decoding of audio formats, such as DTS or Dolby Digital, resulting in muffled dialogue or poor bass response, all because the correct switch needs to be toggled!
To get the best audio performance from your soundbar, the main setting to adjust is the audio output format in your TV’s audio settings menu. The most common audio formats are PCM (Pulse Code Modulation) and Bitstream. Both these formats transmit a digital audio signal to your soundbar, but they work in different ways.
PCM vs. Bitstream: What’s the Difference?
To put it simply, PCM and Bitstream each refer to the method by which digital audio is transmitted from your TV or media player. The difference lies in where the decoding takes place.
PCM means that your TV decodes the audio before sending it to your soundbar.
Bitstream sends compressed audio to your soundbar, which decodes it internally.
So with a PCM setup, your TV does all the hard work. This is usually fine, provided it has a strong audio processor (which my midrange Samsung model doesn’t). Soundbars, on the other hand, are built purely for audio, so by selecting Bitstream—or in my case, “Auto”—you are likely to get better decoding, especially if you are using advanced audio formats.
For most home theater setups, including my own, Bitstream (or Auto) is usually the best option, particularly if your soundbar supports the latest surround sound formats.
Bitstream typically plays true 5.1 and 7.1 surround sound more effectively from streaming apps and media players.
Bitstream offers better audio decoding, as even some Dolby and DTS-ready TVs downmix surround sound (convert it to fewer channels) before passing it to the soundbar. In contrast, Bitstream sends the raw signal for the soundbar to process.
Bitstream is required for spatial audio formats, such as Dolby Atmos and DTS:X, to provide a full complement of object-based audio effects.
Additionally, if your soundbar supports HDMI-ARC or eARC connectivity, Bitstream enables better processing of high-bitrate audio formats. Conversely, PCM might struggle to handle uncompressed data due to bandwidth constraints.
Bitstream might usually be the preferred choice, but PCM has its place. Here are a few scenarios where PCM might be the better option:
For simpler setups that don’t support advanced audio formats like Dolby Atmos, PCM ensures compatibility.
Some TVs may have limitations when processing Bitstream, resulting in latency. In these cases, having PCM decode the audio on the TV might be the better option.
Gamers may find that PCM is more effective when using their Xbox or PlayStation. In some instances, using pre-decoded audio can reduce lag and preserve quality.
As a general rule, if you’re not using your soundbar for surround sound formats or if your soundbar has issues while the TV is in Bitstream mode, try switching to PCM to see if this is more effective.
Other Settings to Consider for Optimal Sound Quality
Switching your TV’s audio output format from PCM to Bitstream (or vice versa) can resolve many performance issues. Still, several other factors also affect sound quality, including the shape of your living space. Consider tweaking the following options for optimal soundbar performance.
Many soundbars have EQ presets for movies, music, sports, and custom profiles. It’s worth experimenting to achieve the best results.
If speech sounds muffled or is getting drowned in the mix, try switching on dialog enhancement in your audio settings.
Some soundbars have manual EQ controls for lower and higher frequencies. Try adjusting these if your overall sound tends to be boomy or tinny.
Some soundbars simulate surround sound with virtual surround or 3D sound modes. Even if your soundbar doesn’t support true surround sound, it’s worth activating these for a more immersive experience.
I now know it’s essential to check a TV’s audio format settings when setting up a soundbar or channeling audio from a different device, such as a games console. If your current soundbar sounds underwhelming or experiences performance issues, try switching between PCM and Bitstream (or Auto) to see if it improves the sound quality. Simply toggling this one switch might unlock clearer dialog, fix any latency issues, or deliver more dynamic sound effects, all within your existing audiovisual setup.
Most people never venture beyond Ctrl+C and Ctrl+V in Google Docs. But the real time-savers are the shortcuts nobody talks about—especially for navigating long docs or fixing formatting fast.
Once you use them, you’ll wonder how you ever managed without.
1
Paste Without Formatting Makes Everything Cleaner
This is my favorite shortcut—and for good reason. You copy text from a website, paste it into your document, and suddenly you’re dealing with weird fonts, random colors, and formatting that doesn’t match. Instead of spending some more time cleaning it up, just use Ctrl + Shift + V (Windows) or Cmd + Shift + V (Mac) to paste the content without formatting.
With this shortcut you can strip away all the original formatting and paste plain text that matches your document’s style. It’s perfect when you’re pulling quotes from research papers, copying code snippets, or grabbing text from emails.
Adding comments to documents usually means highlighting text, right-clicking, and navigating through menus. The Ctrl + Alt + M (Windows) or Cmd + Option + M (Mac) shortcut lets you add comments instantly without breaking your typing flow.
This shortcut is most useful during editing sessions. You can mark sections that need fact-checking, suggest rewrites, or leave reminders without interrupting your reading flow. It’s also brilliant for collaborative projects where you need to give feedback quickly.
To use this shortcut more effectively, combine it with other Google Docs shortcuts. For instance, you can pair it with Ctrl + Shift + Right/Left Arrow key to select text with your keyboard, add a comment, type your note, and hit Enter.
3
Voice Typing Beats Typing Every Time
Google Docs voice typing turns your speech into text with impressive accuracy. When your fingers are tired, but your brain is still churning out ideas, Ctrl + Shift + S (works on both Windows and Mac) instantly activates voice typing. Google’s voice recognition is highly impressive, and it understands punctuation commands, too.
You can say, period to add a period, new line to start a new paragraph, or comma to add a comma. It handles technical terms surprisingly well, though you might need to clean up a word or two. Voice typing is perfect for first drafts, brainstorming sessions, or when you’re dealing with repetitive strain injury.
To get the best results with voice typing, try to speak naturally and clearly, but don’t slow down too much. The AI often performs better with normal speech patterns than with overly careful pronunciation.
4
Quickly Select Whole Paragraphs
When working with longer documents, you often need to adjust entire sections at once. A common problem with click-and-drag selection is that you can frequently miss the first word or grab unwanted text from adjacent paragraphs. For precise selection, use Ctrl + Shift + Up/Down Arrow (Windows) or Cmd + Shift + Up/Down Arrow (Mac) to select complete paragraphs instantly.
This shortcut makes restructuring documents and applying consistent formatting effortless, even when you’re moving sections around or formatting multiple paragraphs with the same style.
5
Move Paragraphs Up and Down Instantly
Often, when you need to reorganize paragraphs for better flow, you’ll simply cut and paste the text blocks, which risks breaking formatting. Alt + Shift + Up/Down Arrow (Windows) or Option + Shift + Up/Down Arrow (Mac) moves your current paragraph up or down without touching your clipboard.
Put your cursor anywhere in a paragraph and use this shortcut to slide it into the perfect position. It’s incredible for outlining, reordering lists, or fixing the flow of your arguments.
This works beautifully with bullet points and numbered lists, too. You can rearrange entire sections without worrying about breaking your formatting or losing your numbering.
Scrolling through a long document isn’t fun when you have to jump back and forth from start to finish. On Windows, press Ctrl + Home to go to the beginning and Ctrl + End to reach the end. On a Mac, Cmd + Up Arrow takes you to the top, and Cmd + Down Arrow moves you to the bottom instantly.
This shortcut is handy when you’re working with lengthy reports, manuscripts, or research papers. I often need to check the introduction after writing the conclusion and vice versa, so this makes it easy to jump to the start and back.
7
Bonus: Show All Shortcuts When You Forget
I use these shortcuts daily to speed up my Google Docs workflow and rely less on the mouse. But there are dozens more worth learning, though it’s hard to remember them all. Fortunately, you can bring up the list of supported Google Docs shortcuts using Ctrl + / (Windows) or Cmd + / (Mac).
The list is searchable too. In the Keyboard shortcuts search bar, type format to find formatting shortcuts, insert for insertion options, orbrowse categories to discover shortcuts you didn’t know existed.
These seven shortcuts help you work faster without reaching for the mouse all the time. Start with the ones you need most. Once you get used to them, try these 90+ Google Docs keyboard shortcuts to save even more time and effort every day.
Want to enjoy streaming TV and movies while keeping your personal data to yourself? You do not have to trade privacy for great entertainment. These apps and devices help you keep your habits private every time you stream.
Stremio stands out as a privacy-focused streaming app that puts privacy back in your hands. This open-source media center operates differently from traditional streaming services by using add-ons to discover content from various sources across the web.
What I particularly find unique about Stremio is its transparent approach. The entire codebase is available on GitHub, meaning security researchers can audit the software for any potential privacy issues. Stremio itself doesn’t require you to store your viewing history or build a personal profile, and guest mode is available to limit further the information tied to your streaming. Still, some data, such as analytics and your IP address, is needed when loading content or using add-ons. As a best practice, stick to well-reviewed and official add-ons, and consider using privacy tools like a VPN to limit exposure to third-party hosts.
The add-on system works by running extensions remotely, which provides an extra layer of security compared to downloading potentially malicious software directly to your device. I use add-ons such as YouTube integration and various official community-created extensions that help expand my viewing options without compromising on privacy.
You can sign up with only basic information, or even use its guest mode, which skips data collection entirely. In guest mode, you won’t have to worry about your personal info leaking out. Add-ons like Torrentio and WatchHub help you discover content easily, all without platforms creating data profiles about your preferences.
Looking for something more optimized for use on your streaming stick or TV box? Kodi is another open-source media player that collects no personal information. Unlike commercial alternatives, Kodi can operate entirely offline by default, meaning your viewing habits stay exclusively on your device.
The platform excels at organizing your personal media collection. Point Kodi toward your movie and TV show folders, and it automatically organizes everything with beautiful artwork, episode descriptions, and cast information. This local approach ensures that nobody else knows what you’re watching or when you’re watching it.
Official add-ons from the Kodi repository connect to legitimate streaming services like YouTube, Twitch, and various news networks. These official extensions maintain the same privacy standards as the core application. Kodi also allows you to watch IPTV on your PC or streaming stick, listen to podcasts, and even play some games, making it a complete media center for entertainment.
Like Stremio, Kodi’s add-on ecosystem extends its capabilities beyond local media. However, note that add-ons can still ask for private data. Official Kodi repository add-ons generally uphold strong privacy standards, but third-party or unofficial add-ons can potentially log data such as your IP address and viewing activity with their own servers or developers. Again, be careful of installing third-party add-ons outside the official repository.
The software works particularly well if you want complete control over your entertainment setup. Whether you’re running Kodi on a dedicated media PC, Raspberry Pi, or smartphone, the experience remains consistent and private.
If you want to host your own private Netflix-like media library, Plex strikes a good balance between convenience and privacy. The platform excels at creating a polished streaming service that closely rivals many popular paid streaming services.
The basic Plex functionality remains free and includes local streaming of personal content. You can install the Plex Media Server on your old computer or NAS device, then access your library through apps on various devices. No need to plug your computer into your TV; just host the app and visit your Plex landing page. The interface is particularly user-friendly, making it accessible even for less technical folks.
However, Plex has introduced limitations on remote streaming for free users, now requiring a subscription to access your media outside your home network. Despite this change, local streaming within your home remains free and doesn’t require sharing additional personal data. You can boost your privacy by tweaking Plex settings, like activating incognito mode or disabling playback collection data.
The platform’s strength lies in its automatic organization capabilities and broad device support. Plex can identify your media files and enhance them with artwork, descriptions, and other metadata, creating a professional-looking library experience.
If you tried Plex and found that it lacks certain features, you may want to try JellyFin. Many people have moved to JellyFin and found that it provides great privacy through its open-source development and features that you’d have to pay a premium for on other platforms. This self-hosted media server software is completely free and open-source, ensuring no corporate entity has access to your viewing data.
Unlike commercial media servers, JellyFin never phones home to external servers. Your media stays on your hardware, accessible only to users you specifically authorize. This approach means your streaming habits remain completely private, whether you’re watching from home or accessing your library remotely.
Another reason to choose Jellyfin is that it gives you premium features like remote streaming and mobile access for free. I keep Jellyfin running on my server alongside Plex because it lets me stream my media collection from anywhere, including on my phone, and never puts features behind a paywall or restriction.
These streaming solutions prove streaming doesn’t have to mean sacrificing privacy. Whether you prefer self-hosted media servers, open-source applications, or privacy-respecting streaming services, options exist for every preference and technical skill level. The key is choosing platforms that align with your privacy priorities while delivering the content experience you want.
Spreadsheets are supposed to save time, but sometimes they just make things messier. I hated digging through endless menus until I found a handful of formulas that do the heavy lifting for me.
8
VLOOKUP
VLOOKUP searches for a specific value in the first column of a range and returns a corresponding value from another column in the same row. You can call it a lookup tool that saves you from manually scrolling through vast datasets. The syntax for VLOOKUP is:
VLOOKUP(search_key, range, index, [is_sorted])
Here, search_key is the value you want to find, and range is the table where you’re searching. The index parameter tells VLOOKUP which column to return data from, while is_sorted indicates whether your data is sorted.
If you set is_sorted to FALSE, it will show you exact matches, which is usually what you want for most lookup tasks.
Here’s how VLOOKUP works in practice:
=VLOOKUP("Saniya", B2:J3000, 9, FALSE)
This formula searches for “Saniya” in column B and returns the corresponding value from the ninth column. It’s perfect if you want to find employee details, product information, or any data organized in tables.
However, there’s a limitation of VLOOKUP that it only searches to the right. It can’t look left of your search column. But for most everyday tasks, it handles data lookup perfectly. For more detailed examples, you can check out our guide on using the VLOOKUP function in Google Sheets.
7
SUMIF
SUMIF adds up values in a range based on specific criteria you set. Instead of manually calculating totals for different categories, this formula does the heavy lifting, and it’s accurate.
While the basic IF function returns TRUE or FALSE based on conditions, SUMIF takes it further by performing calculations on the data that meets your criteria. It has the following syntax:
SUMIF(range, criteria, [sum_range])
Here, the range contains the cells you’re checking against your criteria, the criteria is your condition, and sum_range is the actual values to add up. If you omit sum_range, SUMIF adds the values in the range itself. It only works with text, numbers, and even wildcards, such as asterisks (*) for partial matches.
=SUMIF(V2:V3000, "<1000", Z2:Z3000)
In the above example, the formula checks column V for values less than 1000 and then sums the corresponding amounts in column Z. This formula is handy for calculating sales totals, expense categories, or any conditional summation.
Related
How to Use the SUMIFS Function in Excel
Want to make data analysis in Excel a breeze? Learn how to use the SUMIFS function to quickly sum up specific criteria in your spreadsheets.
You can even combine multiple criteria, though you’ll need SUMIFS for that level of complexity. For such complex examples and advanced criteria combinations, you can check out our detailed guide on using the SUMIF function in Google Sheets.
6
CONCATENATE
This function combines text from multiple cells into a single cell. When you need to merge first and last names, create email addresses, or build custom labels, you can use this function in your formula to handle the text manipulation.
You can also use the ampersand (&) symbol as a shortcut for basic concatenation, though using the CONCATENATE function in Google Sheets offers more flexibility for complex combinations. The syntax for CONCATENATE is:
CONCATENATE(string1, [string2, ...])
Here, string1 is your first text value, and you can add unlimited additional strings. Each parameter can be a cell reference, actual text in quotes, or a mix of both.
Remember that it doesn’t automatically add spaces, so you need to include them manually as separate parameters, as shown in the following example.
=CONCATENATE(B2, " ", C2)
This formula combines the values from cells B2 and C2, separated by a space. It is perfect for creating full names, product codes, formatted addresses, and more.
CONCATENATE can become unwieldy if you use many parameters, but it’s still the most reliable way to merge text data. You can also use CONCATENATE in Excel to join text from multiple cells.
5
COUNTIF
COUNTIF counts cells that meet specific criteria within a range. When you need to track how many items fall into certain categories—like counting completed tasks or tallying specific responses—this formula eliminates manual counting errors.
It works well for analyzing survey data, inventory tracking, and performance metrics. The syntax for COUNTIF is:
COUNTIF(range, criteria)
Here, range specifies the cells you want to examine, and criteria define the condition that cells must meet to be counted. The criteria can include text, numbers, or logical operators. The following is an example:
=COUNTIF(K2:K3000, "Active")
This formula counts the number of cells in the range K2:K3000 that contain exactly the text “Active.” You can use the COUNTIF function in Google Sheets to track project statuses, count specific product types, or analyze categorical data.
COUNTIF also supports wildcards like asterisks (*) for partial text matches and question marks (?) for single-character substitutions.
You can also use comparison operators like “>50” or “>=100” to count numerical ranges. The formula is handy when dealing with large datasets where manual counting simply isn’t practical.
4
ARRAYFORMULA
Next on the list is ARRAYFORMULA, which applies a single formula to an entire range of cells automatically. Instead of copying formulas down hundreds of rows, you write it once and let Google Sheets handle the rest.
I’ve found this useful when working with large datasets that constantly expand. Rather than remembering to drag formulas down every time new data appears, ARRAYFORMULA automatically keeps everything up to date. The basic syntax wraps your regular formula:
=ARRAYFORMULA(your_formula_here)
However, you need to reference entire columns or ranges rather than single cells. For instance, instead of A2, you’d use A2:A to include the whole column from row 2 downward.
Here’s a practical example that combines first and last names:
=ARRAYFORMULA(B2:B & " " & C2:C)
This formula concatenates every corresponding pair in columns B and C simultaneously. The results appear instantly across all rows with data. Moreover, it automatically adjusts when new rows are added.
For more examples, you can check out our guide on the ARRAYFORMULA function in Google Sheets. It’s definitely worth the learning curve, especially if you work with data on a regular basis.
3
FILTER
It extracts specific rows from a dataset based on the conditions you define. When you need to see only certain employees, projects, or sales records without manually hiding rows, this formula creates a dynamic subset instantly.
What I appreciate most about FILTER is that the results update automatically when your source data changes, unlike manual filtering. It is useful for live dashboards and reports. The syntax follows this pattern:
FILTER(range, condition1, [condition2], ...)
The range contains your data, while condition1 specifies your first criterion. Additionally, you can stack multiple conditions for more precise filtering, as shown in the example below.
=FILTER(D2:D3000, R2:R3000="Engineers")
This formula shows only Engineering department employees from the employee database. Consequently, you get exactly the subset you need without scrolling through irrelevant records.
FILTER works exceptionally well for project tracking, expense analysis, and client management, as it handles text and numerical criteria equally well.
If you want to see more detailed examples and filtering techniques, check out our guide on the FILTER function in Google Sheets. Honestly, it’s one of those formulas that genuinely saves hours of manual work when you’re constantly pulling different data subsets for reports and meetings.
2
QUERY
QUERY brings database-style searching to Google Sheets using SQL-like language. While it might sound intimidating initially, this Google Sheets function can save you hours every week. It’s straightforward once you understand the basics and powerful for office data analysis.
It combines filtering, sorting, and grouping into a single formula. Instead of using multiple functions, you can extract exactly what you need with a single command. The basic syntax looks like this:
QUERY(data, query, [headers])
The data parameter contains your range, the query holds your SQL-like command in quotes, and the headers specify how many header rows to include. In the following example, QUERY analyzes employee performance data:
=QUERY(A1:AB3000, "SELECT D, Q, AB ORDER BY AB DESC")
This formula retrieves employee names (column D), departments (column Q), and performance scores (column AB), then sorts by performance score in descending order. Essentially, you’re creating custom reports that otherwise would require you to use pivot tables in Excel or Google Sheets.
QUERY can be helpful in sales analysis, project tracking, and budget reporting as it handles text searches, date ranges, and mathematical operations. For more examples, you can check out our detailed guide on the QUERY function in Google Sheets.
1
IMPORTRANGE
This function directly imports data from other Google Sheets files into your current spreadsheet. When you’re managing multiple project files, budget trackers, or departmental reports, IMPORTNAGE can eliminate the copy-paste routine for you.
It maintains live connections between files. As a result, when your colleague updates the master sales spreadsheet, your dashboard automatically reflects those changes, and no manual updates are required. The syntax requires two key pieces of information.
IMPORTRANGE("spreadsheet_url", "range")
The spreadsheet_url is the complete web address of the source file, while the range specifies exactly which cells to import using standard notation, such as “Sheet1!A1:C10”. The following is an example:
This formula imports employee data from another department’s file directly into your consolidated report. But you’ll need to grant permission the first time, as Google Sheets will prompt you to connect the files.
IMPORTRANGE is handy for creating executive dashboards, consolidating team reports, and maintaining centralized data views, as it is the easiest way to import data from another Google Sheets file. However, remember that too many IMPORTRANGE formulas can slow down your spreadsheet.
Related
5 Ways to Import Data From a Website Into Google Sheets
Tired of copying and pasting data from websites? Learn how to import it directly into Google Sheets.
These eight formulas make spreadsheet work considerably easier. There is a learning curve involved, but the time savings become obvious once you’re using them regularly. Data tasks that used to take time will now happen in minutes, and that’s worth the effort.
Windows File Explorer provides a ton of options to change how you view your files. What you might not know is that a critical option is disabled by default, despite being vital to your system’s safety.
File Extensions Are Important
File extensions are three or four-letter suffixes that appear after the final period of a file name, such as .txt, .exe, or .pdf. These extensions act as identifiers so the OS (and you) can tell at a glance what kind of file they are.
Windows uses file extensions to determine which app should launch when you double-click a file. For example, an .exe file will launch an application, while a .docx file will open a Word file in Microsoft Word. A lot of programs save files in their own unique file extensions, which can then only be opened in that program (or a compatible third-party tool).
Yadullah Abidi / MakeUseOf
A key advantage of being able to see file extensions is the ability to spot potentially dangerous files. Certain extensions like .exe, .bat, .cmd, .vbs, and .scr (among others) can be dangerous files designed to run malicious code on your system. Such files often employ file extensions used by legitimate Windows tools and programs, so spotting them can be tricky.
Despite their importance, file extensions are hidden by default in all modern versions of Windows. This is done to create a cleaner user interface within File Explorer. However, malware creators often use hidden extensions to disguise malicious executable files as seemingly harmless documents to trick you into running malware on your PC, so it’s much better to have them visible.
Showing File Extensions on Windows
Thankfully, enabling file extensions on Windows takes only a few clicks. On Windows 11, simply open File Explorer by using the Windows key + E keyboard shortcut, click View in the top bar, hover over Show, and select File name extensions. You should start seeing file extensions for all files saved on your PC.
If you don’t see the top bar in File Explorer, you can also enable file extensions from Windows settings. Follow these steps:
Press Windows key + I to open Windows Settings. Head to the System tab and select For developers.
Expand the File Explorer section by clicking it, then make sure the Show file extensions slider is turned on.
Particualrly if you’re using an older version of Windows, the Control Panel also comes in handy for enabling file extensions:
Open the Start menu and search for Control Panel. Click the corresponding option.
Change Category to Small icons if needed, then choose File Explorer options.
Under the View tab, make sure that the Hide extensions for known file types option is unchecked.
You can also enable file extensions by making a small change to the Windows registry, but I recommend avoiding this. The three methods above should work on any version of Windows you’re using in 2025, and are much less prone to error. However, if you want a quick way of enabling file extensions, simply run this command in either the Windows Terminal or PowerShell:
reg add HKCUSoftwareMicrosoftWindowsCurrentVersionExplorerAdvanced /v HideFileExt /t REG_DWORD /d 0 /fThis command will add the required entries to the Windows registry that tell File Explorer to start showing file extensions. Make sure to refresh File Explorer using the F5 key to see the changes.
How Attackers Exploit Hidden File Extensions
As mentioned, hackers often exploit hidden file extensions on Windows to disguise malicious files as innocent ones. For example, a file named image.png.exe will appear as a PNG image file in File Explorer with file extensions hidden, when in reality it’s an executable file that can run malicious code or malware when launched.
This technique is called a “double extension attack” and is the most common type of extension attack you’ll see. Thankfully, as long as file extensions are enabled, these malicious EXE files are pretty easy to spot and avoid. However, this is far from the only technique that tries to use hidden extensions to confuse you. Some other popular methods include:
Technique
Example
Description
Right-to-Left Override (RTLO)
image[RTLO]gpj.exe appears as image.exe.jpg
Attackers use the Unicode character U+202E to reverse the file name.
Whitespace Padding
document.pdf[insert 100 spaces].exe
You can place multiple spaces between the fake and real file extension, so the real extension gets pushed off-screen even when file extensions are enabled.
Icon Manipulation
document.exe file with a PDF icon
This is a simple technique where a criminal swaps out the icon of a malicious file for something more familiar, such as a PDF or JPG icon.
PIF Files
document.pif
PIF file extensions are automatically hidden by Windows, even if file extensions are enabled. That said, PIF files are rarely used in modern Windows versions.
As you can see, there are plenty of tricks attackers can use to trick you into running a malicious executable you might think is an image. However, by spending just a few seconds enabling file extensions on Windows, you can catch these traps before accidentally launching any malware on your PC.
Related
9 Default Windows Settings That Make Your Life Harder
Stop settling for a subpar Windows experience.
File extensions help identify what type of file you’re dealing with, but Microsoft’s choice to hide them by default in File Explorer opens the door for fraudsters to disguise malicious files. Don’t fall for these tricks. Enable file extensions and always double-check a file before opening it, especially if it came from the internet or you didn’t ask for it.
Google Drive is great—but “great” can always be better. If you spend a lot of time saving files to Drive, searching through folders, or transferring files from it, installing the right browser extensions can make your job much easier.
While browsing the web, you’re bound to come across a useful article, an interesting image, or an important PDF you’d like to save. Instead of cluttering your desktop with downloads and forgetting about them later, you can use the Save to Google Drive extension.
Once the extension is installed, you can right-click on any image or PDF and choose Save [File] to Google Drive. You can even save an entire webpage by clicking the Save to Google Drive icon next to the address bar.
The extension’s options menu allows you to specify how web pages are saved, whether as a PNG, HTML file, or Google Doc. You can also set a default folder in your Drive to keep all your web finds neatly organized. The best part about saving everything directly to Google Drive is that your files are instantly available across all your devices.
Sometimes, all you want is a quick glance at a Word document or a review of a PDF someone sent over. Instead of saving the file to your PC and then opening it in a different app, the Open with Google Drive Viewer extension lets you view it in your browser instead.
The way it works is quite simple. You just need to right-click on the file you want to view and select Open with Google Drive Viewer from the context menu. The file will open in a new tab, neatly displayed in Google Drive’s built-in viewer. It’s perfect for viewing documents, presentations, and even the contents of ZIP files without downloading them first.
And if the file turns out to be worth saving, you can add it to your Google Drive directly from the viewer. The extension supports a wide range of formats, including DOC, XLS, PDF, PPT, ZIP, HTML, TXT, JS, and more.
If you’re using Microsoft Edge, you can already open Office files without downloading them first. For this, go to Settings > Downloads and enable the Open Office files in the browser toggle.
While it’s possible to open Microsoft Office files in Google’s ecosystem, such as opening a Word document in Google Docs, it usually involves a few extra steps, like launching Docs, Sheets, or Slides, uploading the file, and waiting for it to convert. But if all you need is a quick look or a simple edit, the Office Editing for Docs, Sheets & Slides extension from Google can save you the hassle.
With this extension installed, you can drag a Word, Excel, or PowerPoint file directly into your browser. Once you do, the file will open in a new tab, where you can view or make edits without converting the file or saving it to Google Drive.
When you finish viewing or editing, you can save your changes in the file’s original format, so there’s no awkward back-and-forth with colleagues or clients who still use Office. Of course, if you prefer, you can choose to convert the file to a Google Docs, Sheets, or Slides version, which automatically saves it to your Google Drive.
Inbox chaos is real. Between receipts, contracts, itineraries, and long email threads, it’s easy for important information to get lost. The Save Emails to Google Drive extension lets you create hard copy backups of key emails and their attachments.
This makes it easier to find your important emails when you need them. Even better, you can choose to save emails in a shared Drive folder, giving teammates instant access without the need for endless forwarding.
After installing the extension, a brief setup process is required. You’ll need to create a cloudHQ account, grant the necessary permissions, and choose the folder where your saved emails should go.
Once set up, saving is as easy as selecting one or more emails in Gmail and clicking the Save to Google Drive icon. The extension supports saving emails in PDF, TXT, HTML, and EML formats, so you can pick the one that works best for you.
If there’s one Google Drive extension worth pinning, it’s Checker Plus. Once installed, you can click its icon in the toolbar to access your Google Drive without having to open a separate webpage.
You can easily search your Drive, rename documents, delete files, and even open them directly from the extension’s popup window. It’s a convenient tool for anyone who needs to dip in and out of Google Drive throughout the day.
Checker Plus isn’t all about quick access to Google Drive, though. It also sends real-time push notifications when someone opens, edits, moves, or deletes a file. You can customize which files and folders to monitor, so you only receive alerts that truly matter.
Your Google Docs, Sheets, and Slides automatically save to Google Drive, but what if you want to save some of them to other cloud storage services? There’s no need to download the file and manually upload it if you have the Backup and Sync Google Drive extension installed.
With this extension, you’ll see a “Save to” button in the upper-right corner of your Google Docs or Sheets. Click it to view a menu of available cloud services. Select your preferred destination, log into your account, and your file will sync. Also, any changes you make will continue to save in real time.
The Backup and Sync extension also works with your existing Google Drive folders. So, if there’s a specific folder you want to keep in sync with another service, simply open that folder in Drive and click “Sync this folder.” A setup wizard will then guide you through connecting it to your preferred cloud storage provider.
If you often find yourself opening Google Keep or Docs just to jot down a sudden idea or reminder, the Notes extension can help. It makes it easy to capture thoughts, to-dos, reminders, and flashes of inspiration directly to Google Drive.
To use it, just click the Notes icon in your browser toolbar and start typing—it’s that simple. Each note is saved as a Google Docs file in the “Notes” folder in your Google Drive. The extension uses the first line of your note as the title, which makes it easy to find your notes using Google Drive search.
Best of all, you don’t even have to leave your current browser window to revisit your notes. Just click the extension icon again, and a convenient mini viewer lets you scroll through and edit all your saved notes without opening Google Drive.
Google Drive on its own is already a powerful tool, but with the right extensions, you can turn it into something even better. Whether you want to save files instantly, view documents seamlessly, jot down notes, or sync content across multiple cloud platforms, these extensions make it easy to do it all.
More importantly, they let you do it smoothly, without interrupting your flow. So give the ones that fit your needs a try, and your Google Drive experience will be all the better for it.
I switch phones quite frequently. My current favorite is the OnePlus 13 because in addition to packing exceptional hardware, it also offers a decades-old feature: an IR blaster. I find this indispensable and think it should be available on more Android phones.
What’s an IR Blaster?
An IR blaster, short for infrared blaster, is a device comprising a small LED that’s designed to emit infrared light in the form of pulses. This infrared light mimics the signals transmitted by remote controls to control electronic appliances that have an IR receiver.
Yash Wate/MakeUseOf
You can typically find an IR blaster located at the top or bottom edge of your phone. Your phone manufacturer will also preload an app on the phone that interfaces with the IR blaster, allowing you to perform various actions on your desired device.
What Can You Do With an IR Blaster on Your Android Phone?
You can use the IR blaster on your Android phone to control pretty much any device that has an IR receiver. This can include electronic devices such as your TV, set-top box, projector, AV receiver, DVD player, and certain camera models. It can also work with household appliances, like fans (with an IR remote), motorized curtains, robot vacuum cleaners, and air conditioners.
Related
Infrared vs. Radio Frequency: How Does a Remote Control Work?
You use one all the time, but how does your remote control actually change the channels?
Generally speaking, you can control most of the features and functionalities of these devices or appliances with your phone’s IR blaster. However, there can be exceptions. The controller app’s database may sometimes not have a one-to-one controller of an appliance or device, leaving you with few—often the most basic—controls.
Having the ability to control devices using your phone is useful in a lot of scenarios. For instance, it can prove a lifesaver when you misplace or break the remote control for your TV. Similarly, it can come in handy when you’re traveling and can’t find the remote control for a TV, set-top box, or A/C in your hotel room. And if you’re feeling a bit daring, it should even work to turn down the volume of annoying TVs in public places.
How to Set Up and Use the IR Blaster on Your OnePlus Phone
OnePlus phones that have an IR blaster come pre-installed with the IR Remote app. This app allows you to set up and save remote controls for various appliances, allowing you to control them from a single place.
Setting up the IR Remote app is easy. You can set up a controller for a device manually or by scanning a QR code carrying its configuration. The latter option is useful when you want to import a remote control from another device, or if you’ve obtained a QR code for a controller online or in the device’s manual.
Related
Here’s How I Check if a QR Code Is Safe to Scan
About to scan that QR code? Check it’s safe first.
To add a controller for a device using the QR code option, tap the Plus (+) button on the main screen and hit the scanner icon in the top-right corner. Grant the app access to the phone’s camera. Once done, point the phone’s camera at the scanner, and the IR Remote app should recognize and import the remote.
Alternatively, you can add a remote manually. To do this, tap the Plus (+)on the main screen and select the device type on the following screen. Next, choose your device’s manufacturer. Hit Got it to dismiss the prompt.
Ensure nothing’s blocking the IR blaster on your phone; remove its case if required. Also, turn on the device you’re setting up the controller for if it isn’t already.
Now, point your phone at the device and tap the test button you see on the app. If the device responds to this test signal, tap Yes. (You may need to do this a few times, depending on the device for which you’re setting up the controller.) Alternatively, if your device doesn’t respond to the test signal, tap No response, try next. Keep tapping the new test signal buttons you see on the screen until your device responds.
Once you’ve managed to successfully test all the signals, hit Yes again. Then, type a descriptive name for the remote control on the next screen, so you can easily identify it among other remote controls you may add on the app going forward.
While here, you can also add a quick access shortcut for this remote control to your phone’s home screen by toggling the Add Home screen shortcut option. Finally, hit Save to store the remote and add it to the app’s main screen.
Once set up, using the IR Remote app is straightforward. Tap the remote control for the device you want to control on the main screen, and it’ll present you with a bunch of buttons on the screen. Tap the appropriate button, depending on what you want to do on the device, and the app should send a signal through the IR blaster to perform that action.
How to Check if Your Android Phone Has an IR Blaster
Not every Android phone comes with an IR blaster, but it’s easy to tell if your phone has one. Here are some ways to do it:
Look for the IR blaster dot on your phone: Most manufacturers place an IR blaster at the top edge of the phone. It appears as a small circular-shaped translucent dot, sitting flush with the surface. Remove the case from your phone and check the top or bottom edge to look for the dot.
Check your phone’s specifications: You can also check the specifications of your phone on the manufacturer’s official website to determine if it comes with an IR blaster. Be sure to enter the correct model on the website, and you should see an entry for “IR port,” “IR sensor,” “infrared port,” or similar under a section labeled “Specifications,” “Features,” or “Hardware.”
Look for a pre-installed IR Remote app: If your phone has an IR blaster, it’ll most likely also come pre-loaded with a remote controller app to control it. Access your phone’s app drawer and look for an app labeled “Remote,” “IR Remote,” “Smart Remote,” or “Remote Control.”
Install the IR Test app: You can also use a third-party app, like IR Test, to check if your phone has an IR blaster—and whether it functions correctly. Download the IR Test app from the Play Store, open it, and hit the Start IR Test button. It’ll then tell you whether your phone has an IR blaster.
What to Do if Your Android Phone Doesn’t Have an IR Blaster
If your Android phone doesn’t have a built-in IR blaster, don’t be surprised; most manufacturers don’t include one on their phones these days. Luckily, workarounds exist to get similar functionality.
The best—and most reliable—is to get a USB-powered IR remote control adapter like the R09 Mini Smartphone IR Remote Controller Adapter. These are inexpensive, and are one of many accessories that plug directly into your phone’s charging port.
You just need to download a compatible app—often recommended by the dongle manufacturer—on your phone to use the IR blaster. Once done, follow the on-screen instructions to set up the controller for the device you want to work with. Then, use the controller to perform actions and the app will send IR signals through the dongle.
An IR blaster on a phone isn’t anything new; it was a common sight a while back. However, many brands eventually phased it out due to limited adoption, cost-cutting measures, and the rise of smart home devices that use Wi-Fi and Bluetooth for control.
Nonetheless, that doesn’t discount the convenience of having an IR blaster on a phone. It remains a valuable addition that I and many others appreciate. It’s also why certain brands, especially those based in China, continue to include it on their phones. I hope more brands reintroduce the IR blaster on their phones and market it like other neat features.
Using your house’s electrical wiring to run wired internet connections can be a great idea for getting fast internet without running ugly cables across your floor. However, the speed and performance of your powerline adapters are influenced by factors you can’t see—and there are more than a few powerline adapter myths clouding the conversation.
5
Your House Wiring Matters
Since powerline adapters are completely dependent on your house wiring to carry internet signals, the age and quality of your electrical wiring are the single most important factors determining their performance. Older wiring often uses smaller gauge wires, usually 14 gauge, which is limited to 15 amps compared to modern 12 gauge wiring, which can carry up to 20 amps with lower resistance.
Older wiring is also more susceptible to interference from nearby cables. This introduces unnecessary electrical noise, which can significantly degrade adapter performance.
Hannah Stryker / MakeUseOf
Age also plays a role. A U.S. Consumer Product Safety Commission study [PDF] found that homes older than 40 years had disproportionately high electrical system issues, largely due to aging electrical infrastructure and outdated building codes. While modern building codes require better grounding, proper wire spacing, and the use of higher quality materials—factors that improve powerline adapter performance—wiring quality can vary significantly between houses.
4
You Don’t’ Get the Advertised Speed
Just because an adapter is rated for gigabit speeds doesn’t mean you’ll get them when browsing the internet or downloading files. These speeds are theoretical maximums tested under ideal laboratory conditions and represent the data rate of the powerline protocol, rather than the internet speed. The internet speed you get will drop significantly in real-world scenarios.
TP-Link, one of the major powerline adapter manufacturers, openly acknowledges this in its technical documentation. For example, its AV1300 powerline adapter kit claims speeds of up to 1300 Mbps. However, a TP-Link support page explains that the conversion rate on such kits is only about 30 to 35%. This means that even if the powerline speed between two adapters is rated 1,000 Mbps in ideal conditions, your internet speed will be between 300 and 350 Mbps. TP-Link also adds that this rule “basically applies to all Home Plug AV products.”
Related
How to Make Sense of Your Wi-Fi Speed Test
Understanding the various numbers is actually quite useful when you run a Wi-Fi speed test.
It isn’t exactly false advertising, but it can be misleading to customers looking to buy their first powerline adapters. Internet speeds can be challenging to comprehend, and most routers and network devices tend to advertise higher speeds that are only achievable in ideal situations. So while the box says you’ll get gigabit internet, the actual speeds are much slower.
3
Surge Strips Can Hurt Your Connection
Make sure to always plug your powerline adapters directly into the wall. Plugging them into surge protectors, power strips, or extensions can severely hamper their performance.
Image Credit: Jowi Morales
Apart from adding additional length to your connection, surge protectors and filtered power strips filter out electrical noise to protect your devices from power fluctuations. However, this also worsens powerline adapter performance as they use the same frequency ranges for data transmission that get filtered out by these devices.
To be clear, this will not prevent your powerline adapters from functioning, but it will impact data transmission speeds. Powerline adapters have built-in filters designed specifically for their communication protocols, so it’s always best to plug them straight into the wall outlet.
2
Adapters Should Share the Same Breaker
Another small thing to keep in mind is that your powerline adapters should all be on the same breaker, whenever possible. Powerline can work across different breakers, but the performance will vary significantly.
North American homes typically use split-phase electrical systems, which consist of two “legs” or “phases” of power. Each circuit breaker is connected to either line 1 or line 2, and communication between these lines must pass through an electrical panel. In such cases, if you have a pair of powerline adapters across breakers, it can introduce unwanted resistance and interference that degrade performance.
Yadullah Abidi / MakeUseOf
Plugging your adapters into the same circuit provides the most direct electrical path between adapters, minimizing any loss and interference. If plugging on the same circuit isn’t possible due to house layout or outlet unavailability, try and get them connected to breakers on the same phase.
It’s unlikely that you’ll be able to make changes to the wiring to support powerline adapters better later, especially if you’re in a rented property. The difference in performance will vary, but Reddit user wintersdark tested TP-Link’s AV2000 adapters in a “fairly new house” with the following results:
Adapters on the same breaker: 500 Mbps
Adapters on the same leg, different breaker: 250 Mbps
Adapters on different breakers: 90 Mbps
As mentioned earlier, these tests were conducted on AV2000 adapters, which promise speeds of up to 2,000 Mbps (2 Gbps). While these tests are over five years old at the time of writing, they’re still a good indicator of how powerline adapters will work across breakers.
1
Keep Connections Short
Last but not least, it’s important that you keep connection distances between powerline adapters as short as possible. Keep in mind that the distance between two adapters is the length of cable running between outlets that these adapters are plugging into, and that’s much larger than what you see if you were to measure the distance between said outlets.
The electrical wires in your house rarely take the most direct path, going inside walls, avoiding obstacles, and running back and forth between breakers and electrical panels before reaching outlets and switches. So while two outlets can be right next to each other, the cable distance between them can be several feet or even more.
As the distance between two adapters increases, the likelihood of your data transmission being slowed down by interference increases, and the wire’s resistance also increases. This isn’t a linear relationship either, and even small increases in cable length can significantly affect adapter performance.
Powerline adapters can seem like a hassle-free way to get wired internet throughout your house without dealing with Ethernet cables. However, there are a lot of little factors, most of which will be beyond your control, when it comes to how well these adapters perform.
Related
Mesh Wi-Fi Will Solve Your Connectivity Problems, Even in the Biggest Home
Poor Wi-Fi performance? Hard to reach corners? You need mesh Wi-Fi.
Depending on the age of your house and its wiring, running a mesh Wi-Fi or using a Wi-Fi repeater might be better options. You can even use old routers to fix Wi-Fi dead spots around your house to save some money instead of buying a mesh system. However, if you want the best possible speed and stability, running an Ethernet cable directly from your router to your PC remains the best option.
After recently being in the market for a used iPhone, I came across several devices with deal-breaking defects that aren’t easy to catch at first glance. It’s more important than ever to know what to look for when buying a pre-owned iPhone.
5
Check the Battery Health Using a Proper Diagnostics App
Before buying a used iPhone, the first point you should check is the battery health, since the battery is usually the fastest part to degrade in any phone.
In case you’re not familiar with battery health, it refers to the maximum charge a battery can hold compared to when it was new. It’s shown as a percentage, and over time, this number drops as the battery undergoes charge cycles. For example: at 90% battery health, charging your battery to 100% will provide as much power as charging it to 90% did when it was brand-new.
Raghav Sethi/MakeUseOf
If you’re buying an iPhone from someone you trust, you can quickly check the battery health in the Settings app. A reading above 80% usually means you’ll get decent battery life (Apple says 80% health is when you should replace your battery).
However, if you’re purchasing the phone from a refurbished retailer or third-party seller, be cautious. Some sellers spoof the battery health percentage shown in the Settings app, so while it may show 100% health, the actual number could be much lower.
To be safe, use a third-party diagnostics tool like coconutBattery (macOS) or 3uTools (Windows/macOS). After installing the app on your computer, connect the iPhone using a cable and tap Trust on the phone when prompted. The app will then generate a detailed report showing the actual battery health, including the charge cycle count and real battery capacity.
4
Look for Signs of a Non-Genuine Screen
Another important factor to check is whether the iPhone’s screen has been replaced with a non-genuine one. Since a lot of phones sold to refurbishers arrive with broken displays, the screen is one of the most commonly replaced parts, and it’s often swapped out with lower-quality aftermarket versions.
One simple trick is to place the phone on a wireless charger and unlock it. If you notice ghost touches or the phone randomly opening apps on its own, there’s a good chance it’s using a fake screen. Aftermarket displays often don’t work well with wireless charging.
Dreamchild/MakeUseOf
Also, pay close attention to the bezels around the screen. On a genuine iPhone, the borders are always evenly sized on all sides. If you notice that one edge (especially the bottom bezel) looks noticeably thicker or uneven compared to the rest, there’s a good chance the screen has been replaced with a non-original display.
On an iPhone 12 or newer, you should also make sure it has an OLED screen. Some fake replacements use cheaper LCD panels instead. To check, turn on dark mode on the iPhone and open the Settings app. If the background appears dark gray instead of pitch-black, it’s probably an inferior LCD screen and not the original OLED panel.
3
Check All the Speakers And Microphones
It’s also worth knowing that your iPhone has multiple speakers and microphones. Just because you’re hearing sound or your voice is being picked up doesn’t always mean everything is working properly.
There are two speakers on an iPhone: one at the bottom near the charging port, and another at the top near the front camera. To test them, play some audio and hold the phone to your ear, one speaker at a time. If you can clearly hear sound coming from both spots, both speakers work fine.
Zarif Ali / MakeUseOf
iPhones also have several microphones placed around the device, including the top, bottom, and back. To check if they’re all working, open the Voice Memos app and start a recording. Speak into the phone from different directions, then play it back to see if your voice is being clearly picked up, no matter where you’re speaking from.
2
Check if Face ID Is Working
You should also make sure that Face ID is working properly. This often stops functioning if the TrueDepth camera has been replaced, or if the phone has gone through a poor-quality screen replacement that damaged internal components. While you’ll usually see a warning on the home screen saying that Face ID has been disabled when you first turn on the phone, it’s still a good idea to double-check.
Raghav Sethi/MakeUseOf
To test it, set up Face ID anew by opening the Settings app and going to Face ID & Passcode > Set Up Face ID. Follow the on-screen instructions to position your face in front of the camera and slowly move your head in a circle. Once the setup is complete, lock the phone and try unlocking it with Face ID to confirm that everything is working as expected.
1
Confirm Activation Lock Isn’t Enabled on the iPhone
If you’re buying a refurbished iPhone online and the seller has only shared pictures of the phone showing the setup screen, that’s a major red flag. In many cases, these could be stolen devices that still have Activation Lock enabled.
Activation Lock is a security feature that ties the iPhone to the owner’s Apple Account, even if the device is erased. You won’t be able to complete setup or use the phone unless the previous owner either enters their Apple Account password during setup or manually removes the device from their iCloud account using the Find My app.
If the seller is unable or unwilling to remove the activation lock, it’s a strong sign that the iPhone is stolen. In that case, not only will you be stuck with a useless device, but there’s also a good chance the original owner can track it. Always ask the seller to confirm that the phone is not locked to someone else’s account before buying an iPhone—and never remove a stolen iPhone from your own Apple Account.
While it’s important to know what to check when buying a refurbished iPhone, the safest option is to go through a trusted seller. There are pros and cons to Apple’s own refurbished store, but overall, I recommend it.
The prices may not be the lowest, but you get a brand-new battery, a full one-year warranty, and the peace of mind that it’s been properly inspected. It’s easily the most reliable way to buy a used iPhone.
ChatGPT has become predictable. Agreeable. Boring. It just kept agreeing with me—even when I’m clearly wrong. Then, by accident, I found an AI that does the exact opposite—and I’m hooked.
I Can’t Stand ChatGPT Calling Me a “Genius”
ChatGPT has unediably been declining. Every time I’d reply with my opinion, ChatGPT would gush back, “You’re absolutely right!” If I caught a mistake in my previous messages, “Brilliant catch! This shows that you really understand your work!” It was cute for the first five seconds. By the hundredth compliment, I was ready to scream.
There’s a reason people constantly try to jailbreak ChatGPT—not to do anything malicious, but to overcome its absurd default instructions.
Honestly, I get why ChatGPT would do this. OpenAI wants customer retention. We’ve moved past the point where LLMs were niche tools; they’re mainstream now. More and more average users—including older people who prefer a friendly, non-confrontational experience—are flocking to them. If ChatGPT keeps praising the average joes as “geniuses” who offer “brilliant perspectives,” they’re more likely to come back.
This strategy works, but not for someone who wants outcomes and not chit-chat. It starts as mildly irritating but quickly becomes a genuine obstacle. When I present a half-baked idea looking for genuine critique, ChatGPT buries any potential criticism under a mountain of false flattery. If it identifies any problems at all, I have to dig through layers of praise just to find them.
Related
How I Stop AI Chatbots From Agreeing With Me All the Time
Constant agreement isn’t intelligence.
Grok Is the Unorthodox Savior
I’m locked into OpenAI’s ecosystem. I’ve talked about this before when ChatGPT went offline for a day, but with all the memory upgrades ChatGPT has received, it knows me very well. I’ve set up projects, customized instructions, created personalized GPTs, and basically done everything possible to tailor it.
Because of these customizations, I haven’t explored other AI options in a long time. I was out with a friend when we decided to test out Grok, and its voice mode immediately impressed me. Beyond content, the speed of response alone blew ChatGPT away.
I’d been so entrenched in ChatGPT that I never tried Grok out for myself. Perhaps Grok isn’t yet as powerful as OpenAI’s GPT models, but unlike ChatGPT, Grok actually lets you use it. After all, an AI is only as good as its prompts and default instructions. If the instructions are terrible, processing power or data volume becomes meaningless.
The Argumentative Persona
When I opened Grok’s voice mode settings, a list of personalities and animated avatars appeared. What immediately drew my attention (aside from a few questionable options) was the Argumentative personality.
I selected it, and then voiced a frustration that was on my mind at the time—something that I had also brought up with ChatGPT, and ChatGPT had validated it.
Amir Bohlooli / MUO
Grok instantly flipped the script. Instead of agreeing and placating, it challenged me head-on. It questioned my perspectives and pushed me to provide evidence. Frankly, it was brutal.
Talking with AI has annoyed or frustrated me, but never had I genuinely felt under attack by an AI. It was psychologically interesting to me how I couldn’t just stop the conversation to save myself. Grok made me feel compelled to defend my ideas rigorously or risk internalizing its harsh criticisms as valid.
The exchange went back and forth relentlessly until I managed to somewhat soften its stance—but even then, I felt roasted. It was a grueling experience, especially because I had started with something personal and meaningful without expecting such intense scrutiny.
I don’t have a premium subscription for Grok, so everything I’ve experienced has been with the free Grok 3 model. I imagine that the premium models are even better.
Voice Mode Done Right
Even more surprising was the effectiveness of Grok’s voice mode. It genuinely felt like the text-based interaction, just delivered verbally—exactly how voice mode should function. In contrast, ChatGPT’s “advanced” voice mode feels severely limited and frustratingly inept. It frequently loses context, ignores instructions, and amplifies all of ChatGPT’s shortcomings tenfold.
This issue likely stems from OpenAI’s recognition that casual or older users prefer pleasant, non-challenging interactions over productive or critical ones. Grok, thankfully, prioritizes effectiveness over pleasantness.
Getting an idea past Grok’s Argumentative persona is an accomplishment. If one of my ideas actually survives the grilling, I know I can take it public—because Grok has already thrown every possible gap, question, and flaw at it. If it holds up there, it’ll hold up anywhere.
ChatGPT doesn’t lie outright—it just coats everything in sickening optimism. Even clearly incorrect ideas are labeled “unique perspectives.” Grok’s argumentative mode is the opposite: it will challenge you even when you’re undeniably right.
Related
ChatGPT Still Can’t Answer These 4 Easy Questions
ChatGPT keeps stumbling over these questions—can you solve them?
Of course, Grok’s criticism isn’t objectively “true.” Remember that it’s an LLM that merely manipulates words. It doesn’t truly think or reason, despite what marketing might suggest.
Grok will challenge you on correct statements and wrong ones alike. It’s relentless by design. Treat its critiques like stress‑tests, not final judgments. Take what lands, discard what doesn’t, then move on.
The software features on Pixel smartphones are one of the best reasons to buy them. However, depending on what you want, there’s a good chance you can get a suite of Pixel-exclusive features running on the Android device you already own.
6
Google Camera Functionality
The crown jewel of Pixel devices is the Google Camera app. While Pixel camera hardware has improved over the years, Google’s expertise lies in the software magic of its camera app. Features like Night Sight, HDR+, and Portrait Mode can work wonders regardless of the physical cameras.
Yadullah Abidi / MakeUseOf
Porting this feature to any other Android device is surprisingly simple. First, you need to check if your device supports the Camera2 API used by the Google Camera app. Do this by downloading and running the Manual Camera Compatibility app from the Play Store. If your phone is compatible, you can then download a modified Google Camera app APK file for your device, and you’re all set.
There’s no universal third-party Google Camera app that’ll work on all phones. Based on your phone’s SoC, Android version, and Camera2 API support, you have to experiment with different APK files to find the one that works best. One of the best collections of GCam APKs is Celso Azevedo’s repository, but there are other sites for safe APK downloads as well.
Related
Sideloading: Why Installing Unofficial Apps May Put You at Risk
Can’t find the app you’re looking for on official app stores? You might be tempted to sideload content. Here’s why you shouldn’t.
Be extremely cautious when installing third-party APKs, though. We’ve covered how to sideload APKs on Android in the past, but depending on your Android version, you may have to enable a few more permissions.
5
Now Playing
Now Playing is another highlight Pixel feature; it identifies music playing around you on your lock screen. This is an extremely handy tool since you don’t have to open an app, and it even works offline.
Similar to GCam, you can get this feature on any Android smartphone by sideloading the Ambient Music Mod on your phone. This is an open-source port of Google’s Now Playing feature, based on the newest version from Pixel devices and the latest music databases. It also offers features like Playing History, Favorites, and Summary Report; you can even control how often the recognition runs.
Yadullah Abidi / MakeUseOf
The installation process, however, is different from simply sideloading an APK file. First, follow these initial setup steps:
Install the Shizuku app from the Play Store. This is an open-source service that allows apps to use system APIs directly with root privileges. It’s also open source; check out the source code on GitHub if you like.
Install the Ambient Music Mod APK file from its official GitHub repository.
Access the Developer Options menu on your phone and enable USB Debugging mode, as well as Wireless Debugging so you don’t need to have your phone plugged in.
Next, inside the Shizuku app:
Select Pairing under Start via Wireless debugging, then tap Developer Options. (Some phones like Xiaomi, OpenPlus, Oppo, and Huawei require additional settings to be enabled, which you can find in Shizuku’s user guide.) You may be prompted to allow Shizuku to show notifications.
Shizuku should send you back to Developer Options. Scroll to find Wireless Debugging, select it, and tap Pair Device with pairing code.
Open your notification drawer and type the pairing code found in the last step.
Go back to the Shizuku app and tap Start under the Pairing button. If it works, a terminal window will appear confirming the connection and close automatically.
Now, open the Ambient Music Mod app:
Go through the basic setup, including selecting the appropriate data and region settings.
Ambient Music Mod should automatically start downloading the Now Playing app. Install it when prompted. Also, grant phone and microphone permissions and disable battery optimizations when prompted.
Go to the app’s settings, then tap Advanced. Enable the Use Alternative Encoding feature. You can leave this disabled, but the mod works more reliably with the feature enabled.
Go back to the app’s main page and configure your lock screen and position settings to adjust how you want to see the “now playing” text. Keep in mind you’ll have to give the app access to accessibility settings.
There are a lot more configuration settings in the Ambient Music Mod app that let you fine-tune battery usage and find a balance that works for you. You can also install new updates to the app from within it. Every time you restart your phone, you’ll need to restart the Shizuku service by repeating the steps under it above.
It’s not the easiest setup process, and having to restart the service every time you reboot your phone is a hassle. Otherwise, the app works great and shares the same music library as a Pixel (updated weekly). That means if a Pixel can detect a piece of music, so can your phone.
4
Magic Eraser
Magic Eraser is a far more handy tool than I first imagined. Since I started using a Pixel, I’ve used it to wipe objects, distractions, and even entire crowds from my photos. And thankfully, porting it to any Android device is simple.
Yadullah Abidi / MakeUseOf
While initially exclusive to Pixel owners, this feature has since become a part of the Google One subscription. Google One members get access to Magic Eraser, an HDR video effect, and exclusive collage styles on both Android and iOS.
If you want the feature without adding yet another subscription, you need a modified Google Photos APK file. First, download the Split APKs Installer (SAI) from the Play Store. Then, follow the Android app uninstall process to uninstall updates from the Google Photos app (since it’s a system app, you can uninstall updates but not the entire app). Following that, install the modified APK using SAI.
The only catch is that updating Google Photos can result in losing this feature, so you’ll likely have to stick with an older version of the app. You can disable automatic app updates for Google Photos to get around this, but subscribing to Google One remains the best way of getting Magic Eraser on any device.
3
Call Screen
Call Screen is a lifesaver that lets you spot and reduce spam calls, or at least get some context before you decide to answer a call from an unknown number. The feature lets Google Assistant answer calls on your behalf and provides transcripts of what callers are saying before you take over.
Yadullah Abidi / MakeUseOf
Unfortunately, there’s no reliable way of porting the exact Pixel version of the feature to any Android, as it requires deep system integration to work properly. You can, however, get similar functionality using the Kontxt Screen Calls & Block Spam app, available on the Play Store.
2
Google Recorder
Google Recorder is one of the best voice recording apps you can use, in my opinion. It provides real-time transcriptions and a powerful search feature. If you frequently record voice notes or analyze conversations, this app can save you a lot of time and effort.
Yadullah Abidi / MakeUseOf
Porting it over to any Android phone that isn’t a Pixel is a simple matter of installing a modified version of the Google Recorder app. That said, finding an APK of the app that works can be tricky. You can try your luck with the latest versions from APKMirror, but you’ll have to do some trial and error to find a version that works for you.
Keep in mind some requirements for the app to run properly. First, you need to be running Android 9 or higher. Second, if your phone manufacturer has made modifications to the TextView component in Android, chances are the app’s transcription features won’t work. There’s no way to tell if the app will work on your device without testing it, so I recommend you give it a shot.
1
Pixel Launcher
Pixel Launcher might look simple at first glance, and that’s its biggest selling point. It offers a clean, minimalist interface coupled with features like At a Glance widgets and integration with Google services. This is as pure as an Android launcher can get, making it perfect if you’re after a vanilla Android experience.
Yadullah Abidi / MakeUseOf
Thankfully, there are plenty of apps that offer rootless ports of the Pixel Launcher and work on most Android devices. You can use the Lawnchair Launcher, which offers additional customization options while retaining authentic Pixel Launcher features and look.
Alternatively, you can download AmirZ’s Rootless Pixel Launcher from the official GitHub repository. I’ve used AmirZ’s Rootless Pixel Launcher in the past to get the Pixel Launcher on my old Motorola phones, but it hasn’t been updated since 2019. You thus might miss out on some of the newer Pixel Launcher features.
Pixel-exclusive features are one of the reasons so many people get these devices. However, with some software wizardry, you can enjoy the best of these features on your current phone. While not always an exact copy, these workarounds keep you free from Google’s hardware ecosystem.
Are the internet speeds on your home Wi-Fi network not meeting your expectations? There is a relatively inexpensive and straightforward solution to this: powerline adapters.
The Problem: Your Wi-Fi Isn’t Fast Enough
Over the years, Wi-Fi speeds have significantly improved as newer standards, such as Wi-Fi 6 (and now Wi-Fi 7), have been implemented, and internet service providers (ISPs) have increased the speeds from the source. And yet, there are still issues inherent to all Wi-Fi connections.
Wi-Fi signals are susceptible to interference from other wireless devices and physical obstructions, such as walls and furniture. They can also be negatively affected by nearby Wi-Fi networks in densely populated areas. Further, Wi-Fi signals to specific devices are also heavily influenced by the location of the equipment. This, in turn, can lead to “Wi-Fi dead zones” with poor connectivity.
Gavin Phillips/MakeUseOf
Wi-Fi networks also suffer from higher latency compared to physically connected networks, such as Ethernet, which can lower real-time responsiveness. This is why online video gaming and video conferencing are sometimes met with ever-so-slight delays.
Two ways homeowners have attempted to resolve these issues are by adding Wi-Fi extenders or Wi-Fi mesh systems to their network. The former acts as a signal booster, taking your existing Wi-Fi signal and rebroadcasting it. In doing so, end users can choose from a list of separate Wi-Fi networks in your home to find the one with the strongest signal. Finding which one is strongest, unfortunately, can be a tedious process that may confuse less tech-savvy users.
Mesh networks are newer than Wi-Fi extenders and provide a much better experience. Here, you would connect tiny boxes to your Wi-Fi network to create a single, unified Wi-Fi network. In this case, your devices will seamlessly roam and connect to the strongest box on the network.
The biggest drawback to both Wi-Fi extenders and mesh systems is that each involves purchasing new equipment, some of which is on the pricey side.
Solve Your Slow Wi-Fi Woes With Powerline Adapters
If you’re on a tight budget, consider powerline adapters as an alternative solution for enhanced device connectivity. These devices expand your internet reach through your home’s existing electrical wiring system. Data from your Wi-Fi router is transformed into high-frequency radio signals, which power through standard alternating current electrical cables.
From there, a second powerline adapter, located in a different outlet, receives the high-frequency signal and converts it into digital data, establishing a connection between your device and the second adapter using an Ethernet cable.
The adapters function at their peak when placed on the same electrical circuit and should be directly connected to wall outlets to minimize interference from other electrical devices. By design, powerline adapters provide better stability and potentially faster speeds than Wi-Fi extenders in locations with weak wireless signals. Additionally, the devices enable more secure data transmission through encryption while also providing simple plug-and-play installation.
Related
What Are Powerline Adapters? 9 Things You Need to Know
Powerline adapters turn electrical outlets into Ethernet network points. Here’s what you should know before using them at home.
Lower Cost
If you need to upgrade your internet speeds on specific devices but don’t want to splash out on an expensive mesh network, I strongly suggest checking out powerline adapters. Where a full mesh Wi-Fi setup may cost hundreds of dollars for full coverage (depending on your square footage), powerline adapters get the job done at a fraction of the price.
Powerline adapters typically range in price from $30 to over $100 per pair, with the price largely determined by the brand, speed, and features. For example, the TP-Link AV1000 Kit can deliver gigabit Ethernet around your home, and works straight out of the box. I suddenly had gigabit Ethernet at my computer for less than 50 bucks—problem solved!
I didn’t go this far, but you can also buy powerline adapters that work as Wi-Fi repeaters, like the TP-Link Powerline Wi-Fi 6 Extender TL-WPA7817 kit. As said, this wasn’t required for me, but these Wi-Fi-enabled versions can be useful for bringing both Wi-Fi and Ethernet to specific devices and areas of your home.
Ease of Installation
Installing a powerline adapter is straightforward. The key is to make sure each unit is plugged directly into a wall outlet. As such, avoid using power strips or extension cords since they can interfere with the signal. The powerline adapter will most likely work if you need to use a power strip; however, you may experience slower internet speeds as a result.
Andy Cormier / MakeUseOf
The first device should be connected to your home’s router via an Ethernet cable. For the second adapter, plug it into a wall outlet in the room where you want to extend your network, again, avoiding power strips. From there, connect an Ethernet cable from this second adapter to your device, such as a computer, smart TV, or gaming console.
Once both adapters are connected to your router and a device, pairing should be automatic. Many devices, however, have an additional layer of security, where you need to press a button on each unit to initiate the process. Be sure to follow the manufacturer’s instructions for the units you purchase.
Improve Speed and Stability
In my home, I connected my PlayStation 5 and LG smart TV to my TP-Link powerline adapter. I also used the adapter with my MacBook Pro (connected to a hub) when working in my home office. My rough estimate is that I was able to increase the speed of my network for these connected devices by about 15%. Latency also appeared to improve ever-so-slightly, especially on my gaming console.
Where I saw the biggest change was in network stability. Before adding the powerline adapters, I believed that every occasional network hiccup was due to an issue at the ISP, rather than one that was network-based. The powerline adapters eliminated all of those problems. This was the biggest surprise experienced during this exercise.
Are Powerline Adapters Secure?
One of the biggest drawbacks of Wi-Fi networks is the increased chance (versus wired solutions) of outside hacking. This is largely eliminated with powerline adapters, as they utilize your home’s electrical wiring to create an automatic network boundary. Additionally, most of today’s powerline adapters also feature 128-bit AES (Advanced Encryption Standard) to provide secure data transmission. This encryption method scrambles your data before it’s sent and requires a decryption key (on the other side) for the data to be read.
And then there’s that security button mentioned above. This button, commonly found on modern powerline adapters, serves as a pairing feature that, when pressed, establishes a secure connection. As such, the network remains secure because unauthorized devices require your direct permission to connect.
Powerline Adapters Can’t Replace Wi-Fi—but They’re Such Good Value
I’m thrilled with the improvements my powerline adapters brought to my network, as is my teenage daughter, who seems to like console gaming again now. However, these adapters in no way have eliminated my Wi-Fi network. My devices, such as iPhones, iPads, and smart home devices like light switches, still need to connect remotely through the Wi-Fi network, where general issues remain.
Did adding some of my devices to the powerline adapters improve the Wi-Fi connection for the other ones? I tried to test this, but honestly, I couldn’t detect any significant change either way.
Nonetheless, it was well worth spending $50 to improve the internet connection for some of my devices, even in small ways. And for that, I’m grateful. There’s no denying that this is a simple plug-and-play networking solution, which would benefit those who lack the time or desire to learn something more technical. And what’s not to love about the price? Most folks can bring powerline adapters into their homes for under $100. That’s an excellent deal, especially when you compare it to other solutions.
Windows File Explorer does the job, but just barely. No quick previews, clunky cloud access, and tedious bulk operations mean daily file management is harder than it needs to be. These free add-ons fix that.
6
Listary
I have tried numerous File Explorer search hacks over the past decade, but they’ve still been disappointing for as long as I can remember. This is why I’ve relied on Everything Search for years; nothing beats its lightning-fast file searches.
But Listary has recently won me over because it does something that Everything can’t: it integrates directly into File Explorer and every dialog box in Windows. So instead of navigating to a directory, you can simply type the file or folder name and then jump directly to it.
While Everything is still my go-to for pure file searching, Listary brings that same instant search everywhere I work. Press Ctrl twice, and Listary’s quick launcher (search bar) appears. Just type a few letters of any file name, and it shows results instantly—almost as fast as Everything.
What really sold me is the quick switch feature. When I’m in a Save As dialog and need to jump to a different folder, I type its name and Listary takes me there immediately. The app also remembers my recent folders and files, making it easy to jump back to folders you frequently access.
The fuzzy search is another nifty trick up Listary’s sleeve. I can type budgt instead of budget or 2024rep to find 2024_annual_report and Listary figures out what I mean. The app also doubles as a launcher. You can type calc to open Calculator, or run command-line tools without opening a terminal.
While Listary handles search, copying large files on Windows is still a headache. The progress bar is unreliable, transfers randomly fail, and while Windows does have a pause button, it doesn’t always work as expected. The pause isn’t immediate, and if your system crashes or restarts, you can’t resume where you left off.
TeraCopy replaces the default copy handler with a more advanced file transfer utility. Whenever I move or copy files on Windows, TeraCopy automatically manages the process, displaying real transfer speeds and accurate time estimates. I can easily pause transfers if I need to free up bandwidth for other tasks.
Where TeraCopy also excels is error recovery. If a file fails to copy, TeraCopy doesn’t stop the entire operation—it skips the problematic file and continues with the rest. Additionally, it can automatically verify files after each transfer to make sure nothing was missed or corrupted during the copy process.
Related
The Easiest Ways to Find Large Files on Windows
Don’t let large files eat up your PC storage!
TeraCopy is free for personal use, but for business use, you’ll need a TeraCopy Pro license. The Pro version offers extra features like secure file deletion, editing file lists, and exporting reports.
I work with cloud storage every day to manage article drafts, code repositories, and research files. But constantly switching between browser tabs and syncing whole folders takes time and clutters my device. Mountain Duck solves this by making cloud drives appear as regular storage drives in File Explorer.
Once I connect my Google Drive, Dropbox, and OneDrive accounts, they show up in File Explorer just like my computer’s system drive. I can drag files directly into cloud folders, edit documents without downloading them first, and search across all my cloud storage at once. The app only downloads files when I open them, so they don’t take up space on my computer until I need them.
Mountain Duck works with almost all the best cloud storage services—not just the popular ones like Google Drive, but also FTP servers, WebDAV, and dozens of other technical storage options like Wasabi and Backblaze. The app includes pre-set templates for these services, so you don’t need to figure out complicated server details yourself.
Mountain Duck is a paid app, but it offers a 14-day free trial so you can test all its features before buying. If you use multiple cloud services or need to connect to specialized storage systems, this tool makes everything work together like one big storage drive on your computer.
If you consistently download research PDFs, client drafts, images, or code samples to your Downloads, that folder becomes a mess in no time. While you could manage these files manually by moving them to appropriate folders, nobody does that, especially when dealing with dozens of files daily.
DropIt is one of my favorite Windows automation utilities, even though it hasn’t been updated in some time. It takes the hassle out of file management by monitoring folders and moving files based on rules you set. For example, I have DropIt keep an eye on my Downloads folder. When I download a PDF, it automatically moves it to my Documents folder. Images are sent to Pictures and sorted by date, while installer files are deleted after 30 days.
Setting up rules is simple: just choose which files to watch for—by type, name, or size—and decide what should happen to them. DropIt can move, copy, compress, rename, or even upload files to cloud storage. Once it’s set up, it runs quietly in the background, keeping your folders organized without you having to lift a finger.
Windows File Explorer’s Preview Pane is a convenient way to view images and text files in the right pane without opening them first. However, its support is limited to basic image formats, plain text, and some Office documents (with inconsistent results). Quick Look is a free utility that allows you to preview any file by pressing the spacebar and close it by pressing Esc.
Whether it’s a PDF, image, video, or even a ZIP file, Quick Look shows the contents instantly. I can flip through multi-page documents, play videos, and even browse folders without opening them. For someone who deals with dozens of files daily, this allows me to browse through files without dealing with multiple apps and their loading times.
You can further extend its capabilities using QuickLook plugins. I’ve added support for markdown and Office 365 files, code syntax highlighting, and even 3D models. It’s become so essential that using File Explorer without it feels broken. It should be built into Windows.
Bulk Rename Utility handles complex file renaming tasks that File Explorer can’t manage. While File Explorer only adds basic sequential numbers when mass-renaming, this tool can rename multiple files and even an entire folder using advanced patterns and rules.
Bulk Rename Utility offers plenty of options to rename files using date, metadata, changing letter case, inserting text at specific positions, updating extensions, or using regular expressions. You can extract EXIF data from photos or ID3 tags from music files to create meaningful names based on actual file content. The live preview shows exactly how each file will look before applying changes, so you know what to expect.
I save frequently used patterns as templates for instant reuse. It integrates with File Explorer’s right-click menu and offers a portable version if you prefer to run the tool from a USB drive.
Bulk Rename Utility is free for personal home use. If you plan to use it in a commercial setup, you’ll need to purchase a license.
These are just a few tools that solve my biggest gripes with Windows File Explorer. They’ve become such an essential part of my workflow that I install them on every new Windows machine I set up. And aside from Mountain Duck, they all offer a free version.
I was growing tired of algorithm-fed playlists serving up the same old sounds. Then I discovered Bandcamp, which offers a welcome retreat for music lovers seeking originality, variety, and discovery far beyond the mainstream echo chamber. Now I’m hooked!
Discover Music You Won’t Hear Elsewhere
Don’t get me wrong, I love Spotify, and having over 100 million tracks at my fingertips is great. However, I do have one major gripe, and that is with its curated playlists. In fact, I have found that every mainstream platform I have trialled—whether it’s Spotify, Apple Music, Qobuz, or Amazon Music—primarily pushes content from major labels and heavily curated “safe bets” when it comes to music discovery.
Bandcamp’s catalog is refreshingly unfiltered, as anyone can upload their music, and artists have total control over how their music is presented and sold. This means that I am introduced to music that sits well outside the commercial comfort zone, as the platform isn’t beholden to algorithms or label politics.
Since discovering Bandcamp, I have not only gotten to know great artists and bands like Samara Joy and Wet Leg, but I have also come across entire genres that are new to me, such as reggaeton, as well as cool remixers like Munick Disko.
Bandcamp Supports Artists Better
As a one-time working musician (and current dedicated bedroom guitarist), I like to see artists treated well. It’s well-documented that musicians are poorly compensated by streaming platforms, even though physical media manufacturing doesn’t eat into production costs. This means that creators are finding it increasingly difficult to sustain themselves, and with less talent flooding the market, everyone loses out.
Bandcamp, on the other hand, has an artist-first business model, which allows musicians to sell their music and merchandise directly to the public, earning on average 82% of each sale. A total of over $1.5 billion has been paid to musicians by the platform. Additionally, once a month is Bandcamp Friday, when every cent of sales goes directly to the artist!
This direct connection between the consumer and the artist makes every purchase more meaningful, and I am happier knowing that a major corporation isn’t taking the lion’s share of my hard-earned cash.
While it’s true that not all content I have seen on Bandcamp passes muster when it comes to quality control, this is a symptom of the platform’s thriving ecosystem, and you sometimes have to separate the wheat from the chaff, so to speak.
However, the Bandcamp Daily editorial team does a fine job of finding the best that the platform has to offer, with in-depth features, artist spotlights, and genre deep-dives that suggest that they are well-versed in music journalism, with a keen sense of what people want to listen to.
I also find the Bandcamp lists to be very helpful when discovering new genres, and these are comprehensive and thoughtfully presented. This type of music discovery feels more like a conversation than a sales pitch, and it has opened my eyes (and ears) to a whole world of new sounds.
Why Bandcamp Is Needed Now More Than Ever
Like many modern industries, the music industry of today is becoming increasingly centralized. A few major players (such as Universal Music Group, Sony Music Entertainment, and Warner Music Group) have significant control over how music is promoted and consumed. For independent artists, the need for alternative streaming solutions has never been greater.
Convenience always comes at a price, and the homogenization of streaming services has very real consequences. Algorithms promote songs that sound like the last big hit. Music starts to sound increasingly formulaic and familiar. It is more difficult for musicians to break into the market, despite widespread access to music creation tools. On top of this, the spectre of AI looms large, having already made a significant impact on music streaming playlists.
Bandcamp reverses this trend, providing a decentralized alternative to music discovery at a time when algorithms and market forces are stifling creativity. For me, it feels like a breath of fresh air and a safe haven where I don’t feel like I’m being sold to.
Bandcamp Is All About Music, Not Algorithms
One of the things that I like most about Bandcamp is the community that it has fostered. Musicians are more than just content providers; they are shop owners with their own storefronts, profiles, and promotional tools. In turn, fans can show their support by publicly sharing, collecting, and recommending their favorite artists and tracks.
The Bandcamp ecosystem appears to be built on mutual respect and appreciation, allowing musicians to connect directly with their fans. In this way, everyone feels valued, and the platform chooses not to exploit but to nurture this unique dynamic between the artist and the consumer.
In an era when music often feels like a product rather than an art form, Bandcamp stands out as a platform where originality, international appeal, and collaboration take precedence. So next time your music streaming recommendations feel flat and colorless, give Bandcamp a try. You might find it just as inspiring as I do.
Short URLs are handy for cleaning up long links, but they also hide the true destination. If you want to avoid malware or a phishing scam, blindly clicking that link isn’t your best bet—there are better and safer options!
Why Short URLs Are a Security Nightmare
The biggest problem with short URLs is simple: you can’t see the destination. That clean, tidy link from a service like Bitly or TinyURL completely masks the actual web address you’re about to visit. It’s a total blind spot in your online safety, leaving you to trust the sender completely.
Attackers love this lack of transparency. They can hide a malicious domain behind a trusted shortener for phishing scams. These are the kinds of email habits hackers use against you—luring you with a link that looks clean but leads to a fake login page designed to steal your credentials.
A single click could also trigger a drive-by download, where malware is automatically installed on your device. You wouldn’t even need to click anything on the malicious page itself. This makes it important to know how to check if a downloaded file is safe before it’s too late.
Even worse, scammers can customize short links to look more legitimate (e.g., Bit.ly/courier-tracking-update). This social engineering tactic preys on your trust and urgency. The very convenience that makes short URLs popular is what makes them a security nightmare—they encourage you to click first and think later.
How to Open Short URLs Safely
You don’t have to play Russian roulette with every short link you see. With the right approach, you can unmask these URLs and check their destination before you even think about clicking. It’s a two-step process: first, expand, then scan.
Expand the URL Without Clicking It
Instead of clicking blindly, take a moment to reveal the link’s true destination. The best way to do this is with a URL expander—a simple web tool that shows you the full address.
Just copy the short link and paste it into a site like Unshorten.it or CheckShortURL. These services follow the redirect for you and display the final URL. It’s a quick, easy step that takes the guesswork out of clicking.
Some URL shorteners offer built-in ways to peek at the destination without clicking. For Bitly links, simply tack on a “+” plus symbol at the end of the URL to see where it leads. TinyURL lets you add “preview.” before their shortened link to get a safety preview page. These quick tricks work directly in your browser without needing any third-party tools.
Once the full URL is visible, scrutinize it. Does the domain name look right? A link supposedly for a package delivery shouldn’t lead to a strange, unrelated website. Look for obviously fake domains that mimic real ones, a classic tactic in phishing scams.
Also, check for suspicious file extensions at the end of the URL, like .exe or .zip. A link that immediately tries to download a file is a massive red flag.
Run a Quick Virus Scan
Even if the expanded URL looks legitimate, it’s worth getting a second opinion. The site itself could be compromised. This is where online security scanners come in; they analyze the destination page for known threats.
Related
The 6 Best Free Online Virus Scan and Removal Sites
Need to check for a computer virus but don’t have antivirus software installed? Try these excellent online virus-scanning tools.
Services like VirusTotal and URLVoid are perfect for this. Paste the full, expanded URL into their search bar, and they’ll check it against dozens of antivirus engines and blocklists. The report will tell you if any security vendors have flagged the site as malicious. This process gives you a comprehensive threat assessment in seconds.
After a while, you develop a sixth sense for sketchy links. It’s less about technical analysis and more about pattern recognition because certain things just scream “danger” before you even copy the link to expand it.
The biggest red flag is a lack of context. A short link sent out of the blue from a friend or in a random email is instantly suspicious. If the message is just the link and nothing else—or something generic like “Check this out!”—I assume it’s malicious until proven otherwise.
Multiple redirects are also a major red flag. When you expand a short URL and see it bounce through several different domains before reaching the final destination, that’s suspicious. Legitimate websites rarely need more than one redirect.
URLs with weird query parameters should make you pause. If the expanded link shows something like “?ref=mal123” or contains random strings of characters after question marks, it’s likely tracking your click or worse.
Links to file-sharing sites hosting executables are particularly dangerous. If a short link leads to Dropbox, Google Drive, or similar services offering .exe, .zip, or .bat files, assume it’s malware. But if you’ve already downloaded something suspicious, there are fixes you can try before doing a factory reset.
Related
Don’t Tap That Notification—This Is How Malware Sneaks Onto Smartphones
Malware isn’t just for computers; protect your phone by understanding the biggest threats.
Scammers thrive on urgency. Any message that demands immediate action and provides a short link is a classic phishing attempt. Your bank, ISP, or any legitimate service will never text you a generic bit.ly link to unlock your account or verify a payment. It just doesn’t happen.
While many people use the link shortening tools for legitimate reasons, be wary of generic shorteners from official sources. A real company will almost always use its own branded domain for links. A tinyurl link in an email supposedly from Microsoft is a dead giveaway that something is wrong.
Habit tracking felt like a chore until I tried a simple paper-based system that breaks goals into two-week cycles. Now, slip-ups feel normal instead of fatal, and for once, I’m actually sticking with it.
My Failed Attempts With Habit Apps
I find that installing every shiny new habit app is in itself a bad habit. None of them quite worked for me in the long term. Each promised streaks and badges, as well as gamified systems. I even tried a variety of strict habit-tracking apps to keep me committed. Sometimes, those endless streak counters felt like a ticking time bomb.
One missed day erased my progress and sapped my motivation. Logging every detail felt like busywork. I let the tools become more important than the tasks.
Worst of all, most apps hide the reasons I slipped. Without context, I never learned from my mistakes. I ended up frustrated and stopped tracking altogether.
Related
Your Productivity Tools Don’t Matter Without a Strong System: Here’s Why
All the tools in the world won’t help if your system isn’t solid.
The Low-Tech Method That Finally Worked
I felt relieved when I discovered a one-year-old YouTube video. It describes a simple habit-tracking method—what I’ll call Thomas Frank’s Martin System in honor of the creator. Now, it’s helping me piggyback on my already established journaling habit to keep track of my tasks.
I’ll walk you through how I use this system now, but you can also find the original video linked in the final section below.
Setting Up: Notebook, Grid, and Symbols
The habit tracker uses just a notebook, a pen, and two-week cycles. Instead of chasing an endless streak, you commit for 14 days at a time. That short window feels doable.
At the start of each cycle, you pick two to four habits that matter most—say, a daily walk, reading, or going to bed on time. In your notebook, draw a table. Then, write days 1–15 (or any other block of dates) across the top and list each habit down the side.
Draw a grid of squares below each habit, each corresponding to the dates you want to do them on.
As not all habits are daily, note the frequency too. For instance: daily, weekdays only, or specific days. Separate the blocks accordingly to use as a visual cue for the frequency.
Saikat Basu/MakeUseOf
Every evening, I record one of three symbols:
“+” for success
“–” when I could have done better
“O” when life got in the way
I jot a quick note under any – or O. For example, “Stuck at work” or “Felt tired.” Those notes help me spot patterns instead of feeling guilty. I mark a grid square with a hyphen ( – ) when I at least show up, even if it’s for 5 minutes. That might be when instead of writing a full blog post, I managed to write just 100 words.
Making Failure Useful
Create a dedicated section for failure notes where you can record the date and reason for any failures. I placed mine on the other side, so my “failures” are hidden from view.
Saikat Basu/MakeUseOf
At the end of each cycle, use a cycle review section to reflect on what worked, what didn’t, and what to change for the next cycle.
On day 16, I spend five minutes jotting my thoughts on this page. I ask: Which habits stuck? What held me back? Then I tweak my plan for the next two weeks.
Saikat Basu/MakeUseOf
If a habit feels too hard, I lower its frequency or adjust its timing; if it flows easily, I consider adding a small new goal.
This daily marking fires my brain’s reward circuits and teaches it where to adjust. The short cycles of two weeks keep my discipline on an even keel.
This High-Tech Method Can Also Work
You can replicate the two-week grid in any note-taking app like Notion or Apple Notes.
In Notion, create a table with days 1–15 as columns and your habits as rows. Add a Status property that you update each evening with +, –, or O, and include a Notes column for quick failure reasons. Use filters or views to spotlight incomplete habits or visualize streaks with simple color tags.
In Apple Notes, draw a basic table or use checklists grouped into two sections (days 1–15 and 16–end). Tap or type your symbols in each cell and add a line or two underneath any – or O.
At the end of the cycle, scroll back to review your entries, tally wins, and spot patterns. This digital twist keeps your system portable and backed up.
How to Get Started Today
In his YouTube video “A Better Way to Track Your Habits“, Thomas Frank suggests starting with a two-week cycle. This period can work like a “prototype,” helping you recalibrate if you need to tweak your habits and routines.
Grab a simple notebook and a pen you enjoy writing with. Pick two to four clear, specific habits, like “walk 20 minutes,” “read one chapter,” or “go to bed by 10 PM”, avoiding vague goals.
I use a spiral notebook and keep it standing on my desk. The tracker is always in my eyeline and works like a reminder.
Saikat Basu/MakeUseOf
Optionally, share a snapshot of your filled grid with a friend or on social media for extra motivation. Finally, reward yourself for finishing a cycle. Small treats or moments of rest reinforce the habit loop and keep you moving forward.
By working in bite-sized bursts, you dodge the guilt of endless streaks. You learn from slips instead of punishing yourself. And you keep motivation fresh by resetting every two weeks. Grab your notebook and start your first cycle today. You’ll be surprised how small, focused efforts lead to big changes.
Getting your phone stolen is one of the most frustrating experiences you can have. And while you may not be able to get your old device back, there are ways to recover your data.
4
Secure Your Phone
The first action to take when you realize your phone is gone is to secure it. Google’s Find Hub has a Secure device feature that locks your phone with its PIN, pattern, or password, signs you out of your Google account, and deletes any payment cards stored in Google Wallet—but still lets you locate the device.
There’s also a Remote Lock option that lets you add a unique password to your device to lock it remotely. This also gives you the option to leave a phone number and message on your device’s screen.
Keep in mind that Remote Lock needs to be enabled on your phone, and your device must be online. If it isn’t, the screen will automatically lock once it’s online. This is also a fairly new feature and will likely not be present on older versions of Android. If you’re not using a relatively modern phone that has received Android updates to add anti-theft protection, you’re probably out of luck.
That said, the Find Hub can still factory reset your device for you. There’s a catch, though—you won’t be able to track your phone once it’s reset. Google’s Find Hub (formerly Find My) is getting a lot better with upcoming Android features, but some of these features are already available, and you should enable them if possible.
3
Start Updating Your Credentials ASAP
The next step to take after your phone is stolen is to start updating all your credentials. If you’ve properly locked down your phone against theft, your data should be relatively protected, but it’s always a good idea to update your passwords out of caution.
This will be tricky, especially if you’re using 2FA apps like Google or Microsoft Authenticator. I started by making a list of all the accounts logged into various apps and websites on my phone, in order of importance. It’s best if you update your Google account (or Apple if you lost an iPhone) first, as that’s the most accessible account on an Android smartphone.
Jowi Morales / MakeUseOf
Next should be your banking credentials. If you added your cards to a wallet app on your smartphone, I’d recommend canceling the old cards and getting new ones from the bank. I keep relatively little payment information on my phone, so resetting my bank account’s online password was enough.
Then come your other important credentials, especially any work-related emails or apps you might be using on your phone. Make sure you sign out of all active sessions as you update your passwords, as that’ll force any app or website that was previously logged into your account to ask for the new password before letting anyone in.
When you enable 2FA, you’ll receive some backup codes that you can use to log in and change important account security settings. If you have access to these keys, life will be a lot easier as you won’t have to jump through hoops trying to disable 2FA on your account before gaining access to it. If not, depending on the account you’re trying to reset, it can be a troublesome process to regain access. This is why many of the best 2FA apps let you sign in on your desktop or multiple devices, so losing your phone doesn’t completely remove access.
Note that this might break functionality on some accounts, meaning you’ll likely have to reach out to support to get your accounts back. I still can’t log into LinkedIn on my new phone, despite resetting my password and disabling 2FA from my PC.
2
Check Your Backups
Most apps do a pretty good job of backing up your data, even if you haven’t messed with the options. Your contacts are automatically synced to your Google account, so you’re covered there. Depending on your SMS app, you may or may not be able to recover your messages. Internet-based messaging apps like WhatsApp also save backups on your Google Drive.
I use Google Photos as my main gallery app, which automatically backs up photos and videos from select folders when you’re connected to Wi-Fi. Most of my photos, except for those from the day my phone was stolen, were recovered thanks to Google Photos backups.
Related
Where Are Google Photos Stored and How Do You Find Them?
Looking for old photos you’ve taken? They may still be accessible online in Google Photos.
Apart from that, most apps you use daily, especially social media apps like Instagram or Reddit, are synced with their servers. As long as you’re able to log into your accounts, you shouldn’t see any major data loss there either.
That said, I would highly recommend getting your hands on a new device as soon as possible, so you can start to recover your data from any backups available. In case the thief gains access to any of your accounts before you’ve had the chance to change your passwords, you could lose access to your cloud backups—and by extension, any data that would have been recoverable in such situations.
1
You Can’t Save Everything
While you can save a lot of the data on your stolen phone, you can’t protect everything. Most of what you can recover will depend on whether you had automatic cloud backups enabled on your device. Files, photos, and any other data stored on your phone that haven’t been backed up can’t be saved.
Yadullah Abidi / MakeUseOf
For example, when my Pixel 7a was stolen, I had no way of recovering local documents, several APK files, and photos that Google Photos hadn’t backed up at the time of the theft. If something is only stored locally on your device, it’s gone for good when you lose that device.
Related
The Next Time You Lose Your Android Phone, It Will Be Easier to Recover
Your Android phone will lock itself to oblivion rather than be reset.
Having your phone stolen is an incredibly frustrating experience and one that I hope none of you go through. There are plenty of ways thieves can stop you from tracking your device, but there’s still a good chance you can lock it remotely. That lets you prevent your data from falling into the wrong hands and gives you a chance to recover it on your new phone.
Google Sheets can do a lot—but with Apps Script, it does everything. I’d been using Sheets for years without touching this feature. Once I did, I started automating the chores I didn’t even realize were slowing me down.
Automating Boring Tasks
If you’re tired of repeating the same task over and over again in Google Sheets, whether it’s inserting a date, cleaning up text, applying formatting, or exporting data, Apps Script can help you automate that.
For instance, you can easily insert the current date in Google Sheets by pressing Ctrl + ; on Windows or Cmd + ; on Mac. But if you need it to be in a particular format like yyyy-MM-dd, you must use a formula or do some manual formatting. With Apps Script, you can create a function that gets the current date, formats it as desired, and then inserts it into the selected cells.
You only need to do this once, and you can reuse it wherever you need it. Here is an example of what the script would look like:
functioninsertCurrentDate() { var sheet = SpreadsheetApp.getActiveSpreadsheet().getActiveSheet(); var selectedCell = sheet.getActiveCell(); var currentDate = newDate(); var formattedDate = Utilities.formatDate(currentDate, Session.getScriptTimeZone(),'yyyy-MM-dd'); selectedCell.setValue(formattedDate); }
If you are following along, I will show you how to run the above code from within a spreadsheet in the next section.
Create Customized Spreadsheets
One way Apps Script helps you customize your spreadsheet is by letting you create specialized tools that streamline your workflow. For instance, you can insert a button that applies formatting or performs advanced calculations, or create dashboards that help you to easily analyze your data. These capabilities are far beyond anything Google Sheets can do on its own.
Continuing with our example from the previous section, we can add a custom menu item that allows us to run the function from within the spreadsheet. Here is the script that does that (insert above the function in the previous section):
functiononOpen(){ var ui = SpreadsheetApp.getUi(); ui.createMenu('My Menu').addItem('InsertCurrentDate', 'insertCurrentDate').addToUi(); }
Once you run this code in Apps Script and refresh Google Sheets, you will see My Menu appear in the top menu. Now, you can insert the current date in a selected cell by clicking My Menu > Insert Current Date.
Perform Specific Calculations Through Custom Functions
Google Sheets doesn’t always have the functions you need to perform specific calculations. In cases like these, creating your own function using Apps Script, inserting the calculation into it, and using it within the sheet (just like you would any other) is the way to go. This also means that you don’t have to repeat the complex calculations throughout the script, making your spreadsheet cleaner and more readable.
Related
30+ Essential Google Sheets Functions
Manipulate your Google Sheets data and simplify processes with these handy functions, available in a free downloadable cheat sheet.
Consider the function below that accepts a date and checks how many days have passed since the current day (similarly to calculating the difference between two dates) to determine the due date:
functionCHECKDUEDATE(inputDate) { var today = newDate(); var timeDiff = today - inputDate; var daysDiff = Math.floor(timeDiff / (1000 * 60 * 60 * 24));
Depending on the date entered, it says if it’s overdue, if the days difference is less than zero, how many days are left if greater than zero, or due that day if equal to zero.
The best part of Apps Script is that you can create a time-based trigger that runs the function at a specific time (e.g., midnight) to dynamically update the due date. It can even be used for conditional formatting—the possibilities are many.
You Can Use Apps Script with Other Google Services
Apps Script allows you to integrate your spreadsheets with other Google services, including Gmail, Google Drive, and Google Docs. This capability enables you to build comprehensive workflows that span multiple tools in the Google ecosystem.
Here is an example script that extracts the body text from a Google Docs document and inserts it into cell A1:
functiongetBodyTextFromGoogleDoc() { const doc = DocumentApp.openById("insert Google Docs ID here"); const bodyText = doc.getBody().getText();
Be sure to replace insert Google Docs ID here in the second line with the ID of the Google Docs document you want to get the body text from (don’t remove the parentheses).
Apps Script Is Not That Hard to Learn
If you have some basic programming knowledge, Apps Script is particularly easy to learn. This is especially true if you’re familiar with JavaScript, as that is the primary language used by the platform. You can start slowly with simple automations and tasks (basic calculations and sending an email), and build up from there.
Even if you’ve never written code in your life, Apps Script can be a great way to learn. Since you’ll mainly be using it to automate tasks in Google Sheets, you will see results instantly, which is a great motivator. With that said, you still need to learn basic programming concepts (e.g., variables, loops, and functions)—Google has great tutorials, and Apps Script has a supportive community behind it to assist you.
Furthermore, there is no need for a complicated setup, as it runs in the cloud. You don’t need additional software or libraries.
Related
These Free Websites Taught Me More Than Any Paid Course Ever Did
Paid doesn’t mean better.
Apps Script is just one of the many Google Docs features that you’re missing out on and worth a try. The cool thing about Apps Script is that you can also use it in other Google Workspace apps like Docs and Slides. For instance, I created a simple text case converter in Google Docs since it doesn’t have that functionality built-in.
After using an iPhone as my daily driver for years, I decided to switch to a Samsung phone for my next upgrade. And while I’ve been enjoying the experience for the most part, there are still a few bits that fall short.
4
App Quality Is Much Better on iOS
Ruby Helyer / MakeUseOf
The first difference I noticed after switching to a Samsung phone is that so many mainstream apps feel a little worse on Android. What surprised me most is that this even includes Google’s own apps. You’d think Android would be the most stable platform to use, say, YouTube, but I’ve run into random bugs like picture-in-picture breaking or playback controls freezing up. These are issues I never saw on my iPhone.
Social media apps are an even bigger letdown. At almost every launch, Samsung makes it a point to highlight partnerships with social media companies to improve camera performance inside apps like Instagram and Snapchat. But the results are still shockingly bad. The in-app camera on Instagram still looks considerably worse than the native one, and compared to my old iPhone, it’s not even close. It’s still a noisy, low-quality mess, so I find myself using the stock camera app more than I should have to.
Even when it comes to gaming, iOS holds an edge. A lot of the more demanding titles, like Genshin Impact, run at higher graphics settings and better resolution by default on iPhones. They even do so while maintaining better frame rates.
3
iPhones Actually Get Software Updates on Time
Justin Duino / MakeUseOf
This isn’t something I’d say about every Android brand, but Samsung is easily one of the worst when it comes to delivering timely software updates. There are several exciting features in OneUI 7 that I love, but the rollout was a mess.
For context, Android 15 officially launched for Google Pixel phones in October 2024. I didn’t get the Android 15-based OneUI 7 update on my Galaxy S24 Ultra until June 2025. That’s eight months later. By the time the update landed on my phone, Google had already started testing the Android 16 beta.
Related
6 Built-in Apps I Actually Use On My Samsung Device
Some built-in apps aren’t just bloatware.
I’m not expecting Samsung to deliver instant updates to every single A-series phone or older budget devices, but this is the Galaxy S24 Ultra we’re talking about: a flagship phone that’s a little over a year old. Despite that, the update was still delayed by months. After all the hype about Samsung promising seven years of updates, fumbling this badly in the first cycle feels off.
I knew exactly what I was missing out on during those months, and being left behind like that made me appreciate how straightforward the update situation was on my iPhone. When Apple pushes out a new iOS version, every supported device gets it on the same day.
2
The Apple Ecosystem Is Better
Zarif Ali / MakeUseOf
Samsung has done a decent job building out its ecosystem; it has its own version of AirDrop, seamless device syncing, and integration across laptops, tablets, and wearables. On paper, it checks all the boxes. But in practice, it still feels clunky and inconsistent.
For example, you can use Quick Share to share files wirelessly; when it works, it’s faster than AirDrop in my experience. But that “when” is doing a lot of heavy lifting. More often than not, it refuses to work. I’ve had so many moments where I gave up and grabbed a cable instead—because somehow in 2025, that’s still the fastest and most reliable way to move files.
Even the Galaxy Buds, which should connect instantly to my phone, sometimes don’t. I’ve had to manually dig into the Bluetooth settings more than once just to get them paired. That’s something I never had to think about with my AirPods on an iPhone.
When it comes to tablets, Samsung’s ecosystem hits another wall. Android tablets have definitely improved, but tablet apps are still wildly hit or miss. Some apps scale properly, while others look like stretched-out phone screens. The only area where they used to have an edge over the iPad was multitasking, but iPadOS 26 has tons of amazing features that solve this problem.
I’m not saying Samsung doesn’t have an ecosystem. It’s present, and on paper, it’s nearly feature-for-feature with Apple. But in my experience, not a single part of it has worked flawlessly. I’ve run into some issue with every component, and it makes the whole experience feel like an afterthought.
1
iOS Simply Feels More Cohesive
Amir M. Bohlooli / MakeUseOf
One of the biggest aspects I’ve come to appreciate after using an iPhone for so long is how everything feels like it belongs together. iOS is built as a single system with one clear design, so everything flows smoothly. On Samsung phones, it feels more like two different mixed ideas. You have Google’s version of Android, then Samsung adds its own layer on top, and the result doesn’t always feel cohesive.
For example, some apps use Samsung’s Gallery app for importing photos, and others use Google Photos. There’s no easy way to set a default. You end up switching between the two without knowing why, and it gets annoying after a while.
There’s also the app store situation. You get both the Play Store and the Galaxy Store preinstalled. Most people stick with the Play Store, but Samsung keeps pushing its version with exclusive apps and updates. It feels unnecessary and adds more clutter.
On top of that, there are so many duplicate apps. You get Samsung Internet and Chrome, Samsung Messages and Google Messages, and then Samsung Calendar and Google Calendar. It’s confusing at first, and you won’t know which ones to use. On iOS, there’s only one version of each app, and you never have to think about this problem.
Related
5 Samsung Apps I Ignore Because Google’s Alternatives Are Simply Better
Samsung makes great phones, but Google makes better apps.
This is not to say I regret switching. There are plenty of points I really like, especially the hardware, but Samsung still has some work to do on the software side. Even so, I think it’s a strong option for anyone considering leaving the iPhone.
I always used to think that goal-tracking apps were a no-go for me because they caused more confusion than clarity. However, I changed my mind after I started using Griply. Of the countless tools I have tried, this is the only one in which I have seen tangible progress.
Setting Up Griply
Griply was very easy for me to set up. After creating an account, the app then asked me a set of questions to learn more about me. First, I had the opportunity to say why I was using Griply—whether that be starting a business or improving my personal relationships.
Once I have answered what I plan to use Griply for, I can then go into the specifics of what will get me toward my goals. The app asked me to outline my most important goals. I’m planning a trip to Japan and also want to start my own business at the time of writing, so I’ve chosen these as my two key areas.
Besides picking my goals, I could also choose which life areas these fit into. This feature would be pretty useful even if I were planning monthly goals rather than longer-term ones.
To finish the initial setup, Griply asked me a few more questions. I selected the habits I wanted to develop, in addition to the initial tasks I wanted to complete. All of these questions were easy to skip if I wanted to start from scratch instead.
Customizing My Goals in Griply
After completing the initial setup, I then went into Griply to further customize my goals. The tool allowed me to customize the dates, making them more attainable. Beyond that, I could choose from different colors to better differentiate each category. Color-coding is one of the easiest ways to avoid overwhelm, and I appreciated the numerous options available.
Griply let me go into even more detail beyond that. For example, I could choose the specific metrics I wanted to use for measuring success. These included:
Money saved
Percentage of tasks and subtasks completed
Pages and chapters completed (useful for writing books)
If none of the preset options applied to me, I could create my own goals from scratch instead.
Keeping Track of My Goals
Griply makes tracking goals very easy. There’s a dedicated tab in the left-hand toolbar, and once you click on this, you’ll see an overview of everything. From here, you can then go into each goal you have and fine-tune as you like.
With the free version of Griply, I can track up to two goals; upgrading to a paid plan would allow me to store as many as I want. I didn’t feel like I needed this, but you may want to consider upgrading if you have additional goals to track.
When tracking goals in the app, I can pick how I want to organize everything. For me, Life area is the easiest one to keep track of. However, it’s possible to sort by deadline, progress made, and other aspects. In addition to tracking your goals in apps like Griply, you may want to use visualization tools to help you achieve them. For example, you can create vision boards with ChatGPT.
Adding Habits to the Griply App
Habits are just as important as goals, if not more so. Without setting up the right ones, achieving your goals becomes significantly more difficult. Griply makes adding habits—and tracking them—very straightforward.
Creating habits in Griply offers significant customization. For example, you can schedule the specific days on which the habit counts. This is helpful for habits you may not do daily, such as going to the gym, but for which you have clearly set days.
When adding habits, you can select the priority level and choose whether to set reminders as well. Additionally, you’ve the option to link your habits to specific goals you’ve already established. In my opinion, doing so is one of the easiest ways to keep everything organized.
Why Griply Is the Best Goal-Tracking App for Me
Griply is simple but effective, and personally, it’s the only goal-tracking app I have actually seen myself using long-term. Besides being efficient, Griply is well-designed and easy to navigate.
1. No Bloated Features
One of my biggest issues with many apps is that they try to be too many things at once. This is particularly a problem with productivity tools, and one of the reasons why I generally think all-in-one apps don’t work. Griply, however, does not suffer from this issue.
The Griply app is very well-designed, and finding what I need is pretty straightforward. Unlike many goal-tracking tools I’ve used, the in-app lag time is minimal. The free plan has fewer capabilities than the free version, but even then, it still has enough for me to work toward a couple of meaningful goals without friction.
2. Clear and Tangible Progress
Setting goals is pointless if you don’t have a way to track them. Data can be particularly useful in this context because when working toward something significant, you don’t notice much of a difference in day-to-day activities. Instead, it’s only once results start compounding that you see how much has changed.
To stay motivated during those difficult early periods when the results lag behind your efforts, Griply can help. You get to choose the metrics, meaning you see obvious progress if you’re moving in the right direction.
I also like how Griply gives significant customization options. Thanks to this, it’s easier than ever to track goals exactly how I want to, and not based on an app’s limited functionality.
3. Better Goal Overviews
I now set meaningful goals in fewer areas than before as I’m more likely to stick to them. However, I still like having a full overview of everything I will work toward. In Griply, I can do precisely that.
Via the Goals tab, I immediately see my most important projects. If I need to make any tweaks, I can do so without too much of a hassle.
Related
These iPhone Apps Make Widgets Actually Useful
Your widgets are about to get a serious upgrade.
Griply is one of the best ways to track goals digitally, and it’s very easy to set up. Even with a free plan, you can still track two goals and organize them in significant detail. With its numerous customization features and intuitive navigation, it’s well worth using.
I’ve subscribed to Spotify for years—my oldest playlist was made 14 years ago. And I’ve been a premium user all of that time, so I think it’s fair to ask: why is Spotify still missing these features after all this time?
9
Absolute Feature Parity Between Mobile and Desktop
As I’m often chained to my desk, writing or editing, I primarily use Spotify’s desktop version. And the number of times changes are made to Spotify’s desktop version to unify features or the design experience with mobile is frustrating, as it often makes the desktop experience worse.
Case in point: when you clicked the currently playing song icon in the bottom right corner, it used to take you to the song playing in the playlist. It worked perfectly and helped you find the song you were listening to. But Spotify decided that the flow should match the mobile process (why?!), so it changed the action to open the Now Playing View—even if you have that view disabled.
You then have to click again to open the actual playlist with the song, as the Now Playing view doesn’t actually show that information. So, desktop users have to make extra clicks through extra windows to find the same information. Again, just why?
Spotify’s mobile version typically receives updates first, with many features never making it to the desktop version. For example, in June 2025, Spotify added new features to Discover Weekly, but only the mobile version. Desktop users, who pay the exact same subscription fee, don’t get the same features.
Oh, and with this new feature, I can change the settings in the mobile app to adjust them on the desktop version, which is plainly ridiculous. If the desktop version can support the changes, why not just add the feature to the Spotify desktop app?
It’s just wrong and shows Spotify doesn’t care about its desktop users at all, and it’s time that this changes.
This is definitely on the newer list of “features I wish Spotify had,” but it’s an important addition.
The rise of AI music on music streaming platforms like Spotify reduces the already meager earnings for those not already superstars. Spotify should follow in Deezer’s footsteps by introducing a specific AI-music label, allowing those who wish to avoid it to do so.
There are a few ways you can try to spot AI music, but they’re far from being foolproof, and it’ll only become harder over time.
Related
Spotify’s Viral Band The Velvet Sundown Is Completely AI—And We Knew It All Along
AI music is here to stay, and there is no way to opt out.
7
Home Feed Curation
Spotify’s home feed is increasingly cluttered with podcasts and audiobooks, overshadowing music discovery. Simple toggles allowing users to select “Music Only,” “Podcasts Only,” or both, combined with dismiss, pin, or “never show again” controls, would significantly improve user experience, keeping content relevant and personalized.
You can make some of these changes with amazing Spicetify mods, but really, we shouldn’t have to rely on third-party tools to adjust the feed on a service we pay for.
6
Advanced Search
Spotify’s integrated search tools are really quite basic, especially when you consider the phenomenal volume of music on the platform.
Sure, you can input specific search phrases and have Spotify generate unique playlists relating to that, but an advanced search feature really is a must for those niche music lovers.
Advanced search options would transform the experience: allow searches by detailed genre subcategories, production credits, mood descriptors, lyrical themes, and so on. Incorporating detailed filters like popularity, release dates, BPM ranges, or geographical origin could be a game-changer for finding new music.
Spotify already has all of this data and uses it to fill your algorithmically generated playlists, so why not give us some extra power and let us make use of it?
5
Spotify HiFi Lossless Streaming
The long-mooted Spotify Music Pro tier is allegedly set to launch in 2025. It’s been an extremely long time coming, first mentioned back in 2021 (though with rumours about its launch surfacing long before then).
It’s taken so long that most folks have already opted for one of Spotify’s hi-res music streaming alternatives, and probably won’t be returning once Spotify launches its new listening tier.
But for folks like me who are locked into Spotify, the new audio tier can’t come soon enough. The only downside is that I’m sure Music Pro (or whatever it will eventually be known as) won’t be a free upgrade for Premium subscribers.
But really, it needs to make it free or as cheap as possible to compete with Apple Music, Tidal, and so on, otherwise there is still little point in using Spotify for hi-res audio.
4
Social Listening Party—Pump Up the Jam
Group Sessions currently limit participants to eight Premium-only listeners, all requiring real-time participation on mobile. Spotify should raise participant limits and allow scheduling sessions ahead of time.
Imagine “Spotify Watch Party” style listening experiences—an engaging way to enjoy albums with friends, family, and others when you’re not hanging out. But then, when you are all hanging out, you have the option that more than eight people can contribute. I know when my friends hang out, there are typically more than eight people who want to contribute.
Sure, we could share phones, but the eight-person limit just seems arbitrary.
Another interesting feature could be to directly send music to friends within Spotify. I’m keenly aware that many folks already hate the slow creep of social features into Spotify, so this may be more hit and miss, but it could be fun.
3
Better Discography Filtering
This somewhat ties into Advanced Search, but has a slightly different bent. Spotify’s discography listing is genuinely appalling. It’s awful to work through to find an album when each artist has every single album, LP, EP, collaboration, and mention listed in their discog.
It’s a time-consuming and frankly antiquated way of listing data that, again, Spotify already has ways of sorting. So why not give your subscribers easier ways to sort through it to find what they want?!
Add filters for live albums, compilations, best-of albums, most recent, oldest, most popular, and so on. Even just adding the option to collapse the song titles while browsing would be a substantial improvement. Now, before someone points out that Spotify has these toggles on the artist home page—yes, you’re right. But they don’t sort through the entire discography, just what Spotify decides to show you.
Come on, Spotify, we know you already have these tools. Just make them visible to us.
2
Spotify Curated Playlist Toggles
I’m a big fan of Spotify’s algorithmically generated playlists. I use them frequently; they’re handy when I can’t think of what I want to listen to.
But Spotify’s insistence on filling those playlists with all the same songs I’ve been listening to is painful. Where is the Spotify toggle to say, “I like this song, but I don’t want to listen to it on repeat in each playlist,” or “Please only include songs that I don’t already have saved in other playlists”?
1
Spotify Shazam
I love Shazam. I have the app widget pinned to my Android smartphone homescreen so I can use it whenever I need, without having to open the app.
However, as much as I love it, at times, I just wonder how great a Spotify version of Shazam would be. Instead of using an extra service, Spotify could open directly to the song you’re listening to, and bam, you add it to your Favorites or another playlist.
Spotify is still good value for money, especially if you can pay less for a Spotify Premium subscription. But it doesn’t get around the fact that after all these years, Spotify is still missing features that its subscribers have been asking about for years, let alone all of the features Spotify has removed over the years, too.
Need an extra monitor but don’t want to buy one? Your phone or tablet is already the perfect second screen—you just need the right app to make the most out of it.
Meet GlideX and Set It Up
GlideX is a cross-device utility that lets you connect your Android device, iPhone, or iPad to a Windows PC using Wi-Fi or USB. It handles basic tasks like file transfer and screen mirroring, but the real draw is its Extend feature, which turns your phone or tablet into a second monitor for your PC. GlideX also supports PC-to-PC extension, meaning you can use another Windows PC or Mac as an additional display.
If you own an ASUS laptop, there’s a GlideXExclusive version that unlocks advanced features. With this, you can connect up to two devices simultaneously and enjoy 2K resolution at 60Hz, compared to the standard 1080p 60Hz limit and one connected device. The Exclusive edition also includes remote access capabilities and shared camera features. But the general version offers everything most people need for a solid extended display experience.
Setting up GlideX is surprisingly easy. Download the GlideX app on your Windows PC from the Microsoft Store and install the companion app on your Android or iOS device. Launch both apps and ensure your devices are on the same Wi-Fi network, or connect the devices via a USB cable.
For a USB connection on Android, you’ll need to enable Developer Options first, then turn on USB debugging. Once USB debugging is enabled, connect your devices via a USB cable.
The app will automatically detect available devices. Click Start Now on your PC, then follow the on-screen instructions to pair your devices.
How to Use Your Phone or Tablet as an Extended Display
To use your phone or tablet as an extended display, open GlideX on your PC and navigate to the Cross-device operation tab. Under the Extend option, click Search for device. Your tablet or phone should appear in the list of available devices. Select it, and you’ll see a screen share request pop up on your mobile device—tap Accept to connect.
Once connected, your phone or tablet will become an extended part of your computer display. You can launch apps on your main screen and move them to your mobile device, and switch between windows using Alt + Tab like with any regular monitor. To disconnect, simply click the unlinkicon next to your connected device.
The touchscreen support makes GlideX especially useful for tablets. You can tap, scroll, and pinch to zoom directly on your tablet screen—it responds just like a touchscreen laptop display. This makes it perfect for reading documents, monitoring chat windows, or keeping reference materials visible while you work on your main screen.
GlideX offers flexible display configuration options. Click the Preferences button to access display settings where you can adjust the layout, resolution, and frame rate. Choose between Dynamic mode, which automatically adjusts quality based on network speed, or Manual mode for fixed settings. You can set the resolution up to FHD (1080p) and frame rate up to 60 FPS, depending on your connection quality.
What sets GlideX apart from similar solutions is its flexibility. You can continue using your phone normally without disconnecting the extended display. Simply switch between apps on your mobile device, and when you need the extended screen again, switch back to GlideX.
GlideX Can Do a Whole Lot More
Beyond screen extension, GlideX packs plenty of useful features to help you work more efficiently across devices. You can mirror your phone’s screen on your PC or use Unify Control to link your phone, tablet, and even another PC, allowing you to control them all with a single keyboard and mouse and move your cursor smoothly between screens.
Sharing files is just as easy thanks to the File Transfer feature. Drag and drop files into the transfer window, and they’ll instantly appear on your other device. The Activity Feed keeps track of every transfer, showing file names, sizes, and status updates at a glance.
When you need quick access to your photos, Phone Album works much like Phone Link’s Photos feature, allowing you to browse and view all images stored on your phone using your PC. You can also download multiple files at once or delete them to free up storage space.
The Exclusive version also adds a few practical extras. The Communication feature lets you make and receive phone calls through your PC’s speakers and microphone. Shared Cam turns your phone into a webcam for video calls in apps like Zoom or Skype. Finally, Remote Access allows you to use your ASUS PC as personal cloud storage, so you can get to your files from anywhere on your phone or tablet.
Whether you need a quick second monitor for a spreadsheet, want to keep messaging apps visible while working, or simply need to move files between devices, GlideX handles it all through one clean interface. While it won’t serve as a full replacement for using Phone Link to connect your phone and PC, especially if you don’t have an ASUS computer, it’s a simple way to extend your setup without spending anything extra.
Netflix isn’t exactly cheap anymore, but that doesn’t mean you have to pay top dollar. With these simple tips, you can keep your subscription costs under control in 2025.
6
Split Premium With Friends or Family
Before you pay full price for Netflix again this month, think about how you’re using it. Premium costs about $25 per month in the US, and it lets you stream on up to four screens at the same time. Rather than covering the entire cost yourself, you could share it with family or housemates and pay just a fraction for the same access. However, remember that Netflix now requires everyone to share an account to live in the same household, so this works best for people you already live with.
Better yet, you can stop paying for Netflix in the months you barely use it. Instead of keeping your subscription active all year, reactivate it only when there’s something specific you want to watch. Binge your favorite shows, then cancel and switch to another streaming service for fresh content. Since Netflix doesn’t lock you into long-term contracts, you’re free to pause and resume whenever you like, which saves you money in the months you don’t really need it.
5
Downgrade to a Cheaper Netflix Plan
Netflix offers several plans, and if you haven’t checked yours in a while, you might be paying for features you don’t actually use. Right now, the Standard with Ads plan is just $7.99 per month, the ad-free Standard plan costs $17.99, and Premium sits at $24.99. The old Basic plan is gone in the US, so these are your main choices.
If you don’t mind a few ads, switching to the Standard with Ads plan is the quickest way to cut your Netflix bill in half while still enjoying Full HD streaming on two screens. Sure, a handful of shows remain locked behind ad-free tiers, but for most people watching after work or during dinner, it hardly matters.
And if you’re paying for Premium, ask yourself if you really need 4K streaming and access on four screens at once. Downgrading to Standard saves about $7 per month, while moving from Standard (No Ads) to Standard with Ads puts an extra $10 back in your pocket each month. That adds up to over a hundred dollars a year in savings with minimal sacrifice.
To change your plan, head to your Netflix account settings, select Change plan under Quick Links, choose your preferred tier, and confirm.
The update usually takes effect on your next billing date, though sometimes it applies immediately. For everyday streaming, sticking with a cheaper plan keeps your shows rolling while your wallet breathes easier.
4
Use a VPN to Access Regional Discounts
If downgrading your Netflix plan isn’t stretching your budget far enough, there’s another smart way to save. Netflix subscription prices vary drastically between countries, and the differences might surprise you. For example, while a Premium plan costs about $25 per month in the US, the same plan can be as low as $5 in countries like Pakistan or Nigeria. That’s a huge price gap for access to the exact same content.
This pricing disparity exists because Netflix adjusts its rates based on each country’s economic conditions. But you don’t need to relocate abroad to benefit from these lower rates. With a VPN, you can make it appear as though you’re signing up from another country, unlocking their local prices from the comfort of your home.
To try this, you’ll need a reliable VPN service like NordVPN, which usually costs just a few dollars a month. Once installed, connect to a server in a country with cheaper Netflix rates. Then open Netflix and sign up for a new account while connected to that country, and you should see their local prices instead of US rates.
Although using a VPN is generally safe for your data, it does violate Netflix’s terms of service. And while Netflix may not pursue legal action, they could suspend your account or cancel your subscription if they detect it.
Related
I Used a VPN to Buy a Subscription for Cheap, but It Massively Backfired
I tried to save, but ended up frustrated.
3
Grab Discounted Netflix Gift Cards
Netflix gift cards aren’t just for birthdays or holiday gifts. They’re actually a practical way to cut down your own streaming costs. These cards work like prepaid credits for your account, which, when purchased below face value, let you pay less for the exact same Netflix access.
You can find discounted Netflix gift cards on sites like CardBear, which often lists them at around six percent off, or Raise, where discounts can reach up to ten percent. These savings might look small at first, but if you use discounted gift cards throughout the year, they can easily add up to a free month or more of streaming.
After buying a card, log in to your Netflix account, go to Payment info, and enter the code under Redeem gift or promo code. The balance is added instantly, and since Netflix gift cards never expire, you can stock up whenever you find a good deal, especially during big sales like Black Friday or Cyber Monday.
Be sure to buy from trusted, well-reviewed sellers. Deals that look unbelievably cheap often come with risks like invalid or stolen codes. It’s always better to lock in a modest but guaranteed saving than to chase an offer that ends up wasting your money.
2
Check Carrier and Internet Bundles
Several major providers in the US now include Netflix in their service bundles, which can instantly cut your monthly cost without changing anything about how you watch. T-Mobile’s Netflix On Us program is one of its prime examples. It offers the Netflix Standard with Ads plan at no additional cost for customers on eligible Go5G or Magenta plans.
If you don’t already have a Netflix account, you can create one during setup and link it to your T-Mobile account. You can also upgrade to a higher tier, like the ad-free Standard or Premium plan, and just pay the difference on your monthly bill.
Other providers offer similar savings. Verizon includes both Netflix Standard with Ads and Max as a combined perk in some of its mobile and home internet plans, priced around $10 a month. Comcast also bundles Netflix with Peacock Premium and Apple TV Plus through its StreamSaver package, which is available to Xfinity internet customers for about $15 a month.
If you’re already with one of these providers or are thinking of switching, it’s worth checking if Netflix is included. In most cases, redeeming the offer takes just a few steps and can eliminate the cost of your standalone subscription entirely.
1
Use Reseller Sites (With Caution)
Some users join reseller platforms to split the cost of Netflix Premium plans with others. Platforms like Together Price and Spliiit connect you to existing accounts and handle payments automatically, so each member pays only a portion of the monthly fee.
It may sound convenient, but this approach comes with real risks. Netflix now limits account sharing to people living in the same household. If you join a group spread across different locations, you could face access issues or lose service altogether. And because these platforms operate independently of Netflix, there’s no guarantee your access will continue if the account owner cancels or changes their plan.
If you’re considering using these services, stick to well-reviewed platforms and check recent feedback. While the savings might be tempting, this option is far less reliable than those we have addressed so far.
I’ve finally done it—sold my smart TV. Now, I’m completely done with smart TVs, and any other TV for that matter, and it could just be time for you to do the same.
8
Too Much Space
I’ve become more of an essentialist over the past few years. I don’t think full-on minimalism is the right way for me (at least from a material perspective), but being intentional about what I do with my time—along with the items I own—has been hugely beneficial. I regularly audit my life to determine what is and isn’t serving me, and this time, my smart TV made the chopping board.
I live in quite a small apartment, and using our space wisely is very important. When I looked at things honestly, I would have needed to remove something else for the TV to continue making sense. I wasn’t willing to get rid of my desk or work corner, nor did I want to use the spare room; if I did the latter, I know for a fact my TV would’ve gathered dust.
Digvijay Kumar / MakeUseOf
This left me with only one choice that made sense: To get rid of it completely.
7
Mindless Consumption Was Too Easy
Ever since reading Digital Minimalism for the first time, I’ve become much more aware of my digital consumption habits. However, I am far from perfect. I sometimes slip back into my old ways, and often, it creeps up on me over time.
Earlier in the year, I became annoyed with how I had let my digital consumption increase beyond what I liked. My screen time rose significantly, and I caught myself trying to fill my spare time with stimulation when sitting still or going for a walk would’ve been more fulfilling and effective.
Jack Mitchell/MakeUseOf
For me, having a smart TV was a particular source of mindless consumption. I would often switch on random shows because I wanted to justify having the TV, but in reality, I found those programs boring and almost always a waste of time.
To stem the tide and get back to a position of strength, I decided enough was enough. Since then, I’ve also sought to set firmer boundaries with other devices, which includes deleting all apps with even the slightest risk of me spiraling into overconsumption.
6
I Can Access What I Need From My Tablet
For a long time, I had questioned whether I even needed a smart TV. Compared to my iPad, the benefits were minimal. Sure, I could watch shows with others, but I would rather host a nice dinner than mindlessly watch a show I know nobody is actually interested in.
If I ever need to watch TV on my own, I’d much rather use my tablet. I can take it everywhere, from my living room to the airport if I’m traveling. When combined with gadgets to stay stress-free during travel, this is a great option to kill time while waiting for a flight.
Mahnoor Faisal/MakeUseOf
The only reason I even had a smart TV before was because I didn’t have a tablet. With the need now eliminated, the choice to keep one would’ve been based on sunk cost fallacy rather than logic.
5
It Was Another Piece of Tech to Worry About
Digital Minimalism applies largely to social media and other online tools, but I also think it’s worth adopting a critical approach to technology in general. I don’t understand the point in having certain tools just because others do, especially if they add more stress to your life.
Combined with my declining use of it anyway, I got fed up with having to worry about my smart TV all the time. Besides more concerns like someone seeing it and wanting to steal it, I also didn’t want to deal with software updates or potential digital security threats. Yes, it’s important to protect your smart home from hackers.
Another issue was having to call a technician or repair the problem myself if it stopped working. In addition to my TV, I already had to worry about my smartphone, Apple Watch, iPad, computer, headphones, and various other gadgets. Rather than adding more to my plate, I felt it was time to eliminate some things.
4
I Wanted More Meaningful Conversations
TVs are, in my opinion, a great way to mindlessly consume content while not talking to the other person you’re in the room with. I’d argue it’s just as sinister as both people scrolling on their smartphones, if not more. Since this didn’t feel like the best way to spend time, I decided to take action.
When you live with someone, I think it’s wise to spend at least some time daily having a conversation with them. You don’t need to debate the works of Nietzsche every day, but at least speaking about your days is a good idea. This is even more important if that person is a partner.
For me, owning a smart TV stopped me from having those conversations. As a result, I wanted to remove it from my life and make room for more meaningful interactions.
3
I Didn’t Use Most Streaming Subscriptions
Even before selling my smart TV, I had made a conscious effort to reduce the number of subscriptions I had. Canceling all streaming subscriptions for a few months had numerous beneficial effects for me, such as determining what was actually valuable. Unsurprisingly, I realized the majority were time-fillers and not much more.
After auditing my subscriptions, I kept Max and Disney+ (Max is better than Netflix for my needs). However, I did not see the point in keeping live sports subscriptions. My life is full of so many other things that I rarely watch events; instead, I’d rather catch up with the highlights in one go on a Sunday evening.
GPT-4o / MakeUseOf
I decided I did not need a smart TV or any other subscription, such as YouTube Premium, either. I gave up video gaming a long time ago and no longer have a console, so I couldn’t even justify having a TV for those reasons either.
2
No More Keeping Up With the Joneses
While we can say “don’t compare yourself to others” until the cows come home, humans naturally compare themselves to others. It doesn’t matter how many books you’ve read about stoicism or the number of self-esteem affirmations you have shouted at yourself in the mirror.
The “keeping up with the Joneses” phenomenon took me years to disconnect from. Once I critically assessed why I made the decisions I did, I realized one reason I cared about having a TV was to look successful to others.
As soon as I noticed this, I got rid of my smart TV without thinking twice. The same went for every other status symbol in my house, like clothes I didn’t actually want.
1
I Wanted Fewer Screens in My Life
Nowadays, we have screens everywhere. The checkout till at my grocery store is a self-checkout. We check our phones multiple times daily, and many people also work on computers. I truly believe one key to a good life is to limit the number of screens you have, and I wanted to run this experiment. (Spoiler: It worked.)
I looked at my own life and audited everything. All unnecessary screens were removed. My TV was one of those, and I’m much happier without it.
Selling my smart TV has been a great decision, and I have zero regrets whatsoever. I have more space in my house and less of an excuse to consume mindlessly. Moreover, I’ve audited my subscriptions even further; saving money as a byproduct is nice, I must admit.
At first glance, ultra-cheap streaming boxes promise endless entertainment and high-end specs for around 25 bucks. But when you actually plug one in, the experience rarely matches the hype, and the real costs quickly start to show.
The Specs Look Impressive, but Real Performance Is Often Disappointing
When you browse online marketplaces, those cheap streaming boxes catch your eye with their impressive spec sheets. Manufacturers throw around big numbers because they work. The problem is that many of these numbers come from modified system files rather than actual hardware capabilities. These cheap streaming boxes are so slow that I can’t even take screenshots without a capture card, never mind installing diagnostic tools to test their legitimacy.
So, I opened up a streaming box I had handy (the MXQPro) and found a Rockchip RK3128A processor and a budget SK hynix eMMC storage inside. These are the kinds of components you will find in the cheapest devices, not in anything meant for smooth streaming or modern apps. This is not unique to the MXQPro, most cheap streaming boxes sold online today use similar low-end hardware.
Jayric Maning / MakeUseOf
Here’s a look at some of the most common specs that get exaggerated or faked on cheap TV streaming boxes:
Advertised Spec
What’s Really Inside (MXQPro Example)
What You Actually Get When You Use It
“4K/8K Ultra HD output”
Rockchip RK3128A SoC, HDMI port supports 4K on paper
The RK3128A can’t decode 8K or even smooth 4K; it struggles with 1080p.
“8GB RAM / 128GB storage”
SK hynix eMMC, usually 32GB system storage/ 1GB or 2GB RAM
Modern apps crash, and storage fills up fast.
“Android 12/13/14”
Firmware fakes Android version. The kernel version uses 3.10.104, which Android 7–9 uses.
Many apps won’t install or update; the system is outdated.
“Quad-core 2.0 GHz CPU”
Rockchip RK3128A, quad-core Cortex-A7 @ 1.2GHz
Performance is sluggish, slower than most modern smartphones.
“Dolby Vision, HDR10, AV1”
Logos on the box, but the Mali-400 GPU on the Rockchip processor cannot handle these formats.
Video plays in basic quality; advanced features are missing.
Cheap streaming boxes often use low-end Rockchip or Allwinner processors that just can’t keep up. After a few minutes of watching a show, the device heats up and does thermal throttling. When this happens, the processor deliberately reduces its speed to avoid overheating, which leads to laggy menus, stuttering video, and audio that falls out of sync.
The trouble doesn’t stop with overheating. The SoC (System on Chip) in these streaming boxes is so underpowered that they struggle to play even regular HD video, let alone 4K or 8K.
There’s also a safety side to consider. Many bargain streaming boxes use the cheapest possible power supplies, which are small, lightweight, and made with minimal components. These power adapters often fail after a short time and can even be a fire risk. Instead of using properly regulated parts, manufacturers cut corners to save money, putting your home at risk for the sake of a few dollars.
If the cheap hardware isn’t enough to make you think twice, remember that these devices usually come with poorly made software and almost no support. Problems are common, and when something goes wrong, you’re left on your own.
Hidden Headaches with Software, Updates, and App Compatibility
Certified streaming sticks and boxes like Chromecast or Walmart’s Onn 4K come with Android TV, regular updates, and Google Play Protect. Most bargain boxes skip all of that. Instead, they run a generic version of Android that was never meant for your TV, and that’s where the headaches begin.
Android TV is built for the living room. It has a clean interface, works smoothly with remotes, and gets updates that keep things running smoothly. Cheap boxes usually run a phone or tablet version of Android, which means clunky menus, awkward navigation, and features that just don’t work right on a TV.
Here’s what you’re likely to run into with these low-cost boxes:
No Play Protect or Certification: Most cheap boxes use an open-source Android fork, not official Android TV. That means no Google Play Protect, no formal security checks, and no guarantee that your device is safe or up to date.
App Compatibility Nightmares: Many streaming apps, like Netflix and Disney Plus, require Widevine Level 1 DRM for HD or 4K playback. Cheap boxes usually only support Level 3, so you’re stuck with blurry standard definition, even if your TV can do more.>
Fake or Outdated Android Versions: The box might claim to run Android 12 or 13, but it’s often a much older version with a renamed label. This tricks you into thinking you’re getting the latest features, but in reality, many new apps won’t install or run properly.
No Firmware Updates: Don’t expect regular updates. Most sellers disappear from online marketplaces before the first patch is ever released.
No Real Support: With no-name brands, there’s no customer service to call when things go wrong. If your box stops working, you’re on your own.
All these issues add up to a frustrating experience. You might save money at first, but you pay for it in wasted time and lost features. Certified devices cost a bit more, but they deliver smoother performance, better app support, and regular updates that keep your streaming safe and running the way it should.
Security Risks and Privacy Pitfalls in Cheap Streaming Boxes
Even before you have a chance to get frustrated by laggy menus or unreliable performance, cheap streaming boxes from lesser-known brands can bring even bigger headaches into your home. Many of these devices arrive with malware pre-installed, hidden deep within the system before you even open the box. Researchers at Dr.Web reported that malware like Android Vo1d was found on nearly 1.3 million TV boxes. This type of malware hands over root access to attackers, giving them full control to silently install more harmful software whenever they want. What makes this situation even more concerning is that the malware is embedded right in the firmware, so it is active from the moment you power on the device.
Trying to remove this malware is nearly impossible for the average user. Because it hides in special system partitions that are untouched during a factory reset, any attempt to wipe the device clean is useless. Once a box is infected, the malware will survive resets and continue to operate in the background.
Take the MXQPro as an example. Although the box claims to run Android 11, a closer look reveals the kernel version is 3.10.104, which is typically used for much older Android versions like 7, 8, or 9. Software updates are important in keeping your devices safe. However, the last security update on this device ended in 2017, which means any Android malware discovered after that year can easily infect the device. This problem is not unique to the MXQPro. Most cheap streaming boxes at similar price points, with specs that seem too good to be true, use the same outdated software and are just as vulnerable.
The risks do not end with the streaming box itself. Once attackers gain access to your device, they can use it as a gateway to reach other devices on your home network, such as your computers, smartphones, and smart home gadgets. A single compromised streaming box can put your entire network, privacy, and security at risk.
What Are You Really Trading for That Low Price?
Those savings look tempting, but cheap streaming boxes often cost you more in the long run. You might save a few bucks upfront, but you end up trading smooth video for choppy playback, regular updates for abandoned software, and your privacy for potential security risks. The time you spend troubleshooting crashes, lag, and app failures quickly adds up, making that bargain box feel like anything but a deal.
The problems go deeper than just performance. These boxes often cut corners on hardware and software, so even basic tasks like navigating menus or streaming in HD become frustrating. You lose out on features that should be standard, like voice control and reliable casting, and you have no real customer support if something goes wrong. Worse, many of these devices send your data to unknown servers or come loaded with spyware, putting your privacy and home network at risk.
Spending a little more on a certified device pays off with better performance, regular security updates, and peace of mind. Reliable brands deliver a smoother experience, protect your data, and save you hours of hassle. When it comes to tech, you usually get what you pay for—and sometimes, with the cheapest options, you get far less.
My smart TV has plenty of streaming apps for my entertainment, but did you know there are heaps of apps you can install that aren’t about watching movies and shows? You can get so much more out of your smart TV with these apps.
6
Capsule Podcasts
I listen to podcasts on my smart TV through the Capsule podcasts app. While it’s not widely known and may not appear in the list of best podcast apps, Capsule is one of the few with a dedicated TV app, saving you the hassle of casting. Capsule offers a sleek, TV-friendly interface that’s easy to navigate with your remote.
You can browse through podcasts by category, and the Home tab includes various rows of podcasts you may be interested in, such as the currently trending ones. Playback is smooth, and the app remembers where you left off, so picking up mid-episode is a breeze.
It supports skipping forward or backward a few seconds and adjusting playback speed. It also has a special feature for trimming silence if you need to skip the usual awkward pauses in podcasts automatically. Additionally, Capsule features a section for local radio, allowing you to listen to local radio stations directly in the app.
At some point, you may want to transfer content to or from your smart TV. This can be a challenge since most TVs don’t provide a convenient way to transfer files. It’s often assumed that if you don’t stream directly, you’ll play content on your phone or laptop and cast it to your TV. One file transfer option is to use an external drive like a USB stick or hard drive. However, you may not have one at your disposal.
But you don’t need one if you install the Send Files to TV app, as it enables you to wirelessly transfer photos, videos, music, or documents from your phone directly to or from your smart TV without a hassle. Whether you’re sideloading apps on your Google TV or want to move downloaded media files to watch on the big screen, Send Files to TV is a must-have app.
Related
The 7 Best Android TV Apps Worth Sideloading
Not all Android TV apps are officially available. Here are some essential Android TV apps worth sideloading.
It’s simple to use: connect both devices to the same Wi-Fi network, open the app, click Send, select the files you want to transfer, choose the recipient device, and you’re good to go. Send Files to TV uses Wi-Fi to transfer files in both directions, but it doesn’t require an internet connection.
VPNs aren’t just for your computer. Similar to your smartphone, laptop, and desktop, a VPN is a must-have for your smart TV. One of the primary reasons to get a VPN is for privacy, which comes from sending your traffic in an encrypted tunnel and masking your real IP address. However, beyond privacy, a VPN is a handy tool for bypassing geo-restrictions.
Whether you pay for Netflix, Prime Video, HBO Max, or a different streaming service, you may see different libraries depending on your location. For instance, you may not be able to watch a game in your city due to sports blackout restrictions.
Related
8 VPNs You Can Use on a Smart TV
If you want to watch Netflix libraries from other territories on your smart TV, you need one of these VPNs.
With a solid VPN, you can virtually appear to be in a different country or region, thus unlocking movies, TV shows, or sports broadcasts that aren’t available in your area. Some of our top VPN services, such as NordVPN, ExpressVPN, and CyberGhost, offer dedicated apps that you can install and connect directly to from your smart TV.
3
FX File Explorer
Unfortunately, most smart TVs don’t come with a file management app pre-installed. For example, my TCL Google TV-powered smart TV only came with a gallery, media player, and various streaming apps. However, if you sideload apps, store media locally, or connect to external storage drives, you need a file management app to navigate, copy, move, delete, and organize local files with ease.
FX File Explorer is an incredibly handy app that brings true file management power to your smart TV. With FX File Explorer, you can browse your internal and connected drives and easily copy or move files from one folder to another. It has an intuitive interface and gives you the power to access nearly any storage folder on your smart TV.
Additionally, like most modern file management apps, you can connect to supported cloud storage services (like Google Drive, OneDrive, Box, and OwnCloud), FTP servers, and even shared folders on your PC for easy file transfer. It also handles compressed files, so you can unzip or archive content without needing a computer.
AirScreen is an app that transforms your TV into a universal receiver thanks to its support for all the major casting protocols. If you have a TV or streaming device that runs Google TV, chances are it supports Google Cast by default.
Depending on the manufacturer and TV model, you may be able to get support for additional casting protocols, such as AirPlay or Miracast; however, support for more than one protocol is rare. Additionally, not all devices support Google Cast. For example, Apple’s devices, such as iPhones or iPads, only support AirPlay.
AirScreen resolves this issue by supporting all major casting protocols, including AirPlay, Google Cast, Miracast, and DLNA. With AirScreen installed on your TV, you can cast any device, including your iPhone or Android device, directly to your TV. The app is easy to set up and guides you through the process on the first launch, so you’ll be up and running in no time.
Your TV’s remote provides basic access to the most frequently used actions and a selection of apps. However, some of the buttons are for apps you don’t use, and most remotes don’t offer any customization options, which is frustrating. That’s where Button Mapper comes into play.
Button Mapper is a handy utility app that enables you to customize the functionality of your smart TV remote by mapping existing buttons to different actions. Instead of being limited to default remote functions, Button Mapper enables you to reassign buttons to launch apps, toggle settings, or perform shortcuts. Button Mapper allows you to customize any button by selecting an action (single, double, or long press) and choosing what happens when it’s pressed.
So, instead of just clicking the Home button to navigate to your TV’s home screen, you can add extra actions that can be accessed by a double or long press. For instance, to take screenshots used in this article, I mapped my TV remote’s Home button to take a screenshot when I long-press. I’ve also remapped my remote’s dedicated buttons for streaming apps to open my alternative options.
While not all of these apps stream shows, they bring valuable new features you never knew you needed. With them, you can easily share files, manage your TV’s internal storage, customize your remote’s buttons, cast from any device, and much more. Best of all, most are free to use, and you’ll only need to pay for optional extras beyond the basics.
For all its advantages, ChatGPT’s Deep Research tool still has some big flaws. One of the biggest is that it struggles to find up-to-date information, which can make studying more time-consuming. Scholar GPT, a custom GPT, can help you solve this problem.
Finding Recent Information
When I first used ChatGPT Deep Research, I tested the tool in multiple categories. While it excelled in many (it beat Copilot’s equivalent in various categories), it struggled to find up-to-date information. Much of the time, I’d have issues finding anything relevant that was newer than two years old. As far as I was concerned, this defeated the point of using the tool.
Scholar GPT is much better at finding recent information. Once I prompt to find me the latest research, I receive a compiled list of facts, with links to the original source. It makes it very easy to organize everything.
In some instances, I receive a list of bullet points without links to the original resource. However, I can then find links to useful online sources when I scroll further down. Scholar GPT’s table view presents everything in an easily digestible format.
Reading Research Documents
In addition to finding relevant and timely information, Scholar GPT can read research documents and synthesize their findings. This feature is helpful for shorter documents as it can provide a handy summary, meaning you should have fewer problems extracting the most essential details from whatever you’re reading.
Reading and rationalizing research is also helpful for more comprehensive PDFs. Once you upload the document, Scholar GPT provides a quick overview. Beyond the key findings, the tool also seeks to provide a balanced approach and question whether correlation equals causation.
After conducting the initial research, Scholar GPT offers the opportunity to delve deeper. For example, you can use the custom GPT to develop mind maps, explain things in simpler terms, or compare its findings with other research on the same topic. You can do this for each document you want to research and bring your ideas together later for more effective studying.
Assessing Links
I usually prefer uploading files to ChatGPT because historically, the app has been hit-and-miss when trying to get it to read links. However, Scholar GPT does a pretty good job of doing so. Before uploading the link, I can add a disclaimer to the chat stating I’ll be sharing it.
Scholar GPT will then ask me if I wish to explore specific themes, and if so, to say these. Doing so means I can get more accurate responses and don’t have to worry about needing to correct everything later.
Once I’ve uploaded the link, Scholar GPT then goes through it and reads the page or document. Thereafter, it’ll give an overview of the most important concepts to explore. Everything is presented well, and I can ask follow-up questions if I need more information.
When asking Scholar GPT to assess links, I suggest asking it for a critical analysis and to potentially generate alternative points of view. Doing so will give you better balance and make your learning more rational, especially if the paper seems more biased.
Helping With Specific Research Tips
In addition to reading research papers, Scholar GPT can help you research more effectively in general. For example, you can use it to understand more about specific ways to improve your learning. As one of the initial prompts, you can ask the chatbot to:
“Type “LS” to list my built-in critical reading skills”
From here, Scholar GPT’s initial answer gives you several critical reading methods to consider. You will also see a short description of each. As a follow-up, you can ask Scholar GPT something like:
“Can you help me learn more about [number]?”
From here, the GPT provides a more comprehensive overview. Additionally, it’s possible to complete practice tasks. This is one of the best ways to use ChatGPT in school.
Building Research Strategies
While you can replicate common frameworks when studying, not all of them will work for you. As a result, you need to be more strategic and find a way to best meet your skills. Scholar GPT can help with this. To do this, enter the prompt:
“Can you list some of the [number] most common research strategies with a quick description for each?”
Scholar GPT will then provide a list. From here, you can ask the tool to help develop a specific strategy. You’ll receive a comprehensive overview you can work with and customize as needed.
Is Scholar GPT a Complete Deep Research Replacement?
Scholar GPT has plenty of helpful features, and it’s excellent at finding the latest research. Moreover, you can use the tool to develop comprehensive strategies that’ll help you go further with your studies.
For academic research, I think Scholar GPT is much better than Deep Research. It’s better at finding more accurate information and also runs much faster. However, I’d still use ChatGPT Deep Research if it weren’t for studying, as while Scholar GPT is better at reading research papers, Deep Research excels in finding shopping recommendations and more day-to-day findings.
ChatGPT remains the go-to AI chatbot for many, but it’s by no means the only one to consider. If you’re looking for something new, Claude is the perfect alternative for all kinds of projects.
6
Better Initial Prompts
ChatGPT occasionally gives you initial prompts. You’ll often see these when using Custom GPTs, which are arguably the most underrated ChatGPT feature. These prompts are ideal for generating ideas when you’re not thinking clearly, and often, they can trigger follow-up thoughts and additional prompts.
But while ChatGPT is good at doing this on Custom GPTs, it isn’t otherwise great. You often don’t get starting prompts when starting new conversations, which can be annoying if you want to stimulate your mind with ideas. This is one area that even Copilot does better than ChatGPT.
Claude offers multiple prompts for the start of each conversation. Even more useful is how the tool segments these into different categories. You have Claude’s choice, for example, which gives some niche topics like “Discover a new perspective”.
When using Claude, you’ll also find a Life stuff section. Here, you can ask for morning routine tips, celebration plans, and more.
5
Easier-to-Comprehend Answers
ChatGPT is really good at providing detailed answers. I love the Deep Research feature, for example. Even with basic conversations, you can get lots of detail by just asking the tool to give you outline-based responses.
But while I like how much detail ChatGPT can go into with its answers, I’m not a fan of its information layout sometimes. I like seeing content in table format, but some responses can feel cluttered. As a result, it’s occasionally difficult for me to keep up.
Meanwhile, Claude presents its answers in an easily digestible format, more often than not. Thanks to this, I find it much easier to follow along with everything; as a result, I have more clarity.
4
Solid Writing Customization Features
While ChatGPT is great at many things, I don’t think writing is one of them. Even its newer models are not as convincing as the marketing messages try to portray. ChatGPT Canvas is a solid tool for working with, but at the same time, the customization features aren’t as good as those of other AI tools.
Claude has a lot of great tools for writing. For example, you can change the style. In addition to preset options, such as Concise, Explanatory, and Formal, you can create and edit your own styles. These are somewhat similar to instructions in ChatGPT, but with what I think is a bit more clarity.
Writing with Claude is also nice because you can pick from preset suggestions. The tool has an option to edit your content, and it’s also possible to develop content calendars and instructional content.
While I still don’t see myself ever using AI to write anything, Claude is a great tool for outlining ideas. I would recommend using it over ChatGPT almost all the time.
3
Nicer Interface & Appearance Customization
ChatGPT’s interface has certainly gotten better since the app’s early iterations. For example, I think Projects is an absolute must-use feature. But at the same time, I still think it lacks in areas where other AI tools—namely Claude—do not.
Besides Projects, ChatGPT doesn’t offer a huge amount of interface customization. For the whole time I’ve used the app, this has been one of my biggest annoyances. I was happy when I started using Claude for this reason.
Sure, Claude lacks a Projects-style feature (and I definitely think it should add something like this). But in terms of tweaking the interface, it’s great. For example, you can choose from different fonts.
In general, I think the colors in Claude’s interface—and its overall design—work much better than ChatGPT. To me, ChatGPT feels a bit utilitarian, while Claude is genuinely fun to use.
2
GitHub Integration
Coding is one of the most common reasons people use Claude, and in my opinion, it’s more accommodating for this than ChatGPT. As a baseline, you have the option to choose prompts and code within Claude Artifacts. Beyond that, though, the tool integrates with GitHub.
With the GitHub integration, you have the choice to connect your repositories to the app. You can simply select the ones you want to add before importing them to Claude. As a result, it’s much easier to meet all your coding needs.
1
The Ability to Batch-Delete Chats
Projects has certainly helped me clean up my ChatGPT interface, but I really don’t like how I still can’t batch-delete chats. Removing my chats is tedious, and as a result, it’s easy for my non-Projects conversations to sit around long after I will ever need them.
Batch-deleting chats is the easiest way to solve this problem, which is why it bothers me that ChatGPT still doesn’t have this feature. Claude, on the other hand, does. All I have to do is tick the box next to each discussion and select Delete Selected when I’m ready to remove them.
Despite its many benefits, ChatGPT misses out in a couple of ways compared to Claude. Not having an option to batch-delete chats is one reason, but I also wish ChatGPT had better prompting and easier-to-understand conversations.
You probably don’t think much about your smart TV beyond what you’re watching. But if it has a camera, you might want to give it a second thought. Like any internet-connected device, just because you’re not actively using the camera doesn’t always mean it’s inactive.
Take a moment to imagine what your smart TV with a camera sees. It’s pointed directly at the space where you relax, hang out with family, entertain guests, and maybe even work from home. If that camera is active without your knowledge, it could be silently recording personal moments you’d never want shared.
To further put things into perspective, your TV camera can glimpse financial documents on your coffee table, see who comes and goes, pick up on what brands you use, or even notice that expensive tech setup in the corner. In the wrong hands—whether it’s a hacker, a rogue app, or an overreaching data policy—that footage could be used to build a surprisingly detailed profile about you.
Worse yet, you may not even realize your TV has a built-in camera. On many models, the camera is subtly embedded above or below the screen, so discreet that you’d probably miss it unless you’re actively looking. A closer inspection or a peek at your TV’s manual or settings should tell you for sure. And if it turns out your set does come with a built-in camera, it’s totally fair to wonder: what’s it even there for? Some TVs use it for stuff like video calls, facial recognition, or waving at the screen to change the volume—but to be honest, most of us never touch those features anyway.
Yes, Your Smart TV Camera Can Be Hacked
If the thought of someone spying on you through your TV sounds a bit of sci-fi, well, it’s actually not that far off. Back in April 2017, WikiLeaks dropped a bombshell with its sixth “Vault 7” release, called “Weeping Angel” (named for a monster in the TV show Doctor Who). It was a joint creation by the CIA and Britain’s MI5, designed to hijack early smart TVs and turn them into covert surveillance tools. This revelation showed that even government agencies were actively developing tools to spy on people through their televisions.
It even goes beyond spy agencies. In 2018, Consumer Reports discovered that smart TVs from brands like TCL, Samsung, and others that use the Roku TV smart-TV platform could be remotely manipulated to change channels, adjust volume, and even install apps—all happening without the owner having a clue.
Related
12 Ways Hackers Can Attack and Take Control of Your Smart TV
Your smart TV is just another computer connected to your network, and there’s a good chance it’s not a well-protected one.
Fast-forward a few years, and researchers at Bitdefender uncovered fresh vulnerabilities (CVE-2023-6317 through CVE-2023-6320, if you like technical receipts) in LG smart TVs running webOS 4 to 7. These flaws could let someone bypass all security and take full control of the device.
The FBI also chimed in with a warning about risks related to smart TVs in 2019. According to Business Insider, the risks ranged from prank-level annoyances like forced channel changes to far more sinister stuff, like bad actors hijacking your TV’s camera and mic to spy on you at home.
When federal law enforcement agencies issue warnings about your TV, it’s time to take the threat seriously.
Smart TVs don’t exactly scream when something goes wrong, but they do sometimes whisper. If your camera light turns on unexpectedly or stays on longer than usual, that’s a big red flag. The same goes for sudden performance slowdowns, apps opening on their own, or the TV turning itself on or off.
You also want to keep an eye out for mystery apps. If something unfamiliar pops up on your home screen or tucked away in your app list—and you know you didn’t install it (and no one else fesses up to it)—that may be a strong clue that someone or something may have remote access to your TV.
Another subtle sign is seeing a spike in data usage from your TV, even when you’re not streaming anything. That could mean something (or someone) is using it to send or receive information in the background.
These signs don’t always confirm an intrusion, but if something feels off, it’s worth investigating further. Regardless, one simple precaution can go a long way—and it’s one you can take right now.
Covering Your Smart TV’s Camera Is the Easiest Fix
The easiest way to prevent your TV from seeing what you’re up to is to cover the camera. Unlike software-based protections that can be bypassed or become outdated, a physical barrier is foolproof. It doesn’t require updates, won’t slow down your TV’s performance, and costs virtually nothing. It’s the one method that can’t be remotely defeated.
A piece of opaque tape, a Sliding Webcam Cover, or even a sticky note will do the trick, all of which you can find on Amazon for under $5. Many people already do this with their laptops and tablets, so don’t feel weird slapping one on your smart TV, either.
Unlike your phone or computer, your TV’s camera probably isn’t something you rely on daily or even weekly. So, keeping it covered won’t mess with anything. And if someday you really do need it (for a video call, maybe, or some rare gesture control), you can just peel it back.
Other Tips For Locking Down Your Smart TV’s Privacy
Covering the camera is a great first step, but there’s more you can do to keep your smart TV from becoming a privacy liability. Start by reviewing your TV’s privacy settings and disabling features you don’t use, particularly voice recognition, automatic content recognition (ACR), and any data-sharing agreements with third parties. Most smart TVs collect viewing data by default, so you’ll need to opt out of these programs actively.
Keep your TV’s firmware updated, as manufacturers are likely to release security patches for newly discovered vulnerabilities. Enable automatic updates if available, and periodically check for manual updates if not.
If your smart TV is connected to the same Wi-Fi network as your phone, laptop, and other gadgets, there’s a bit of a risk lurking in the background. If the TV ever gets compromised, it could, in theory, be a stepping stone to infecting other devices connected to that same network. So, you should consider placing your TV on a separate network segment or guest network to isolate it from your more sensitive devices. Or, if you rarely use the “smart” features, you could just skip the internet connection altogether.
Related
Here’s Yet Another Reason Not to Connect Your Smart TV to the Internet
Owning a smart TV is a tiring, privacy-invading process.
Also, it’s worth being a bit picky about the apps you install. Stick to the official app store that comes with your TV and steer clear of sketchy third-party sources. They might seem harmless, but they can easily open the door to privacy and security headaches you didn’t sign up for.
These steps don’t require you to be a tech wizard. Just a few minutes of effort can dramatically improve your smart TV’s privacy.
You wouldn’t leave your front door unlocked just because it’s easier. The same thinking should apply to your smart TV. It might look harmless, but it’s a window into your most private spaces—and keeping that window shut is easier than you might think.
There are certain settings you can implement to prevent your email from being hacked. However, this one setting, if left disabled, can make a hacker’s day—while ruining yours.
A Password Isn’t Enough: How MFA Protects You From Hackers
Believe it or not, passwords are the bane of the internet. Memorable passwords that an average person might use on their account aren’t very secure, and secure passwords tend not to be memorable. This leaves us in a situation where most passwords you’d use daily, such as the one to your email inbox, aren’t very secure.
With computers becoming faster, brute-forcing such passwords wouldn’t be a significant problem. Hackers often conduct research on their targets, which makes the guessing game easier. Account passwords are also often leaked in data breaches, and since people tend to use the same passwords across online accounts, this puts multiple accounts at risk from a single leak.
We can’t eliminate passwords entirely. However, they’re not the most secure means of authentication either and require additional verification. This is where Multi-Factor Authentication (MFA) comes into play. Usually, MFA works by sending a one-time password (OTP) code to another account or device that you own. Authenticator apps can generate these codes and are better protected against SIM-swapping attacks, while SMS 2FA is popular but not considered as secure.
Related
Don’t Click That! 4 Innocent Email Habits Hackers Use Against You
Your routine email habits might be putting your security at risk.
It’s essentially locking your account with multiple “factors.” In most cases, these factors are “something you know,” such as your password, and “something you have,” like your phone, which receives or generates the OTP codes. This is called two-factor authentication or 2FA and is the most popular form of MFA you’ll come across on the internet.
Having to enter a secondary code during sign-in that only you have access to significantly decreases the risk if a hacker acquires your password. Regardless of whether they skimmed your password from a data leak or a phishing attack, they’ll still require the OTP. These codes are much harder to obtain unless hackers have physical access to your phone.
How to Enable MFA on Your Email Account
Most email services have either mandated MFA or will often prompt you to set it up. The steps to enable MFA vary based on what email provider you’re using, but you’ll generally find MFA settings tucked away under your account’s security and privacy settings.
We’ve covered how to secure your Gmail, Outlook, and other accounts with 2FA before, but here’s a quick rundown for enabling it on some of the most popular email services.
Gmail
Enabling 2FA on Gmail is a simple matter of updating your Google account settings.
Head to your Google Account, sign in, and click the Security tab.
Scroll down and click 2-Step Verification. You may be prompted to sign in again.
Select the sign-in option that best suits your needs.
While Google can send you OTPs via SMS, we recommend you install Google Authenticator to generate OTPs locally on your device. It’s available on both Android and iOS and can work for other services as well.
Outlook.com
You can also set up 2FA protect on Outlook.com. Note that this is different from your desktop Outlook client.
Select the Two-step Verification option, then select Turn on two-step verification, and hit Next to proceed.
From here, you can set up an authenticator app to work with Outlook.com.
Other 2FA methods are set using your email account and the phone number linked to your account.
Proton Mail
Follow these steps to enable 2FA on Proton Mail.
Head over to your Proton Mail dashboard, sign in, and click the Account and Password tab.
Under Two-factor authentication, enable the Authenticator app slider.
You’ll be shown a QR code. Scan it with Google Authenticator to enable 2FA.
We have more online accounts than ever, which means our potential for exposure is higher than ever before. With data breaches taking place all the time, taking a moment to protect your account with multi-factor authentication is a quick and easy way to add some extra protection to your accounts.
Google Calendar, Notion Calendar, Outlook Calendar, and some more. I’ve tried all the major calendar apps, as well as some lesser-known ones; despite their many great features, none keep me on schedule in the same way that Apple Calendar does.
6
Better App Syncing on Mobile
One of my favorite things about using Apple Calendar is how easily my events sync with the app on mobile. I have an iPhone, and all my big events instantly go into the app once I grant permissions. For example, each time I book a class at the gym, I automatically see it there.
Since I have an Apple Calendar widget on my phone, this synchronization gives me an instant look at my upcoming events for the day. Another benefit is that when I cancel an event within an app, it’s automatically removed from my calendar. For example, I’ve sometimes had to cancel gym classes; thankfully, these don’t show up in my calendar once I have.
Because I use Apple Calendar on my Mac and iPad as well, I can sync my events across all devices and add widgets if needed. So, it’s easy to see everything I need to complete.
5
A More Intuitive Interface
When using any calendar app (or apps in general, for that matter), the interface is one of its most important aspects for me. I already know I won’t use a tool for the long run if it’s difficult to navigate or doesn’t look nice. The same goes for if it feels clunky.
Apple Calendar is an example of what a calendar app should look like. I found Notion Calendar quite clunky, and almost every business-oriented calendar tool was similarly difficult to navigate. All too often, I felt like I had to work twice as hard to build a basic schedule with these apps; Google Calendar was the only exception.
Apple Calendar’s interface is intuitive across all apps. You can even apply easy tricks to make your Apple Calendar app more useful.
4
Core Features Without Gimmicks
I’m all for extra features in apps, but only if they work. When I see tools add random “tools” I know I’ll never use, it gets frustrating. In the same way that most creative software doesn’t need AI, in my opinion, many calendar app tools are gimmicky.
For example, while I like many aspects of Notion Calendar, adding Notion databases to my app feels way too clunky. I don’t think calendar apps need to do everything at once, but unfortunately, many try to do precisely this.
One of many reasons I enjoy using Apple Calendar is that it’s not full of gimmicky features. The app is very simple, and yet, it allows me to do everything I need to. I can create events, show or hide calendars if needed, and get an overview of my tasks for the day, week, and month.
3
Using Siri Suggestions With Apple Calendar
I actually use Siri less than the average iPhone user, but it’s still helpful for some things. Siri Suggestions in Apple Calendar is one of my favorite features; it’s so simple, yet incredibly effective.
With Siri Suggestions, I can add events from other apps based on what Siri thinks should be included. For example, I often use hotel-booking apps on my phone to find accommodation when I travel. Once I’ve finalized a trip, Siri will suggest that I add my travel dates to my Apple Calendar.
Thanks to this feature, organizing my daily schedule requires much less manual work than it otherwise would.
2
Calendar Inboxes
One of the only things I didn’t like about Google Calendar is that I didn’t have access to inboxes in the app. Yes, it integrates well with Gmail—but that’s not the same. Notion Calendar has this tool, too, which made it more disappointing for me that Google Calendar did not.
With Apple Calendar inboxes, I can see any potential events I may have missed. When these appear, I can then choose whether I want to add them to my calendar or not. These will sometimes be for tentative events I’m not entirely sure about, so sometimes, I leave them there until further notice.
1
FaceTime Integration
Since I live abroad, I use FaceTime for a lot of interactions with friends and family. For me, there is no better video communication app; I’ve tried Zoom, Google Meet, and even some open-source alternatives.
One of my favorite things about Apple Calendar is that since it’s part of the Apple ecosystem, it integrates well with FaceTime. When setting up an event, I can choose FaceTime from the list of options. So, if I want to arrange a call with someone in advance, this is a great option.
Despite the numerous advantages of other calendar apps, none help me stay on track as much as Apple Calendar. It integrates well across the Apple ecosystem, and I love how Siri can pick up and add events without much of my input. Moreover, I like that the app is simple but still effective.
AI-generated artists are gaining popularity on streaming services, to the point that you’re probably listening to AI artists without even realizing it. Thankfully, however, there are ways to spot AI artists.
AI Bands Such as The Velvet Sundown Are Increasing in Popularity
In case you missed it, a band called The Velvet Sundown has been in the news recently. Not because they have big gigs coming up, or because one of their members has left the band under mysterious circumstances. Instead, it’s all because people have realized that The Velvet Sundown is an AI group. Whether entirely or partly, we know that The Velvet Sundown uses artificial intelligence to produce music.
Is this necessarily a problem? That depends entirely on your point of view. Human musicians will likely hate the fact that artificially produced music is now competing with them for people’s ears. And people who listened to the band without knowing that AI was involved may feel somewhat cheated. Others may not care one way or the other, as long as they genuinely enjoy the music.
Either way, we all need to start paying attention to what to look for to spot AI-generated bands on streaming services.
How to Spot AI Bands on Spotify and Other Streaming Services
There are several different ways to spot AI artists on streaming services, so here’s what you need to look (and listen) out for.
1. Generic/Bland Sound
Probably the most obvious telltale sign to look out for is the poor quality of music an artist is producing. Due to the nature of how generative AI works, everything that it produces will, by its very nature, be derivative. This is because it can only produce music based on what it has previously absorbed. Hence, AI-generated music just doesn’t sound that great. Instead, it will have a generic/bland sound.
Is this any different from how humans hear music and then produce sound, somewhat based on that? Not necessarily, but humans have an innate ability to experiment and invent, creating all-new genres or something that sounds original, new, and/or fresh. As it stands right now, artificial intelligence cannot replicate that, leading to music so generic and bland that it becomes a feature.
2. Multiple Albums Releases Close Together
Serious artists who write and produce their own music can go years between releasing albums. In the meantime, they will tour that album to death, making serious money now that everyone is streaming rather than buying albums. Pop artists, who often employ other people to write their songs, can release albums more frequently, but it’s still usually years, rather than months, between releases.
This isn’t the case with AI artists, as the people behind that artist can spit out a new album’s worth of songs in days, if not hours. This is how The Velvet Sundown has already managed to write, produce, and release three albums in 2025. That sort of release schedule is unheard of for a real musical act, and so it’s another obvious telltale sign to look out for.
3. The Artist Doesn’t Play Any Gigs
As mentioned in the previous entry, real musical artists generally tour between albums. Not only do tours allow fans to see an artist live, but they’re also a good source of income in the streaming era. AI artists simply cannot tour, because there are no actual people able to take to the stage.
Therefore, it stands to reason that a lack of any gigs, either previously played or forthcoming, is another surefire way to detect the involvement of artificial intelligence. Some streaming services list forthcoming gigs, so that’s an easy thing to check. You can also Google the band’s name to see where, if anywhere, they have previously performed.
Related
These 6 Streaming Services Are Actually Worth Paying For
Streaming is expensive, but some services are still worth it.
4. Zero Social Media Presence
In a similar vein to a lack of live performances, an AI artist is highly unlikely to have a big presence on social media. Now, it should be noted that some very real, human artists also don’t bother with social media for various reasons, so this is more of a telltale sign to pair with others on the list. However, it was actually an attempt to join social media that ultimately led to the demise of The Velvet Sundown.
If the “band” had retained zero social media presence, it may have never been outed as the product of artificial intelligence. However, once the very obviously AI-generated “photo” of the band was posted online, the whole charade was exposed by internet sleuths, especially when further investigation found that the members looked slightly different in each image of them.
Some streaming services, such as Deezer, have started applying AI-generated labels to artists. Either the artist itself can attach the label, or the streaming service can. Either way, the aim is to make it clear to listeners (and potential fans) that generative artificial intelligence has been used in the writing, recording, and production of the artist’s music.
If you suspect that a music artist you have started listening to may be employing AI, explore their profile to look for one of these labels. In the case of The Velvet Sundown, once the band went viral, the description on Spotify was changed to describe the band as a “synthetic music project guided by human creative direction, and composed, voiced, and visualized with the support of artificial intelligence.”
6. An Artist Is Employing AI Elsewhere
While it may be difficult to detect AI-generated music, the individuals behind the project are likely to utilize AI in other areas. And this may be easier to detect. That was definitely the case with The Velvet Sundown, whose use of AI (though suspected) wasn’t widely recognized until the band launched a social media presence. As previously mentioned, the band’s photo was clearly generated with AI, suggesting that their music may also have been created with AI.
The bottom line is that if an artist is using AI to make music, their use of other forms of AI is almost guaranteed. Short of following the Milli Vanilli example and pretending that real people are behind the band, photos of the band members will likely need to be generated with AI. The people behind the artist may also use AI to write descriptions, social media posts, and the like.
Spotting All Forms of AI Content Is Getting Trickier
Music is far from the only form of content now regularly being produced by (or at least with the help of) artificial intelligence. As generative AI improves, the chances of spotting it decrease, which is why it’s crucial to stay focused and understand what to look for to identify content produced either fully or partly by AI.
Related
6 Dead Giveaways the Video You’re Watching Is AI-Generated
As AI-generated video gets more capable, it’s going to become more difficult to spot. However, there are some obvious giveaways.
Start by looking for the telltale signs listed above, as any one (or more) could give an AI artist away. Beyond that, trust your instincts, and be on the lookout for something (anything) that feels decidedly off. By using a mixture of common sense and clues, and spending time actively listening to AI music, you should be able to detect music produced by AI. It’s then up to you to decide whether to listen to it or not.
You’re probably already using HDMI or DisplayPort to connect your monitor, but did you know you can use its USB ports? The often-overlooked monitor USB ports can power your devices, reduce cable clutter, and even unlock features you might not know your monitor offers.
7
Charge Your Devices and Power Accessories
Pankil Shah / MakeUseOf
Just like the USB port on your laptop or desktop, the one on your monitor can supply power. That means you can use it to charge all kinds of gadgets, from wireless earbuds and smartwatches to fitness trackers and even small USB-powered fans.
It won’t fast-charge your phone or power bank, but for low-power devices or a quick top-up while you work, it gets the job done. If your monitor has both USB 2.0 and USB 3.0 ports, you’ll see different charging speeds—around 2.5 watts from USB 2.0 and up to 4.5 watts from USB 3.0. So if you have the option, make sure to plug higher-power accessories into the faster port.
Of course, you’re not limited to just charging. You can also power accessories like a desk lamp, LED light bar, or even a cooling pad directly from your monitor. If you don’t want to clutter your desk with a power strip or adapters, those extra USB ports on your monitor can be surprisingly handy.
Unless you have a smart monitor that can function on its own, plugging a keyboard or mouse directly into your monitor’s USB port won’t do anything. However, once the monitor is connected to a computer, that’s a different story.
If your monitor includes a built-in USB hub (which many modern ones do), plugging your keyboard and mouse into your monitor can be a convenient solution. It’ll not only help you keep your desk clean but also save you from having to reach behind your desktop or stretch cables across to your laptop to connect your input devices.
Keep in mind that this won’t work with every monitor. USB ports on some monitors are only for firmware updates or basic power delivery. To actually use your monitor as a USB hub, it needs to support USB data passthrough. In other words, simply connecting it via HDMI or DisplayPort isn’t enough—those cables only carry video and audio, not data.
You probably plug all kinds of USB devices into your computer, like flash drives, hard drives, printers, and more. It’s the default, no-brainer move. But if your monitor has a built-in USB hub, it can handle those devices just as well.
Once you connect the monitor to your PC with a USB upstream cable (usually USB-B to USB-A or USB-C), the monitor’s USB ports function as an extension of your computer’s USB system, meaning you can plug in peripherals like a USB storage drive, your phone, or even a USB hub—all through your monitor. Your PC will recognize them just as if they were connected directly to one of its own USB ports.
This way, instead of having wires snaking out in every direction from your PC, you can plug everything neatly into your monitor. It’s especially convenient if your computer is tucked under a desk or if you’re using a laptop with limited ports.
4
Connect USB Speakers
Jack Mitchell/MakeUseOf
If your monitor doesn’t have built-in speakers (and a surprising number still don’t), plugging in USB speakers is one of the easiest solutions. Most USB speakers use a single cable for both power and audio, so connecting them to your monitor’s USB port keeps things simple and cuts down on cable clutter.
This setup works for microphones too. If you’re using a USB mic for video calls, streaming, or in-game chat, plugging it into your monitor’s USB port is a convenient option.
A single monitor may not always be enough. If you’re editing videos, writing code, or juggling massive spreadsheets, a dual or even triple monitor setup can make a huge difference. The good news is that your monitor’s USB ports can help you expand your screen space without needing a complicated docking station or a bunch of extra cables.
This won’t work with the standard USB-A ports on your monitor, since they’re typically designed for peripherals like keyboards, mice, or flash drives and can’t transmit video. However, if your monitor has a USB-C port with DisplayPort Alternate Mode, Thunderbolt with Multi-Stream Transport (MST), or a DisplayPort that supports MST, you’re in luck.
These technologies let you connect multiple monitors through a method called “daisy chaining,” where each display links to the next using a single video output. For example, you can connect your laptop to a primary monitor using USB-C, then link a second monitor through the USB-C or DisplayPort on the first one.
This is especially handy for laptop users who want to set up multiple monitors but only have a single HDMI port. Of course, compatibility is a big factor here. Your laptop, both monitors, and even the cables you use need to support daisy-chaining and the appropriate video protocols.
2
Play Videos and Files Straight From a USB Drive
Pankil Shah / MakeUseOf
Before you get too excited, please note that this won’t work with just any monitor. Most standard monitors with USB ports can’t read flash drives directly. In most cases, those ports are only useful for firmware updates—you download the update file to the drive, plug it in, and use the monitor’s physical buttons to start the installation.
However, if you own a smart monitor, such as one from Samsung’s Smart Monitor series (which comes with its own operating system), you can use a USB flash drive to play media without needing a PC. Simply plug in a drive loaded with videos, music, photos, or even documents, then use the remote to navigate the built-in media player and browse your content directly on-screen.
This way, you’ll be able to play content directly from a USB drive, much like you would on a smart TV. File compatibility can vary depending on the monitor model, but most smart monitors support common formats like MP4, AVI, JPG, and PNG.
You can check the user manual or the manufacturer’s site for a full list, but chances are, your vacation photos and downloaded videos will work just fine.
1
Webcam for Easy Access & Cable Management
Hannah Stryker / MakeUseOf
Unless you’re using a DSLR as a webcam, you probably keep your webcam plugged in all the time. But instead of connecting it directly to your computer tower, plugging it into your monitor’s USB hub can simplify everything.
This way, you’ll be able to keep a USB port free and won’t have messy cables hanging off your desk or tangled around your keyboard. And if you ever need to unplug your webcam—whether you’re traveling or switching devices—you can do it easily, without fumbling around in hard-to-reach places.
When most people think about a computer monitor, they only think of it as a screen—something that displays your work, your games, or your favorite shows. But its USB ports can be useful for everything from charging your gadgets to connecting peripherals you’d normally connect to your desktop or laptop.
The number and type of USB ports on your monitor can vary by model, but chances are, you’ll find a way to put them to good use. So, next time you’re about to plug something into the back of your tower or the side of your laptop, don’t forget about your monitor—you might find it can handle the job just as well, and with less hassle.
If you’re unsure whether a multi-monitor setup is right for you—or just want to make the most of your smart TV between movie nights—converting it into a second display is an easy win. And the best part? It’s simpler than you might think.
Connect Your PC or Mac to Smart TV Using an HDMI Cable
Christian Cawley / MakeUseOf
The simplest way to use your smart TV as a second monitor is by connecting it directly to your computer with an HDMI cable. It’s a straightforward, plug-and-play setup that usually takes less than a minute to get going.
You need to plug one end of the HDMI cable into your PC or Mac and the other end into one of your TV’s HDMI ports. Of course, your laptop needs to be close enough to your TV for the cable to reach.
If you’re using a newer, slimmer laptop that doesn’t have an HDMI port, you’ll need a USB-C to HDMI adapter to make the connection. This adapter can also be useful for connecting your smartphone to the TV.
The main advantage of using an HDMI connection is reliability. You get a crisp, lag-free display with smooth video and audio, which is perfect for both mirroring and extending your screen.
Once everything’s plugged in, grab your TV remote and switch the input source to the correct HDMI port. By default, your PC or Mac will mirror the display. To use the TV as a second monitor, press Windows + P and select Extend.
On a Mac, head to System Settings > Displays, then click the Use as dropdown menu to choose Extended display. This way, you can drag windows between your laptop and TV screens for multitasking or watching content while you work.
Connect Your PC or Mac to Smart TV Wirelessly
While using a wired connection is the most reliable way to turn your smart TV into a second monitor, it may not always be possible. The good thing is that you can also connect your Windows or Mac to your smart TV wirelessly, as long as it supports wireless display technologies like Miracast or AirPlay.
Most modern smart TVs support wireless display, but if yours doesn’t, you can use a wireless HDMI display dongle. These devices plug into an HDMI port on your TV and connect to your Wi-Fi network. Once done, you can mirror or extend your computer’s screen just as you would with a built-in wireless display.
If you’re using a Windows 10 or 11 PC, you can use Miracast to connect it to a smart TV wirelessly. First, make sure both your PC and TV are connected to the same Wi-Fi network, then use these steps:
Press Windows + K on your keyboard.
A sidebar will appear with a list of available devices. Select your smart TV from the list.
If your TV doesn’t show up, go to Settings > Bluetooth & devices, then click Add device.
Choose Wireless display or dock, and select your TV.
Tick the Allow mouse, keyboard, touch, and pen input from this device checkbox and click Done.
Now, your TV should be wirelessly connected as a display, and you can use your PC’s keyboard and mouse to navigate just like you would with a traditional second monitor.
If you’re on a Mac, you can use Apple’s AirPlay to connect to your smart TV. Here’s how:
Open Control Center from the menu bar.
Click the Screen Mirroring icon.
Choose your smart TV from the list. You might be asked to enter a four-digit code that appears on your TV screen.
Click Display Settings, and choose the Extended Display option to turn your TV into a true second monitor.
With a wireless setup, you might notice a bit of lag compared to using a cable connection. That said, for things like media streaming, casual browsing, or light multitasking, it should work just fine, as long as your Wi-Fi connection is strong and stable.
Configure Display Settings
Once you’ve connected your smart TV to your computer via HDMI or wirelessly, you might want to configure the display settings. On Windows, right-click anywhere on your desktop and select Display settings. Here, you’ll see both your primary monitor and your smart TV represented as screens.
To make the smart TV your main display, check the box that says Make this my main display after selecting the TV screen. You can also adjust settings like resolution, refresh rate, orientation, and enable features like Night Light for eye comfort.
If you’re using a Mac, head to System Settings > Displays, where you’ll see a visual layout of your screens. You can drag and rearrange them to match their physical positions so that moving your mouse between screens feels natural. If you want to mirror your main screen instead of extending it, there’s an option to toggle Mirror Displays in the same menu.
Turning your smart TV into a second monitor is an easy way to get more screen space without buying a new display. The whole process of connecting your PC or Mac to a smart TV is also quick and painless.
While this setup may not be ideal for intense gaming or professional design work that requires precise color accuracy, it’s a solid option for everyday tasks, casual multitasking, or simply giving your overcrowded browser some breathing room.
You may already know how to use a USB port on your computer or smart TV, but what about the one on your router? It can turn your router into a media hub, a personal cloud server, a backup machine, and more.
6
Turn a USB Drive Into Network Storage
Sharing files with family members or colleagues is something we have to do occasionally. But instead of constantly emailing documents, swapping around flash drives, or using cloud storage, you can turn your router into a NAS (Network Attached Storage).
To set this up, you just need to plug a USB flash drive or hard drive into your router. Your router should automatically detect it and make the storage available over your Wi-Fi network. From there, you can map it as a network drive on your computer, or access it through your smartphone or tablet.
It’s like having your own personal cloud, except it’s free and totally private. Plus, it’s way faster to transfer large files over your home network than uploading and downloading them via the internet.
Some routers even support remote access, so you can grab those files while you’re out and about, just like you would with Dropbox or Google Drive. This is also a great way to repurpose an old router.
5
Backup Your Devices Automatically
Backing up your devices is one of those things everyone knows they should be doing regularly, but actually keeping up with it is a different story. Manual backups are tedious, and while cloud storage is a great option for automatic backups, the cost can add up fast, especially if you’re trying to keep multiple devices backed up.
Instead, you can connect a USB drive or even a full external hard drive to your router and turn it into a simple, always-on backup hub. Some routers even include built-in tools that let you schedule and manage backups right from their admin panel. If yours doesn’t, you can still use the File History feature in Windows to automatically back up files to the network drive your router creates from the connected storage.
4
Make a Wired Printer Work Wirelessly
A printer is one of those shared devices that everyone in the house or office needs access to. And if your printer is wired, chances are it’s buried in some corner, connected to a single computer. That usually means sending files to that computer just to print something.
However, if your router has a USB port, you can connect your wired printer directly to it. This effectively makes your wired printer wireless; anyone connected to your Wi-Fi network can print without needing a direct cable connection.
Most modern routers support this feature out of the box. All you have to do is log into your router’s admin panel (usually by typing its IP address into your web browser) and enable printer sharing.
3
Charge Smaller Devices
Pankil Shah / MakeUseOf
That lonely USB port on the back of your router can also double as a charging station for your devices. Of course, it won’t deliver fast charging like a wall adapter, but it’s more than enough to juice up low-power devices like fitness trackers, wireless earbuds, smartwatches, or even your Bluetooth mice.
These kinds of devices don’t need much power and usually charge slowly anyway, which makes your router’s USB port a surprisingly practical backup option. It’s especially useful if your computer’s USB ports are already occupied, or you don’t have an extra wall adapter handy.
If your router supports DLNA (Digital Living Network Alliance) or a similar media-sharing protocol, you can turn it into a media hub for streaming content throughout your home.
It’s actually pretty simple. You first need to plug a USB drive loaded with your favorite movies, music, or photos into your router’s USB port. Then, head into your router’s settings and enable the media server feature.
Once enabled, your router acts as an always-on streaming hub. Devices like smart TVs, gaming consoles, tablets, and even smartphones connected to your home Wi-Fi can easily access and stream your media library.
1
Use Mobile Internet as a Backup
Internet outages always seem to happen at the worst possible time—but even then, your router can still come in handy. Many modern routers support USB tethering, allowing you to connect your smartphone (or a USB mobile broadband dongle) directly to the router. You can then enable USB tethering on your phone and configure your router to treat it as a backup WAN connection.
This may not be ideal if you’re on a limited mobile data plan, but in a pinch, it can be a lifesaver. It’s especially useful if you work remotely and want to keep your devices online during an internet outage.
So there you have it. Your router’s humble USB port isn’t just for show. Most routers come with only one USB port, maybe two if you’re lucky, so you won’t be able to try out every idea at once. Still, putting just one or two of these to use can unlock some seriously useful hidden potential.
With every Android update, Google adds a host of new features and optimizations to the platform. And while Android 16 hasn’t introduced any major changes (yet), it does bundle several important new security features that you should take a look at ASAP.
What Is Advanced Protection in Android 16?
Sanuj Bhatia / MakeUseOf
With Android 15, Google added several new security features to its operating system, including new Android anti-theft tools and on-device spam detection for Pixel phones—but these were buried deep in the settings and thus hard for most people to find. Android 16’s Advanced Protection Mode brings all those features (plus a few more) to the forefront.
When this mode is enabled, your Android device enters a high-security mode: USB access is blocked when locked, scam detection is enhanced, app installs from unknown sources are prevented, older networks like 2G are disabled, and even your browsing becomes more secure with HTTPS enforced across the board.
This setup protects you from targeted attacks, harmful apps, online threats, and data risks, with every layer working quietly in the background. While this may seem slightly exaggerated—Google says this feature is built for high-risk users like journalists, politicians, and activists—average folks can still benefit from these privacy settings.
How to Enable and Use Advanced Protection on Android
Enabling Advanced Protection on Android 16 is straightforward and only takes a minute:
Make sure your device is updated to Android 16. You can check your phone’s software version by going to Settings > About phone > Android version.
In the Settings app, go to Security & privacy.
Scroll down and tap Advanced Protection.
Toggle the switch to enable the mode.
Restart your device when prompted to activate all protections.
Once enabled, your Android device goes into full security and privacy mode. In addition to activating anti-theft features and Google’s on-device protection against spam and fraud, it also disables sideloading of apps on your device. It enables Google Play Protect if it was disabled, since one of the main malware-spreading threats on Android is through sideloaded APKs—this one setting puts a hard stop to that.
It also won’t allow a factory reset unless the device is unlocked first or 72 hours have passed, making stolen phones far less valuable to thieves. USB connections to computers or external drives are blocked unless the phone is unlocked.
However, the best part about Advanced Protection Mode is that it runs quietly in the background without slowing down your phone or bombarding it with alerts. It simply locks in some of the best protections Android already had—plus a few new ones—and ensures they stay on, no matter what.
Other Key Security Features to Enable Right Now
If you don’t want to enable Advanced Protection Mode but are still interested in taking advantage of some of its features, you should know about a couple of new security tools Android 16 adds to your device.
Scam Detection
Scams and fraud are getting increasingly smarter. Thankfully, detection in the Messages and Phone apps is now stronger than ever in Android 16, with new on-device AI models that flag suspicious texts and robocalls before they appear on-screen. The system can even filter out these messages and calls automatically, reducing the risk of accidentally tapping something malicious.
Google Play Protect
Android’s built-in Play Protect has also received a major upgrade. It can now perform real-time scanning of apps during installation (even sideloaded ones) and can flag apps that misuse sensitive permissions. All of this happens locally, so your data isn’t sent to the cloud to check for malware.
Hannah Stryker / MakeUseOf
Android 16 Prevents Sensitive Info From Showing on Your Lock Screen
Another key upgrade in Android 16 is how it handles one-time passwords (OTPs). These are part of nearly every login or payment flow these days, but instead of displaying them on the lock screen right away, the system now uses contextual intelligence to decide when it’s safe to show them.
If your phone’s been locked for a while or is offline, sensitive messages like OTPs and banking alerts are hidden automatically. You’ll thus need to unlock the device to view them.
More Secure Mobile Network Settings
Mobile network settings have also been revamped. Android 16 now includes alerts for fake cell towers (often called Stingrays or IMSI catchers) that can intercept calls or texts. In addition, you can manually disable the 2G network on your phone to reduce exposure to outdated, insecure network protocols. It’s buried in the Safety Center, but it’s a worthwhile switch to flip.
While Android 16 may not have delivered the major features we were hoping for overall, it brings a significant under-the-hood upgrade for privacy and security. But that’s not all. Google is also working on a major new UI refresh for Android 16 with Material 3 Expressive, which is expected to roll out with the next Android 16 update alongside the Pixel 10 series launch in late August.
The truth is finally out: everyone’s favorite new Spotify band is absolute generative AI, just as most of us had suspected all along.
Who or What Are The Velvet Sundown?
If you’ve still not heard about The Velvet Sundown, they’re a new musical group taking Spotify by storm, racking up a truly astonishing one million monthly listeners in just a couple of months.
It’s a phenomenal figure for a group publishing what can only be described as generic psych-rock with some folk-rock overtones. It’s not bad, but it’s also not mindblowingly good, either. However, The Velvet Sundown caught the imagination of enough Spotify users to propel the group into the unexpected spotlight—and with it, intense scrutiny that the band is completely AI-generated, from top to bottom.
We Knew The Velvet Sundown Was AI All Along
But now, an update to The Velvet Sundown’s Spotify Artist About page confirms what many have long suspected, including this writer.
The Velvet Sundown is a synthetic music project guided by human creative direction, and composed, voiced, and visualized with the support of artificial intelligence.
However, the AI-generated band is framed as an artistic project “designed to challenge the boundaries of authorship, identity, and the future of music itself in the age of AI.”
The signs of AI creation were clear to see. The images of the band standing together have a distinctly generative AI glow to them, despite some editing and touching up. Small edits can alleviate some of the issues with generative AI, but ultimately, anyone who has used AI to create images of humans knows that tell-tale style: uniform textures, a yellowish, sepia hue, and that uncanny, almost “over-human” generic look.
Oh, and they look a little different in each picture—just as the supposed lead singer sounds different on every single track.
Then there was the fact that this band appeared out of nowhere, overnight, and somehow managed to produce two full studio-sounding albums. In this day and age, that’s pretty unheard of, especially with the supposed quality of The Velvet Sundown. And there is another album launching at the end of this week, making it three full albums in 2025.
The Velvet Sundown (and AI Music) Aren’t Going Anywhere
It appears that, despite the revelation that The Velvet Sundown is completely AI-generated, the “band” will continue to produce and publish music.
The supposed popularity of an AI band of this nature is intriguing for several reasons. One, The Velvet Sundown is so middle-of-the-road that I can’t think of reasons why people would specifically turn it off. You might not specifically turn it on, but it’s familiar enough, with that classic 1970s-style psych/folk rock sound, that you could listen to for hours.
Its lyrics are also startlingly basic, but easy to follow and learn. Take The Velvet Sundown’s most listened song, Dust on the Wind:
[Verse 1] Dust on the wind/ Boots on the ground/ Smoke in the sky/ No peace found/ Rivers run red/ The drums roll slow/ Tell me brother, where do we go?
[Chorus] Raise your hand/ Don’t look away/ Sing out loud/ Make them pay/ March for peace/ Not for pride/ Let that flag turn with the tide
Nice and vague, with some national pride and military overtones, but nothing offensive. Combined with the music, it’s a perfect combination of almost soul-soothing familarity, tinged with the backdrop of nothingness—which makes it oh-so-listenable.
But there’s another angle. There are more than a few suspicions that The Velvet Sundown may also be profiting from Spotify’s listening bots, another issue that plagues the platform. It isn’t difficult to imagine the generator of a completely AI band using Spotify listening bots to inflate the AI band’s stats, pushing it into those lucrative Spotify-generated playlists.
AI music has been gradually appearing in more Spotify playlists, with the platform actively promoting certain AI artists. For example, another AI artist, Aventhis, appeared on my Discover Weekly at one point.
It was ultra-generic, and I skipped the track, only realizing that Spotify had served me up some AI-generated music after the fact. So, whether you like it or not, Spotify is pushing AI music on its subscribers, and there is currently no way to opt out.
The rise of The Velvet Sundown highlights a turning point for music discovery. When AI-generated bands can rack up millions of streams, land on curated playlists, and blur the line between real and synthetic artistry, what does that mean for emerging human musicians trying to break through?
It also raises questions about transparency: should platforms like Spotify clearly label AI-generated content? And as AI music becomes increasingly indistinguishable from the real thing, will listeners even care who—or what—is behind the music they’re hearing? One thing’s clear: this isn’t just a novelty. It’s the future knocking.
Spotify Premium makes your music experience better, but the price tag stings. So if your wallet is feeling the burn or you want to save some extra dollars, there are a few smart ways to keep Spotify’s tunes rolling without paying the full amount.
6
Try Free Trials That Most People Miss
Spotify offers new users a free month of Premium to try out the service. What people miss, though, is that it occasionally runs hidden promotions where you can get two or even three months free. These exclusive offers usually pop up around Black Friday, New Year, or as surprise perks when you sign up at just the right time.
Even if you’ve used Premium before (or are unsure if Spotify Premium is worth upgrading to), don’t assume you’re out of options. Spotify often tries to win back inactive users by offering another free month to tempt you back. These comeback deals can appear in your email inbox, promotions tab, or right on the Spotify homepage, so it’s always worth checking what’s available today.
If you’re unsure about which subscription suits your listening habits best, take a moment to compare the options so you’re not paying for features you don’t need.
Set a reminder to cancel before the billing date if you only plan on using the free trial. By doing so, you can enjoy all the Premium features without worrying about unexpected charges.
5
Save Big With the Student Discount
If you’re studying right now, Spotify Premium won’t cost you much. Spotify offers a special student plan that cuts the subscription charge in half, giving you all the same premium perks for just $5.99 per month.
To qualify, you’ll need to verify your student status through SheerID. This is a quick process that usually involves uploading a document like your student ID or enrollment letter. Even if you’re studying part-time or taking online classes, it’s worth checking your eligibility.
Once verified, your discount remains valid for up to four years; however, you’ll need to reverify every 12 months to keep it active. As soon as you graduate, the discount ends, and your plan will revert to the standard premium price.
Along with Premium, you also get access to Hulu (with ads) at no additional cost. This bundle used to include Showtime as well, but that part has been discontinued. Even so, having Hulu alongside Spotify still makes it a solid deal.
4
Switch to Family or Duo Plans
Perhaps you’re no longer a student, and your trial period has already expired. However, if you share your home with someone, there are still easy ways to reduce your Spotify costs.
With Spotify Duo, you and one other person under the same roof get separate Premium accounts for about $16.99 monthly, which means you’re each paying roughly $8.50. It’s perfect for couples or roommates who want to split the bill while keeping their listening history and recommendations separate.
For bigger households, Spotify Family is an even better deal. At around $19.99 per month, up to six people living at the same address can each have their own Premium account. That works out to just over $3 per person if you split it evenly, making it one of the cheapest ways to enjoy ad-free listening.
The Family plan also includes parental controls to restrict explicit content for younger listeners and a Family Mix playlist that curates music based on the listening habits of everyone in the household.
Both plans require members to live at the same address, and Spotify sometimes asks for re-verification to keep the discount active.
3
Grab Discounted Gift Cards or Use Cashback
Spotify gift cards aren’t just for gifting others—they can be a smart way to cut your own premium costs if you know when and where to shop. Big sales events like Cyber Monday are prime opportunities to snag discounted gift cards from major retailers such as Amazon, Walmart, and Best Buy.
These cards typically cover 1, 3, 6, or 12 months of Spotify Premium. Occasionally, you’ll even find bundle deals where purchasing a certain amount earns you an extra bonus card. Some stores also run limited-time promotions that combine gift card discounts with free store credits. It’s a tactic retailers use to drive sales during busy shopping seasons, but for you, it’s an easy way to save money and gain extra benefits.
To stretch your savings even further, try buying these gift cards through cashback platforms like Rakuten or TopCashback. When you purchase through their links, you earn a small percentage back as cashback. It might not seem like much at first, but stacking discounts with cashback rewards can significantly reduce your subscription costs over time.
Spotify gift cards can’t be used directly with the Student, Duo, or Family plans. If you’re on one of these discounted plans, you’ll need to switch to an individual plan to redeem the card, then revert to your original plan afterward if required.
2
Check Phone or Service Bundles
Before signing up for Spotify Premium, take a moment to see if it’s already included with your phone or internet plan. Many providers offer Spotify as a free or discounted perk. For example, Verizon includes six months of Premium with select Unlimited plans, while Vodafone in the UK provides similar deals with certain contracts.
These benefits usually apply to both new and existing customers, so do your research before paying out of pocket. It’s not only phone and internet providers offering Premium; Some smart devices also come with free trials. Google Nest speakers, like the Nest Mini or Nest Audio, often include a Spotify Premium trial when you purchase.
Similarly, Roku streaming devices have partnered with Spotify to offer Premium trials. These offers change throughout the year, so before paying for Spotify Premium separately, check what your phone plan, internet package, or new smart device includes.
Remember, though, that these deals usually auto-renew at the standard Premium price once the promo ends, with charges appearing on your phone bill. To avoid unpleasant surprises, be sure to cancel or adjust your plan before the trial expires.
1
Regional Pricing via a VPN (Know the Risks)
Spotify Premium prices aren’t the same everywhere. Depending on where you live, the monthly cost can vary significantly. In countries like Egypt or Nigeria, Premium can cost just a fraction of what users pay in the US or Europe. Some people try to take advantage of these regional differences by using a VPN to sign up at a lower rate.
While this might sound tempting, there are a few things to consider. To pay for a subscription in another country, you usually need a local payment method that matches the region you’re signing up in. Even if you manage that, using a VPN with Spotify isn’t officially supported and can lead to performance issues like slower streaming or connection problems.
Related
I Used a VPN to Buy a Subscription for Cheap, but It Massively Backfired
I tried to save, but ended up frustrated.
This approach may be suitable for individuals who frequently travel or relocate abroad and have a valid local payment option. But for most users, the hassle outweighs the savings. It’s worth thinking carefully before going down this route just to save a few dollars each month.
When I plugged in my Roku Express for the first time, it stuttered, buffered, and lagged—but with a few tweaks to its settings, I had it running perfectly. Thankfully, maximizing the performance of your Roku’s rough edges is easy with these simple settings tweaks.
My cheap Roku Express streaming stick isn’t a performance powerhouse. Whenever I’m scrolling through content, videos automatically playing are not only annoying, but they also slow down the UI, not to mention slowing down my network.
Brady Meyers / MakeUseOf
First, go to the Roku home screen and select Settings.
Choose Accessibility.
Under the Reduce motion section, highlight Auto-play video and switch the setting to Off.
Disabling this option also silences some of Roku’s automatic ads, which is rather handy since you can no longer disable ads completely, so this is the next best alternative.
Related
Roku TVs Are Getting Smart Camera Integrations, but I Really Want These Features
Integrated cameras are cool, but I’d rather see Roku products improve in these ways.
7
Hide Roku’s Content Recommendations
Discovering new movies and TV shows is a very different process for me: I never, if ever, pick something suggested to me by the platform. My approach is by happenstance or fueled by wanting a specific mood. Naturally, I disabled Roku’s content recommendations for good to prevent any influence.
Brady Meyers / MakeUseOf
From the Roku home screen, choose Settings. It’s near the bottom of the menu.
Now select Home screen.
For Recommendation rows, set it to Hide.
You can go one step further and hide content listed under the Menu items section. All I want to see are my favorite Roku apps, not an awkwardly placed banner. I more or less want my UI to look as close to Netflix as possible.
6
Disable Automatic Display Type
The devices I use daily are pretty good at setting themselves to the right resolution, but I prefer setting the display type myself. I noticed I ran into issues more often than not, like taking longer to boot up or even reverting to a lower resolution. Setting it to a specific resolution was crucial for resolving the issue.
Brady Meyers / MakeUseOf
Once more, go to the Roku home screen and open Settings.
The option is located in Display type.
Under the Manual settings section, specify a resolution.
I set my Roku Express to display at 1080p, even though my smart TV can handle 4K. For starters, 1080p is more than enough for what I usually watch. Lastly, I have numerous devices connected to Wi-Fi, and I’d rather not thin my bandwidth even further.
Related
I’ll Sell My Roku TV If It Goes Ahead With This Update
Roku’s latest ad integration could stand between a bright future and a fiery end.
5
Eliminate Stuttering With Automatic Refresh Rate
The stuttering I experienced shortly after I hooked up my Roku Express was a real head-scratcher. I thought it was a network issue, but digging in the menus, I discovered it was my refresh rate. It wasn’t adjusting to match the content I was watching, like movies, where the standard is 24 frames per second. Roku will do the work if you:
Brady Meyers / MakeUseOf
Go to the Roku home screen and select Settings.
Go into System where you’ll find Advanced system settings or, in some Roku smart TVs, Advanced display settings instead.
Set Auto-adjust display refresh rate to On.
While you’re at it, consider also adjusting any motion smoothing your TV may have. This has the opposite effect of a sketchy refresh rate—it makes content look too smooth. Colloquially, it’s called the “soap opera” effect, but in your TV menu, disable any feature referring to motion smoothing, frame interpolation, and motion interpolation.
4
Rearrange and Resize Your App Tiles
There comes a point at which an app tile is so small, it just blends in with the rest. Rather than lean into the TV more and make it more comfortable, I’ve set my app tiles to be much larger. You should, too. I’ve had an easier time picking something from the comfort of my bed.
To get started, go to the Roku home screen and open Settings.
Locate the Home screen options.
Under the Recommendations section, set Tile size to either Smaller or Larger.
To rearrange an app, go to your list of installed apps, highlight one, and press the Options button (the star icon) on your Roku remote. From the menu, choose Move app or Move app to top. Using the arrow keys, position the app, then press the Select button on your remote.
Related
Roku’s New Streaming Sticks Are Perfect for Any TV, Dumb or Smart
The steaming sticks can be powered directly from a TV.
3
Tweak Your Captions So They’re Clear as Day
Do you hate the look of captions over a background? I do, passionately. It’s like looking at a redacted document. If that’s how you prefer your captions, Roku offers a nice selection of styles to choose from.
Brady Meyers / MakeUseOf
To access your caption settings, go to the Roku home screen and select Settings > Accessibility.
First, set Captions mode. If you just want captions on content you’ve already watched, set it to On replay. If you want them on all the time, set it to On, or disable them for good if you find it distracting.
Back out of Captions mode to access Captions style.
What’s particularly useful is that Roku gives you a preview window on the right. I recommend removing the background, keeping the text white, and giving it a drop shadow. That’ll keep the text from being too distracting and still make it easy to read. Personally, I can’t “hear” without my captions!
2
Enabling Guest Mode Saved Me Numerous Headaches
Even if you’re more of a recluse and only have company on every other summer solstice, having Guest Mode ready to go for company has saved me so many headaches. I’ve accidentally bought content myself, which means your guests can do it, too.
Brady Meyers / MakeUseOf
Open Settings once again and pick Guest Mode.
Once you pick Enter Guest Mode you’ll need to use your 4-digit PIN, or set one if you haven’t.
Your guest can then set their checkout date.
The good news is your guests can’t use your streaming accounts—they have to sign in with theirs. And as protection for the guest, their information isn’t shared, nor is it saved when they leave. In fact, it should be connected to a separate network, too, for the sake of protection and to prevent guests chewing into your Wi-Fi bandwidth.
Related
The Complete Guide to Roku Screen Mirroring and Casting
Here’s what you need to know about screen mirroring and casting to your Roku TV.
1
Fix Your Audio Settings to Enjoy Your New Speakers
If you have a soundbar, subwoofers, or speakers of any kind, there’s a chance you’re not getting the full range. Roku detects automatically, but that feature doesn’t always get it right.
Brady Meyers / MakeUseOf
Open Roku’s Settings menu and choose Audio.
First, set Preferred streaming format to Dolby or DTS, depending on what your setup supports. Otherwise, you can leave it on Auto.
It’s the same with Digital output format. You’ll have your pick of Stereo, Auto, or Custom if your setup supports Dolby Digital, Dolby Digital Plus, or DTS.
Once complete, Roku will default to, say, Dolby Digital if that’s what you’ve chosen. Any time you watch content that also supports those formats, it’ll make use of it.
More importantly, you don’t have to make any more changes to your Roku device. Just in time, too. Your Roku device has all sorts of secret menus to access!
I was a longtime fan of the Google Chromecast, having owned one since the first iteration in 2013. However, its 2024 discontinuation forced me to move over to Amazon’s Fire TV Stick 4K—and it’s been a surprisingly great upgrade!
6
An Intuitive and Feature-Rich Interface
Jack Mitchell/MakeUseOf
Having not owned an Amazon streaming device since the first-generation Fire TV Stick, I was impressed by the significant improvements that the Fire TV OS has undergone in recent years. In 2025, it is one of the most user-friendly streaming interfaces I’ve used, and while Chromecast also stepped up to the challenge with Google TV, the Fire TV Stick’s UI still surpasses it in terms of personalization, discoverability, and overall responsiveness.
Like with Google TV, the Fire TV home screen is neatly organized into personalized content rows, shortcuts, and trending shows, along with quick access to your favorite apps. However, unlike Google TV, which often prioritizes Google services and content, Fire TV provides a more neutral experience, whether you’re watching Hulu, Netflix, or Amazon’s native Prime Video.
5
A Superior Remote Control With Alexa Integration
Jack Mitchell/MakeUseOf
The Fire TV Stick 4K features a newly redesigned Alexa Voice Remote, which sets it apart from Chromecast with Google TV—the only generation of the device to include a remote. While the latter does support Google Assistant, it’s not as polished and lacks the deeper ecosystem capabilities that Amazon Alexa provides.
The latest Alexa Voice Remote is highly intuitive, with dedicated app buttons and volume and power buttons that sync to your TV. The blue-highlighted microphone button takes pride of place at the top of the handset next to the mic itself. This allows you not only to open apps and search for shows and movies but also to control your smart home devices, check weather reports, and manage Alexa routines.
In contrast, over the years, Chromecast has been heavily reliant on its app. While Chromecasts are still a good purchase in 2025 and can be controlled by my smartphone, for home use, I prefer the holistic and simplified solution that the Alexa Voice Remote provides.
4
Third-Party App Support and Native Streaming Services
Jack Mitchell/MakeUseOf
One of the primary benefits of the Fire TV Stick 4K is its support for a wide range of third-party apps and streaming services. Of course, there is the usual array of options available, including Netflix, YouTube, Max, Disney+, Apple TV+, and live TV streaming, among others. However, what really sets it apart from other plug-and-play devices is the ability to sideload apps for better customization and a more personalized viewing experience.
While Chromecast with Google TV also offers a wide selection of mainstream apps, Fire TV’s compatibility with lesser-known services, like IPTV services and gaming platforms, as well as its ad-free integration of Prime Video and Freevee, makes it a much more versatile tool overall.
Amazon has invested considerable effort in creating its native ecosystem, and the Fire TV Stick 4K integrates seamlessly, offering superior automation and control compared to its Google counterpart. Amazon’s smart products are affordable and readily available, and the Fire TV Stick 4K easily connects with a wide range of devices, including Echo speakers, Ring doorbells, Blink cameras, and smart plugs.
For example, you can ask Alexa to show your front door camera while watching a movie or dim your smart lights using voice commands via the remote. Fire TV even supports Matter and Thread, making it a future-proof hub for smart home devices across different brands. For me, deeper control and better customization options make the Fire TV Stick 4K stand out in comparison to Google Assistant-supported devices.
2
Improved Performance Overall
Jack MItchell/MakeUseOf
The latest Fire TV Stick 4K is powered by an upgraded quad-core processor and GPU combination for smoother navigation, quicker app launches, and buffering-free playback. It also supports 4K Ultra HD, HDR10+, Dolby Vision, and Dolby Atmos, providing a premium audiovisual experience that will hold its own when connected to a high-quality TV.
This performance is similar to that of the new Google TV Streamer, which is also a premium device, although it has a much larger footprint and a price tag that is double that of Amazon’s Fire TV Stick 4K.
1
Excellent Value for Money
Value for money was the most compelling reason for me to opt for the Fire TV Stick 4K. In recent years, Google has decided to drop the ultra-compact, smartphone-activated, and affordable Chromecast in favor of the more expensive, bulkier, and remote-controlled Chromecast with Google TV. This was ultimately succeeded by the even bulkier shelf-top console, the Google TV Streamer, which is significantly more powerful—and more expensive.
When I considered that the Fire TV Stick 4K combines portability, convenience, app compatibility, performance, and affordability, along with the ability to stream live TV and free ad-supported content, it was a no-brainer for me.
If you also want a secondary streaming device for sideloading apps, streaming foreign networks via VPN, and having a portable backup unit for all your streaming subscriptions, the Amazon Fire TV Stick 4K is a perfect fit. And while Google’s streaming products have never let me down, and I will continue to pack my Chromecast in my tech pouch when traveling, the Fire TV Stick 4K offers the best balance of functionality, ecosystem compatibility, and affordability, making it my top choice for streaming in 2025.
Image editing on mobile has always been a compromise—either you settle for basic tools or wrestle with apps that are too clunky for a phone. Adobe’s new Firefly app flips that on its head. It comes with a feature that makes image editing faster, simpler, and surprisingly fun.
Adobe’s New AI App Brings Generative Fill to Mobile
Generative Fill used to be locked away in Photoshop’s desktop interface and Adobe’s web tools. Now it’s broken free into a mobile app you can pull out anywhere, even while waiting in a coffee shop line.
The Firefly mobile app brings the same powerful AI editing to your phone. The process works in three straightforward steps: highlight what you want to change, describe what you want instead, and let the AI handle the rest.
Related
Why I Prefer Editing My Photos With AI Tools Over Manual Techniques
Letting AI handle the heavy lifting in photo editing has been a game-changer for me.
What makes this especially compelling on mobile is how fluid the workflow feels. You don’t need layers or masks. You don’t even need precision. Adobe has simplified the interface so that it feels more like sketching with a finger than editing with a mouse. There’s enough power under the hood to create high-quality results, but the barrier to entry is low enough that anyone can use it within minutes.
Unlike Google’s Magic Eraser and Apple’s Clean Up, which require specific hardware or subscriptions, Adobe Firefly runs on any modern smartphone. Adobe includes 10 Generative Fill uses each month for free, so you can try the tool without committing to a plan.
If you need more, you can subscribe to a Creative Cloud plan or a Firefly credit bundle. And because it’s tied to your Creative Cloud account, whatever you create syncs instantly across devices. This cross-platform integration puts it ahead of platform-locked alternatives.
Using Generative Fill is straightforward. You don’t need to understand layers, masks, or technical settings. Just tap, describe, and wait a few seconds.
Here’s how it works in practice:
Open the Firefly app.
Select Generative fill from the tool list.
Upload a photo.
Once the image is on the screen, tap the Insert icon.
Use your finger to highlight the area you want to change.
A text box will appear asking what you want to add, remove, or replace.
Type your prompt and Firefly will generate the result in seconds.
Say you’re editing a beach photo and there’s a stranger walking through the background, you can brush over them and type: “remove person, replace with sand.” The app processes it in seconds and gives you a few variations to choose from. Pick your favorite, and it’s done.
The same works in reverse. Want to add something? Just highlight empty space and type “add a palm tree” or “place a surfboard leaning on the wall.” It doesn’t matter if you’re exact with your selection, Firefly’s model fills in surrounding details naturally, blending lighting and perspective better than most mobile editors ever could.
This is also where Firefly really outshines simpler tools like Magic Eraser or Clean Up. While those focus primarily on removing objects, Firefly’s Generative Fill can remove, replace, and add elements with sophisticated understanding of context. Instead of just erasing that photobomber, you can replace them with a palm tree that matches the scene’s lighting perfectly.
Processing typically takes 5-10 seconds per generation, depending on your internet connection and the complexity of your edit.
Related
How I Instantly Remove Unwanted Objects From My Photos With One Tap
You saw the object. Now it’s gone.
Surprising Ways You Can Use Generative Fill
You might open the Firefly app thinking you’ll just erase a trash can or clean up a messy corner. And yeah, it’s great at that. But the more you use Generative Fill, the more it becomes your quiet little cheat code for making images feel complete.
Take a product photo that feels a little empty. With a quick brush over the corner and the prompt “add potted plant with soft light,” the whole scene looks professionally styled instead of rushed.
When a portrait background feels dull, you don’t have to reshoot or hunt for stock. Just select the area behind your subject and try a prompt like “brick wall with window light” or “cozy bookstore interior.” Instantly, the mood shifts.
Took a decent photo but your coffee table’s a disaster? Brush over the mess, type something like “clean wooden surface with a book,” and watch it turn into something you’d actually post.
If you try one thing in Adobe’s new Firefly app, make it Generative Fill. It’s fast, intuitive, and surprisingly fun, like Photoshop magic without the learning curve.
Chrome on Android is a great browser out of the box, but you can make it so much better. These tips and features will supercharge how you browse.
11
Unlock Experimental Features With Chrome Flags
While you may already be familiar with many of Chrome’s great features, there are plenty of lesser-known ones hidden under the hood. These are experimental features currently being tested, which may be added to the browser once they’re deemed stable.
However, you can get them early by enabling their respective flags. Chrome offers plenty of flags across different categories, like Parallel downloading, GPU rasterization, Auto Dark Mode for Web Contents, Partial swap, and Incognito Screenshot.
Related
Speed Up Chrome By Changing These 8 Flags
While many people claim Chrome is a memory hog, it is possible to greatly improve your browser’s speed by tweaking some “flags”. Here are the eight best tweaks that you can make today.
To find and enable a flag, open Chrome, tap the address bar, and type chrome://flags. You’ll see a list of all the flags currently available; tap one to reveal its complete description. Alternatively, you can use the search bar at the top to find a flag by name.
Once you’ve found the flag you want to enable, tap the dropdown next to it and select Enabled (or an equivalent option). Hit the Relaunch button at the bottom to restart Chrome and apply the changes.
Return to this page when you want to modify a flag. You can also use flags on Chrome for desktop, following the same method.
10
Switch to Desktop View
Most websites today have a fully functional mobile version. However, there are times when you may need to access websites that lack a dedicated mobile version, or ones that have limited features or a poor layout on their mobile version.
You can access the desktop version of such websites in Chrome on Android so you can use their full functionality. To do this, tap the three-dot menu in the Chrome toolbar and tick the checkbox for Desktop site. This will reload the page and open its desktop version. You may need to use the pinch-to-zoom gesture to zoom in and interact with the content on the page.
When you’re done browsing, go to the three-dot menu and uncheck the Desktop site checkbox.
9
Always Browse With Secure Connections
Not all websites are secure. Some websites still use HTTP (Hypertext Transfer Protocol), which doesn’t encrypt sensitive details such as passwords and payment information during transmission. That means anyone monitoring the network could intercept and read the information.
Related
HTTP vs. HTTPS: What’s the Difference?
You might be aware that HTTPS is an improvement on HTTP, but how exactly, and why should you be using it?
Browsing or entering personal details on such sites can be risky. However, you can protect yourself by enabling the Always use secure connections feature. Once enabled, it will warn you every time you try to access an unsecured website, so you don’t accidentally enter your personal information. You can then decide to proceed or go back.
To enable this feature, open Chrome’s Settings under the three-dot menu. Select Privacy and security, then scroll down to the Security section. Select Always use secure connections and enable the switch on the next page. Choose whether you want Chrome to warn you about insecure public sites, or both public and private sites (private sites are those that aren’t available to the wider web, such as internal company sites).
8
Capture Screenshots in Incognito Mode
Chrome doesn’t allow you to take screenshots in incognito by default. But thanks to support for flags, you can bypass this and enable the screenshot functionality in Chrome’s incognito mode.
Go to the Chrome flags page, as explained above. Here, look for the Incognito Screenshot flag. Tap the dropdown button below it and select Enabled. Hit Relaunch.
You should now be able to take screenshots of pages open while incognito.
7
Secure Your Incognito Browsing
Aside from enabling screenshots in incognito, you can also secure your browsing sessions in this mode for added privacy. Once you do this, Chrome will automatically lock incognito tabs whenever you switch apps, minimize Chrome, or lock your screen—preventing anyone from accessing them or taking screenshots from the Recents menu.
Locking incognito tabs in Chrome is easy. Tap the three-dot menu and go to Settings. Select Privacy and security under Basics, and toggle on the Lock Incognito tabs when you leave Chrome option under Privacy. You’ll need to authenticate yourself.
Now, whenever you try to access incognito tabs, Chrome will prompt you to authenticate yourself. Use your phone’s unlock method to verify, and it will let you see the tabs.
6
Preview Pages Before Opening
There’s a fast and easy way to preview links without fully loading them, which helps reduce unnecessary tab clutter. Additionally, it keeps you in the same spot on your current page, so you can resume browsing where you left off.
To quickly preview a link in Chrome, long-press it until you see a context menu. Select Preview page, and Chrome will open a preview of the link in a slide-up pane. You can browse this page like you usually do and close it out once you’re done. It’s also possible to open it in full view (in a new tab) if desired.
Chrome on Android app features a toolbar near the address bar, which has buttons for quick actions like going home, jumping into the app switcher, and accessing other settings.
However, that’s not all. Chrome also lets you add a shortcut button for other actions, such as Share, Voice Search, and Translation. You can even tell Chrome to surface the relevant button based on your usage.
To add a shortcut to the Chrome toolbar, tap the three-dot menu in the toolbar and select Settings. Scroll down to the Advanced tab and select Toolbar shortcut. Turn on the toggle next to Toolbar shortcut on the following page. Then, choose an action listed below.
4
Listen to a Webpage Aloud
For times when you don’t want to scroll through a page and read the text yourself, Chrome’s Listen to this page feature comes in handy. It allows you to have the contents of webpages read out loud.
Start by bringing up the page whose content you want to listen to, tap the three-dot menu in the toolbar, and select Listen to this page. Chrome will start reading the text on the page—highlighting the text as it goes so you can follow along visually.
You’ll also see a mini-player at the bottom of the page. Tap this to display a bunch of controls. From here, you can play/pause, skip forward/back by 10 seconds, adjust the playback speed, and change the voice.
Screenshot by Yash Wate — no attribution
If you plan to use this feature regularly going forward, you can add the Listen to this page action to your toolbar using the steps shown above.
3
Perform Instant Searches on a Webpage
When you come across new words or phrases online, you can look them up by copying and pasting into a Google search in a new tab. However, this is slow.
Instead, Chrome for Android has a Web search feature that lets you quickly look up a word or phrase directly from a page. To use it, long-press on the word or phrase you want to look up until you see a context menu pop-up.
Tap Web search, and Chrome will open a quick Google search in a new tab for what you chose. When you’re done, swipe inwards from the left edge of the screen or tap the back button to close this tab and take you back to where you were.
2
Quickly Find Text on a Page
Chrome also makes it easy to search for any word or phrase on a webpage you’re currently viewing, so you don’t have to peruse the entire page manually. This is possible thanks to the Find in Page feature, which highlights all instances of your search and lets you navigate between them easily.
To use it, tap the three-dot menu in the toolbar and select Find in page. Type in the word or phrase you want to search for; you’ll see it at the top in a search field.
If it finds any matches, Chrome will highlight all instances in yellow. At the top, you’ll also see the number of times it appears on the page. Tap the up or down arrow to navigate through the various instances, then hit the X button to close the search field when done.
Once every blue moon, I love going to the movie theater to see a blockbuster, and also for the experience. But when you don’t want to leave the house or just have some friends over, there are a few ways to capture the cinematic magic without leaving your living room.
7
Invest in a Big Screen or Projector
James Hirtz / MakeUseOf
When it comes to replicating the theater experience at home, screen size plays a major role. While a standard 55-inch TV works well for casual viewing, it falls short of delivering the immersive, larger-than-life feel you get at the movies. To achieve that sense of immersion, the screen needs to fill more of your field of vision, which is similar to how it does in a cinema.
THX, the well-known audio/visual standards company, recommends a 36-degree viewing angle for optimal immersion without causing eye strain. In practical terms, that usually means upgrading to a 75- to 85-inch TV or opting for a projector system. Projectors, in particular, can recreate a cinematic feel with screen sizes typically ranging from 100 to 120 inches.
If you choose a projector, the screen is just as important as the projector itself. A good projection screen offers significantly better contrast, color fidelity, and image sharpness compared to a plain white wall. For TV setups, OLED or premium LED models are ideal, especially in dark rooms, thanks to their deep blacks and rich, vibrant colors.
6
Upgrade Your Sound System
Jayric Maning / MakeUseOf
Few things kill the movie mood faster than muffled dialogue or action scenes that sound like they’re happening in the next room. Your built-in TV speakers simply aren’t equipped to deliver the kind of immersive, room-filling sound that draws you into the story.
For a true Dolby Atmos experience, three key elements matter: room layout, speaker placement, and equipment that matches your space. That might sound like a big ask, but you don’t have to go full audio geek right away. You can start with a solid Dolby Atmos-enabled soundbar, which can level up your experience in a big way.
Related
How I Upgraded My Home Audio Setup Without Spending Much
You can make your audio so much better, and it doesn’t have to cost a month’s wages.
But if you’re ready to dive in headfirst, the gold standard is a 7.1.4 setup—seven speakers at ear level, four overhead, and a subwoofer to shake the floorboards. Even a classic 5.1 arrangement (front left/right, center, two rears, and a sub) is more than enough to bring your movie watching to life. You’ll hear every whisper, every footstep, and every explosion the way it was meant to be heard.
5
Tweak Your TV Settings
Brady Meyers/MakeUseOf
Most TVs are shipped with default settings tuned for bright retail environments, not the dim, controlled lighting of a home theater. These factory presets often result in overly saturated colors, excessive brightness, and motion-smoothing features that distort the cinematic look.
To get a more accurate and immersive picture on your TV, start by switching to the Cinema or Movie mode. These presets are generally closer to filmmakers’ visual intent. Then, turn off motion smoothing (it could be labeled as “Auto Motion” or “TruMotion,” depending on your TV). That setting tries to smooth out motion, but it ends up making movies look weirdly artificial, like they were shot on a camcorder.
It’s also important to adjust brightness and contrast to match your actual viewing environment. In a dark room, lower brightness settings tend to provide a more comfortable and visually accurate experience. If your TV supports HDR, double-check that HDR mode is enabled and properly configured. When set up correctly, HDR can dramatically enhance color depth and contrast, making movies look truly cinematic.
4
Turn Off the Lights and Block Out Natural Light
The goal is to create a space where your screen is the primary light source, just like in a real theater. The first move is to turn off all room lights during movie time. But to go a step further, consider installing blackout curtains or blinds to block out natural light, especially during a mid-afternoon movie binge.
You should also pay attention to reflected light sources within the room. That lamp in the corner might be off, but if it’s reflecting light from your screen back at you, it’s still creating glare. Try to rearrange or remove anything that’s shining light where it shouldn’t.
Comfort is a make-or-break part of the whole home theater movie experience. If you’re constantly shifting around trying to get comfortable, you’re not fully immersed in what’s happening on screen. Everyone should have an unobstructed view of the screen without having to crane their necks or lean around someone else.
For seating itself, recliners specifically designed for home theaters are worth the investment if your budget allows. Look for chairs with cup holders, storage compartments, and motorized reclining functions. Some premium options—like the Valencia Tuscany lineup—even throw in built-in USB ports and subtle LED lighting, because why not lean into the luxury?
If dedicated theater seating isn’t in the cards, work with what you have. Arrange your existing furniture to create the best viewing angles, add comfortable cushions and throw blankets, and make sure everyone has a place to set drinks and snacks without blocking views. A little thoughtful setup goes a long way.
2
Set the Mood With LED Lighting
James Bruce / MakeUseOf
The goal here is to add light without stealing the spotlight. You want ambient lighting that complements the screen, not something that competes with it or washes it out, and that’s where bias lighting comes in. These are LED strips you stick behind your TV or projector screen, and they’re more than just a cool glow. They help reduce eye strain during long viewing sessions and, bonus, they make the blacks on your screen look deeper and more dramatic by boosting contrast.
For the most comfortable vibe, go for warm white LEDs around the 6500K range—something like the Luminoodle USB Bias Lighting you’ll find on Amazon. If you want to take things a step further, you can think about adding dimmable LED strips around the edges of the room or tucked behind furniture. They can double as pathway lights, so people can move around without fumbling in the dark or flipping on that one blinding ceiling fixture. Remember to keep the brightness low and the color subtle. Again, the lighting should support the movie, not upstage it.
Related
Govee TV Backlight 3 Lite Review: This Affordable Ambilight Clone Is Much Better Than Expected
Despite using a webcam on top of your TV, this sub-$100 TV backlighting kit is virtually indistinguishable from an original Ambilight.
In our streaming-dominated world, it might seem old-fashioned to suggest physical media, but Blu-ray discs still offer the highest quality movie experience you can get at home. Streaming services compress video and audio to save bandwidth, which means you’re not getting the full quality that filmmakers intended.
Related
Why It’s Still Worth Buying Blu-rays in 2025
I’m still all in on physical media, and Blu-ray is an excellent option.
4K Blu-ray discs provide uncompressed video with higher bitrates than any streaming service can match. The difference is most noticeable in action scenes with lots of movement, where streaming compression can create artifacts and softness that Blu-ray handles cleanly. If you don’t own a Blu-ray player, you can consider a gaming console like the PlayStation 5, which doubles as a solid Blu-ray player, among several other uses beyond gaming.
Audio quality also stands out in Blu-ray. Lossless audio formats like Dolby TrueHD and DTS-HD Master Audio deliver every nuance of the soundtrack without the compression artifacts you get from streaming. If you’ve put money into a good sound setup, this is where it really starts to earn its keep. Beyond the technical advantages, there’s something satisfying about the ritual of selecting a disc, seeing the studio logos, and watching trailers, which all contribute to creating that special movie atmosphere.
You’ve got the screen, the sound, the lighting, and the atmosphere, but don’t forget the viewing rituals that complete the experience. Silence all phones, keep conversation to a minimum, and avoid hitting pause unless absolutely necessary. And of course, don’t forget to grab some popcorn (air-popped or drenched in butter—I’m not judging), something to sip on, and let yourself sink into the movie.
Your 5GB of free iCloud storage probably didn’t last long; even with a paid iCloud plan, you can find your storage filling up faster than you expected. As it turns out, some of your iPhone’s default settings are to blame for this.
6
Backups From Messages
While keeping your old conversations backed up is a good way to preserve memories, Messages app backups are one of the biggest hidden storage consumers. Usually, the worst offenders within this are large videos or photos you receive.
It’s up to you to decide how important your old messages are compared to the space they take. You might wish to turn off Messages backups after taking screenshots of any particularly sentimental text threads, for instance.
Switching off automatic backups is quite easy:
Go to Settings and tap your Apple Account at the top of the screen.
Navigate to iCloud > Saved to iCloud.
Go to Messages in iCloud and toggle off Use on this iPhone.
Select Disable and Download on this iPhone when the pop-up window appears.
If you need to move messages to your new iPhone from an old one, you can temporarily turn this feature back on.
You can also limit the timescale for how long you keep synced messages in iCloud, to free up space. Doing this is a good balance between keeping your recent conversations synchronized and freeing up storage. To do this, go to Keep Messages and choose your preferred timescale.
5
iCloud Photos Syncing
Photo backups are one of the most common reasons why people upgrade to a paid version of iCloud. It’s not uncommon for your image library to consume multiple gigabytes; while storing your memories is important, you’ll need to consider the impact on your storage space.
The best way to stop the Photos app from consuming so much iCloud storage is by switching the feature off altogether:
Go to Settings > Apple ID > iCloud.
Select Saved to iCloud > iCloud Photos and go to Manage Storage.
Scroll to the bottom and tap Turn Off and Delete Photos before confirming your choice when the pop-up appears.
Once you’ve switched the feature off, you can download your photos and videos from iCloud within 30 days. Consider spreading your photos around other cloud storage services, like Google Photos, to keep them backed up without spending a lot more.
Decluttering your iPhone’s Photos app by removing images you no longer need, along with duplicates and screenshots, can also help.
4
Device Backups to iCloud
Turning off iCloud device backups can reduce the amount of storage used, but you need to strike a balance. If you completely disable backups, you’ll lose everything if something happens to your iPhone. As a replacement, it’s a good idea to back up your iPhone to your computer instead.
If you wish to go ahead with turning off your device backups to iCloud, the process is simple:
Go to Settings > Apple Account > iCloud.
Tap iCloud Backup in the list.
Toggle Back Up This iPhone off and confirm.
If applicable, tap your other Apple devices in the bottom list and turn off backups for them too.
3
Backups for Apps You Rarely Use
Third-party messaging apps, such as WhatsApp, also sync with iCloud by default. If you don’t need these backups, you can stop this from happening and subsequently free up a bit of space. The process is slightly different from the Messages app; you can repeat these same steps for any apps you rarely use:
In Settings > Apple Account > iCloud, go to iCloud Backup.
Under the All Device Backups list, tap the one labeled This iPhone.
Wait for your apps to load and select Show All Apps.
Toggle off all the apps you don’t want to sync with iCloud and confirm as needed.
This is one of the best alternative iPhone backup options: a balance between optimizing storage and not losing your most important data.
2
Notes Synchronization
While Apple Notes might not seem like a big storage eater, it can end up using a lot of space, especially if you use your phone to scan documents or include photos in your notes. Turning off Notes app synchronization can save some space in iCloud, especially if you don’t need to access your notes across devices:
Navigate to Settings > Apple Account > iCloud.
Select Notes, which should appear under Saved to iCloud.
Toggle Sync this iPhone off.
Go into Manage Storage and tap Delete from iCloud.
You can use alternatives to Apple Notes on your iPhone and turn off iCloud syncing for these. Instead, use an app that automatically syncs across devices, such as Notion or Simplenote. That way, you’ll always have access to your content without having to worry about cloud space.
1
Your Health Stats
Your Health app statistics might not seem like the most obvious consumer of space, but they can add up over time—especially if you use all the functionality of the app. Turning off this feature is one of the easiest ways to free up some extra storage:
Go to Settings > Apple Account > iCloud.
Select Saved to iCloud > Health.
Toggle Sync this iPhone off.
Select Manage Storage > Delete Data From iCloud.
While default settings can consume significant iCloud storage, you don’t need to let them do that. With a few simple tricks, you can free up more space than you might think. Depending on how much space you need, you may not even need to upgrade to a paid plan.
The Discover Weekly playlist is one of my favorite Spotify features—but I can’t pretend it’s always spot on. Old music tastes locked into the algorithm can easily upset the week, and that’s without getting into the absolute curveball oddities sometimes served up.
So, while I love Spotify Discover Weekly, these are the changes I’d like to see to make it even better.
5
Some User Input—Just a Little
Part of the wonder of Spotify’s Discover Weekly is that it pulls from your listening taste profile to create a unique playlist packed with new music.
For me, it means a weekly dose of new music that often hits the spot, and I’ll typically add a few tracks to my existing go-to playlists, and maybe favorite one or two. However, there are some weeks when the option to steer the Discover Weekly playlist in a certain direction would be welcome.
Now, in fairness, Spotify is experimenting with this at the time of writing. Spotify’s June 2025 Discover Weekly update introduced the idea of tweaking your playlist.
You’ll also now see a list of five genres above the songs, allowing you to tweak the playlist more to your liking. Essentially, this means you now have six distinct Discover Weekly playlists to explore each week. Which will be (literal) music to the ears of fans of the feature.
It’s a good start. But I’d like to push that one step further and have the option to add mood filters to this, too, like “chill,” “euphoric,” “studying,” and so on. And how about an era toggle for those weeks where you want to hear something new from, say, the 70s that you’ve never heard before?
Another interesting way Spotify could implement this is with a selection of randomized options relating to your algorithm. Instead of a set list of six core genres, it adds six randomized options that throw up something new. Or, how about a weight slider that pushes your algorithm to artists with fewer than a certain number of monthly listeners or similar.
As said, Spotify is experimenting with this feature already, which I’m really happy to see.
4
Why Is This Track on My Discover Weekly?
One feature that I’d like to see is how Spotify decides what music it’s serving up to you each week.
The Spotify Discover Weekly algorithm, like much of Spotify’s other algorithmically-generated playlists, is a black box. It’s great when your Discover Weekly playlist appears, but it would be wonderful to know why some of the tracks were chosen.
Discover Weekly uses a range of different signals to populate your playlist: implicit behavior, playlist graphs and groupings, global listening history and links, collaborative filtering, and so on.
However, it would be great if you could hover over a track and see a little information on why it was selected—the strongest signal that pushed it onto your list.
3
Easier Options to Remove Genres From the Taste Profile
Your Spotify Taste Profile is what guides your Discover Weekly playlist. It’s an evolving set of data that Spotify uses to serve up new music to you, taking in every decision you make to better refine it choices.
How well the Taste Profile works depends on your listening preferences. Spend a week listening to dubstep, and your Discover Weekly is likely to assume you’re keen to hear more. But we’ve all been there: that brief stint listening to obscure Brazilian hip-hop was fun, but it was just a phase.
So, having the option to remove specific genres from your Taste Profile would be great.
It’s very much worth pointing out that this functionality exists in Spotify. The Exclude from your taste profile button is available on most Spotify playlists. Before you begin playing the niche flavor of the week, select this option, and Spotify will ignore it. It works—but you have to remember to do this for each playlist you switch to. And, I don’t know about you, but I definitely don’t always consider that I don’t want this in my Taste Profile.
The option to remove certain genres, songs, and styles from your Discover Weekly would be another welcome addition.
2
Show My Past Discover Weekly Playlists
Your Spotify Discover Weekly is a one-off playlist, generated each week. If you want to keep a particular week, you have to create a new playlist with all of the songs on it. It’s not a taxing process; creating a Spotify playlist is easily done.
But it would be fantastic if there were an option to return to old Discover Weekly playlists. You could see the songs that you liked earlier in the month or year, building a small personal archive of your unique Discover Weekly playlists.
1
Let Me Rate It
You can run down your Spotify Discover Weekly playlist and add them to your Liked Songs list. But the option to give the whole of the Discover Weekly playlist a proper rating would be a handy way to provide specific feedback to Spotify on what it served up that week.
The introduction of a weekly rating would help to guide Spotify and improve your playlists each week.
I’d be slightly concerned that Spotify would interpret this as a message to focus on specific genres repeatedly, but it’s another way for listeners to signal their approval (or not).
Windows 11 may look pretty, but Microsoft’s design choices often frustrate rather than make your life easier. These free mods address those shortcomings, turning a barely functional system into a productive powerhouse.
A cluttered desktop can slow you down and make your computer feel overwhelming to use. While organizing files into folders is a good start, there’s an even better solution that can improve desktop management.
Fences is a desktop organization tool that creates shaded, labeled containers on your desktop where you can group related files, folders, and shortcuts. I have a Current Projects fence for active work files, a Tools fence for frequently used apps, and a Downloads fence that automatically captures new downloads.
I love that double-clicking anywhere on the desktop instantly hides all icons—perfect for screen recordings or presentations. The roll-up feature is also a nice touch. Hover over a fence title, and it collapses to give you more desktop space without losing organization. For anyone juggling multiple projects or dealing with desktop clutter, Fences turns your messy desktop into a clean, functional workspace.
While Fences offers a 30-day free trial, it’s a premium app that costs $29.99 for a lifetime license, $9.99 per year for a single device, or $19.99 per year for up to five devices.
Start11 turns Windows 11’s pretty-but-sluggish Start menu into something that actually works—and works your way. Click Start and it opens instantly, with no half-second delays to break your flow. Searches feel just as fast: type any filename and it appears right away, instead of getting buried under Bing results and web clutter.
But Start11 doesn’t stop at fixing the Start menu: it brings back the taskbar customization that Microsoft removed. I keep my taskbar on the left side of my ultrawide monitor with ungrouped buttons, so I can see exactly which files and apps are open. I’ve also pinned project folders directly to the Start menu for instant access to my current work without opening File Explorer.
If you prefer the old look, you can switch back to a Windows 7- or 10-style Start menu. For me, the upgraded Windows 11 style with Start11’s performance boost strikes the best balance between modern design and real productivity.
Start11 comes from Stardock, the same team behind Fences. Like the company’s desktop organizer, it offers a 30-day trial before you’ll need a license: $7.49 per year for one device or $11.24 per year for up to five.
Windhawk is a free, open-source tool that works like an app store for Windows modifications. With one-click installation, these mods fix Windows 11’s minor annoyances while adding quality-of-life improvements.
Some of my favorite Windhawk mods include the classic taskbar labels (so I can see which Word documents are open), middle-click to close on the taskbar, and the ability to disable the Windows 11 context menu completely in favor of the classic one. The browser tab scrolling mod is another clever trick—hover over Chrome or Edge on the taskbar and scroll through tabs with your mouse wheel.
For non-technical folks, it’s the safest way to add power-user features. Just browse the mod library, install on what you want, and enjoy a more functional Windows. Each mod clearly explains what it changes, includes user reviews and ratings, and can be toggled off instantly if you don’t like the result.
Windows has hundreds of settings scattered across the Control Panel, Settings app, and registry/Group Policy. WinToys consolidates them into one clean interface. Instead of going through endless menus trying to find that one privacy toggle, you can change all the essential settings from a centralized dashboard.
While the Home tab shows your system specs and real-time usage stats at a glance, the Apps tab lists all installed programs with sizes and dates, making bloatware easy to spot. In the Services tab, you can view what’s running in the background without having to open the Task Manager.
The Performance tab lets you manage settings to improve system performance. It offers simple toggles to turn on the Ultimate performance power plan to squeeze maximum performance by allowing the PC to draw necessary power, reduce graphics task latency with hardware-accelerated GPU scheduling, change game settings, and disable startup apps.
In the Health tab, you have tools to check disk health and fix corrupted files. Moving to the Tweaks tab, you’ll find privacy improvements like disabling telemetry and removing Windows ads. You can also configure what appears on your desktop, clean up the Start menu, and restore the classic context menu in File Explorer, among other nifty customizations.
Microsoft’s own PowerToys feels like an apology for Windows 11’s missing features. While PowerToys includes a hidden suite of productivity tools, a few stand out as the most important for Windows 11 specifically.
Among the standout utilities, Awake prevents your system from entering sleep mode during critical tasks like large file downloads or lengthy video exports. FancyZones takes window management to the next level with custom screen layouts where you can define specific zones for different applications and snap windows into place with a simple drag motion.
One of my favorites is the Peek utility (Ctrl+Space), which offers instant file previews for images and documents without opening them first. Always on Top complements this by letting you pin any window above all other applications, preventing important windows from disappearing behind whatever you’re actively using.
Windows 11 has a clipboard history feature that lets you access up to 25 of your most recent copied items (using Win + V), but it’s pretty limited. I’ve switched to Ditto instead, which remembers everything (text, images, and files) with no arbitrary limits. It even keeps your clipboard history after system restarts.
Hit Ctrl + Accent (`) (a customizable shortcut) to see your entire clipboard history. Search for that SQL query from yesterday, find that customer email from this morning, or grab that hex color code from last week. Ditto saves everything with full text search, and you can sync your clipboard across multiple computers.
Rainmeter transforms your desktop from a static wallpaper into an information dashboard. Yes, it can get complicated, but starting with pre-made skins makes it accessible to everyone.
I use a minimal setup: system stats in the corner (CPU, RAM, and disk usage), a better clock with calendar, and weather that actually updates. The Spotify integration shows what’s playing with controls right on the desktop.
For beginners, grab a skin like Mond or Enigma and customize from there. Advanced users can create anything—I’ve seen everything from desktops that look like Iron Man’s interface to minimalist productivity dashboards.
If Rainmeter feels too complex, there are other excellent desktop customization tools worth exploring. The community shares thousands of skins, so you don’t need to code anything yourself.
Monitorian allows you to control the brightness of your external monitors with hotkeys or the mouse. No more reaching behind the monitor hunting for tiny buttons.
The free version handles most needs perfectly: you get brightness control, large sliders for easy adjustment, and automatic start with Windows. The app shows your adjusted brightness percentage and maintains the order of your monitor arrangement.
For power users, there’s a premium subscription that adds customizable hotkeys, command-line options, brightness sync across monitors, and control for more than four displays. But the free version does everything most people need.
Each tool on this list tackles a specific Windows 11 frustration—whether it’s Start11’s instant search that actually finds your files, or Ditto’s unlimited clipboard history that remembers everything you copy. Most are completely free, and the paid ones offer generous trials, so you can test them thoroughly before deciding to buy.
Last month, I stared at a 1,200-word blog post about an idea I wanted to write about and felt unsure. The thoughts were good, but the structure was a mess. That’s when I discovered reverse outlining with ChatGPT that turned my fuzzy draft into a clear, compelling article. Now I use this method for different projects, from writing articles to creating presentations.
What Is Reverse Outlining?
Reverse outlining works backward from your completed draft to reveal what you actually wrote versus what you intended to write. Unlike traditional outlining as a notetaking tactic, which happens before writing, reverse outlining strips away all the supporting details to show your bare-bones structure.
The process involves reading through your draft and identifying the core idea of each paragraph, then listing these main points to create a bird’s-eye view of your content’s organization. Think of it as taking notes on your writing to see if your ideas flow logically.
Here’s why reverse outlining works so well:
Reveals structural problems that aren’t obvious when reading the full text
Tests the focus of each paragraph by showing whether each section sticks to one main point
Identifies gaps where you need more evidence or explanation
Improves organization by making it easy to spot which paragraphs should be rearranged
The traditional method of reverse outlining requires manually summarizing each paragraph, which can be time-consuming and subjective. That’s where reverse outlining with ChatGPT becomes invaluable and faster.
How to Boost Your Reverse Outlines With ChatGPT
ChatGPT excels at reverse outlining because it provides an objective distance from your text. When you’re too close to your writing, it’s difficult to see structural issues or recognize when your narrative limps off track. On the other hand, ChatGPT is an excellent reasoning model with the right prompt.
I paste my draft into ChatGPT and ask it to break down my content paragraph by paragraph. The AI generates reverse outlines in seconds, rather than the manual process of reading and summarizing each section myself.
Here’s my sample draft about finding purpose through tiny experiments:
When I ran this draft through ChatGPT, the reverse outline revealed that my conclusion felt rushed and my examples needed more specificity. The AI helped me see structural issues I’d missed during writing.
Sample Prompts for Reverse Outlining Your Ideas
Once you get the idea behind reverse outlining, you can create your prompts. Remember to follow the rules for creating perfect ChatGPT prompts. My own prompts have transformed how I analyze my writing. Each serves a different purpose depending on what kind of feedback I need or the type of project I am on.
1. Basic Structure Analysis
Create a reverse outline for this blog post draft. For each paragraph, provide: 1) A one-sentence summary of the main point, 2) The function this paragraph serves in the overall argument, and 3) Any structural issues you notice.
This prompt gives you a sweeping overview of the content’s organization and highlights problem areas. ChatGPT can also summarize it with a concise overall structure note highlighting the strengths and potential gaps.
2. Flow and Cohesion Check
Analyze this draft and provide: 1) A bullet-point reverse outline of each paragraph’s main idea, 2) Does it form a cohesive narrative? 3) Where does the narrative stray or become redundant? 4) What gaps exist in the logical flow?
This prompt is perfect for identifying where your argument loses steam or loses precision.
3. Audience Feedback
I’m writing for people who feel stuck in their careers. Create a reverse outline that evaluates: 1) The main message of each paragraph, 2) Whether each section resonates with this audience, 3) Where I might be missing their key concerns, 4) Suggestions for better emotional connection.
This prompt helps ensure your content serves your audiences’ needs and concerns.
4. Content Gap Identification
Based on this reverse outline, what are the three biggest structural improvements I should make? For each suggestion, explain specifically how to implement the change.
Use this after getting your initial reverse outline to drill down into actionable revision strategies.
5. Series Ideation Analysis
I’m writing a multi-part series on finding purpose. Create a reverse outline that evaluates: 1) How this post can generate new concepts, 2) Whether this post stands alone, and 3) Gaps that future posts should address.
I am using this prompt to fill content gaps and generate more ideas. Try this when you’re working on a blog series or longer content projects that can be strung together around a common theme.
The combination of reverse outlining and ChatGPT has made me a more strategic thinker. Instead of struggling to take my ideas to the next level, I can quickly break them down, then identify and fix structural problems before they blindside me.
You can try reverse outlining with any kind of project. For instance, reverse outlines are invaluable for designing presentations that grab attention. Use it to improve your reading and learning comprehension. As ChatGPT goes through your ideas paragraph by paragraph, you can take a microscope to your content.
On top of Android, Samsung’s One UI adds its own layer of software and services, each with separate settings, permissions, and default data-sharing options. So even if you’ve already tightened the Android’s core privacy controls on your Samsung phone, there’s still more to do.
6
Turn Off Samsung’s Diagnostic Data Collection
By default, Google collects all kinds of data, including how you use your device, your app activity, and details about your network connections. But even if you adjust Android’s privacy settings to limit what Google can track, manufacturers like Samsung often have their own data collection systems that run quietly in the background.
Samsung’s “Send diagnostic data” feature is one of those settings that’s turned on by default. According to Samsung, this data is used to improve the user experience and fix errors. But if the idea of ongoing data collection makes you uneasy, it’s possible to stop this.
On your Samsung phone, head to Settings > Security and privacy > More privacy settings and turn off the Send diagnostic data toggle.
5
Keep Galaxy AI Data on Your Device Only
Samsung’s high-end devices come packed with handy Galaxy AI features to make your everyday tasks easier. If you have a Galaxy device that supports it, AI can summarize webpages, transcribe voice notes, and even translate phone calls in real time. But convenience often comes with a cost, and in this case, it’s your data privacy.
By default, Galaxy AI sends your interactions to Samsung’s servers for processing, and the data is also used to improve the AI experience. If you’d rather keep everything on your device, though, there’s a quick setting you can switch to make that happen.
To do this, go to Settings > Galaxy AI and turn on Process data only on device. This keeps all AI-related data processing on your device. However, there is a trade-off. Since some of the more advanced Galaxy AI features depend on cloud processing, you’ll lose access to tools like chat translation, note summarization, and generative photo editing.
4
Use Private Share for Safer File Transfers
Sharing files from your Samsung phone is something you probably do all the time. But you don’t have to rely solely on Android’s Quick Share. Your Samsung phone includes a feature called Private Share, which is more privacy-focused.
This encrypts your files before sending them and gives you full control over who can access them, for how long, and how they can interact with them. You can set an expiration date, make files read-only, and even block screenshots on the recipient’s device.
Once a file is sent through Private Share, only the recipient can view it. And if you change your mind, the services allows you to revoke access at any time. To use Private Share, open the share menu and select Quick Share. Then, tap the three-dot menu in the top-right corner and choose Turn on Private sharing. From there, set an expiration date and choose which contacts can access the file.
Of course, Samsung’s Private Share feature only works with Galaxy phones and laptops. So if you need to share something with someone using an iPhone or a Windows laptop, you’ll have to use other methods.
3
Regularly Review Your Privacy Dashboard
It’s easy to forget about apps on your phone that quietly collect data in the background. Some may only need limited access to function properly, yet they might continue to tap into your location, microphone, contacts, and more. The Privacy Dashboard feature can help you stay on top of exactly which apps are doing what, and how often.
To access it, go to Settings > Security and privacy > Permissions used in last 24 hours. You’ll see a breakdown of which apps have accessed sensitive data like your contacts, calendar, location, photos, and microphone over the past day. For a broader view, tap the drop-down menu to expand the timeline to the past 7 days. You can also tap the small i icon at the top of the screen for more specific details about what each permission controls.
Tap any listed permission to see exactly when and how often it was used, complete with timestamps. If you want to check permission usage by app, switch to the Apps tab. If something seems off—like a game accessing your contacts—tap it and select Don’t allow. If you don’t use that app or game, it’s a good idea to uninstall it.
Doing this once a week can help you catch overreaching apps before they become a problem. That said, it’s always best to review an app’s permissions before you install it.
2
Tighten Privacy Settings for Bixby and Samsung Internet
Bixby might not be the most popular Samsung feature, but it’s deeply integrated into the system. And if you haven’t disabled Bixby on your phone, you need to review what data it has access to.
Start by heading to Settings > Advanced features > Bixby. Here, tap Offline processing and make sure it’s enabled. This will ensure that voice commands are handled directly on the device rather than being sent to Samsung’s servers, whenever possible.
Next, scroll down and go to Privacy settings in the Bixby settings menu. Turn off both Allow audio recording review and Allow voiceprint review. These options let Samsung store and review voice recordings and voiceprint data, which isn’t necessary if you are not comfortable with it.
Samsung Internet is a solid alternative to Chrome and other browsers; if you use it regularly, it’s worth tweaking its privacy settings too. In the Samsung Internet app, tap the Menu icon and select Privacy. Tap on Smart anti-tracking and select Strict. This setting automatically deletes tracking cookies and blocks most attempts by websites to track your activity.
While you’re there, it’s a good idea to enable other protective features too, like Block unwanted downloads, Block pop-ups, and Warn about malicious sites.
1
Protect Sensitive Files With Secure Folder
You’ve hopefully already set up a lock screen PIN or password to protect the data on your phone. But if you have specific apps, photos, videos, or documents you want to keep extra private, Samsung’s Secure Folder can help.
Secure Folder is a protected, encrypted space within your Samsung phone. It acts like a vault and keeps anything inside it isolated from the rest of your phone. Files and apps stored here don’t show up in your main storage, gallery, or app drawer, and they’re accessible only after you unlock the Secure Folder. It’s an extra layer of security that helps keep your private data truly private.
To use Secure Folder, go to Settings > Security and Privacy > More security settings > Secure Folder, then follow the prompts to set it up. Once it’s ready, you can move photos, videos, and files into it, or even add apps. This lets you run two copies of the same app, each with its own separate data. It’s especially useful for messaging or banking apps, or if you keep separate accounts for work and personal use.
It’s even possible to hide the Secure Folder icon from the app drawer, so there’s no chance of someone accidentally stumbling across it.
Out of the box, your Samsung phone comes with several settings that quietly share more data than you might realize. All it takes is a few quick tweaks to take control of your data and enjoy a more private experience on your Galaxy device. These changes don’t take long to set up, so make sure you don’t skip them.
If you’re looking to edit videos on your Galaxy phone, you don’t have to look far. On Samsung phones running One UI 6 or later, Samsung Studio gives you a full set of video editing tools for free.
What Is Samsung Studio, and How Can You Access It?
While the editing tool in the Gallery app is good enough for trimming, cropping, and even muting videos on your phone, Samsung Studio goes beyond basic edits. It gives you a timeline setup that is way more flexible.
You can move clips around, add smooth transitions, combine a bunch of videos into one project, and throw in effects on specific parts of the footage. It’s made for more thoughtful edits without making things overly complex.
To open Samsung Studio, launch the Gallery app first. Then, tap the Menu button at the bottom and select Go to Studio. In Samsung Studio, tap Start new project, pick the video you want to work on, and you’re good to go.
If you want to open Samsung Studio directly from your app drawer like a regular app, you can do that too. Just tap the three-dot icon in the top-right corner in Samsung Studio, go to Settings, and turn on the Add Studio to Apps screen toggle.
1
Choose Your Preferred Aspect Ratio
Before diving into the edit, it’s a good idea to pick the right aspect ratio depending on where you plan to share the video. For instance, if you shot it in landscape but want to post it as an Instagram Reel, you’ll need to switch it to a vertical format so it looks right.
In Samsung’s Studio app, tap the three-dot icon in the top right and head to Project settings. There, you can choose from popular aspect ratios like 1:1, 9:16, 16:9, or even 2:1. The app will automatically adjust your video by adding black bars either on the sides or at the top and bottom to fit the video.
2
Add, Trim, and Rearrange Clips
Once you’ve set the aspect ratio, you can start trimming, merging, and rearranging clips. If you’ve used any video editor before, this part will feel pretty familiar.
To trim a clip, tap it in the timeline to select it. You’ll see white handles pop up on both ends. Drag these inward to chop off anything you don’t need from the start or finish. If the part you want to remove is in the middle, you’ll need to split the clip first.
Drag the playhead to the exact spot where you want to make the cut, then tap the split icon to break the clip into two pieces. You can then delete a chunk from the middle or drop something new in between. You can also tap the trash icon to delete a clip entirely.
To add a new clip, tap the plus (+) icon at the far left of the timeline. You can insert a blank slide, a photo, or another video from your Gallery. Once it’s in, tap and hold the clip to drag it wherever you want in the timeline.
3
Edit Clips and Add Smooth Transitions
Samsung Studio includes pretty much all the editing tools you get in the Gallery app’s built-in video editor. You can speed up or slow down clips, add filters, crop the frame, and adjust stuff like brightness, contrast, and saturation. If a clip has a sound you don’t want, tap the speaker icon and slide the volume down to zero.
Adding transitions between clips is an easy way to make your video feel more polished. Once you’ve got your clips trimmed, arranged, and in the right order, you can add a few smooth transitions to tie everything together.
To add a transition, tap the small icon that shows up between two clips in the timeline. In the menu that opens, you’ll see different transition effects like Fade, Slide, Wipe, and more. You can preview each one by tapping through the options, and once you pick one, it’s applied right away. If you want to keep things consistent, there’s also the Apply to all option that adds the same transition across all your clips.
4
Add Text, Stickers, and Drawings
Beyond the basic editing, you can add text, stickers, or drawings to clips to make the video more engaging. To start, tap on the clip you want to edit and look for the text, sticker, or pencil icon.
Tap the Text tool to add captions, titles, or labels anywhere in your video. It’s great for calling out key moments or giving a bit of context. You can tweak the font style, size, alignment, and color as you see fit.
Once you’ve added the text, you can drag it anywhere on the screen. If you only want it to show up during a specific part of the clip, use the timeline below to set when it appears. You can also tap the text in the timeline to add entry and exit animations like “pop in,” “slide down,” or “fade out” to give it a bit more flair.
The Stickers tool works pretty much the same way. You’ll find emojis, fun icons, timestamps, and even custom avatars. Like text, you can resize and move stickers around, and set them to pop up at specific points in your video.
And if you’re feeling a bit more creative, the Drawing tool lets you doodle right on the video using your finger or a stylus. It’s perfect for circling something important, underlining a point, or just adding some personal touch. You can pick from different brush styles and colors to match the video.
5
Add Background Music to Videos
Adding background music can really level up your video and make it way more fun. In Samsung Studio, tap the music icon in the bottom right corner. Then choose Soundtrack to browse music from Samsung’s built-in library, or tap My music if you want to use a song or voice recording from your phone’s storage.
In the Soundtrack menu, you’ll find a bunch of tracks from Samsung sorted in categories like Funny, Happy, Lounge, and Upbeat. Tap on any track to download and preview it. If it feels like a good fit, tap Done to add it into your project. Once it’s on the timeline, you can tap the music clip to tweak the volume or add a fade-in and fade-out effect for a smoother feel.
You can trim the track to match the video’s length or layer multiple audio files if needed. Tap on the music clip in the timeline to apply a fade in or fade out effect. You can also adjust the volume to ensure it doesn’t overpower dialogue or important sounds in the video.
To see how everything comes together, tap the full screen icon, then hit the play button to preview your video. If everything looks good, tap Done. From there, tap the three-dot menu to choose your preferred export size and format. Finally, tap Save video to store the edited video to the Gallery.
Related
8 Surprisingly Useful Samsung Apps You Won’t Find Pre-Installed on Galaxy Phones
If you own a Samsung phone, you don’t want to miss out on these!
While there’s no shortage of good video editing apps on the Play Store, if you’ve got a Samsung Galaxy phone, you probably don’t need to bother with most of them. For quick edits on a single video, the video editor in the Gallery app does the job. And when you want something more flexible with a timeline setup, Samsung Studio has you covered.
Sure, Samsung Studio is not meant to replace full-fledged video editing software, but for everyday video projects, it’s more than enough.
If you still think a powerful PC means a giant tower under your desk, think again. Modern mini PCs are nothing like their older counterparts, which means it’s time to say goodbye to those big, old tower PCs.
4
Mini PCs Are Powerful Enough for Most Tasks
Don’t let their small size fool you; modern mini PCs pack a serious amount of power. For years, if you wanted a workhorse computer to handle your everyday tasks, you had to get a bulky desktop tower. And it was justified because desktop towers offered far more power than mini PCs.
However, thanks to improvements in hardware over the last couple of years, mini PCs have become increasingly capable machines that can handle most everyday computing tasks with ease. These tiny boxes pack more power than you’d get from desktop computers just a few years ago.
Take the 2024 Mac mini, for example. It’s powered by Apple’s 10-core M4 chip with a 10-core GPU. There’s also an M4 Pro option, with either a 12- or 14-core CPU paired with a 16- or 20-core GPU, respectively. Memory starts at 16GB but can be configured up to a whopping 64GB, depending on your needs.
If you prefer Windows, consider Beelink’s SER9 Pro. It ships with two CPU options: AMD’s Ryzen AI 9 365 (10-core CPU with a 12-core GPU) and Ryzen 9 HX 370 (12-core CPU and 16-core GPU). These chips can deliver boost speeds of up to 5.0 GHz and 5.1 GHz, respectively, and you can choose between 32GB/1TB or 64GB/2TB memory and storage configurations.
That’s serious hardware by today’s standards, and these machines can handle almost anything you throw at them without a struggle. With their power, they can easily breeze through mundane tasks like web browsing, office work, video conferencing, and media streaming. They’re even capable of handling more demanding ones, such as gaming, video editing, and software development.
And most people aren’t doing demanding tasks to justify getting more powerful hardware than mini PCs offer. Even a low-powered CPU can be enough for most of today’s tasks.
3
They Save Space
One of the most significant advantages of buying a mini PC is how much space it frees up in your workspace. Their small footprint means you only need to spare a tiny area on your desk for the PC, unlike traditional desktop computers, which require more space. Heck, you can even mount it behind your monitor.
Using our two models as a reference, the Beelink SER9 Pro measures 5.3 x 5.3 x 1.7 inches and weighs only 3.21 pounds. The M4 Mac mini, on the other hand, measures 5.0 x 5.0 x 2.0 inches and is barely two pounds (the M4 Pro model, the heaviest of the two, is just 1.6 pounds).
Mini PCs are perfect for compact work setups where space is limited. Another advantage of the small footprint is that they’re portable and can be easily carried around, just like laptops. Of course, mini PCs aren’t as convenient as laptops because you’ll need a mouse, keyboard, plus a portable monitor.
2
They Cost Less Than You Think
Despite packing more than enough power for most people and tasks, mini PCs are surprisingly affordable. Entry-level mini PCs start as low as $150 to $200, with some going for even less.
The GMKtec Mini PC, for example, is an entry-level model that starts at around $158 as of this writing. It packs 16GB RAM, 512GB storage, and Intel’s N150 processor. The M4 Mac mini starts at $599 for a 16/256GB model, while the Beelink SER9 series starts at around $829. Beelink’s previous generation SER8 mini PC is even more affordable, starting at $479 for a model with 24GB RAM and 1TB storage.
Related
Mini PC vs. Desktop PC: What Should You Buy?
Do you really need a big, bulky desktop PC? It’s time to consider switching to a mini PC.
And with the vibrant mini PC market, you’ll surely find something that’s just powerful enough for everyday needs, fitting your budget. Compared to laptops or desktops, you get more computing power for a fraction of the cost.
1
They’re Quiet and Energy-Efficient
When you compare costs, it’s not just about the sticker price. Mini PCs also help you save money on energy costs. They often use efficient CPUs that generate less heat, allowing manufacturers to build models with smaller, quieter fans or, in some cases, no fans at all.
Energy efficiency is another significant benefit of opting for a mini PC, as they utilize power-efficient CPUs compared to full-sized tower PCs. For context, the TDP (Thermal Design Power) of the AMD Ryzen AI 9 365 processor used in Beelink’s SER9 Pro is just 65W, the same as the base version of Apple’s M4 chip. That’s almost half the default TDP of AMD’s desktop-class Ryzen 9 9900X3D.
Kannon Yamada / MakeUseOf
It might not seem like a significant difference, but over the course of a year, lower electricity usage can trim your utility bills, especially if you leave your computer running for extended periods each day.
Modern mini PCs might be the only computers you’ll ever need in 2025 and beyond. They’re portable, energy-efficient, and affordable compared to desktop PCs, and yet powerful enough for most tasks.
Incredibly, Discover Weekly has been a part of the Spotify app for 10 years now. Which, in terms of tech, makes it an ancient feature. And if you’re not yet familiar with Discover Weekly despite subscribing to Spotify, the latest update means that now is the time to check it out.
Spotify Is Improving Its Discover Weekly Playlists
If you’re not yet familiar with Discover Weekly, it’s Spotify’s way of getting you to listen to new (to you) music. The playlist updates every Monday, adding tracks that the streaming service’s algorithm thinks you’ll like. Spotify generates various different playlists each week, but Discover Weekly was the first when it was launched in 2015.
Millions of people now open Discover Weekly every Monday, hoping to hear a song that they’re unfamiliar with, but which goes on to become a favorite. And now, as announced in a post on For the Record mainly focused on Discover Weekly turning 10 years old, Spotify is making some changes to it.
First up is a visual refresh, with a new geometric pattern that Spotify claims “reflects its ever-evolving nature and the dynamic energy of weekly discovery.” However, much more interesting than the new look is the option to tweak the Discover Weekly playlist by genre.
When you open Discover Weekly from the Made for You hub, initially, you’ll still see the default playlist of 30 songs. However, you’ll also now see a list of five genres above the songs, allowing you to tweak the playlist more to your liking. Essentially, this means you now have six distinct Discover Weekly playlists to explore each week. Which will be (literal) music to the ears of fans of the feature.
I must admit that I don’t listen to all the Discover Weekly tracks, but I almost always discover something I like by flicking through the suggestions. Being able to do that for five specific genres massively increases the chances that a. I’ll hear something completely new to me, and b. I’ll find new songs I like enough to add to my long list of Liked songs.
Discovering New Music Is At the Heart of Spotify
We’re now fully into the streaming era, where almost every movie, game, and song is available to play on demand on whatever device you have to hand. And while some people still mourn for the days of physical media (hence the renewed interest in vinyl), streaming does bring lots of advantages. One of which is the ability to discover new content quickly and easily.
For me, discovering new music is at the very heart of the Spotify experience, and there are lots of different ways to discover new music on Spotify. Discover Weekly is just one of those ways, and the new Discover Weekly playlist makes the feature even better than it already was. But if it still doesn’t hit the spot for you personally, try these AI playlist generators instead.
When your PC encounters a problem, seeing how everything is running can help you troubleshoot the issue. And when all is well, this information can also help you optimize your system. It’s all available in the Task Manager’s Performance tab—as well as a more advanced option.
What Is the Performance Tab in Task Manager?
The Performance tab in Task Manager provides a comprehensive and real-time overview of your Windows computer’s resource usage. It displays graphs and other useful data, allowing you to monitor system performance, identify bottlenecks, and efficiently manage resource-intensive applications.
You can access the Performance tab by right-clicking an empty part of the taskbar and selecting Task Manager, or by hitting Ctrl + Shift + Esc anytime. In Task Manager, click Performance on the left menu to access the tab.
Understanding the Performance Tab and How to Use It Effectively
The Performance tab is divided into several sections; the ones that appear depend on your setup. Here’s what you’ll typically see, along with examples of common use case scenarios.
CPU
This section displays real-time CPU usage through graphs and percentages. It shows detailed information about the processor, including its name, cores, threads, and clock speed. You can also use it to monitor your system’s uptime and track running processes.
A common reason to visit the CPU tab is when you notice your PC acting sluggish during taxing work, like playing a game or editing a video. If this section shows high usage (90–100%), that indicates a bottleneck. From there, you can walk through ways to fix high CPU usage on your Windows computer.
Memory
Random access memory (RAM), or just “memory”, is the temporary, fast storage where your PC keeps running programs. This section displays your computer’s total RAM, including how much of it is in use and available.
Committed refers to memory that’s spoken for, while Paged pool shows how much of your storage disk Windows will use as the paging file (a part of your drive used as pretend RAM when your actual memory runs low). Other useful information includes the memory’s speed, and the RAM slots used and available on your computer.
The memory section comes in most handy when you notice your computer has become slow when multitasking. When memory usage is around 90–100%, you need to do something to identify what is causing the high RAM usage and fix it. For me, this is usually closing memory-intensive applications like Chrome and Blender.
Disk
If you have more than one storage disk in your computer, each one will have its own section in Task Manager (e.g., Disk 0 and Disk 1). This shows the disk’s activity, with separate graphs for active time and transfer rate. It also shows information like capacity, disk type, read/write speed, and whether it’s a System disk (the one Windows is installed on).
High disk usage can indicate a bottleneck, especially when transferring or loading files. The information in this section can also help you troubleshoot apps that cause heavy disk utilization. Studying this will also help you make informed decisions on whether you need to upgrade your storage or switch to an SSD to speed up operations.
Wi-Fi/Ethernet
The Wi-Fi or Ethernet section (depending on your connection type) shows your network usage data in real time, including send/receive data rates. You also get useful information like the adapter name, local IP address, and signal strength.
This networking tab comes in handy when you’re experiencing connectivity issues or slow internet speeds—it’s easy to check if the connection is stable or operating at the speed you expect. You can also use this section to identify bandwidth-hogging applications. Additionally, it’s useful as a way to monitor signal strength when optimizing your router placement.
GPU
Like Disk, you’ll see multiple GPU tabs if you have more than one video card installed in your computer. Each one shows GPU usage statistics on various processes, including 3D rendering, video processing, and video decoding. It also displays specific information about the GPU itself, such as the model and dedicated/shared memory.
The GPU section is crucial for monitoring graphics performance, especially when playing a game or editing video. It also helps you check if your graphics card is working properly. Furthermore, it can help you understand your GPU usage patterns so you know if you need to upgrade your hardware or optimize software.
You Should Also Use the Resource Manager (Resmon)
The Performance tab is good for a quick, high-level overview of how your computer is running. If you want to get a detailed analysis that includes every active process, you should use the Resource Monitor instead. It can help drill down on the root cause of the problem you’re experiencing better than the Performance tab.
There’s a shortcut to access the Resource Manager from the Performance tab you were just on. Click the three-dot icon in the top-right corner and select Resource Monitor from the menu. To open it on its own, just type “resource monitor” into the Start menu.
Once you open it, you’ll see that the Resource Monitor is more advanced. To learn more, we’ve walked through how to troubleshoot various problems with the Resource Monitor.
Windows has a lot of tools to help you optimize performance or troubleshoot issues. Learning to navigate these built-in utilities will save you from installing unnecessary third-party software. Mastering the Task Manager’s Performance tab is an excellent first step toward becoming more proficient with your Windows system.
Even as someone who genuinely likes Samsung phones, the company’s devices have a few recurring issues that get under my skin. While not bad enough to make me switch, they show up often enough to make me groan every time.
6
Too Much Bloatware
Sergio Rodriguez / MakeUseOf
Almost every Android phone ships with a few pre-installed apps, but Samsung takes it to another level. Out of the box, Galaxy phones come packed with dozens of apps that you may never need or use.
It starts with Samsung’s own lineup of apps, like Samsung TV, Samsung Members, Smart Tutor, SmartThings, and the Wearable app. Then, because of the Microsoft partnership, you also get apps like Microsoft 365, LinkedIn, OneNote, and OneDrive on your phone from the start.
Put all this together, and even a brand-new Samsung phone can feel messy right out of the box. There are so many preloaded apps, and they don’t just sit there. They take up storage, drain your battery, and quietly eat up system resources in the background. The problem is even worse on budget Galaxy models, where storage and performance are already tight.
Sure, it’s not that hard to get rid of most of the pre-installed apps on your Samsung phone. But first impressions matter, and One UI doesn’t exactly make a great one.
5
Still No Support for Multiple User Profiles
Justin Duino / MakeUseOf
One of the best functions Android phones have that iPhones still don’t is letting you set up multiple profiles or guest accounts. This essentially gives you separate spaces on the same device, like you’d have with multiple users on Windows or macOS. Each profile gets its own home screen, apps, accounts, and settings. It’s kind of like having two phones in one without the extra hardware.
This is super handy if you want a separate space for kids, or to keep work and personal matters apart. Although Samsung phones run on Android, they don’t support this feature for some reason. Strangely enough, the multi-profile option does show up on Samsung tablets.
On Samsung phones, the closest equivalent is Secure Folder. It lets you lock apps, photos, and other personal data behind a passcode, which is great for privacy. But it’s not functionally the same, as you can’t use it to create separate spaces for different users.
4
One UI vs. One UI Core Confusion
Zarif Ali / MakeUseOf
Even though all Samsung phones technically run One UI, the experience isn’t the same across every device. Flagship models like the Galaxy S series or the Z Fold and Flip get the full version of One UI, packed with all the features. But a lot of budget and mid-range Galaxy models come with a watered-down version called One UI Core.
The name “One UI Core” used to be a helpful way to tell you that you were getting a lighter, more limited version of the software. However, Samsung has quietly stopped labeling it that way. So now, two devices might both say they run One UI 6.1, but only one gives you the full experience.
The differences between One UI and One UI Core are hard to miss. For starters, phones with the Core version don’t have functions like Edge Panels or Edge Lighting. You also lose out on features like Link to Windows, Secure Folder, and support for Samsung’s Good Lock app. So if you’re using one of these devices, you’re missing out on a bunch of customization options, multitasking tools, and extra privacy features.
While it makes sense that lower-end phones would skip a few features, the confusing part is that Samsung doesn’t make this clear anymore. Unless you go digging through forums or watch detailed reviews, you probably won’t notice what’s missing until you buy a phone and try to use a feature that isn’t there.
3
Duplicate Apps
Sanuj Bhatia / MakeUseOf
Samsung loads up its Galaxy phones with its own apps like Gallery, Phone, Contacts, Messages, and a bunch of others. And to be fair, some of them are quite good, with features you won’t find in Google’s versions. The problem is that Android already includes Google’s apps by default, so you end up with two apps for the same purpose.
On a Galaxy device, you get Samsung Internet and Chrome, Gallery and Google Photos, and then Samsung Messages and Google Messages. It’s not just a couple of apps; it’s a whole list. Sure, having options can be nice, but the real issue is that you can’t simply clean this up by picking what you want.
If you’re into Samsung’s apps, then it’s not a big deal since most of the Google ones can be uninstalled. But if you prefer sticking with Google’s ecosystem, you’re out of luck. One UI won’t let you remove many of the Samsung apps, like Gallery, My Files, Phone, Contacts, and the Galaxy Store.
So even if you never plan on using Samsung Internet or Samsung Messages, they’ll stay there, and you can’t delete them. You can hide them if you want, but you won’t get back the storage they’re taking up.
2
Annoying Ads Everywhere (Even on Flagship Models)
Sanuj Bhatia / MakeUseOf
If you’ve ever used a Samsung phone, you probably know how often ads show up. They’re not just hiding in random corners of the interface. You’ll see them right on the lock screen, in your notifications, or even inside Samsung’s default apps. And it can get annoying, fast.
Ads aren’t unusual on budget phones where companies have to cut corners, but Samsung doesn’t stop there. Even high-end devices like the Galaxy S25 Ultra or the Fold 6—phones that cost well over a thousand dollars—still come loaded with ads.
What makes it even more frustrating is that there’s no simple, one-tap way to turn all the ads off. You have to dig through settings, tweak permissions, and manually disable app notifications to get rid of ads on Samsung phones.
Even after all that, some ads still manage to sneak through. For anyone coming from an iPhone or even a Pixel, both of which offer a clean, ad-free experience, this can be a total deal-breaker.
1
Charging Speeds That Lag Behind the Competition
Digvijay Kumar/MakeUseOf
Most Samsung phones provide great bang for your buck, with top-notch displays, solid performance, and premium build quality. But when it comes to charging speed, Samsung still lags behind a lot of other Android brands.
While brands like Motorola, Oppo, and OnePlus are pushing fast charging speeds to 68W, 80W, and even 100W, Samsung has barely moved on this. Even its latest flagship, the Galaxy S25 Ultra, maxes out at just 45W. That might have sounded impressive a few years ago, but in 2025, it’s just not enough to keep up.
In everyday use, this means charging your phone feels slower. A full charge can still take more than an hour, while phones from other brands can go from empty to 100 percent in less time. It gets even more frustrating with phones like the Galaxy S25 Edge, which has just a 3,900mAh battery despite its big 6.7-inch display. With a battery that small, faster charging could have at least made up for the more frequent top-ups.
Samsung phones still rank among the top choices for anyone looking to buy a smartphone. But even the most loyal fans can’t ignore the recurring headaches that come with them. Hopefully, future models will iron out these kinks. Until then, we’ll just have to rely on workarounds to make the experience as good as it should be.
Sometimes, it can feel like ChatGPT is trying to be your biggest cheerleader rather than offering balanced opinions. While sometimes nice, this can cause problems when trying to plan something or trying to get an unbiased response. To combat this, I made ChatGPT as brutally honest as possible.
6
Speaking to ChatGPT Like I Would to a Friend
When I first started using ChatGPT, I talked to the tool like it was a robot. And while it technically is, I unsurprisingly got robotic responses. Unfortunately, this all too often meant the replies were either not honest enough or what I would call “harmless but dull”.
More recent ChatGPT iterations have become much better at speaking more like human beings. For example, the lack of robotic responses in GPT-4o makes ChatGPT Plus very much worth subscribing to.
Now, I type in ChatGPT like I would when texting someone I know. Because of this, my responses are more personalized and honest.
5
Be Direct: Tell ChatGPT to be as Honest as Possible
In my early days of using ChatGPT, I thought simply typing a prompt would result in my desired responses. However, I quickly discovered this wasn’t true. Rather than relying on ChatGPT to completely understand the context I wanted (without saying), I decided to be more specific in my prompts.
If I want an unbiased answer, I’ll simply tell ChatGPT to be as honest as possible. From personal experience, this has been one of the various prompting tricks that actually work. I’m much more likely to get more balanced answers, and if I need more of an overview, I’ll ask the software to provide a full pros and cons list.
Once I’ve put these instructions into the chat (or project), I’m more likely to get honest responses for future parts of the conversation. Sometimes, the memory updates; if it does, I re-enter the prompt.
4
Asking ChatGPT for Conflicting Opinions
I’ve noticed that if I use ChatGPT too much without it disagreeing with me, the tool becomes more detrimental than beneficial. If I’m having a conversation and discussing ideas, the constant agreement also starts to wear on me. While the software has sometimes called me out without needing anything to, I often have to enter the prompt myself.
Besides asking the tool to disagree with me so I don’t become too full of myself, I’ll also ask for conflicting opinions when I’m debating a certain decision. For example, this tactic works really well when I’m thinking about whether to add a new digital tool to my life or keep my toolkit streamlined.
Understanding when ChatGPT is being too agreeable and taking action when needed is one way I stop AI chatbots from agreeing with me all the time.
3
Telling ChatGPT to Go Into “Roast Mode”
I first realized ChatGPT could be quite funny when asking the software for some hot takes. Since then, some of the responses it has given me have been… interesting, to say the least. Telling the software to go into Roast Mode often gives me some brutally honest (and somewhat edgy) results, which makes using the tool more interesting.
Most of the time, ChatGPT goes into Roast Mode if I give a prompt with a brutally honest opinion. This particularly works in projects where I’ve done this before (by the way, Projects is the most underrated ChatGPT feature). The app has more context from other conversations when I use this version.
Sometimes, the software updates its memory and doesn’t give the responses I want. When it does this, I just provide the instructions on how to enter Roast Mode.
2
Asking ChatGPT to Play the Role of an Expert
While I sometimes need to explicitly tell ChatGPT to be more honest, I don’t always have to resort to this. Sometimes, telling the software to play the role of an expert is good enough.
I’ll often tell ChatGPT to be an expert when asking for help with planning my goals. For example, if I were trying to put together a gym routine, I may tell the tool to pretend it’s a personal trainer or nutritionist.
Asking ChatGPT to be an expert is generally the best way to get better prompts.
1
Telling ChatGPT to Disagree With Me in Instructions
While ChatGPT is good with conflicting opinions when asked, it sometimes still agrees with me (or gives both sides of the story). So, when I’m looking for thoughts from the other side, I’ll ask ChatGPT to disagree with me. Doing so is much easier than having a discussion on social media since it tends not to resort to insults.
I’ll sometimes put this instruction in projects, but on other occasions, it’ll just go in the prompt. Occasionally, I will play devil’s advocate and continue asking conflicting questions—but in other instances, I’ll just try and get a more detailed answer.
While ChatGPT can seem like a robotic golden retriever that wants to please, you can make the tool more honest. It’ll sometimes go full-on Roast Mode, but on other occasions, you can get respectful disagreeing responses. Using each of these has made the app more fun to use and also improved the quality of each response I get.
Most of Windows 11 Pro’s features are replicable on Windows Home with third-party options. However, there’s one tool that wraps so many useful functionalities into a single convenient menu that it’s the sole reason you should consider Windows Pro.
What Is Group Policy Editor and What Does It Do?
Group Policy Editor, also known by its Run command of gpedit.msc, is a control center that lets you configure hundreds of Windows options that aren’t available through the regular Settings app. Think of it as Windows’ hidden control room where you can tell your computer what to do, instead of accepting whatever Microsoft decides is best for you.
When you try to control Windows behavior through the regular Settings app, you’re limited to what Microsoft thinks most users should change. Learning how to navigate the Registry Editor gives you more control, but it’s risky; one wrong move and you could break your entire system. Group Policy Editor sits in the middle, giving you powerful control with built-in safety guards.
What I like most about Group Policy Editor is its transparency. Unlike mysterious Registry tweaks you find online, every Group Policy setting comes with clear descriptions of what it does and what happens when you enable or disable it. You’re not guessing when you make changes. The interface shows you exactly which systems will be affected and provides detailed explanations for each setting.
Related
The 9 Most Annoying Windows 11 Features (and How to Fix Them in Minutes)
Make Windows 11 work for you, not against you.
Another reason to use Group Policy Editor is its reliability. When you make changes through Group Policy Editor, Windows respects those decisions. Unlike some Registry tweaks that Windows Updates can overwrite, Group Policy settings stick around and maintain your preferences. This consistency means you can set up your computer once and trust that it will stay configured the way you want it.
Overall, the key advantage of Group Policy over all other methods is its combination of safety, persistence, and transparency. It’s the professional way to manage Windows computers, even in a home environment.
How I Easily Manage My Device With Group Policy Editor
Most people think Group Policy Editor is just for IT departments, but I’ve found it’s one of the most practical tools for home users like me. I use it to shape my computer into a machine that works exactly how I want, without the usual Windows headaches.
Getting started is simple; press Win + R, type “gpedit.msc”, and hit Enter. You can also hit the Windows key and search for “group policy editor” to open the menu, or use the many other ways to open Local Group Policy Editor on Windows 11.
Once it’s open, there’s no need to feel overwhelmed. Let’s look at the various ways I use Group Policy Editor to make my computer work better for me.
After I make changes in Group Policy Editor, I always run gpupdate /force in the Command Prompt to apply them right away. Some settings might need a restart or sign-out.
Taking Control of Windows Updates
Windows Updates used to drive me crazy. My computer would restart right in the middle of important work, or it would spend twenty minutes installing updates when I just needed to quickly grab a file before heading out. Group Policy Editor completely solved this frustration.
Navigate to Computer Configuration > Administrative Templates > Windows Components > Windows Update. Here you can set exactly when updates get installed. I configure my main work computer to only install updates at 2AM on Saturdays.
The best part is controlling which updates get installed automatically. I allow security updates to be installed immediately because they are critical, but I defer feature updates for several weeks. This way, I avoid being an unwilling beta tester for Microsoft’s latest experiment while still staying secure. Group Policy lets me strike the perfect balance between security and stability.
Hide Shutdown and Restart to Prevent Family Mishaps
When my nieces visit, I often let them play on my desktop computer with one of the virtual desktops I use for multitasking. Since I do my writing projects on this specific computer, having a virtual workspace prevents my work from being tampered with. However, there have been had multiple cases where I lost progress because someone accidentally pressed the power button.
To fix this, I used Group Policy Editor to disable the power button on my computer. This way, others can’t accidentally turn off the machine while downloads are in progress or I’m in the middle of certain tasks.
Disabling the power button is easy. Go to Computer Configuration > Administrative Templates > System > Power Management > Button Settings. There, double-click Select the Power Button Action; set it to Enabled, select Take no action, hit Apply, and then choose Okay. The change takes effect right away.
Aside from the power button issue, I’ve also grown tired of cleaning up “free game boosters” and other mysterious junk programs. I thus use a policy that blocks users from installing software unless I approve it as an admin. This has nearly eliminated malware headaches and keeps my systems running clean.
To do this, open Group Policy Editor and navigate to Computer Configuration > Windows Settings > Security Settings > Software Restriction Policies. Right-click to create a new policy if there isn’t one already. Under Enforcement, set it so that software restriction policies apply to everyone except local administrators.
This way, only I can install new programs, and I know exactly what’s on the living room computer.
Prevent Windows Bloatware From Reinstalling After an Update
It’s pretty frustrating when you do a big Windows update, only to see Microsoft fill your Start menu with apps and ads you never asked for. Suddenly, Candy Crush, TikTok, and a bunch of other “suggested” programs are back, even after you took the time to remove them before.
To stop this from happening, open Group Policy Editor and go to Computer Configuration > Administrative Templates > Windows Components > Cloud Content. Look for the setting called Turn off Microsoft consumer experiences. Double-click it, set it to Enabled, and apply your changes.
This simple tweak tells Windows to stop automatically installing bloatware and suggested apps after updates or resets. Your Start menu stays clean, and you don’t have to keep uninstalling the same unwanted programs over and over again. It’s a small change that makes a big difference in keeping your PC clutter-free.
Stop Windows Telemetry and Take Back Privacy
I’m not comfortable with Windows sending usage info to Microsoft, especially from computers used for banking or sensitive work. The regular Settings app doesn’t go far enough, but Group Policy lets me lock it down.
Unlike Registry tweaks that might be incomplete or reset by updates, Group Policy provides thorough, persistent privacy protection. Third-party privacy tools often interfere with legitimate Windows functions, while Group Policy makes surgical changes.
Open Computer Configuration > Administrative Templates > Windows Components > Data Collection and Preview Builds and double-click Allow Diagnostic Data. I set it to Disabled (or Enabled with Diagnostic data off if that’s what’s available) and hit OK. Now, I know my data isn’t being sent out without my say-so.
Lock Down the Control Panel for Standard Users
I’ve had family members accidentally change my computer’s network settings or display options. With Group Policy, I can hide the Control Panel and Settings utilities from standard users, so only I can make system changes.
In User Configuration > Administrative Templates > Control Panel, double-click Prohibit access to Control Panel and PC settings, set it to Enabled, and click OK. Now, only admins can get into those settings, so I don’t have to keep fixing issues others create.
Toggle Remote Desktop Access for Safe Home Office Connections
Sometimes I need to access my home PC from another room, or even outside the house. Group Policy helps me control who can connect, keeping my machine secure.
Go to Computer Configuration > Administrative Templates > Windows Components > Remote Desktop Services > Remote Desktop Session Host > Connections, double-click Allow users to connect remotely by using Remote Desktop Services, and set it to Enabled or Disabled depending on your needs. You can also adjust other security settings in the same section to keep remote access safe.
Why This Feature Is Worth the Upgrade
With these tweaks, I’ve made my Windows 11 Pro devices easier to manage, safer, and more predictable for everyone in my household.
Whether Group Policy Editor justifies the $199 cost of Windows 11 Pro (or a $99 upgrade from Home) depends on your situation and computing habits. If you’re a casual user who’s comfortable with Windows’ default behaviors and primarily uses your computer for basic tasks, you can probably skip the upgrade. Windows 11 Home handles these everyday needs perfectly well without the added complexity.
However, the upgrade makes a lot more sense if you’re tired of fighting Windows’ default behaviors or need better control while sharing your computer with family members. The value increases significantly when you consider the other Pro features bundled in. Windows Sandbox provides safe testing environments for suspicious downloads, BitLocker offers enterprise-grade drive encryption, and Hyper-V enables virtualization for running multiple operating systems. Meanwhile, Remote Desktop functionality adds professional remote access capabilities.
For power users who want centralized system control, the ability to manage multiple user accounts, or need enhanced security features, Windows 11 Pro delivers substantial value. The time savings from automated management and peace of mind from comprehensive system control easily justify the upgrade cost for anyone who takes their computing seriously. But if you don’t need those, skip Windows Pro and save your money.
I’m sure I’m not alone in often struggling to make decisions. It’s not just the big decisions, such as whether to move house or change jobs, but also everyday minutiae, like what to eat for dinner or what to watch on TV.
Our lives are all punctuated by a never-ending succession of decisions, both big and small. And that can sometimes feel overwhelming. Thankfully, artificial intelligence, and (in my case) ChatGPT in particular, can help.
Using ChatGPT to Help Me Make Decisions
We all make multiple decisions every single day. And that can sometimes feel a little overwhelming. So, when the number of decisions I need to make starts racking up, and I start to feel a little overwhelmed as a result, I turn to ChatGPT for help.
Related
What Are Large Language Models (LLMs) and How Do They Work?
Generative AI is all the rage, but how does a large language model work?
As a large language model, ChatGPT can analyze the information I feed it and logically spit out an answer. So, with some sensible prompting, you can have ChatGPT make decisions for you. Or, if you don’t like the answer it provides, use ChatGPT’s responses to make your own mind up.
Which Restaurant Should I Visit Next?
My partner and I try to eat out at restaurants fairly often. And while it isn’t always possible due to stretched times and budgets, when we do venture out, we like to try new places. But which restaurants should we visit? After all, there are dozens of decent restaurants within traveling distance, so how do we sort the wheat from the chaff and narrow the many options down to just a few?
ChatGPT is an ideal tool to assist with this decision. I tend to start broadly, before providing more information to help ChatGPT narrow in on its choices. The important details are what location you’re referring to, what type of cuisine you’re considering, and the budget you have available. With these three pieces of information, ChatGPT can provide a list of choices for you to pick from, allowing you to make the final decision.
Where’s the Best Place to Go on Vacation?
My partner and I are fortunate enough to be able to go on vacation once a year, providing a nice respite from the pressures of work and home life. However, with just one or two weeks available each year, deciding where to go on vacation becomes an important thing to get right. The first question that needs answering is where to go on vacation, followed closely by where to stay in that location.
As with all of these decisions, ChatGPT requires some information before it can help you choose. In this case, the pertinent information is the type of holiday you’re looking to go on (from a relaxing beach holiday to a cultural city break), the budget you have available, and the time of year you want to travel. Provide this, and ChatGPT will offer suggestions that can then be refined further with additional prompts. Once you have decided where to go, you should consider using Google Maps to make your vacations better.
Which PS5 Game Should I Play Next?
After sticking with my PS4 for a long time, in 2024, I finally took the plunge and purchased a PS5. Since then, I have purchased several games, and have a huge back catalog of PlayStation Plus games available too. Which raises the dilemma of which game to play next? With free time at a premium once you reach adulthood and all the responsibilities that come with that, not wasting time on bad games is important.
You can ask ChatGPT to decide from the list of games you already have available, or allow it to direct you to all the games available for PS5. Either way, you should provide the AI chatbot with the genres of games you generally enjoy playing, whether you enjoy single-player or multiplayer games, and whether you want a short burst of gaming fun or a longer challenge. You can also list games you have previously enjoyed playing.
In What Order Should I Tackle My To-Do List?
I suspect everyone reading this has a to-do list, whether you have it written down or it’s just in your head. There’s always something that needs doing, whether at work or regarding your home life. But in what order should you tackle your to-do list? What tasks should be prioritized over others? Ticking things off your to-do list in the best order is crucial in order to keep everyone happy and life moving in the right direction.
To have ChatGPT help you tackle your to-do list, you just need to feed your to-do list into the AI chatbot. This can either be in the form of a bulleted list or a random brain dump. Either way, ChatGPT will help you organize it and prioritize certain tasks over others. ChatGPT can do this based on your own preferences, whether that’s urgency, importance, time required, or anything else that’s important to you.
What Improvements Should I Make to My Home?
If you’re lucky enough to own your own home, you’ll know that there are always jobs that need doing. Many of these jobs are just maintenance, with certain appliances and elements needing to be maintained regularly. However, you should also consider making home improvements in order to make your house a nicer place to live and/or increase its value when it comes time to sell and move on to new pastures, especially if the home improvements you’re making involve smart technology.
ChatGPT can list a whole range of home improvements you should consider doing, either to make your home a nicer place to live or increase its potential value when selling it. Once ChatGPT provides its initial list of potential home improvements to make, you can provide further prompts to direct ChatGPT to help you further. Naming particular rooms, particular issues, your budget, the type of home you own, and/or how long you plan on staying there before selling can all help direct ChatGPT.
What Career Path Should I Pursue?
With job markets ever-evolving, chances are that most of us will need to switch career paths at least once in our working lives. Having been a freelance writer and editor for 20 years, I’m facing the dilemma of whether to stay in this field until I retire or switch paths now before I get too old to do so. But if I decide to switch, what would the best career path be for me to pursue, given my current experience and skill set?
ChatGPT can help direct you down certain career paths based on the information you provide. That information includes your interests and passions, your skills and strengths, and your level of education. The best thing to do is zero in on what’s important to you. If you would prefer to work in a field that aligns with your values, for example, focus on that over the potential salary level of each potential profession.
How ChatGPT Has Improved My Decision-Making Process
ChatGPT has helped me make decisions in several ways.
As you can see above, it has literally made decisions for me when asked, taking the mental burden off my shoulders and onto the shoulders of the large language model that powers ChatGPT. Whether it’s big decisions or small ones, ChatGPT has helped resolve some dilemmas for me.
The other, equally important way that ChatGPT has helped is by showing me how to work through problems to make better decisions for myself. By observing how ChatGPT approaches decision-making through a logical process, I have acquired some new techniques.
Imagine your Google TV responding instantly, apps launching fast, and menus gliding smoothly. That kind of speed isn’t just for new devices. With a few quick tweaks, you can make your Google TV feel fast and fresh again.
8
Turn on Quick Start
Most Google TV models come with the Quick Start feature turned on. This puts your TV into a low-power standby mode instead of fully powering down when you turn it off. This way, your TV can skip the lengthy splash screen and jump straight to the home screen the next time you turn it on.
It may only save a few seconds, but they can seem like a lot when you’re staring at the screen. That’s why it’s worth making sure Quick Start is enabled on your TV.
To do this, open the Settings menu on Google TV and head to System > Energy Saver or Power and Energy. Look for the Quick Start or TV Standby option and enable it.
7
Use Apps Only Mode
By default, your Google TV’s home screen is filled with trending shows, recommendations, and personalized picks from various streaming services. When you enable Apps Only Mode, all that extra content disappears, and you’re left with a simple, app-focused interface.
That means less background activity, quicker navigation, and a noticeable reduction in lag. A small tradeoff is that you won’t be able to add movies to your watchlist or give feedback on what you’ve watched, but the performance gain is often worth it.
To enable this mode, go to Settings > Accounts & Sign In > [Your Account] > Apps Only Mode, and choose Turn on.
6
Clear the Cache
Over time, apps on Google TV accumulate cached data in the background. While this is designed to help apps load faster by storing temporary files, too much of it can have the opposite effect. Instead of making things snappier, cache overload can slow down performance and even lead to occasional app crashes.
Clearing the cache every now and then is a quick way to keep your Google TV running smoothly. To do this, go to Settings > System > Internal shared storage > Cached data and confirm by hitting OK. Alternatively, you can clean up individual apps by going to Settings > Apps > See all apps, selecting the app you want, and tapping Clear Cache. Repeat this process for your most frequently used apps, and you should notice a noticeable difference instantly.
This won’t delete any of your saved data or login info. It just clears temporary files that might be slowing things down, so there’s really no downside to clearing your TV’s cache regularly.
5
Reduce or Disable Animations
You might not have noticed it, but your Google TV interface is packed with subtle animations, transitions, and visual effects. They look nice, but they come at a cost of speed and responsiveness, especially on older or lower-powered devices.
Reducing or turning off these animations can instantly make your Google TV feel snappier. Menus open faster, scrolling feels smoother, and everything just feels a bit more responsive.
Open the Settings menu on your Google TV.
Navigate to System, then select About.
Find the Build Number and press the OK button on your remote seven times to unlock Developer Options.
Go back to the System page and choose Developer Options.
In Developer Options, scroll down to find Window animation scale, Transition animation scale, and Animator duration scale. Set each of these to 0.5x for a faster feel, or Off if you want maximum speed.
This change won’t affect how apps behave or perform, but it will make navigating the interface feel a lot more responsive. It’s one of the best ways to breathe new life into a sluggish Google TV.
4
Limit Background Processes
When you exit an app and switch to another, it doesn’t necessarily mean the first app has shut down. Often, it remains running in the background, consuming RAM and other system resources. It’s similar to how it works on Android phones, but since TVs typically have limited RAM to begin with, this can significantly slow things down.
When a bunch of apps are running in the background, the system has to keep up with all of them, which can slow things down. If jumping between apps feels a bit sluggish, that’s likely the reason.
To avoid this, you can dig into the developer options to limit background processes. This setting allows you to restrict how many processes are allowed to run behind the scenes. Go to Settings > System > Developer Options > Background process limit and choose At most, 2 processes or At most, 3 processes. This tells the system to actively keep things lean by pausing or closing background apps sooner.
3
Keep Apps and System Updated
App developers and Google regularly release updates that fix bugs, patch security issues, and optimize their software’s performance on devices. Sometimes they add new features too, but even if they don’t, updates can still help with performance.
Navigate to Settings > System > About > System update and enable the Auto Update toggle. This will allow Google TV to install the latest system updates automatically on your TV.
For app updates, open the Google Play Store on your TV. From there, go to Manage apps & games > Updates, and select Update all. You can also configure Google TV to update apps automatically, just like you would on a phone. For that, open the Play Store Settings and select Auto-update apps.
2
Free Up Storage
Just like smartphones and computers, smart TVs need breathing room to run smoothly. When storage fills up, performance can start to lag. Apps take longer to open, navigation becomes sluggish, and even streaming can get choppy.
To check how much space is left, head to Settings > System > Storage > Internal shared storage. If the available space is low, it’s time for a cleanup. TVs typically come with preloaded apps that just sit there taking up space, so getting rid of those can make a real difference.
Go to Settings > Apps > See all apps and take a good look at what’s installed. Scroll through the list and look for anything you haven’t opened in a while. When you find something unnecessary, select it and choose Uninstall.
1
Restart or Reset the TV
With the Quick Start feature enabled, your Google TV boots up in seconds, but it also means it never fully shuts down. That’s why it’s a good idea to give it a proper reboot every once in a while.
To fully restart your TV, you don’t need to get up and unplug anything (though that also works). Instead, simply head to Settings > System > Restart and select it. The system will shut down completely and reboot.
If a regular restart isn’t doing the trick, a factory reset might be the nuclear option you need. It’ll wipe everything and take your TV back to square one, so you’ll need to go through the trouble of setting up your TV from scratch and installing your favorite apps. But if performance is seriously tanking, and you’ve tried everything else, a reset is your best bet.
At the end of the day, your Google TV is no different from a smartphone or computer. If it’s been running a little slow lately, don’t go rage-throwing the remote just yet. A few quick adjustments might be all it needs to get back on track.
Lately, I’ve caught myself looking at my current smartphone and realizing how far we’ve come from what was once my favorite device, back in 2009. I used to rely on a BlackBerry Bold 9700, and the contrast between that focused, utilitarian experience and today’s everything-in-one devices has become hard to ignore.
I Miss the Tactile Satisfaction of a Physical Keyboard
Nothing, and I mean nothing, compares to the feeling of typing on a BlackBerry keyboard. Those tiny, perfectly sculpted keys were a joy to use, just as much as they were functional. Each press gave immediate feedback, letting my fingers know exactly when a letter had registered. I could type with confidence, speed, and, most importantly, accuracy.
I used to write entire emails on my phone while walking down the street, never once looking at the screen. I can’t say the same for my current phone, the Galaxy S22 Plus—if I tried that now, the message would probably read like it was typed during an earthquake. While you can connect a USB keyboard to an Android phone, that’s obviously not practical unless you’re sitting still with it.
Haptic feedback on modern phones tries to simulate the feeling of pressing a real button, but it’s like comparing a photograph of food to an actual meal. You’re constantly second-guessing whether you hit the right key, squinting at tiny letters, and watching autocorrect turn “meeting” into “metering,” for example. (Though, granted, there are ways to minimize autocorrect fails.)
My BlackBerry Bold Was So Durable That I Didn’t Even Need a Case
One of the aspects I miss most about my BlackBerry was how absurdly tough it was. I never worried about dropping it. It could tumble out of my hand, bounce off the pavement, and get stepped on without me worrying about spiderweb cracks.
Although after a long stretch of use, the corners showed some wear, the screen stayed intact, nothing came loose, and it kept working like it was new. It had a solid build: a stainless steel frame around the edges, a faux-leather back, and just enough weight to feel reassuring in the hand.
By contrast, I can’t help but think that phones these days are like glass sandwiches held together by anxiety, good phone screen protectors, and phone cases. We’ve normalized the idea that from the moment you unbox it, you need to immediately wrap your $1,000+ device in silicone or leather for the back, and tempered glass for the screen, just to survive regular life.
As our iPhone 16 review found, the phone is glossy and beautiful. But it’s also so fragile that dropping it without a case or screen protector is practically an act of vandalism against your wallet.
BBM Was a Messaging Platform That Felt Personal and Powerful
Before the explosion of messaging apps like iMessage, WhatsApp, Signal, and Telegram, there was BlackBerry Messenger (BBM)—and it did the job beautifully. It was clean, fast, and focused. You’d send a message and instantly know when it was delivered and when it was read. Features like message deletion and timed disappearing messages were already there, long before they became trendy elsewhere.
There were no random suggested contacts from your phone’s address book, ads, or endless GIF suggestions. Unfortunately, BlackBerry Messenger was officially discontinued in 2019.
One of BBM’s most underrated strengths was its PIN system. It worked like a username, but without tying your identity to a phone number or email address, which meant you could maintain a high level of privacy. If you wanted to chat with someone, you had to exchange PINs and mutually accept the connection. Your number and email were irrelevant to the chat itself.
Compare that to the present messaging landscape, which is fragmented and sometimes frustrating. You need different apps for different groups of people, notifications are scattered across platforms, and it’s not unusual to receive messages (often scams) from total strangers. And half the time, you’re not sure where to reply or even if your message was seen.
Related
The 3 Reasons BlackBerry Failed Spectacularly—and Why They Might Rise Again
Blackberry rode the massive highs, but has long embraced the crushing lows.
Swappable Batteries Meant I Never Worried About Battery Life
This might be the feature I miss most about BlackBerry devices: the ability to swap out a dead battery for a fresh one in about 10 seconds. I used to carry a couple of fully-charged spare batteries, and whenever one ran low, I’d swap it out. I didn’t have to carry power banks with charging cables bulging in my pocket, or hunt for power outlets whenever my phone was low on juice.
Now, smartphone manufacturers have convinced us that sealed batteries are somehow better. But after a few years of using a phone every day, you’ll have much worse battery life than you did at the beginning. And at that point, your only option is to replace the entire phone or pay for expensive battery replacement services.
To be fair, not every BlackBerry had a fully swappable battery. Later models like the Key2, Z10, Z30, and Passport, for example, required more effort and careful disassembly due to stronger adhesive and tighter builds. But even then, battery replacement felt more doable than with today’s glued-shut designs.
The Notification LED Gave Me What Many Modern Phones Don’t
The BlackBerry notification LED was a tiny feature that made a massive difference in daily productivity. That small, multicolored light could tell you everything you needed to know about your phone’s status from across the room. Red meant you had messages, green meant the network was connected, and blue meant Bluetooth was active. You could glance at your phone on your desk and immediately know if anything important required attention, without picking up your phone, unlocking the screen, or breaking your focus.
What made it even better was how customizable it became, especially for power users. With third-party apps like BeBuzz (also known as BerryBuzz), you could assign different colors and blinking patterns to specific types of notifications like emails, texts, BBM messages, missed calls, and even individual contacts. Just a glance at the LED, and you’d know exactly what kind of alert had come in.
Most modern smartphones have walked away from this kind of subtle, glanceable feedback. Instead, we get attention-hungry pop-ups, vibrations, or always-on displays that constantly pull us back into our screens. My Samsung Galaxy still offers edge lighting, and some older Samsung models support LED camera cutout notifications, but even that feels like a watered-down version of what BlackBerry had.
The iPhone never had anything like this, so every ping or buzz demands you stop what you’re doing and check—whether it’s important or not.
I’m not suggesting we throw out all the progress we’ve made and rewind to 2009 during the narrow window when BlackBerry was on top. Smartphones these days are undeniably impressive; packed with cameras that once felt like science fiction, apps that do everything from banking to video editing, and processing power that outpaces older desktop computers.
But I miss the BlackBerry line for what it represented in its time: a focused, purpose-built device that prioritized communication, reliability, and thoughtful design.
It turns out your iPhone can respond to taps on its back. I only recently found out about Back Tap, a hidden gesture that can run shortcuts, open apps, or take screenshots. And it feels like a cheat code for your phone.
What Back Tap Is and Why It’s So Handy
Zarif Ali / MakeUseOf
Back Tap is one of those nifty but hidden iOS features that Apple quietly added to the Accessibility settings menu. It first appeared in iOS 14 and uses your iPhone’s sensors to detect quick taps on the back of the device. You can assign a different action to a Double Tap and a Triple Tap, giving you two shortcuts you can activate without even touching the screen.
What makes Back Tap so useful is that it works almost anywhere. If you’re watching a video, a double-tap can take a screenshot without interrupting playback. If you’re reading, you can triple-tap to scroll down or open Siri. It’s quick, discreet, and feels surprisingly smooth once you start using it.
The best part is that you don’t need the newest iPhone to use it. Back Tap works on the iPhone 8 and newer, as long as you’ve updated to iOS 14 or later. And while it’s designed as an accessibility feature, it’s useful for everyone who wants to get more out of their device.
How to Set Up Back Tap on Your iPhone
Back Tap takes less than a minute to set up. Start by going to Settings, then tap Accessibility. Under Physical and Motor, select Touch, then scroll down and tap Back Tap.
You’ll see two options: Double Tap and Triple Tap. Tap either one to assign it an action. You can choose from options like taking a screenshot, locking the screen, opening Spotlight, scrolling, or launching the camera.
If you’ve created any Shortcuts in Apple’s Shortcuts app, those will also appear in the list. This opens up even more possibilities, like sending pre-written messages, toggling Low Power Mode, launching a playlist, or opening your favorite app.
Once you’ve made your selections, you’re done. Tap the back of your phone near the Apple logo twice or three times in quick succession, and the action you chose will run instantly.
Related
Navigate Your iPhone Faster With These 8 Tricks
These iPhone navigation tricks make everyday tasks feel effortless.
It’s worth noting that Back Tap only works when the screen is on. Additionally, any actions that you can’t do from the Lock Screen only function once your phone is unlocked. For example, if you set Back Tap to launch an app or run a Shortcut, nothing will happen until you’ve unlocked your device.
However, actions like turning off the screen or toggling Reachability will work even with a locked device. This initially threw me off, but once I understood the behavior, it made more sense. You don’t want a shortcut to trigger when your phone’s in your pocket or bag.
One other note: if this feature doesn’t seem to respond, your phone case might be getting in the way. I’ve noticed that slim cases work fine, but thick or rugged ones can make it harder for the phone to register the taps.
You don’t have to go caseless, but if Back Tap feels inconsistent, it’s worth testing with the case off to rule that out. Enabling the Show Banner option in Back Tap’s settings can help with this, as it shows a prompt when either tap registers successfully.
My Favorite Uses for Double Tap and Triple Tap
After some experimenting, I’ve found a few combinations that make my phone more responsive and personal.
Right now, I have Double Tap set to Take Screenshot. I use screenshots constantly for Instagram ads, bits of articles, app bugs, etc.—and this is much faster than pressing two buttons. It works even if something else is on the screen, which makes it feel seamless.
For Triple Tap, I built a Shortcut that grabs my current location and opens a new note. I use it to track where I’ve been when running errands or exploring. Triple-tap, type a note, and move on; it’s fast and reliable.
You can also use Back Tap to run other custom Shortcuts. I’ve tried ones that open my to-do list, paste my clipboard into the Notes app, or even control music playback. If you’ve set up any automations in the Shortcuts app, this is one of the easiest ways to trigger them without digging through menus.
There are also plenty of built-in options. Speak Screen is great if you want something read aloud, and accessibility features like Magnifier or VoiceOver are just as easy to assign.
Another gesture I use is the Accessibility Shortcut, which works a little differently. Instead of tapping the back of the phone, you press the side button three times. Scroll down to the bottom of the Accessibility menu and tap Accessibility Shortcut to access the options. Check as many as you want, using the handles to reorder them as you please. They’ll all appear in a menu when you triple-press the side button.
I’ve set mine to turn on Color Filters (setting the screen to grayscale) when I want to cut down on visual clutter or stay focused. That setting is usually buried in the Settings menu, but with this shortcut, it’s just a quick button press.
Related
9 Ways You’re Unknowingly Ruining Your iPhone Experience
The small things make a big difference.
Back Tap isn’t the kind of feature Apple shouts about, but once you start using it, it feels surprisingly natural. It’s one of those features that blends into your habits and quietly makes your phone easier to use.
If you’ve never tried it before, set it up and give it a try. You’ll probably wonder why you didn’t start sooner.
WhatsApp just got a shiny new trick: Meta AI will now peek at your unread messages and spit out a quick summary. Meta is pitching it as an optional feature that lives in the cloud but somehow stays private thanks to “Private Processing.”
Sounds neat, but it also means Meta AI is technically reading your chats—encrypted or not.
AI Summaries Land on WhatsApp
The feature’s already live for some US users. Open a chat with unread messages, and you’ll see the usual counter flash, this time with an AI badge that reads Summarize Privately. Tap it, and the badge expands into a bullet-point recap of the unread messages.
Message Summaries uses Meta’s Private Processing framework, which executes AI computations inside a hardware-backed Trusted Execution Environment (TEE) on Meta’s cloud servers. Within that enclave, your unread messages are decrypted, summarized by Meta AI, then immediately discarded—allegedly never seen by anyone at Meta or stored in any database.
End-to-end encryption still protects your messages in transit. However, enabling Private Processing briefly lifts that encryption inside the secure enclave so the AI can read your chats. Outside of that enclave, everything remains encrypted. Or so Meta says.
Encrypted, but Exposed?
Cloud-based AI processing always raises eyebrows. Assuming that Meta itself doesn’t collect the data. Even a watertight enclave can be hacked or legally compelled.
While Meta touts that it never stores your summaries, WhatsApp’s backup history tells us that privacy isn’t their first priority: until September 2021, chat backups went unencrypted to iCloud and Google Drive, meaning anyone with access to those clouds, or served a subpoena, could read your entire chat archive.
Related
You Need to Change This Setting Immediately If You Use Meta AI
Meta AI is sharing your prompt history, and you might not even realize it’s happening.
This isn’t the first time Meta’s AI tripped over privacy. Not long ago, the WhatsApp AI helper confidently handed a private user’s number to a total stranger asking for train info. When confronted, the AI balked, lied about “fictional” digits, and deflected responsibility.
Even if the AI never hoards your actual messages, it quietly hoovers up metadata; it tracks which chats you ask it to summarize, how often you lean on it, and in what context you call for a roundup.
That usage pattern is gold for behavioral profiling, sketching out everything from which family drama you’re most invested in to which work conversations you’re ghosting.
The Illusion of Optional
Meta insists these AI summaries are opt-in, but you and I both know how feature rollouts really work. One day you notice a little AI badge in your chats, the next it’s blinking insistently every time you open the app. Granular controls live three menus deep, so most people will just click “Accept” and wonder why their app feels different. Optional in name only, really.
Similarly, it would be naive to think this stops at summaries: once the plumbing is in place, Meta can slide in smart replies, live translation, or cross-chat analysis under the guise of “helping.” It’ll slowly stretch the original feature into a full-blown AI surveillance toolkit.
And privacy aside—what are we even doing as humans? You’re going to read an AI summary of your private chat, use AI to write a reply, then your friend’s AI summarizes your AI’s message and writes a new one, so you can read that summary? At some point, it’s just bots talking to bots while we skim the summaries.
Related
WhatsApp’s Meta AI Button Is Handy, but There Are 5 Reasons I Won’t Use It
The AI button nobody asked for but everyone got. Thanks, Meta.
Before you hit that toggle, ask yourself whether convenience is worth giving Meta AI more chances to peek at your chats. Trusting your privacy to a company with a spotty record isn’t a no-brainer—no matter how sweet those shortcuts look.
We can’t trust any piece of technology to work perfectly forever. Hard drives are no exception, and when they fail, they take years of important files with them. Fortunately, several free tools can predict drive failures before they happen, giving you time to back up your data and replace the drive.
Before downloading third-party software, check what Windows already offers. CHKDSK remains the most straightforward tool for scanning drive errors. Open Command Prompt as an administrator and type chkdsk C: /f /r to scan your main drive. The /f flag fixes errors automatically, while /r locates bad sectors and recovers readable information. Fair warning, this process takes time, especially on larger drives.
Windows also includes S.M.A.R.T. (Self-Monitoring, Analysis, and Reporting Technology) monitoring. You can also use Event Viewer to troubleshoot Windows problems related to the hard drive. Open Event Viewer and navigate to Windows Logs > System and filter for Disk events. Look for warning messages about disk health—these often appear days or weeks before complete failure.
For more detailed monitoring, Windows Performance Monitor tracks disk performance metrics in real-time.
Access it by typing perfmon in the Run dialog.
Click the green plus icon to add counters.
Select Physical Disk from the performance object dropdown.
Choose metrics like “Avg. Disk Queue Length” or “Disk Read Bytes/sec.”
Related
Reliability Monitor vs. Performance Monitor: Comparing Two Underutilized Windows Tools
Windows has two diagnostics tools built into it that not many people know of. Get to know them both with this guide.
Storage Spaces in Windows pools multiple drives together and automatically monitors their health. This feature requires setup through Settings > System > Storage > Manage Storage Spaces in Advanced storage settings. Once configured, it sends notifications when drives show signs of failure and can maintain data redundancy across healthy drives.
These built-in tools work well for basic monitoring, but they lack the detailed health reports that dedicated software provides.
CrystalDiskInfo stands out as the most user-friendly drive monitoring tool available. Its clean interface displays everything you need at a glance.
The color-coded system makes health assessment foolproof. Blue means excellent, green indicates good health, yellow warns of caution, orange signals problems, and red screams immediate replacement needed. The status colors are more like a traffic light for your storage.
Pay attention to key S.M.A.R.T. attributes like reallocated sectors count, current pending sector count, and uncorrectable error count. Rising numbers in these categories often predict imminent failure, sometimes weeks before the drive actually dies.
Related
You Need These Hacks to Stop Your SSD From Dying Prematurely
These simple tweaks can add years of life to your SSD.
CrystalDiskInfo can send email notifications when drive health changes. Enable this feature through Function > Alert Features > Mail Settings to stay informed even when away from your computer.
However, don’t wholly rely on readings. Some drives fail without warning despite showing good health, while others continue working years after yellow warnings appear. Use CrystalDiskInfo as part of a broader monitoring strategy, not your only defense against data loss.
This tool takes hardware monitoring to the next level, and drive health is just one of its key features. It overwhelms beginners with information. Where CrystalDiskInfo shows essentials, HWiNFO displays every conceivable hardware metric.
After installing HWiNFO, navigate to the Drives section to find detailed S.M.A.R.T. data alongside temperature readings and performance statistics. HWiNFO can record drive metrics over time and create detailed reports that reveal gradual degradation patterns. This historical data proves handy for spotting trends that single-moment snapshots might miss.
Drive temperatures fluctuate under load, affecting read/write speeds during intensive operations. HWiNFO provides real-time monitoring, allowing you to observe high temperatures, which is one of the primary reasons why hard drives fail.
The free version handles most monitoring needs ideally. However, this power comes with complexity. You may feel lost navigating dozens of sensor categories and hundreds of individual readings. However, if you want complete monitoring and don’t mind a learning curve, HWiNFO delivers unmatched detail.
HDDScan takes a different approach, focusing on active testing rather than passive monitoring. It performs surface scans and stress tests. These active tests can reveal problems that don’t show up in standard health reports, particularly developing bad sectors or inconsistent read speeds.
This tool works with practically any storage device you can connect to your computer. Whether you have an HDD or SSD, USB flash drives, SD cards, or even network-attached storage, they all fall within its testing scope.
The interface feels dated but functional. You just have to select your drive, choose a test type, and let it run. It offers several test types, each serving different purposes. Surface scans methodically check every sector, while read verification tests measure access times across the entire drive.
Active testing can take hours to complete and put additional wear on ageing drives, potentially accelerating failure in already compromised HDDs.
The tool excels at confirming suspicions rather than routine monitoring. If your computer starts acting sluggishly or files occasionally become corrupted, HDDScan’s testing can pinpoint whether the drive is causing these issues.
Don’t run intensive tests frequently on healthy drives. Save HDDScan for troubleshooting specific problems or performing detailed analysis before important data migrations. For daily monitoring, stick with gentler alternatives.
This tool strikes a balance between simplicity and detail as it focuses on drive lifespan rather than just current health status. It shows temperature monitoring in real-time, prominently displayed alongside health percentages.
The interface displays important information at a glance: drive temperature, total operating hours, and a percentage-based health score. Unlike some other tools that simply report “good” or “bad,” HDDLife attempts to predict remaining drive life based on usage patterns and S.M.A.R.T. attribute analysis.
The performance metrics help distinguish between drives that are failing versus those simply showing their age. However, HDDLife offers only a 15-day free trial before changing to a freeware version. For occasional drive checking, this limitation makes free alternatives more practical.
This tool is also a middle ground between simplicity and technical depth, and one of the recommended ways to test real drive capacity to ensure you’re getting what you paid for.
The main interface keeps things straightforward with a basic health check that displays “PASSED” or “FAILED” for each connected drive. But it shines in its tabbed interface. The General tab provides complete drive specifications, from firmware versions to interface speeds.
Whereas, the Attributes section displays every S.M.A.R.T. parameter with current values, thresholds, and failure predictions. The Self-Tests tab lets you run various diagnostic routines directly from the interface. Short tests usually complete in minutes, while extended tests provide thorough drive validation.
Unlike some tools that only read existing data, GSmartControl actively tests your drives. Additionally, error logs and temperature monitoring round out the feature set. Additionally, historical temperature data helps identify drives running too hot, while error logs reveal problems that might not trigger immediate S.M.A.R.T. alerts.
GSmartControl works reliably across different drive types and manufacturers. The interface feels dated but functional, prioritizing information over aesthetics.
Regular drive monitoring beats crossing your fingers and hoping for the best. These tools provide the warning signs needed to save your data before disaster strikes, but remember that even healthy drives require proper setup. When replacing a failing drive, make sure to format your new hard drive before you start filling it up.
Google Earth now lets you step back in time at street level, thanks to the launch of historical Street View imagery. The feature arrives for the platform’s 20th anniversary and brings new AI-powered tools for professional users (like urban planners) in the U.S.
Explore the Past in Google Earth
Google Earth has always helped everyone see the world from above. Now, it lets you see how streets and neighborhoods have changed over the years. With the new update, you can slide through older Street View images right inside Google Earth. Want to revisit your childhood block or watch a city skyline grow? Just move the timeline slider and see how places looked in the past.
Until now, historical Street View was only available in Google Maps and the Earth Pro desktop app. This update brings it to the main Google Earth app on the web and mobile, making it easier for everyone to use.
Historical street view imagery in Google Earth follows from its popularity in Google Maps. The #somewhereonGoogleMaps trend captured our nostalgia for places past and present. Google Earth’s 20th anniversary is as good a time as any to catch up with its milestones.
A Digital Time Machine for Us
The new historical Street View feature turns Google Earth into more than just a virtual globe. Now, it’s a visual time machine. You can trace your history or see how your favorite places have evolved. It’s fascinating to watch a vacant lot become a playground, or a quiet street transform into a busy neighborhood.
For a long time, I have enjoyed watching a satellite view of my own house with Google Earth.
Now, we can satisfy our curiosity about old places by heading to places with extensive historical records. For instance, New York, London, and Paris, etc. Here are some of my favorites, which I checked out:
Freedom Tower (One World Trade Center) in Lower Manhattan, New York City: You can watch a part of modern American history as this symbolic structure rose from the rebuilding efforts at Ground Zero.
The Berlin Wall in Germany is one of the most historically significant timelapses. Watch the fall of the Berlin Wall, along with the massive urban transformation that followed German reunification.
Kennedy Space Center in Florida provides comprehensive historical imagery of NASA’s launch facilities and the evolution of the space program infrastructure. As a space buff, I head to the SpaceX Starbase in Texas, too, to watch the company’s meteoric rise.
Pompeii, Italy, and its many ancient Roman attractions like the Rectangle Theater, the Theater of Pompeii, the Temple of Apollo, the Arch of Tiberius, and the Public Square.
The World Islands in Dubai, United Arab Emirates, are artificial islands constructed to resemble a world map.
Also: Smarter Maps for Real-World Problems
It’s not about casual nostalgia and fun alone. Along with the time-travel feature, Google is adding powerful new tools for U.S. professionals. Soon, planners and researchers will see overlays that show tree canopy coverage and land surface temperatures. These AI-powered insights can help cities plan for more green spaces or tackle “urban heat islands” where temperatures rise due to a lack of trees and too much concrete.
For decision makers, knowing where trees are missing or where temperatures spike can guide smart choices. They might plant more trees in the hottest areas or design new parks where they’re needed most. These upgrades can make cities cooler, greener, and more comfortable for everyone.
Windows has a built-in tool that creates a completely isolated environment. Using it, you can safely test suspicious files, install questionable software, or browse risky websites without risking damage to your main computer.
Meet Windows Sandbox
Windows Sandbox is a built-in security feature available on Windows 10 and 11 Pro, Enterprise, and Education editions. It creates a temporary, isolated Windows environment that’s completely separate from your main system. Think of it as a disposable computer inside your computer. Anything you do in the sandbox stays there, and when you close it, all traces vanish. This makes it one of the easiest ways to check if a download is safe, without putting your files or settings in harm’s way.
Unlike traditional virtual machines that require you to install an operating system and dedicate a chunk of your storage drive, Windows Sandbox uses your existing Windows files to spin up a lightweight, temporary desktop in seconds. It’s designed to be fast, efficient, and dead-simple for anyone to use—no tech wizardry required!
The temporary nature of Windows Sandbox is both its greatest strength and defining characteristic. Every time you launch it, you get a completely fresh Windows installation. When you close the sandbox, everything disappears permanently. All installed software, downloaded files, registry changes, and system modifications vanish without a trace.
Getting Started With Your First Virtual Sandbox
Windows Sandbox combines the security benefits of virtual machines with the efficiency of container technology. Instead of running like a traditional Hyper-V virtual machine, the sandbox operates more akin to a process within your main operating system, giving it better performance and resource management. The system uses intelligent memory sharing where the sandbox and host computer share the same physical memory pages for executable files, through a technology called “direct map”.
Before you can use Windows Sandbox, your computer needs to meet specific requirements. You need Windows 10 or 11 Pro/Enterprise/ Education. You must enable Hyper-V, and have virtualization turned on in your BIOS. See our guide to fixing common virtualization problems for help with checking this.
Finally, you’ll also need at least 4GB of RAM (8GB recommended), and at least 1GB of free disk space.
To enable Windows Sandbox, you need to turn on the feature within the OS. Open the Start menu and type “Turn Windows features on or off”. Alternatively, you can navigate to the Control Panel, open Programs and Features, and then click Turn Windows features on or off.
In the Windows Features dialog, scroll down and check the box next to Windows Sandbox. Click OK and restart your computer when prompted. The installation process will download and configure the necessary components.
Using the Sandbox
Once you’ve enabled it, launching Windows Sandbox is straightforward. Simply open the Start menu, type “Windows Sandbox,” and click it. The sandbox will launch in its own window, displaying a clean Windows desktop with only the basic built-in applications like File Explorer, Control Panel, Notepad, and Microsoft Edge. You can resize the window or maximize it for full-screen use, just like any other app.
Getting files into the sandbox is simple thanks to clipboard integration. You can copy files from your main computer and paste them directly into the sandbox environment. Alternatively, you can use the built-in Microsoft Edge browser within the sandbox to download files directly from the internet.
The sandbox has network access by default, so you can browse websites, download software, and access online resources.
Why You Should Use Windows Sandbox for Privacy and Security
Windows Sandbox is a practical solution for anyone who wants to stay safe while exploring unknown files or apps. Here’s why you should use this awesome feature:
Complete Isolation: Anything you run in Windows Sandbox is sealed off from your main computer. Malware, viruses, or software bugs cannot escape the sandbox.
Safe Software Testing: You can try out new programs, open suspicious email attachments, or experiment with downloads without worrying about damaging your main Windows setup. If something goes wrong, just close Sandbox and start fresh with another.
Stronger Privacy: All your browsing history, cookies, and temporary files created in the Sandbox are deleted as soon as you exit. Although there are several free online sandboxing tools with more advanced testing capabilities, Windows Sandbox provides faster performance and will always be available within your system.
No System Clutter: Installing and removing software in Sandbox never clutters your real PC. You avoid leftover files, registry changes, or slowdowns since every session starts with a clean slate.
The sandbox is particularly valuable for software testing and experimentation. You can install trial software without cluttering your main system, test different versions of applications, or explore system modifications without fear of permanent damage. Think of it like an incognito browser window, but for your entire PC.
How I Set Up and Use Windows Sandbox
I love how Windows Sandbox gives me a fresh, safe space to test apps and files, but downloading the same installer or file over and over again gets old quickly. That’s why I like to set up my Sandbox so it always has access to my Downloads folder. This way, whenever I want to try out a new program or check if a file is safe, I don’t have to waste time redownloading it inside the Sandbox. I just open the file from my real Downloads folder, test it, and move on.
Setting this up is much easier than you might think. Here’s exactly how I do it:
First, on my regular Windows desktop (not inside the Sandbox), I open File Explorer and go to my Downloads folder. At the top of the window, you’ll see the address bar showing the folder’s path. I right-click on that address bar and select Copy address as text from the menu.
I change the part before HostFolder to my Downloads folder address that I copied previously. In this example, my computer’s username is “jricm”, so the path will look like this:
<HostFolder>C:UsersjricmDownloads</HostFolder>
I then save this text file as “My-Desktop-Sandbox.wsb” on my Desktop (for easy access). Once saved, the file should have a Windows SandBox (.wsb) icon.
Now, whenever I want to open Windows Sandbox, I just double-click this file. Instantly, my Downloads folder appears on the Sandbox desktop, and I can open or test anything I’ve saved there. Because it’s mapped as read-only, I never have to worry about accidentally changing or deleting anything in my real Downloads folder. It’s all about convenience and peace of mind.
Sometimes I want to take it a step further, especially if I’m testing a file that could be risky. In those cases, I like to lock down the Sandbox even more by turning off its internet connection. That way, even if something tries to call home or download more junk, it can’t get online at all.
To do this, I just add one extra line to the top of my configuration file to disable networking:
That’s it. Now, when I launch Sandbox with this file, not only do I get instant, read-only access to my Downloads, but the Sandbox itself is completely cut off from the internet. No downloads, no uploads, and no sneaky background connections.
This setup makes Windows Sandbox feel like a true personal testing lab. I can quickly try out anything in my Downloads folder, confident that nothing will mess with my real files or sneak out onto the web. And if I ever want to go back to the default, all I have to do is open the regular Sandbox app from the Start menu.
I find that Windows Sandbox provides a perfect balance between security and usability. It gives enterprise-grade isolation in a way that’s accessible to everyday users. By taking advantage of custom configurations and automated setups, you can create powerful, secure testing environments that protect your main computer while enabling safe exploration of the digital world.
Windows Security does more than just basic virus protection. It guards against phishing, blocks ransomware, and prevents malicious apps from running. However, these features aren’t easy to spot—they’re hidden behind layers of menus.
Protect Sensitive Files from Ransomware
Downloading files or opening unknown attachments always carries some risk, especially if one turns out to be ransomware that can lock your files in seconds. Luckily, Windows includes a feature called Controlled Folder Access that helps protect your most important folders from exactly that.
Once enabled, it blocks untrusted apps from modifying protected folders. By default, it covers locations like Documents, Pictures, and Desktop, but you’re not limited to just those. You can click Protected folders to add other locations you care about, such as work projects, financial records, or files stored on an external drive.
To turn it on, open Windows Security, go to Virus & threat protection, then click Manage ransomware protection under the Ransomware protection section. From there, toggle on Controlled folder access.
If a trusted app gets blocked, Windows often won’t notify you. To find out what was blocked, open the Protection history section, where Windows logs recent attempts to access protected folders. Just look under Blocked folder access and allow any apps you recognize and trust.
And if a known app, such as your video editor or backup tool, encounters problems, you can head straight to Allow an app through Controlled Folder Access to whitelist it and prevent any future interruptions.
Once it’s set up, the protection works quietly in the background. If ransomware or any suspicious app tries to interfere, Windows will block it instantly, keeping your files safe without you lifting a finger.
Block Malicious or Untrusted Apps Automatically
Threats don’t always look suspicious. That file you downloaded might seem useful, but it could install trackers, malware, or otherwise. Even a fake login page can look convincing enough to fool anyone. One wrong click, and your login details could fall into the wrong hands.
Reputation-based protection, built into Windows Security, stops these threats before they reach you. Using Microsoft’s real-time threat intelligence, it blocks shady apps, suspicious downloads, and phishing sites, so you don’t have to second-guess every click.
To turn it on, open Windows Security and go to App & browser control. Click Reputation-based protection settings, then turn on all available options: Check apps and files, SmartScreen for Microsoft Edge, Potentially unwanted app blocking, and Phishing protection.
Screenshot by Digvijay Kumar – No attribution is required
Once it’s active, Windows quietly monitors your activity in the background. If a file or site appears risky, you’ll receive a warning before it’s executed. You can still approve apps you trust, but these built-in checks help you avoid a mistake that could cost you later.
Use Offline Scan for Stubborn Threats
Some malware is sophisticated enough to evade regular scans. It hides deep within your system, starts running before Windows even loads, and evades detection while quietly causing damage in the background.
When that happens, a normal scan usually isn’t enough. That’s why Windows includes an Offline Scan, which performs a deeper check before Windows starts. This way, hidden threats don’t get a chance to load or interfere.
To run it, open Windows Security, head to Virus & threat protection, then click Scan options.
Select Microsoft Defender Antivirus (offline scan) and click Scan now.
Your PC will restart, perform the scan in a clean state, and return to your desktop when it’s done. It only takes about 15 minutes, and once it starts, there’s nothing you need to do. When it finishes, open Protection history to see if anything was found or removed.
Shield Your System With Memory Integrity
Your system memory handles some of the most sensitive tasks on your PC. If malware manages to reach that level, it can tamper with critical processes, install rogue drivers, or quietly take control without ever touching your personal files.
Memory integrity acts like a security checkpoint at the heart of your system. It creates a protected environment using virtualization, keeping vital processes sealed off from anything untrusted. If something shady makes its way through, it gets blocked the moment it tries.
To activate this, navigate to Windows Security > Device security > Core isolation details. If Memory integrity is turned off, toggle it on. You may be prompted to restart your PC.
If the toggle doesn’t work right away, Windows may flag an outdated driver or app that’s causing a conflict. In that case, try updating or reinstalling the affected software. Once everything is compatible, Memory Integrity should turn on without any issues.
Exploit Protection Settings for System and Programs
Most security threats try to trick you into installing something shady, but exploits are a bit sneakier. Instead of asking for permission, they slip in through hidden flaws in your apps. All it takes is one overlooked vulnerability for an attacker to inject code, hijack a process, or quietly take control of your system.
Exploit Protection helps close those gaps before anything nasty can sneak through. Built right into Windows, it acts as a reinforced shield around your software’s weak spots. It monitors for known attack techniques and stops them automatically, even if the app itself hasn’t been patched yet. Whether it’s your browser, PDF viewer, or another everyday program, this feature helps prevent those apps from being turned against you.
You’ll find it under Windows Security—head to App & browser control and click Exploit protection settings at the bottom. It includes two sections: System settings, which are enabled by default, and Programme settings, where you can create custom rules for individual apps.
To lock down a specific app, go to the Programme settings tab and click Add program to customize. Select an app or its .exe file, then enable advanced defenses, such as Control Flow Guard, Data Execution Prevention, or Mandatory ASLR, to block common exploit tactics.
Unless you’re troubleshooting or locking down a high-risk app, the defaults are usually enough. But if you want more control, Exploit Protection gives you the flexibility to tighten up security even further.
Fix TPM Security Issues With a Quick Reset
The TPM (Trusted Platform Module) is a tiny but essential chip built into your computer. It handles critical security tasks, such as storing encryption keys and verifying hardware integrity.
However, after a major Windows update, BIOS change, or hardware upgrade, TPM-related problems can sometimes appear. You may encounter BitLocker errors, issues signing in with Windows Hello, or warnings about the security processor.
Fortunately, most TPM issues can be fixed by resetting it through Windows Security. This process clears its stored data and reinitializes the chip, which often fixes the problem without affecting your personal files. Just be aware that you may need to reconfigure certain features like BitLocker or Windows Hello afterward.
To reset the TPM, open Windows Security, go to Device security, and click Security processor details. Then select Security processor troubleshooting, pick a reason for the reset, and hit Clear TPM. Your PC will restart to complete the process.
If you don’t see any TPM options, you might need to enable TPM in the BIOS first. Check your BIOS settings for something called TPM, fTPM, or PTT (depending on your hardware), and make sure it’s turned on before trying again.
Control What Your Family Can See and Do
The Family options panel in Windows Security ties directly into Microsoft Family Safety, giving you a central place to set boundaries and monitor how your device is used.
From here, you can manage screen time, limit apps and games, filter web content, and apply rules to every member of your Microsoft family group. It’s especially helpful for guiding your child’s usage and preventing exposure to unsafe content or unapproved downloads.
To access it, open Windows Security, scroll to Family options, and click View family settings. This will take you to the Microsoft Family Safety dashboard in your browser, where you can create child accounts, set restrictions, and check activity reports.
These settings stay linked to your child’s Microsoft account and carry over to any Windows device they use. If they try to access something that’s blocked, you’ll receive a notification and can choose whether to approve or deny the request.
So, these are some of the most powerful features tucked inside Windows Security. They help you protect your files, manage threats, and maintain control over your device’s security. If you haven’t explored them yet, now’s a good time to start.
The whole concept of encryption once intimidated me with all those technical terms flying around. But after diving in and actually trying it myself, I discovered that encryption is surprisingly simple to use and incredibly practical for everyday life.
How Encryption Works
Encryption keeps your data safe by transforming it into a code that only someone with the correct password or key can decipher. When you encrypt a file or message, you scramble the information so that it appears as nonsense to anyone else. Only people with the right key can turn it back into something readable, which protects your private data, whether you’re sending it or just storing it.
Alongside encryption, hashing is another important process often used in data security. Instead of locking and unlocking information, hashing creates a unique fingerprint for your data. It takes your information and runs it through an algorithm, giving you a string of numbers and letters that represent the original. You can’t use a hash to recover the original data, but you can use it to verify if something has changed. For example, if you download a file, you can compare its hash to the original to ensure that nothing has been tampered with.
In short, encryption keeps your information private and allows you to unlock it later with the right key. Hashing helps verify that your data hasn’t been altered. Both work quietly in the background, and you don’t need to understand all the technical details to benefit from them.
Today, there are many tools available for encrypting, decrypting, hashing, and managing keys to help keep your data secure. Here are some of my top picks for easily encrypting my files, flash drives, and emails.
Quickly Encrypting My Archives with 7-Zip
I picked up 7-Zip because it’s free, reliable, and usually already on most Windows computers. Encrypting files with it was a lot easier than I expected, and now I use it any time I want to keep files and documents private before storing or sending them to someone.
Here’s how I do it. I right-click on the file or folder I want to protect, then choose 7-Zip and pick Add to archive. In the window that pops up, I always switch the archive format from ZIP to 7z. The 7z format provides stronger security and enhanced encryption features compared to the default ZIP format.
Next, I set a password. I make sure to use one that’s at least 12 characters long, mixing upper and lowercase letters, numbers, and symbols. A strong password is crucial. Remember, no matter how good the encryption is, a weak password can ruin it.
I also check the box for Encrypt file names. This hides not just the contents of your files, but even their names. If you skip this, someone could still see what the files are called, even if they can’t open them.
The encryption method is set to AES-256 by default, which is the same standard used by government agencies. I stick with this because it’s proven and doesn’t slow things down.
After clicking OK, 7-Zip creates the encrypted archive in the same folder as my original files. It usually takes just a few seconds. I always test my encrypted archives by trying to open them, just to make sure I remember the password and everything works.
To boost my security, I never send the encrypted file and the password through the same channel. If I email someone the archive, I’ll share the password by phone or text. That way, even if someone intercepts the email, they can’t get into the files.
Once you get the hang of it, encrypting with 7-Zip becomes second nature. It’s a simple way to keep your private files truly private.
Encrypting Flash Drives with BitLocker
After learning how to encrypt my hard drive with BitLocker, I realized I also needed to encrypt my flash drives, as I had lost one too many over the years. These small devices are easy to misplace, and I didn’t want anyone stumbling through my personnel files. BitLocker, which comes built into Windows, turned out to be the simplest way to keep everything on my drives safe.
Setting up BitLocker is pretty straightforward. I plugged in my flash drive and opened File Explorer. Then I right-click the drive and choose Turn on BitLocker. On Windows 11, I sometimes have to click Show more options to see this choice.
BitLocker prepares the drive for encryption, which typically takes just a minute or two. After that, it asks me to set a password. I always use a strong, unique password that’s different from the ones I use for my accounts. Since I’ll need to type this password every time I unlock the drive, I make sure it’s something I can remember but still hard to guess.
Next, BitLocker asks where I want to save my recovery key. This key is important. If I ever forget my password, the recovery key is the only way to recover my files. I save it in a safe location, such as my cloud storage or a printed copy stored at home.
BitLocker then lets me pick how much of the drive to encrypt. For a new drive, I opt for encrypting used space only, as it’s faster. If the drive already has files on it, I choose to encrypt the entire drive to make sure nothing is left unprotected.
There’s also an option for encryption compatibility. I always pick Compatible Mode, so the drive works on any Windows computer, not just the latest ones. This saves me headaches if I need to use the drive on an older machine.
Once I confirm everything, BitLocker starts encrypting. For bigger drives, this can take a little while, but I can keep using my computer during the process. When it’s done, I’ll see a lock icon on the drive in File Explorer, showing that it’s protected.
After setup, using an encrypted drive is easy. When I plug it into a Windows computer, BitLocker asks for my password. I can also set it to unlock automatically on my main PC, but I’m careful with this since it lowers security.
Ease-of-use is probably one of the biggest reasons I use BitLocker. It’s so easy that I don’t really have any reason not to encrypt my personal flash drives. Now, even if I lose a drive, I know my files are protected and my personal data cannot be easily accessed outside my Windows machine.
How I Encrypt My Email with PGP
When I want my messages to stay completely private, even from email providers, I use PGP encryption with Kleopatra. There are other ways to send PGP-encrypted emails on Linux, but I choose Kleopatra since I’m using Windows. It takes a little more effort to set up, but once you get the hang of it, the process is straightforward and gives you true end-to-end privacy.
First, I download and install the Gpg4win package, which includes Kleopatra. After opening Kleopatra, I create my own key pair by entering my name, email, and a strong passphrase. Kleopatra generates two keys for me: a public key that I can share with anyone who wants to send me encrypted messages, and a private key that I keep safe on my computer.
When I want to send an encrypted message, I usually write it in Notepad. Then, in Kleopatra, I click the Sign/Encrypt button and select the text file with my message. I check the box to Encrypt with password and enter a password that I’ll share with my recipient. After clicking Encrypt, Kleopatra creates a new PGP-encrypted file.
I can send this encrypted file via email. To open it, the recipient just needs Kleopatra and the password I set. They right-click the PGP file, choose Open with Kleopatra, and enter the password. Kleopatra then decrypts the file and shows the original message.
Both people need to have Kleopatra or a similar PGP tool, and they need to know the password or passphrase. To share the passphrase securely, I can inform my recipient through a meetup or a secure call (using Signal or WhatsApp), and then attach a new passphrase for each PGP file I send.
Aside from simple messages, PGP can also be used to encrypt all kinds of files, such as PDFs, audio recordings, videos, and software. So, things like legal papers, financial records, or your next million-dollar idea are definitely worth encrypting with PGP when sending them through email.
Once I started using these tools in my daily routine, I realized how easy it is to keep my private files and messages safe. Whether I’m locking down my archives, protecting flash drives, or sending sensitive emails, encryption now feels like just another simple step to protect my digital life. If you’ve been hesitant to try it, I can say it’s worth the few minutes it takes to learn. Your future self will thank you for making privacy a habit.
Testing your internet speed is a smart way to check you’re getting what you pay for. But if the results seem slower than expected, don’t rush to blame your ISP—testing mistakes could be skewing your numbers.
1
Running Other Apps or Devices Simultaneously
One of the most common mistakes when testing internet speed is leaving other apps or devices running in the background. If you have apps running in the background, they could distort the results because bandwidth will be shared between the speed test and the other apps.
The extent of the impact will vary depending on the activities other apps are performing, but for bandwidth-intensive tasks like streaming, downloading, or backing up content, the results can be significantly affected.
The same applies to devices connected to your internet. When multiple devices are connected to the network, they share the total bandwidth among themselves. So, when you run a speed test, it won’t reflect your full available bandwidth. Instead, it will show the speed of the leftover bandwidth that your device had access to at that moment, after other devices took their share.
To get an accurate reading, close all the unnecessary apps and browser tabs before starting the test. Additionally, temporarily disconnect other devices from the network.
2
Testing Over Wi-Fi Instead of Ethernet
Testing over Wi-Fi is convenient, and it’s a great way to check your current internet speed. But if you’re interested in getting the most accurate reflection of your network speeds, it’s not the best option. When you run your test over Wi-Fi, you introduce a myriad of variables that can distort the results.
The distance from the router, walls, interference from other devices, and router placement can all affect your Wi-Fi performance. So, if you run your speed test from your bedroom while the router is in the living room, the results could be slower than what your connection is capable of delivering.
Related
Why I Prefer Ethernet Over Wi-Fi for My Streaming Setup
Don’t let Wi-Fi performance affect your live stream.
For the most accurate results, connect directly via Ethernet. If you don’t have any, Ugreen’s 6-Foot Cat8 Ethernet cable or DbillionDa Cat8 Ethernet Cable are affordable and offer high-speed performance. Considering the advantages, you can even start using Ethernet over Wi-Fi wherever possible.
If using Ethernet isn’t an option, try testing as close to the router as possible to minimize physical barriers, such as walls, and interference from other devices. However, keep in mind that Wi-Fi speed will almost always be lower than that of a wired Ethernet connection, even under ideal conditions.
3
Testing Only Once
Relying on a single speed test can give you a misleading snapshot of your internet’s performance. Although you pay for a specific speed from your ISP, that number is mainly only a guide of the maximum you can get at any given time. However, the speed of the actual connection varies throughout the day, depending on various factors such as your ISP’s routing and network congestion.
Even speed test servers can be experiencing issues that impact your results, giving you a false impression that your network is sluggish when it’s fine. Therefore, one test won’t tell you the full story. You should run multiple tests at different times of the day to get an accurate reflection of your internet speed.
Related
How to Make Sense of Your Wi-Fi Speed Test
Understanding the various numbers is actually quite useful when you run a Wi-Fi speed test.
Because the tool you use matters, it’s equally important that you run your test using different testing services. The best websites for testing internet speeds are free, so cross-checking results can help validate them.
4
Overlooking Server Location
When you run a speed test, most tools automatically select a test server, usually one that’s geographically close to you. However, sometimes the server selected may be located far from you, resulting in slower speeds.
Server location matters because speed tests measure your connection to that specific server, not the internet in general. The farther the server, the more network hops your data has to make, which increases the latency of your connection and can lead to slowdowns in download or upload speed.
To avoid this mistake, always check which server you’re using for the test. If the tool you use lets you manually select a server, the better, because you can pick one that’s closer. With tools like Ookla’s Speedtest, you can manually choose a server closer to your region for more consistent and representative results.
5
Using VPNs or Proxies During Testing
Running a speed test while connected to a VPN or proxy can heavily skew your results. VPNs and proxies route your traffic through an intermediary server, which could be located in a different city or, worse, country. As a result, they add overhead to your connection via distance, encryption, or both, resulting in much slower speeds than what your actual internet connection is capable of delivering.
Even using the fastest VPNs won’t help. To get an accurate reflection of your network speeds, disconnect your VPN or proxy server before testing. You can even run a test both with and without the VPN to see a clear picture of how much speed you’re sacrificing for privacy.
6
Testing During Peak Usage Hours
The time of day you run your speed test also matters. If you test during peak internet usage hours, such as in the evening when most people are at home streaming, gaming, or on video calls, the results will be misleadingly low. This could be because your ISP is experiencing network congestion.
Related
How I Check If My ISP Is Throttling My Internet
If you’re experiencing incredibly slow internet speeds, there are a few ways to check if your ISP is throttling your connection.
Network congestion typically happens in the evening between 7 PM and 11 PM. During these so-called peak hours, ISPs may throttle internet speeds to manage network congestion. If you only test during these hours, you might assume your connection is always underperforming when, in reality, you get your money’s worth at other times.
To get a more accurate view of your true internet speed, test at various times throughout the day, including off-peak hours.
7
Running Tests on Old or Underpowered Devices
The hardware you use to test your internet speed also plays a key role in the results you get. If you’re running an older computer, phone, or tablet, the hardware itself could be the bottleneck, giving you results that don’t accurately reflect the actual speed.
Jayric Maning / MakeUseOf
Older devices have much slower processors and outdated network adapters that can’t fully take advantage of high-speed connections. For example, if your laptop only supports Wi-Fi 4 (802.11n) or slower Ethernet ports that max out at, say, 100Mbps, it caps the maximum achievable speed regardless of your internet plan.
Even if you pay for gigabit speeds, your speed tests may not accurately reflect that due to hardware limitations. If you prefer using that old tablet to watch content, ensure you switch to your more recent and capable device for the test.
Related
Does Your Wi-Fi Speed Drop? Here’s Why and 7 Tips to Fix It
Want to speed up your Wi-Fi? Follow these methods to fix slow internet speeds that are spoiling your time online.
Testing your internet speeds is easy, but there’s more that goes into it if you want to get accurate results. If you make any of these mistakes while measuring, you won’t get the most precise reflection of your internet speeds. Before filing a complaint with your ISP, ensure you’ve correctly measured your speeds.
Having used Android phones for the better part of the past decade, I’ve gotten accustomed to several open-source Android apps. I find these better than their closed-source equivalents—in both functionality and user experience—and I can’t imagine using my phone without them.
10
Bitwarden
Bitwarden is an open-source password manager that I use to store login credentials for all my online accounts. The app offers a clean and simple interface that’s easy to navigate and packs all the essential password-management features I need.
Related
The 7 Best Bitwarden Features You’re Not Using
Bitwarden is hiding a heap of features you should absolutely be using.
I particularly like its built-in password generator. It gives me complete control over the generated password, allowing me to choose its various characteristics so I can ensure both my and the website’s requirements are satisfied before I use it for an account. You can also generate passphrases in case you prefer them over passwords.
Custom fields are another Bitwarden feature I use extensively. With these, I can store extra info like security questions, so they’re quickly available along with my login credentials.
Aside from passwords, I also use Bitwarden to store personal information such as software license codes and home server details. This is possible thanks to Bitwarden’s Secure Note feature, which keeps all your notes secure in its encrypted vault.
Bitwarden also offers an easy way to share passwords, even with non-Bitwarden users. It’s called Bitwarden Send, and it gives you control over how the other person can interact with your shared passwords.
VLC is a free and open-source multimedia player available on desktop, as well as Android. It can play a host of audio and video file formats, including MP4, AVI, Ogg, FLAC, MKV, and MOV.
While I use Poweramp for playing local music files, VLC is my go-to player for all video playback needs. This includes playing videos stored locally on my phone, as well as those on other devices like my home server. VLC makes this possible thanks to support for network streaming and network file sharing (SMB, FTP, and DLNA).
The app offers a comprehensive set of controls for both audio and video playback. Outside of the basics, you’ll find features like Audio Boost for files with low audio, picture-in-picture (PiP) mode to play content while multitasking, a built-in 10-band equalizer to tweak the audio, and Bookmark to save specific points within a file to return to quickly.
VLC is also ad-free, which isn’t common for apps in this category.
Binary Eye is my go-to app for scanning and generating barcodes and QR codes on my Android phone. It operates on the ZXing barcode scanning library, which is open-source and supports a range of barcode types.
One of the main reasons I use it, aside from it being 100% free with no ads, is that it can read inverted codes. These inverted-color codes are becoming increasingly common to match design and aesthetics. Similarly, I appreciate that it supports scanning in both portrait and landscape orientations.
As soon as you scan a code, Binary Eye shows its content on the screen. (You can skip this for faster access, but I’d advise against it.) Depending on the code, you’ll see action suggestions like Copy, Share, and Open.
Likewise, generating barcodes in Binary Eye is straightforward. You can choose from a range of desired formats, set your preferred background and foreground, and similar. The app will then create an output that’s easy to save or share.
Image Toolbox is a powerful app that allows you to perform a range of image and PDF manipulations on your Android phone. At the time of writing, it packs around 50 tools spanning multiple categories.
I use Image Toolbox for all kinds of image operations, from cropping, converting, and resizing to removing backgrounds, stitching, and splitting. In addition, I also use its PDF tools to convert PDFs to images and vice versa, and the EXIF tools for editing or deleting metadata before sharing images online.
The best part about Image Toolbox is that it supports batch processing, so you can perform operations on multiple files at once. That said, be aware that the results with some of the advanced tools may not always be comparable to what you’d get from desktop tools.
My work requires me to use several PC and smartphone operating systems. As such, I need an app that allows me to quickly and easily transfer files between all my devices. LocalSend is my current go-to for this.
LocalSend allows peer-to-peer file transfers between devices on the same local network. You can use it to send and receive all kinds of files, including images, videos, documents, and APKs. Plus, you can even share clipboard content or send text messages. If someone doesn’t use LocalSend, you can instead generate a shareable link they can open in a browser to access all the files.
All your transfers in LocalSend are end-to-end encrypted using TLS to ensure complete privacy, and it has no ads to worry about.
Since I use multiple devices and operating systems, I need a browser that ensures my browsing data is accessible across all of them. My primary reason for picking Firefox years ago—aside from it being free and open source—is its superior privacy protection features.
For example, Firefox comes with Enhanced Tracking Protection to protect you against cross-site trackers. By default, it’s set to the Standard level, which blocks fewer trackers, but I switch to Strict (for advanced protection) or Custom (for customized blocking) based on the websites I’m visiting.
There’s another nifty privacy feature called HTTPS-Only Mode. As the name implies, this feature prevents the browser from making any connections that aren’t secured with HTTPS.
Firefox on Android has lots of other perks like support for extensions, a built-in PDF viewer, and the ability to use an external download manager.
FFShare is one of the first apps I always install on a new Android phone. It helps me shrink the size of image, video, or audio files to make them fit for storage or sharing while also removing their metadata.
While many other apps can do this, I prefer FFShare for two reasons. First is the control and flexibility it offers over encoding and decoding: I can choose everything from codec and qscale to resolution and file size.
Second is the fact that it uses FFmpeg, a popular open-source multimedia framework for media processing known for its efficient compression with minimal quality loss. This helps with various media conversion and manipulation needs.
Aside from being efficient and effective, FFShare is also really speedy.
Termux is one of the popular Android terminal emulator apps that gives you access to a Linux environment on your phone. This enables you to run Linux CLI utilities, install packages, automate various tasks, access remote servers, and much more.
My use case for Termux is quite limited, though. I primarily use it to manage my home server (and its content), or to securely access or transfer files between my Android phone and other devices remotely.
I like Termux best because it’s super easy to use, fast, and doesn’t consume excessive battery. And for times when I need additional tools, I can easily install them into Termux to extend its functionality.
F-Droid is an open-source app store, serving as one of the many alternatives to Google’s Play Store, with a huge library of open-source apps that are open for anyone to inspect and modify.
You don’t need an account to browse and download apps on F-Droid, unlike the Play Store. Since it’s committed to transparency and privacy, it flags undesirable aspects of apps such as advertisements, trackers, non-free assets, and non-free service promotions.
While you’ll find many apps from the Play Store on F-Droid, some of the popular F-Droid exclusives include Syncthing-Fork (secure file synchronization service), Aegis Authenticator (2FA app), Seal (audio/video downloader), Amaze (file manager), and Key Mapper (hardware button remapper).
F-Droid is based on a repository system. This means you can add multiple repositories to the app to explore, find, and download the apps they host.
Obtainium allows you to easily install and update apps from their official release pages and sends you notifications when new releases are available. That way, I don’t have to head into the repositories of different apps and install them manually.
As of the time of writing, Obtainium supports over 15 app sources. Some of the popular names include GitHub, GitLab, Aptoide, APKPure, and F-Droid. I’ve installed a few Android apps on my phone from these alternative sources, and this lets me update them all in one place.
It’s important to note that Obtainium relies on web scraping for some sources. As a result, if the websites undergo any major design or structure changes, the app will fail to obtain the latest releases.
If you haven’t explored the world of open-source Android apps, now is a great time to do so. The apps above can serve as a great starting point, but there are countless other useful open-source apps available if you’re interested in this world.
You’ll discover them as you delve deeper into the ecosystem. You can also look up open-source alternatives for apps you’re currently using—but not satisfied with—and see how they compare.
If you’re spending way too long on repetitive data tasks in Google Sheets, you’re not alone. I used to lose hours every week to the same old steps—until I stumbled on a single function that did the heavy lifting for me. Let me introduce you to the QUERY function.
5
Automated Sorting That Updates Itself in Real-Time
The most immediate way the QUERY function improved my spreadsheets is by eliminating my constant re-sorting headaches. You know that frustrating cycle where you sort your data, then an hour later, new information comes in, and suddenly your sorted list is completely out of order again. That’s the one.
Say you want to track your company’s inventory by price. Instead of re-sorting endlessly, you can use a QUERY like this:
=QUERY(A:G, "SELECT * ORDER BY E desc")
In this example, you’re telling Google Sheets to pull everything from columns A through G and sort it by column E (which holds prices, in this case) in descending order.
Immediately, your most expensive cars float straight to the top.
What makes this a game-changer is that it doesn’t stop working. When a new $250,000 car gets added to your spreadsheet, it instantly appears at the top of your QUERY results. No need to sort again.
What used to take me several minutes of clicking and dragging throughout the day now happens automatically. More importantly, I never miss high-priority items anymore because they’re always right where they should be.
4
Combining Multiple Steps Into One Formula
I can’t tell you how many times I used to find myself doing this dance: filtering the data, sorting it, hiding certain columns, and maybe grouping things together. Now, thanks to QUERY, I can do all of that in one shot.
Let’s say I want to prepare a sales review, and I need to do the following:
Filter out only the sold cars
Remove any cars under $30,000
Exclude the Teslas
Sort by price to see the biggest sales first
That’s four separate steps. If I had to do this manually and make a mistake anywhere, I’d have to start afresh. Instead, I type:
=QUERY(Test!A:G, "SELECT * WHERE F = TRUE AND E > 30000 AND NOT B contains 'Tesla' ORDER BY E desc")
One formula replaces four steps. Because I inserted the QUERY function on a blank sheet, I added the sheet’s name with an exclamation mark (Test!) before specifying the columns with my data.
The best part is that I can get even fancier with clauses like PIVOT, LABEL, etc. For instance, when I need to see how each year’s offerings are selling, I add GROUP BY:
=QUERY(Test!A:G, "SELECT D, SUM(E) WHERE F = TRUE GROUP BY D ORDER BY SUM(E) desc")
This shows me the revenue so far from each year’s releases, automatically sorted from highest to lowest.
The time savings add up fast. What used to take me 10–15 minutes of clicking, filtering, and organizing now takes 30 seconds to type a formula. And unlike my old multistep process, I never accidentally skip a step or mess up the order.
Related
These 8 Google Sheets Formulas Simplify My Budgeting Spreadsheet
Why crunch numbers manually when Google Sheets can do the heavy lifting?
3
Handling Massive Datasets Without Any Lag
Picture this: You’re trying to find your most recent 100 customers from a database of over 50,000 rows to send a targeted email campaign. That’s simple enough, right?
Wrong. Every time you attempt sorting, filtering, or maneuvering that kind of massive dataset, Google Sheets will likely freeze. I dealt with this until I discovered QUERY could handle bulky datasets.
Here’s an example:
=QUERY('50000 Sales Records'!A:N, "SELECT * ORDER BY H desc LIMIT 100")
The first formula will grab the top 100 most recent shipments, as column H includes shipment dates. Meanwhile, the second one will grab orders 61 through 160.
Instead of making your computer process and display all 50,000+ rows, while taking its sweet time, just so you can look at the top 100, QUERY (with the LIMIT and OFFSET clause) is smart enough to grab exactly what you need and leave the rest alone.
You can even use LIMIT and OFFSET with all the other QUERY features—grouping, sorting, filtering—without fighting your browser and wasting time.
Related
My Quest to Find the Perfect Browser on Windows
If only it was simple.
2
Analyzing Data Across Multiple Sheets or Files
Are you still manually copying data between spreadsheets or workbooks just to do one report? You can stop now. QUERY enables you to analyze data across multiple sheets—or even across entirely different files—without ever touching Ctrl+C.
Combine Multiple Tabs in One Go
Say you’ve got quarterly data split across tabs like Sales_Q1 and Sales_Q2, you can merge them into a single dataset using curly brackets. Then, run your analysis just like you would on a single sheet.
=QUERY({Sales_Q1!A:N; Sales_Q2!A:N; Sales_Q3!A:N; Sales_Q4!A:N}, "SELECT Col3, Col1, SUM(Col9) WHERE Col5 = 'C' GROUP BY Col3, Col1")
Let’s say column 3 (Col3) is the Item Type, column 1 the Region, column 9 the Units Sold, and column 5 the Order Priority. Just make sure the structure (columns) of each sheet matches, and you’re good to go.
I just combined four sheets with data from different quarters in order to get the total units sold per item and region for C priority orders. Easy peasy!
Pull Data From Another Google Spreadsheet (No Download Required)
If you need data from a completely different file, you can use IMPORTRANGE with Query to bring it in. Say you want to bring in data from our car sales and juxtapose it with the data we’ve gotten from the four sheets, you can use this formula:
=QUERY(IMPORTRANGE("https://docs.google.com/spreadsheets/d/yoursheetID/edit", "Test!A:G"), "SELECT Col4, SUM(Col5) GROUP BY Col4")
You’ll need to grant permission before you can pull data from the external spreadsheet.
Once you grant access, you can grab data from the external spreadsheet in real time, and it’ll update if the source data changes.
QUERY lets you analyze data across tabs and files without having to open a second tab or file.
1
Sorting and Filtering Without Rewriting Formulas
Want to sort or filter your data differently without rewriting your entire QUERY formula every single time? You can, with a simple setup using double quotes and ampersands:
When your boss wants to see European data, you just type “Europe” in cell G21.
When he wants Sub-Saharan Africa data, you type “Sub-Saharan Africa.” Just ensure it’s a valid entry in column 1. The formula stays the same, but the results update instantly. Once you get the hang of it, it’s incredibly powerful.
The real magic happened when I started using this for date ranges. Dates in QUERY formulas are notoriously picky. They need to be in exactly the right format (YYYY-MM-DD) or everything breaks. But with cell references, you can set up user-friendly date controls:
=QUERY({Sales_Q1!A:N; Sales_Q2!A:N; Sales_Q3!A:N; Sales_Q4!A:N}, "SELECT * WHERE Col6 >= date '"&TEXT(G142, "yyyy-mm-dd")&"' AND Col6
Now, I have Cell G142 for the start date, Cell I142 for the end date, and Column 6 representing the Order Date Column. When someone asks what our sales were from March 15th, 2011, to April 30th, 2015, I just change those two cells instead of wrestling with formula syntax.
The best part is, I can share these spreadsheets with colleagues who aren’t formula experts. They see clean input cells where they can change the region or adjust date ranges, and they have no idea there’s a complex QUERY running behind the scenes.
Related
The Top 6 Excel Formulas Every Office Worker Should Know
Once you learn these formulas, you’ll wonder how you ever worked without them.
The QUERY function in Google Sheets isn’t just a formula. It’s a full-blown data automation powerhouse. Whether you’re wrangling tens of thousands of rows, copying data between sheets, or just sick of repetitive sorting and filtering, QUERY handles it all with ease (and style).
It’s fast. It’s flexible. And once you start using the QUERY function in Google Sheets, you’ll seriously wonder how you ever managed without it.
How different would your life be without the streaming services we all know and love? I know: it’s hard to imagine, but that’s exactly what I’ve done over the past two months, with some interesting results in my downtime.
6
No More Late Night Binging
I’m on record for going out of my way to avoid binge-watching shows, a bad habit I blame entirely on streaming services. For the most part, I managed to avoid binge-watching any show, though the show Chernobyl made me break my rule. However, I’m not beat up about it, as these things happen. But, after that, the floodgates were opened, and I was, once again, binge-watching shows before bed.
Related
How I Stopped Infinitely Scrolling and Learned to Actually Watch Something
It’s time to break this nasty habit once and for all.
Cancelling my streaming subscriptions was like ripping a Band-Aid off: painful, but worth it. You’d be surprised by how much better you sleep when you aren’t chaining episodes of a good show before bed. That’s just one solution. There are numerous ways to prevent TV from ruining your sleep!
5
I Was Reminded of My Love For Movie Theaters
Nate Williams/MakeUseOf
Streaming services made watching movies and shows so convenient that when I started subscribing, it lined up perfectly with the decline of my regular visits to the movie theaters. And I love the theaters! It was one of my favorite pastimes growing up, and I realized the convenience of streaming got in the way.
That’s not to say I wasn’t going at all, but there was a notable difference. Once I was free, my partner and I started regularly scheduling movie theaters into date nights, which we both wanted to do more of, and the little bit of extra savings from my cancelled streaming subscriptions made it happen.
4
Streaming Was Causing Unnecessary Stress
For the same reason I don’t play many live service games, streaming services were conditioning me to watch content to justify the cost. A single service isn’t much of a difference, but who do you know who has only one? I had three vying for my attention. How can you ignore them at all when there are so many good movies and shows?
Related
How You Can Save Money on a Streaming Subscription
Streaming services are amazing, but the costs can sure mount up.
Without those little devils on my shoulder, I was free to enjoy something at my own pace. I considered my mood when I bought or rented a movie, which led me to enjoy it even more. Was I missing out on some stuff? Sure, but I’ll get to it eventually. It’s not like it’s actually going anywhere.
3
My Physical Library is Growing at a Steady Pace
Brady Meyers / MakeUseOf
Although I still added physical media to my library while being subscribed to multiple streaming services, it’s the first time I’ve witnessed growth this fast. Obviously, saving money helps, especially when I cancelled three subscriptions. It wasn’t life-changing, per se, but I was able to take that small chunk and invest in the Plex server that hosts all my content.
With a bigger budget for physical media, my Plex server has ultimately grown, too, which really softened the blow when it came to on-demand content. More importantly, I can expand my Plex library for cheap and make the most of my newfound “riches.”
2
I Missed On-Demand Content
While I was ultimately better off for removing the temptation of instant gratification, which is okay in moderation, I did miss having content I’ve watched already, that I know is on that platform, and can play in the background. I’ve watched reruns of The Office both attentively and mostly by audio-only, like a white noise machine.
Related
The 4 Best Apps for Running Dungeons & Dragons From Your Phone
Want to run a game of D&D from your phone? Here are Android and iPhone apps every DM needs to accomplish this.
What I didn’t want to do was fill that space with free streaming services, although my YouTube usage did increase. Surprisingly, it wasn’t entertainment with a capital “E” I was looking for, but videos about my interests and hobbies. Seeing a tablet off to the side open to YouTube videos about Dungeons & Dragons while I prep as a dungeon master was not a strange sight in my house. It has me seriously considering cutting out a streaming service just for a subscription to YouTube Premium.
1
Sometimes It’s the Only Way to Watch a Movie or Show
As much as I go out of my way to invest in physical media, it isn’t always an option. For example, Mike Flanagan’s Hush was entirely locked behind a Netflix subscription, under license, for seven years, and it still didn’t get a physical release until a year after that.
The hold streaming services have on some physical media was made even more apparent when I couldn’t experience it isolated from the platform itself. Rather than have a fit about it, I asked myself if I really cared all that much. What was the rush? How badly do I want to see it? Is it worth the price of admission? Maybe I can come to a compromise and go with a cheaper, ad-supported tier to watch a new release that’s only on streaming and cancel after.
I wasn’t sure what to expect when I decided to cancel my streaming subscriptions, but a zen-like carelessness was not one of them. As it turns out, being bothered to watch this or watch that was like an alarm clock I couldn’t silence. I first needed to notice it was there.
I’m a big fan of Apple and its software. I have an iPhone and a MacBook, and use Apple’s huge range of excellent apps because, let’s face it, why wouldn’t you? But there is one issue among Apple’s fantastic hardware and software: Safari.
1
Extensions Not Working as They Should
Perhaps my biggest gripe with Safari is how I often struggle to use extensions with the browser. For example, I’ve found the Grammarly plugin to be borderline unusable. Each time I try correcting my text, the plugin crashes my browser. This is despite changing Safari settings to improve my browsing experience.
I’ve had issues with other extensions as well. Each time I uninstall them, Safari performs better immediately. Cold Turkey is one of the few exceptions I’ve found; it’s great for blocking websites. Still, it’s hard to justify sticking with a browser just because of one plugin (and especially when the plugin works well across the board).
Some Chrome extensions also don’t work, but most of the time, this is because of the developer. With Safari, I feel like the issue lies with the browser, especially when the same tools have no issues when I use them elsewhere.
2
Pages Closing Due to “Consuming Significant Energy”
I’ve had multiple performance problems with Safari, but one of the most common (and most frustrating) involves my pages closing because they apparently consume significant energy. Most of the time, I’ve noticed this happens to resource-intensive pages, such as websites with video content.
Although the extensions issue primarily affects my Mac, I also experience problems with webpages consuming significant energy on all my Apple devices. It happens more often than other browsers, too; I’ve had issues in Chrome and Firefox, but not as frequently as in Safari.
I’ve also tried clearing my cache and taking other steps to stop this annoyance, but so far, none of them have worked. Since this issue has plagued Safari for years, I hope Apple finds a proper fix for it in the near future.
3
Safari Assumes Some of My Searches Are URLs
When I want to search for something quickly, I don’t necessarily want to visit the search engine’s URL. Instead, I often find it easier to type the term directly into the URL bar. Unfortunately, Safari sometimes doesn’t think I’m doing this.
While I can search for terms using the URL browser with no problems in other browsers, Safari often mistakes my search terms for URLs. This often happens when I use numbers, and it often occurs when I use the percentage symbol, too. To me, these instances are especially bizarre; I’d think that’s when I’m the least likely to try to visit a website.
Having to then go directly to Google to type the same thing again is time-consuming and irritating in equal measure. Until Apple has fixed this problem, I can’t justify using Safari as my main browser.
4
Better Bookmarking Capabilities
While there are browsers built for people who never close tabs, I don’t want to make this the sole reason to choose one. Instead, I’d rather control my tabs by being strategic about how I save webpages. One of the easiest ways I’ve done this is through bookmarking important pages and sites.
When I bookmark my websites and pages, I can then keep only the tabs I truly want to have open at that point. Safari lets me bookmark content, but I think Chrome’s features are much better.
Safari allows me to open and close a sidebar when I want to access my tabs. However, I don’t think this is very intuitive. I’d much rather have them below my open tabs and visible in a way that’s less intrusive. For these reasons, using Chrome just makes a lot more sense to me.
5
Slow Loading Times
When using Safari on my iPhone or iPad, pages in the browser occasionally fail to load properly. I sometimes think it’s my Wi-Fi that’s the problem, but often, I can access other tools—such as social media and different browsers—with no problems. The problem often persists after checking to see if I have a slow connection, too.
Safari will sometimes show a page loading at the first part for several minutes. In many cases, I need to close the browser (and my current tab) before reopening it. Everything typically works as usual once I’ve done so, but nonetheless, it’s still frustrating.
6
Browser Cookie Validation Issues
I have no problem with accepting cookies on websites, but I’d rather not have to do so every single time I visit. Chrome and Firefox have sometimes glitched in this way when I’ve used them, but not on the same level as Safari.
In many cases, I have to accept my cookie preferences each time I visit a site on Safari—even if I’ve visited several times on the same day already. When using other browsers, I typically—hiccups aside—only have to do this once or twice a week at most (unless I’ve cleared the cache).
While Safari has the potential to be an amazing website browser, too many aspects need fixing before I could consider using it more seriously. Slow loading times are frustrating, and I wish pages wouldn’t close so often, either. Until these problems are resolved, Chrome will remain my go-to browser.
Streaming just passed a major milestone: in May 2025, it officially overtook cable and broadcast combined. It’s the kind of moment that should feel like a victory lap for cord-cutters. And yet, as someone who ditched cable years ago, I’ve started feeling something I didn’t expect—I kind of miss it.
Streaming Has Officially Overtaken Cable and Broadcast TV in Viewership
We’ve finally reached the tipping point. For the first time in television history, streaming has officially surpassed traditional TV viewing. According to Nielsen’s report, streaming now accounts for 44.8% of total TV viewership as of May 2025, while broadcast and cable combined only make up 44.2%. It’s a slim margin, but it’s a historic one.
However, I feel a little conflicted. This is what we’ve all been predicting for years, right? The inevitable death of cable, the rise of on-demand everything, and the future where we’re in complete control of what we watch and when we watch it. Streaming usage has exploded by 71% since 2021, while cable viewing has dropped by 39%. The numbers don’t lie—we’ve collectively voted with our remote controls and our wallets.
Netflix continues to dominate the streaming landscape, maintaining its position as the top streaming service for four straight years. The platform even managed to break streaming records with its exclusive NFL games on Christmas Day 2024. Meanwhile, YouTube has become an absolute juggernaut, representing 12.5% of all television viewing in May.
In other words, the era of flipping through channels is officially being drowned out by algorithms, on-demand menus, and autoplay previews. And really, that’s an impressive milestone. But while everyone else is toasting the end of cable, I’ve found myself wanting it back.
Related
Cutting Cable Changed Everything: 4 Unexpected Benefits l Loved
If I could go back in time, I would have cut cable sooner.
Not because I think cable was better, but because streaming—ironically—has started to feel like more work.
The Fragmentation of Streaming Has Turned Choice into a Chore
Remember when Netflix was just Netflix? When you could reasonably expect that most shows and movies would eventually end up there? Those days feel like a distant memory. Today’s streaming terrain has fractured into what feels like dozens of different services, with each one trying to carve out its own piece of the entertainment pie.
The Nielsen report mentions that the list of streaming platforms with significant viewership has expanded from five services in 2021 to eleven in 2025. That’s more than doubled in just four years. Netflix, YouTube, Hulu, Prime Video, Disney+, Paramount+, Peacock, Max, Apple TV+, and the growing list of free ad-supported services like Pluto TV, Roku Channel, and Tubi. To me, that is overwhelming. That’s eleven apps, eleven interfaces, eleven subscriptions—and, in theory, eleven different shows you’re half-watching at once.
What was supposed to simplify our viewing experience has become a complex puzzle. I find myself spending more time deciding what to watch than actually watching. First, I have to remember which service has which show. Then I have to figure out if I’m still subscribed to that service. Then I have to decide if it’s worth subscribing to yet another platform for just one show I want to watch.
Related
How to Check Which Movies Are Available to Stream
Want to know if your favorite movies or TV shows are available to stream? Here are several tools that make it easy to check.
The “Netflix Effect” mentioned in the report—where shows become bigger hits after moving to Netflix—perfectly illustrates this chaos. Shows like Suits and Young Sheldon found new audiences on Netflix even though they originally aired elsewhere. But as a viewer, this just adds another layer of confusion. Where did this show originally come from? Where can I watch it next month? Will it still be there?
Free Streaming Services Are Growing Fast—But They Feel a Lot Like Cable
Here’s where things get really ironic: the free ad-supported streaming services (FAST) are booming. Pluto TV, Roku Channel, and Tubi combined represent 5.7% of total TV viewing—more than any individual broadcast network. These services are growing because they’re free, but they’re also growing because they offer something that feels familiar: the ability to just turn on the TV and have something playing.
Related
I Tried Free Ad-Supported Streaming TV, and I Might Cancel Netflix
FAST streaming services have become quite popular, and now I can see why.
But in my opinion, these services are just cable TV with extra steps. You’re still watching ads, you’re still limited to what’s being programmed for you, and you’re still dealing with content that cycles in and out based on licensing agreements. The main difference is that you access it through an app instead of a cable box.
I’ve caught myself using these services more and more lately, and it’s not because the content is necessarily better. Sometimes, I just want to turn on the TV and have something playing without having to make a decision.
Despite all the advances in streaming technology, there’s still something that traditional TV does better: live events. By the way, streaming services are getting into live sports—Netflix’s NFL games and NBC’s Olympics streaming on Peacock are good examples—but the experience still feels different.
There’s a communal aspect to watching live TV that streaming hasn’t quite captured. When everyone in your neighborhood is watching the same football (please don’t call it soccer) game at the same time, when you can text your friends about a commercial during the Super Bowl knowing they just saw it too, when you can participate in real-time social media conversations about a live event—that’s something that gets lost when everyone is watching across different platforms and have to battle with lag and buffering issues. And sometimes, the whole app may just crash under pressure.
Streaming has also made us impatient. We’re so used to binge-watching entire seasons that waiting a week between episodes feels archaic. But there was something to be said for appointment television, for having to wait, for the anticipation and the shared cultural moments that came with everyone watching the same thing at the same time.
I Still Want Cable TV Back
I know this might sound crazy, especially from someone who cut the cord years ago, but I’m starting to miss cable. It is not the overpriced bundles, the terrible customer service, and the endless channels of infomercials, but the simplicity of it.
With cable, you turned on the TV and flipped through channels until you found something to watch. You didn’t have to remember passwords, worry about whether your internet connection was fast enough, manage multiple subscriptions, or research which platform had the show you wanted to watch.
The Nielsen report suggests that streaming’s dominance over traditional TV might be temporary, shifting back and forth depending on the season and what’s available. Part of me hopes that’s true. Not because I want streaming to fail, but because I think there’s room for both models to coexist.
Maybe the future of television isn’t about one format completely replacing another. Maybe it’s about finding the right balance between choice and simplicity, between control and convenience, between the future and the familiar comfort of just turning on the TV and letting someone else decide what you’re going to watch tonight.
Until then, I’ll be over here scrolling through six apps, trying to remember where I left off on that one show. You know the one. It had a guy. Or maybe a dog. Never mind.
Most modern apps often track your activity, location, and even habits. The best way to stop this is to switch to privacy-first alternatives that don’t harvest your data.
User tracking and data collection have become the standard for most modern apps, even if you don’t always agree to it.
6
Tor Browser
Tor Browser is one of the most trusted tools for surfing the web anonymously. When you use Tor, it gives you an anonymous identity and hides your IP address from websites by routing your traffic through a series of volunteer-run servers (called nodes), which makes it nearly impossible for anyone to track your activity or location.
Related
This Is How Tor Works (And What It Really Hides From Your ISP)
Tor secures your data while using its onion routing network, but your ISP isn’t completely oblivious.
Along the way, it encrypts your traffic so no one can snoop on what you’re doing online, including your ISP. It doesn’t collect any data about its users, and it’s built with privacy in mind to shield your activity from invasive trackers. Tor automatically blocks third-party trackers, resists fingerprinting, and automatically clears your cookies when you close the browser.
It also gives you the option to reset your anonymous identity instantly at any time. This privacy-first and secure approach is what makes Tor one of the best dark web browsers. But that doesn’t mean you can’t use Tor like a normal browser.
I used Tor for a week, and it was a game-changer. However, it has its downsides and may not be suitable for all tasks, like online banking or streaming. For such cases, use DuckDuckGo’s privacy-focused browser instead.
Signal is one of the best instant messaging apps for privacy because it’s owned by an independent, non-profit organization and is fully open-source. It doesn’t track any data and uses end-to-end encryption, so no one—not even Signal—can read your messages or listen to your calls.
Signal supports text, calls, and file sharing. Group chats can support up to 1,000 participants, and group calls can accommodate up to 50 participants. Additionally, you gain access to nearly all the features offered by competing apps, such as WhatsApp, including disappearing stories, text editing, and more, without intrusive tracking.
It boasts an intuitive user interface and is just as easy to use as other alternatives. I wish more people would use Signal because it’s just as robust as the competition, but values user privacy.
Quad9 is a free recursive DNS resolver designed from the ground up with privacy and transparency in mind. It’s owned and operated by a Swiss-based, non-profit organization, so you can rest assured that it complies with the country’s internet privacy laws, which are among the strictest in the world. Thanks to this, Quad9 doesn’t log your IP addresses or store user-identifiable data, making it a strong choice for anyone looking to avoid surveillance or data collection.
For encryption, Quad9 supports several modern encrypted DNS protocols, like DNS over HTTPS (DoH) and DNS over TLS (DoT), which prevent your queries from being intercepted or tampered with. Additionally, it validates Domain Name System Security Extensions (DNSSEC) records by default, helping you avoid being redirected to fake or compromised websites.
Quad9 also stands out from the crowd by offering built-in threat-blocking to defend you against some types of cyberattacks by automatically blocking access to known malicious domains. These built-in protections are why Quad9 ranks among the best DNS servers for online safety.
It has infrastructure spread across the world, in 90 countries, with over 200 locations, ensuring fast and reliable performance. However, Quad9 doesn’t come with a fancy app. It only provides the necessary configuration settings, so you’ll have to configure it manually. However, once set up, it operates quietly in the background, and you don’t need to worry about it.
Mullvad VPN is one of the most trusted names in the privacy space, and for good reason. Unlike most VPNs, which only promise to collect no logs or anonymized user data, Mullvad VPN takes a different approach by allowing its users to be completely anonymous as well.
Creating a Mullvad VPN account doesn’t require your email address or payment details. Instead, you’re assigned a randomly generated account number, and you can pay using cash or cryptocurrency like Bitcoin. This approach eliminates any personal data trail, reinforcing Mullvad’s position as one of the most privacy-focused VPN providers available.
Mullvad is also based in Sweden and thus operates under the country’s strict privacy laws. As such, the service does not track, store, or sell any user activity or connection metadata. Additionally, it undergoes regular independent audits for transparency and has been in operation since 2009.
Related
I Switched to Mullvad VPN, and It Protects My Privacy Perfectly
It may not be as well known, but this VPN has all of the security and privacy features I need.
It offers a kill switch and DNS leak protection and utilizes modern protocols like WireGuard and OpenVPN for fast and secure connections. Mullvad has over 700 servers, so there are plenty of options to choose from. However, Mullvad isn’t free, but it has a flat monthly fee (about $5.76, depending on the exchange rate) and keeps everything simple, with no upsells or gimmicky features.
Proton Mail is one of the go-to privacy-focused email providers available today. What makes Proton Mail one of the best privacy-focused Gmail alternatives is its Swiss roots. Additionally, another key aspect of Proton Mail’s privacy focus is its end-to-end encryption, which ensures that no one, including the company itself, can view your conversations.
Emails between Proton Mail users are end-to-end encrypted, and the service provides options to encrypt messages sent outside the platform, such as setting an optional password or sending an email with an expiration date. Additionally, Proton Mail is open source and has undergone multiple independent security audits. It doesn’t track your usage and has no ads either, unlike most mainstream options like Outlook and Gmail.
Related
There Are Even More Reasons for You to Switch to the Most Secure Gmail Alternative
More convenience without sacrificing privacy.
It also includes features such as spam filtering and contact management, and is available across various devices. Proton Mail offers a generous free plan, although you can upgrade to access more storage and additional features, such as custom domains.
If you’re looking for a cloud storage service that prioritizes your privacy, Proton Drive is the ideal choice. Like Proton Mail, it’s based in Switzerland and protected by the country’s strong privacy laws.
It also offers end-to-end encryption for all your files. While prioritizing privacy, it still offers all the bells and whistles similar to Google Drive and Microsoft’s OneDrive, including collaborative editing and secure file sharing with granular access controls.
Proton Drive offers 5GB of free storage when you sign up, but you can upgrade to a paid plan if you need more. Some plans even include access to paid versions of Proton Mail and Proton VPN.
Download: Proton Mail for Android | iOS | macOS | Windows (free, premium version available)
Mainstream apps often prioritize profit over your privacy. But just because they’re popular doesn’t mean you should stick with them. There are many alternatives that offer similar or sometimes superior functionality but are built with privacy in mind. Tor Browser, Signal, Quad9, Mullvad VPN, Proton Mail, and Proton Drive all prove that privacy isn’t dead. You have to choose it.
Most of us use Windows without ever giving a thought to the small, simple tools that come with it. With the latest updates, Microsoft has converted one of these, Notepad, into quite a handy writing tool that you’ll find hard to ignore now.
It’s the Lightest-Weight Writing App
Notepad is by far the most lightweight text editor you can find. It’s also quite versatile, as it can open just about any text file you come across. This makes Notepad a great tool for performing quick edits to configuration files—extremely helpful when you’re modding games or making configuration changes and don’t want to use a heavier program like Microsoft Word.
There are plenty of reasons to have a lightweight text editor that works with a variety of file formats and doesn’t consume much space. If you’re modding a heavy game and making changes to the game files—to increase performance or get a mod to run—the little overhead Notepad consumes means your system will have an easier time keeping up with the load.
A lot of the time, you’ll be using Notepad to make quick, one-line edits to files with extensions like CFG, TXT, or INI. It doesn’t make sense to use a larger text editor for these tasks, since Notepad works with them out of the box and has all the tools you need to make such changes.
Related
This Default Windows App Is So Good You Won’t Need Another Like It
No need to replace this souped-up program.
I also use Notepad to take quick notes. Its previous lack of formatting abilities was a problem that made me switch to Notion, but Microsoft has since added a lot of new capabilities to Notepad that let you do more without taxing your system.
The Generative AI Features Are Actually Useful
Notepad is no exception to the AI-ification of Windows, and those AI features have made Notepad a proper writing tool. You get these three tools at the time of writing:
Write/Rewrite: Takes a prompt, or pre-written text if available, and generates or edits text based on your commands.
Customized rewrite: Lets you adjust the length, tone, and format of your text. You get five options for tone and six for format.
Summarize: As the name suggests, gives you a short summary of everything included in your text file.
You might not use the Write or Customized rewrite features a lot, especially considering you can use a better tool like ChatGPT for free. However, the Summarize feature is massively helpful, especially if you’re working with larger text files or code/configuration files and don’t understand what everything means.
Using the Summarize feature to make sense of configuration or setting files can be a game-changer. Making manual edits to files can break programs to the point where you’d have to reinstall it entirely. You can also end up breaking some critical Windows settings, so knowing what you’re editing before you start making changes can save you a lot of hassle.
Now, you can do all this with an online chatbot like ChatGPT or Gemini. The fact that using these Notepad features requires a Microsoft 365 subscription also makes them a hard sell. That said, this functionality is built-in, meaning it removes all barriers to using AI tools.
If you’re like me and take notes in Notepad, it can also help you quickly organize or summarize your notes before you lose track.
Notepad Now Has Formatting Support
Another major update to Notepad is formatting support. This brings features like headings, bulleted lists, hyperlinks, italics, bold text, and Markdown support to Notepad.
In my opinion, this is the most significant update Notepad has ever received since it launched in 1983 as an MS-DOS program. It adds everything that was missing from Notepad and makes it a lot more usable for taking notes and actual writing. Markdown support is especially great, as you can apply all the formatting options without ever leaving your keyboard.
I realize this might not sound like a big deal, especially considering tools like Google Docs, Microsoft Word, and other Markdown editors let you do a lot more. However, Notepad’s formatting is entirely optional. Since the program only deals in plain text, everything you paste into Notepad instantly becomes plain text.
Rich text-based editors like Word, Docs, or WordPad will either try to retain the original formatting of the text you copied, or apply their own styles. When you’re trying to work with just text and skip the fancy bells and whistles, using Notepad makes life a lot easier.
Additionally, Notepad has other features like spell check, autocorrect, auto-save, and multiple tab support that make it much easier to work with multiple text files at the same time. And you get all this functionality without having to slow down your PC with heavy programs. There’s no worry about your excessive RAM being consumed when you just need to jot some text down, make a couple of variable changes, or store something to refer to later.
Why Should You Try Notepad Now?
If you’ve stayed away from Notepad before, I wouldn’t blame you. The program was bland and lacked features. However, Microsoft has put in some real work into an already-great program and has fixed everything wrong with it—at least from what I can see.
Related
Why Everyone Should Replace Notepad on Windows With This App
It’s time to think about ditching Notepad for a better text editing experience.
There are certainly better, lightweight Windows apps you can replace Notepad with. However, those are external installs you may not have available. Notepad is built-in and always ready to go, without needing an internet connection or a lot of system resources to work.
The next time you need to make a quick edit to a file, try Notepad. It’s got plenty of features that help, regardless of whether you’re editing code or configuration files, or writing text. It sticks to basic text handling, and does it quite well.
NVMe SSDs offer blazing-fast performance that makes the computing experience faster, but sometimes, we don’t tap their full potential. With a few tweaks and adjustments to settings, your SSD can deliver improved performance and a longer lifespan—so, don’t settle for less than what your hardware can deliver.
6
Update the Drivers and NVMe Firmware
Outdated drivers are often the silent performance killers of high-end hardware. Your NVMe drive might be limping along with generic drivers that don’t take advantage of its capabilities.
Unlike older SATA drives, modern NVMe SSDs require specialized drivers to fully utilize their potential. Many of us assume Windows automatically installs the optimal drivers, but that’s not always the case. The default Microsoft drivers work, sure, but they’re sometimes designed for compatibility rather than peak performance.
Check if your storage controller drivers need an update in Windows Device Manager. You can also check if a firmware update is available for your NVMe. To do that, you will have to visit your SSD manufacturer’s website.
Companies like Samsung, Western Digital, and Crucial regularly release optimized firmware and drivers that can improve read and write speeds and reduce latency. These updates often fix bugs that cause inconsistent performance as well.
Installation is typically straightforward—just download the package, run the installer, and restart your computer. Some manufacturers provide their own SSD management software that automatically handles driver updates. These tools are worth installing as they’ll notify you when new optimizations become available.
Don’t expect miracles from a driver and firmware update alone, but it’s one of the fundamental steps in any NVMe optimization process.
5
Make Sure Your NVMe Is Running in the Correct PCIe Mode
Your NVMe drive will not operate close to its advertised speed if it’s running in the incorrect PCIe mode. This can occur when a PCIe 4.0 drive is operating at PCIe 3.0 speeds without you being aware of it.
First, check your motherboard’s NVMe slots and whether it supports the same generation as your drive. The speed difference between PCIe 4.0 and PCIe 5.0 is significant, and running your drive in a lower-generation slot severely limits performance.
To verify your drive’s current operating mode, download CrystalDiskInfo and check the Transfer Mode field. If your Gen4 drive shows “PCIe 3.0 x4” instead of “PCIe 4.0 x4,” you’re missing out on substantial performance. Common culprits include outdated BIOS, using the wrong motherboard slot, or having the wrong BIOS settings enabled.
Don’t confuse CrystalDiskInfo with CrystalDiskMark. The former displays drive health and connection information (including PCIe mode), while CrystalDiskMark is a benchmarking tool used to measure actual read and write speeds. However, you’ll need both tools for a complete picture of your NVMe drive’s status and performance.
4
Enable TRIM to Keep Your NVMe Running Smoothly
TRIM is one of the important features that many people overlook, yet it’s essential for maintaining your NVMe’s performance over time. Without TRIM, your drive will gradually slow to a crawl as it fills up with data, even data you’ve technically “deleted.”
Unlike traditional hard drives, NVMe drives can’t simply overwrite existing data. They need to erase cells before writing new data, which creates overhead. TRIM solves this by telling your drive which data blocks are no longer in use, allowing it to clean house during idle time rather than when you’re actively trying to save files.
Enabling TRIM can also prevent your SSD from dying prematurely. Luckily, Windows 10 and 11 typically enable TRIM by default, but it’s always worth verifying.
When TRIM is active, deleted files become much harder (often impossible) to recover. It can be beneficial for security, but it’s not ideal if you accidentally delete important files.
Here’s how to check and enable TRIM:
Open Command Prompt as an administrator by searching for “cmd” in the Start menu.
Right-click on the app and select Run as administrator.
Type fsutil behavior query DisableDeleteNotify and press Enter.
If the result is “DisableDeleteNotify = 0,” it means TRIM is enabled, but if it shows “DisableDeleteNotify = 1,” it means TRIM is disabled.
If TRIM is turned off, type fsutil behavior set DisableDeleteNotify 0 in the same administrator Command Prompt to enable it.
You don’t need to manually run TRIM commands on a schedule, as Windows handles this in the background. But if you’re transferring massive files daily or running disk-intensive applications, your drive could benefit from more frequent TRIM operations.
3
Adjust These Windows Settings for Maximum Speed
Windows itself has several settings that can impact the performance of your NVMe. Let’s be honest, these Windows tweaks won’t transform your NVMe drive into something dramatically faster. The performance gains are minimal compared to others. That said, these optimizations are worth implementing to get maximum performance from the drive.
First, check the Windows Search Indexer, as it can be a performance drain. While useful for quickly finding files, it constantly writes to your SSD, which can have an impact on its lifespan and performance. You can disable the Windows Search Indexer, especially if it’s just for games or applications, which can free up resources and reduce unnecessary wear.
Additionally, you may want to adjust the Windows power plan as it often defaults to “Balanced.” This throttles performance to save energy, not what you want for a desktop PC with a high-performance NVMe. Switching to “High Performance” removes these limitations, allowing your drive to operate at full speed without random throttling.
Virtual memory settings, specifically Pagefile.sys, also deserve attention. Even with 16GB or more of RAM, Windows still creates a paging file on your system drive. You can reset the Windows virtual memory by moving it to a secondary drive (if available), or properly sizing it can prevent your NVMe from wasting write cycles on temporary data.
For those comfortable with advanced tweaks, the Windows Registry holds several NVMe-specific optimizations. Adjusting storage-related parameters, such as NVMe timeouts and command queuing, can yield performance improvements. However, proceed with caution and always back up the registry before making changes.
2
Monitor NVMe Temperatures to Prevent Throttling
NVMe drives run hot—much hotter than their SATA counterparts—and excessive heat kills both performance and longevity. Once your drive hits around 70°C (158°F), it starts throttling speeds to prevent damage, which defeats the purpose of having high-performance storage in the first place.
I’ve observed that my Apacer PCIe 4.0 NVMe temperatures spike during heavy file transfers, resulting in throttling. It occurs automatically without any warnings. Tools like HWiNFO64 or CrystalDiskInfo, as mentioned earlier, provide real-time temperature monitoring, allowing you to catch these issues before they impact performance.
The simplest solution is to add an M.2 NVMe Heatsink to your NVMe drive. These inexpensive accessories improve heat dissipation, and faster NVMe SSDs often come with a heatsink. But if you’re using a laptop where adding a heatsink isn’t possible, consider improving general airflow or using a cooling pad.
Related
What Is an M.2 NVMe SSD Heatsink?
The concept of an M.2 SSD heatsink is actually wider than you think, but the same can’t be said about its usefulness.
1
Run These Benchmarks to Verify Your Improvements
After implementing all these optimizations, you need to verify they’re actually making a difference. CrystalDiskMark is my go-to tool to test NVMe speed and performance. It’s straightforward and provides comprehensive metrics for sequential and random read and write speeds, the latter being more important for everyday tasks. Run it before making any changes to establish a baseline, then again after each major optimization to track improvements.
The “SEQ1M” test measures sequential read and write speeds with large files—this matters for transferring movies or large datasets. “RND4K” tests, meanwhile, measure how quickly your drive handles small, random data—what matters most for booting Windows or launching applications.
On the other hand, the “Q” and “T” values indicate queue depth and thread count, respectively. Higher numbers simulate heavier workloads, such as video editing, while Q1T1 represents everyday tasks like web browsing.
Related
This Is Why I Regularly Benchmark My Hardware, and You Should Too
It sounds odd, but it’s so worthwhile.
Don’t obsess over minor variations, as benchmark results can fluctuate by 5% between runs. Look for consistent and significant improvements across multiple tests to confirm that your optimizations are working.
Optimizing your NVMe SSD isn’t just about chasing benchmark numbers; it’s also about ensuring you’re getting what you paid for. Implement these tweaks, and you’ll likely see noticeable improvements in everyday tasks. Your PC will feel more responsive, files will transfer faster, and you might even extend your drive’s lifespan in the process.
If you’ve ever seen something while browsing and wondered what it was or where to get it, you’re in the same boat as me. Thankfully, browser vision tools like Google Lens in Chrome and Microsoft Copilot Vision in Edge are here to help—but which one is better?
Google Lens is built into Chrome and is also available as a smartphone app. Up until June 12, 2025, Copilot Vision was similarly limited to Microsoft Edge, only accessible via the Copilot Vision flag. However, Microsoft’s Copilot Vision update now means you can use its AI vision tool across Windows 10 and Windows 11, though it is limited to US-based users at the time of writing.
I ran the same webpages through Google Lens and Copilot Vision to compare how quickly and accurately they identify objects and offer helpful suggestions. I used a blog post on shirt materials and a plant post shared in a Facebook group. For the blog post, I focused on the section on the Oxford cloth.
Both Google Lens and Copilot Vision recognized the objects immediately, identifying the plant as a Moringa plant; however, there were variances in how they described the Oxford shirt. Google Lens described it as a Nylon Black Oxford Fabric, while Copilot Vision called it an Oxford Shirt and Fabric.
The real difference showed up in what they did next.
Google Lens is far more helpful if you’re trying to find or buy what you’re looking at. It suggested similar items, offered clickable product links, and directed me to stores and blog posts where I could learn more or make a purchase. The layout, with all results appearing in a sidebar, made it easy to browse without leaving the page.
Copilot Vision doesn’t offer product suggestions or direct you to external sources. It recognizes what’s on the page and can answer any questions you have about it. It was quite fun learning about the health benefits of Moringa oleifera, as identified in the Facebook post. I asked if I could plant it in my living room, and it said, “Probably not.” In that, Copilot Vision is very useful if you just want to understand something you’re looking at, but not great if you’re hoping to discover or buy it.
Related
The 6 Best Plant Identifier Apps for Android and iPhone
Here are the best plant identification apps for Android and iOS that allow you to identify flowers and plants anywhere.
Copying, Translating, and Asking Questions About Text
Next, I tested both tools on tasks involving text, such as copying, translating, and asking follow-up questions. I used a dual-language German-English learning PDF and a scanned image of the back of one of my ID cards to see how well each tool handled text in various formats.
Google Lens excels at extracting and translating text from images and documents. I was able to copy text from the image and instantly translate it in the sidebar, which is great if you’re dealing with foreign language documents or want to grab a phone number, name, or ID number without typing it out. You can also use the sidebar to explore search results, get quick definitions, or enter more keywords to search for related information. Everything happens in the side panel, and it’s easy to see what you’re highlighting.
On the other hand, Copilot Vision, as an app, doesn’t allow you to copy text and only offers verbal translations, meaning you cannot copy or note it down as you can with the translations provided by Google Lens. But it was surprisingly good at handling real-time interactions with the text. For instance, when I opened my ID image (which I purposely showed upside down), I asked Copilot Vision to read what was on the page. It suggested rotating it and zooming in. Once I did that, it read out the text and even provided a German translation when I asked it to.
Regarding follow-up questions about the text on the page, Copilot Vision can provide any clarification you need about what you’re looking at. You’ll have to ask your questions and get answers verbally (via on-screen, conversational responses), though.
However, Copilot Vision’s June 12 update is likely to change all of this. According to Microsoft, Copilot Vision now includes “Highlights,” which to me sounds very much like Google Lens’ results page, docked to the right of your screen. Highlights also seems to take this a step further, and can surface useful content from your apps, browsers, and documents; basically, anything on your PC that you share with Copilot Vision. Microsoft states that you won’t even have to prompt Copilot Vision to help—it’ll suggest relevant actions and files based on your activity.
Unfortunately, given that this tool is only available in the US at the time of writing, I’ve been unable to test it.
Related
These Are the 4 Best AI Chatbots For Handling Big Conversations
They don’t lose the thread when discussions get lengthy.
Which App Offers Better Insights Into Webpages and PDFs?
Copilot Vision really stood out when I tried analyzing complete webpages. I tested both tools on a full PDF book and a YouTube video page, specifically MKBHD’s WWDC impressions, to see how well they could summarize and provide insights on broader content.
Google Lens is mostly limited to the individual elements you click on (text, objects, and images). Once you highlight something, it can show you more information or similar results, but it doesn’t process the entire page or PDF. So, I could only highlight the title of the book or the cover page to get similar results.
Meanwhile, Copilot Vision is designed to interpret everything on the page at once. It answered my question about the author’s main point, navigated to the key section, and even highlighted the relevant sentence (although it began to glitch and decline further requests after this instance, likely due to the large file size).
Its performance occasionally lags with large files, but it’s clearly built for interacting with entire pages and larger content.
When I tested the video page, Copilot Vision summarized what MKBHD said and how the video was being received. It even provided stats like views and likes. In contrast, I could only highlight MKBHD’s picture or the video title with Google Lens to perform a search.
Google Lens vs. Copilot Vision: Which One Is Best for You?
Both Google Lens and Microsoft Copilot Vision are powerful tools, but they serve fundamentally different purposes. Rather than one being universally better, the right choice depends on how you use your browser vision tool.
Choose Google Lens if you want to:
Instantly identify products, clothes, or plants and find out where to buy them
Copy and translate text directly from images, webpages, or documents
Use a clean, sidebar-based layout to browse links and definitions without leaving the page
Get quick visual search results and Google’s AI overviews without much interaction
It’s simple, straightforward, and ideal for getting quick answers about what you see while browsing.
Choose Copilot Vision if you want to:
Interact with complex documents, videos, or full webpages
Ask detailed follow-up questions about what you’re reading or watching
Summarize, interpret, or discuss text with a friendly AI chatbot
Use a docked interface (Highlights) that provides more information based on what’s on your screen (again, if you have the recent update)
Copilot Vision doesn’t just identify what you’re looking at. It wants to have a full-blown conversation with you about it.
In terms of availability and access, Google Lens is free and fully integrated into Chrome without usage restrictions. Copilot Vision, on the other hand, requires Microsoft Edge with the feature enabled, and you’ll only be able to use it a few times per day unless you consider upgrading to Copilot Pro.
As for me, I find myself using Google Lens more often, and it’s the one I’d pick as the best overall. Most of the time, I just want to identify something quickly and move on, whether it’s a product, a word, or an image. Google Lens does that instantly, without any friction. The fact that it’s free, easy to access in Chrome (and as a smartphone app), and requires no extra setup makes it the most practical tool for everyday browsing. While Copilot Vision has its strengths, Google Lens wins because of its simplicity.
Ancestry services can tell you a lot, but you also have to hand over some very sensitive personal data to them. Your genetic data being sold on the dark web is no joke, and thanks to this ancestry service’s data breach, that’s exactly what’s happening.
Your Genetic Data Is Being Sold Online
DNA testing firm 23andMe suffered a massive data breach in 2023 that ended up leaking genetic data of millions of customers. Hackers were able to breach 14,000 individual accounts and got away with information relating to about 6.9 million individuals listed as possible relations on the site.
The stolen data includes:
Names
Birthdays
Geographical information
Profile images
Race
Health reports
Ethnicity
Family trees
Following the data breach, the UK’s Information Commissioner’s Office (ICO) and the Office of the Privacy Commissioner of Canada (OPC) announced a joint investigation into the incident in June 2024. One year later, the investigation has concluded with a £2.31 million ($3.13 million) fine for 23andMe for the “profoundly damaging breach” as announced by the ICO.
Yadullah Abidi / MakeUseOf
The investigation also highlighted security mishaps at the time of the breach. The company did not put proper authentication measures in place, with a lack of mandatory multi-factor authentication (MFA) and loose password requirements. 23andMe also didn’t take any measures to prevent accessing and downloading raw genetic data, and did not have “effective systems in place to monitor, detect, or respond to cyber threats targeting its customers’ sensitive information.”
John Edwards, the UK Information Commissioner, explains it best:
23andMe failed to take basic steps to protect this information. Their security systems were inadequate, the warning signs were there, and the company was slow to respond. This left people’s most sensitive data vulnerable to exploitation and harm.
23andMe’s lax attitude in admitting to the breach was also pointed out. The breach first began in April 2023 and lasted until May 2023. However, the company did not confirm the breach and start a full investigation until October 2023, when an employee spotted the stolen data being advertised for sale on Reddit.
Data Protection Begins With You
Unlike passwords and other information that often gets leaked in such data breaches, you can’t simply change your genetic data. Once this data is out there, you’re essentially compromised for life.
Related
After My Data Was Breached, Here’s How I Protected My Accounts
The quicker you move, the safer you’ll be following a data breach of any type.
So while there’s not much you can do in this case except being vigilant about any scamming or identity theft attempts, you can still try and protect yourself from future breaches. Setting up MFA for online accounts and using strong, unique passwords for each account are some of the most basic steps that you should be taking to protect your digital footprint, regardless of whether the service provider mandates them. Protecting your credit rating if you’re affected by a data breach is also important.
Additionally, try to avoid using online services that ask for too much sensitive information in the first place. Sure, it sounds exciting to learn about your ancestry, but this curiosity isn’t worth gambling with extremely sensitive genetic information that can be used for all sorts of malicious purposes.
Windows 10 is nearing its end of life, and with it, so is my time with Windows. As Microsoft prepares to drop support, I’m stepping away too.
Why I Can’t Continue With Windows 10
It’s not like Windows 10 will magically stop working after October 14, 2025—the end-of-support deadline for the OS. But with Microsoft dropping support, there won’t be any more more updates. Sure, you can continue using your PC just fine without any updates. But if you plan to browse the internet or use Microsoft apps, you’ll start hitting many dead ends.
Microsoft has extended support for Office 365 apps on Windows 10 until October 10, 2028. However, the catch is that you’ll only be getting security updates. So while everyone else is going around getting work done with the latest and greatest AI and productivity features, you’ll be stuck in the past.
If outdated software isn’t enough, performance will generally degrade over time. As more and more programs start optimizing for Windows 11, you’ll see drops in performance on Windows 10. Some programs will even drop support for Windows 10 altogether. This is especially true for hardware drivers—and with gaming being one of my main reasons to use Windows, I can’t have that.
Related
Don’t Let Microsoft Kill Your Windows 10 PC—Do This Instead
You may have to part ways with Windows 10, but don’t surrender your PC just yet.
Then there are third-party support options for Windows 10. If you’re running a business that relies on Windows 10 or need the OS for a specific requirement, that’s fine. I don’t see the point in paying for a subscription just to continue using an OS I already paid to license, especially when there are better alternatives available.
Windows 11 Isn’t an Option
If you’re still holding on to Windows 10, it might finally be time to upgrade to Windows 11. However, that isn’t really an option for me.
Microsoft has put a significant amount of work into improving Windows 11 since its launch, but it’s still an AI-riddled mess of an OS. There are far too many unnecessary services, programs, bloatware, and AI features scattered across the interface. These not only make it hard to reach the features you really want, but also consume unnecessary hardware resources that could be used for better performance and a snappier user experience.
You can get a faster, cleaner Windows 11 installation with some hacks. But the fact that I have to download and run a debloater program on a brand-new installation of Windows 11 just to make it usable is very off-putting to me.
Related
Your PC’s a Mess. Here’s the 10-Minute Windows Cleanup Anyone Can Do
Say goodbye to your messy PC.
And then there are the privacy issues.
Setting up Windows 11 on the first install is a minefield of avoiding checkboxes and sliders that are all set up to track as much of your activity as possible. This begins with needing a Microsoft account to even finish installing the OS. There used to be a workaround that let you skip logging in with a Microsoft account when setting up Windows for the first time, but it has since been removed.
Microsoft’s insistence on integrating AI into every nook and cranny of Windows is also a headache. Even Notepad has AI tools built into it now—a tool supposed to be the most basic of all Windows utilities. Then there’s the privacy nightmare that is Windows Recall.
This has since been updated to the point that Microsoft wants you to try Recall again, but I can’t trust it; I don’t want my OS taking screenshots of what I do on my computer.
Hannah Stryker / MakeUseOf
Another major issue I can’t get past is Windows Modern Standby; how Microsoft can’t figure out how to put a laptop to sleep is beyond me. I use my laptop on the go probably even more than my phone, and constantly wonder why my laptop can’t retain the 100% charge I left my house with by the time I’m at my destination. A little drop in battery is fine, but my laptop shouldn’t lose 50% of its battery just sitting in my backpack.
The point is, Windows 11 still feels a lot like a work-in-progress. This continuous evolution and development might even be what Microsoft’s been aiming for since the beginning. I wouldn’t call it the wrong approach, but it’s certainly not for me.
Linux Offers So Much
With Windows 11 out of the picture, Linux is the only real option for me. Sure, Macs exist, but I’ve been using Linux in parallel to Windows for my development uses, and it suits my needs better.
For starters, Linux has some features that Windows should steal. I’m talking about better desktop customization, system snapshots, better software and driver managers, and of course, full control of your privacy and security. Linux is also much lighter to run as compared to Windows, so if you’re about to toss that old PC out with Windows 10, it’s time to switch.
Related
Why I Finally Switched to Linux and Don’t Regret It
Wondering whether to switch to Linux? Let me tell you why it worked out so well for me.
The only drawback of fully switching to Linux is that a lot of your everyday programs might not have native Linux versions. You can use emulators like Wine to solve the problem to some extent, and there are plenty of alternatives that might even be better than the Windows programs you’re used to.
In any case, support for Linux is on the rise, meaning more and more developers are developing native apps for the OS. Given its performance, privacy, and cost benefits, it’s a solid alternative to Windows, especially if you don’t want to be forced to upgrade to Windows 11.
Curious about online anonymity, I ditched my usual browser and spent a week exclusively using the Tor Browser. While its privacy protections are impressive, I didn’t expect how much it would change my perception of the internet itself.
What Tor Changed About My Browsing
Tor is easy to set up and use, just like Chrome or any other browser, but it offers something you won’t get out of the box with typical browsers: privacy. Tor gave me a firsthand look at how different the internet feels when privacy takes priority. With privacy at the forefront, several aspects of my browsing experience changed.
1. My Awareness of Online Tracking
One of the first things I noticed with Tor was how much tracking is baked into everyday browsing. When using a typical browser, I didn’t think that every click, search, and scroll was logged.
After all, we’re bombarded with cookie banners and think we’re in control of what’s tracked, right? Not quite. Often, websites don’t disable every tracker, even if you tap the rejection button on the banner.
Most tracking goes on in the background, often silently and without your explicit consent. But with Tor, online trackers were essentially neutralized. It blocks trackers, and it’s eye-opening to see banners I hadn’t seen before. For instance, I only discovered that Google offers a way to opt out of cookies and other tracking when I attempted to access it via Tor. I’d never seen the screen in the above image displayed in my country before!
2. I Felt More Invisible Online
Using Tor gave me a sense of digital invisibility I hadn’t experienced before. Unlike mainstream browsers that link your activity to your IP address, location, or even your browsing habits, Tor anonymizes all of that by bouncing your traffic through several nodes around the world. By doing so, Tor makes it hard for anyone to trace your online activity back to you.
Dive deep
This Is How Tor Works (And What It Really Hides From Your ISP)
Tor secures your data while using its onion routing network, but your ISP isn’t completely oblivious.
As such, using Tor was a refreshing experience. Suddenly, my real location was no longer visible, which meant I had to change the language on websites from time to time, as some used my fake location and displayed content in unfamiliar languages. Ads felt odd as well, because there was no personalization, which was a great thing. It gets even better if you learn how to use Tor safely.
In Tor, I could even reset my identity instantly, adding another layer of anonymity. Achieving such invisibility on mainstream browsers without significant customization is difficult. It’s the key reason why Tor is one of the go-to browsers for browsing the dark web.
3. My Browsing Habits Shifted
Spending a week with Tor made me much more deliberate in how I used the internet. Because I knew I was operating in a more privacy-conscious environment, I naturally started adjusting my behavior to match. First, I avoided logging into personal accounts because it felt counterproductive to the whole idea of anonymous browsing.
Related
5 Free Anonymous Web Browsers That Are Completely Private
Anonymous web browsing is one way to protect your online privacy. Here are the best anonymous web browsers to use.
Whether I used Tor or not, logging into services like Gmail and Facebook meant that my activity was tied back to my real identity. Using Tor also made me aware of just how much information we give away without really thinking about it.
By browsing in a tightly controlled, private environment, I became more cautious about sharing my personal information with websites. If a site required that I fill out a form before granting access to content, I clicked away. I also steered clear of websites that demanded mandatory cookies to proceed.
4. I Gained Access to Things I Normally Couldn’t
Beyond anonymity and accessing the dark web, I didn’t think of any other reason why I would want to use Tor. Surprisingly, it also opened up parts of the internet I couldn’t normally access on the open web. Since it routes your connection through multiple nodes (or relays), the result is that websites don’t see your real location but rather the location of the exit node.
Related
Should You Use a VPN on the Dark Web?
There’s a difference between the surface, deep, and dark webs, with the latter generally considered a breeding ground for illicit activities…
This meant I was able to view content that isn’t typically accessible in my country, whether due to censorship, licensing limitations, or regional blocking. It was eye-opening to learn that the internet isn’t quite the same for everyone, and Tor tries to level the playing field a bit.
Of course, there are other ways to bypass internet censorship—you don’t need to use Tor. And, as expected, I could also access the dark web safely, a key reason why many people use Tor in the first place.
5. Browsing Was Annoyingly Slow
The biggest drawback I experienced in my one-week Tor trial was just how sluggish everything became. My go-to websites, which typically loaded almost instantaneously, took more time, sometimes up to several milliseconds, before I could even see the content. At times, loading took longer than expected and ultimately failed due to timeouts. But this only happened a few times.
This wasn’t due to a slow internet connection—when I visited the same sites using my usual browser, Vivaldi, everything loaded quickly. The Tor network’s multi-hop routing and encryption slow traffic down, but are integral to its privacy.
That additional hopping from one relay to the next, along with the extra encryption and decryption, adds more overhead to what would otherwise be a simple point-to-point connection.
What Tor Didn’t Change
Using Tor was a game-changer in terms of how I used the internet, but it didn’t transform everything. Certain aspects remain unchanged, ranging from practical annoyances to personal habits that held steady regardless of how private my connection was.
1. My Real Identity Online
Tor is secure and anonymous by design, but even with all the encryption layers, my online identity remained the same. While it protected my activity, IP address, and, by extension, my location, that didn’t stop certain websites from requiring my real identity to use their services.
If I logged into Facebook or Gmail, my identity remained the same. I could create an anonymous account for Netflix and other services that I use, but I wouldn’t be able to fake my payment details. So don’t think using Tor is a magic wand that makes you invisible. It takes more than firing up Tor to achieve complete online anonymity.
2. My Need for Speed and Convenience
Even with all the advantages of privacy and the ability to bypass geo-restrictions, I couldn’t ignore how much I craved the speed and convenience of my regular browser. Pages took longer to load, and videos buffered at times to the extent that I couldn’t get anything done for a couple of minutes.
I also encountered issues with multiple websites, which either broke or refused to open. Certain websites, such as YouTube, didn’t work, especially with Tor’s most restrictive Safest security level enabled (which disables JavaScript and other features by default).
Related
How to Disable JavaScript on Tor Browser (and Whether You Should)
You can disable JavaScript in Tor Browser, but should you?
I was sometimes even blocked from some websites when I tried to access them for the first time, as they flagged me as a robot, which became frustrating.
In the end, using Tor as my primary browser for a week has been an eye-opener, especially in terms of how tracking is rampant in the current web landscape. But while Tor offered a greater sense of anonymity and kept online trackers in check, it also came with trade-offs. I wouldn’t use Tor as my primary browser for anything, but I’ll keep it as my backup option for private browsing sessions.
Whether you’re traveling abroad, working remotely, or just trying to save on your data plan, having reliable access to free Wi-Fi can be a lifesaver. It’s not always clear where you can find free Wi-Fi hotspots when you’re travelling, so I use these free Wi-Fi map apps to help me stay connected without racking up a huge bill.
WiFi Map
WiFi Map is the heavyweight champion of Wi-Fi finder apps, and for good reason. With over 150 million hotspots in its database worldwide, it’s rare to be somewhere that WiFi Map doesn’t know about. The app works like a social network for anyone using Wi-Fi, who share passwords and add new hotspots, creating a constantly growing database of accessible networks. You can even use the WiFi Map website if you prefer finding hotspots on your laptop.
What sets WiFi Map apart is its offline functionality. You can download maps for specific cities or regions before you travel, which means you don’t need an internet connection to find your next hotspot. This feature alone has saved me countless times when landing in a new country without a local SIM card.
The app goes beyond finding Wi-Fi hotspots. It also highlights other points of interest, such as public toilets, water fountains, and ATMs—handy features when exploring a new city. Each Wi-Fi listing includes useful details, such as network health, the last time someone connected successfully, and, most importantly, the password if it’s a secured network. There’s even a built-in internet speed test tool so you can check the connection quality before settling in.
The free version provides access to most features, although you’ll see some ads. The paid version removes ads and adds a VPN for extra security on public networks.
Download: WiFi Map for Android | iOS (Free, $36 Pro Tier)
Wi-Fi Around (iOS)
If you have an iPhone, WiFi Around is a great option for finding Wi-Fi hotspots. Like WiFi Map, it relies on crowdsourced data from users who share and update Wi-Fi information. What makes WiFi Around worth considering is its focus on providing real-time information about network availability and performance.
WiFi Around uses Apple Maps for navigation and supports widgets for quick access from your home screen. You can see nearby hotspots without even opening the app, and it also shows real-time availability for some locations, so you know if a cafe’s Wi-Fi is currently working before you walk in.
The app includes speed test history for each location. You can run speed tests and save the results, giving you a good idea of what to expect before connecting. WiFi Around is free to download and use, but you’ll see ads in the free version. If you want an ad-free experience, you’ll need to subscribe to their premium plan.
Download:Wi-Fi Around (Free, $4.99 per month or $34.99 annually)
Related
How to Get Wi-Fi Without an Internet Service Provider: 5 Methods
Don’t have a regular ISP? Learn how to get Wi-Fi wherever you are, even without an internet service provider.
WeFi (Android)
WeFi was one of the first apps to help people find public Wi-Fi networks, and even after more than a decade, it’s still going strong. WeFi takes a unique approach by automatically connecting you to known safe networks as you move around. Once you’ve connected to a network through the app, it remembers the connection and automatically reconnects the next time you’re in range.
WeFi’s interface is fairly minimal yet functional, featuring a map-based view that displays available Wi-Fi hotspots near your current location. The app is especially good at finding hidden networks that other apps might miss. It uses crowdsourced data but also actively scans for available networks, often finding business Wi-Fi networks that aren’t widely advertised.
Other features include automatic management of the Wi-Fi radio to optimize battery life, the ability to exclude public networks, and a built-in network speed test. Best of all, WeFi is completely free with no ads, a rarity among Wi-Fi finder apps, but is only available for Android devices.
While dedicated Wi-Fi finder apps are incredibly useful, they’re not the only way to find free internet access. Sometimes, the simplest methods work just as well.
Many venue-specific apps now show Wi-Fi availability. Starbucks, McDonald’s, and most major chains have apps that list which locations offer free Wi-Fi. Hotel booking apps like Booking.com and Airbnb let you filter searches by properties with free Wi-Fi. Even apps like Yelp and Google Maps often mention Wi-Fi availability in business listings.
Google Search has become surprisingly good at finding nearby Wi-Fi. Simply searching “free Wi-Fi near me” often brings up a map with local businesses offering it. The results are pulled from Google’s business profiles, where owners can specify if they offer free Wi-Fi to customers.
Reading reviews on Google Maps or Yelp is another smart way to find good Wi-Fi spots. Customers frequently mention Wi-Fi quality in their reviews, giving you real-world feedback about connection speeds and reliability. I’ve found some of my favorite work spots by searching for cafes and filtering reviews that mention “fast Wi-Fi” or “good for working.”
Hannah Stryker / MakeUseOf
Public libraries remain one of the most reliable sources of free Wi-Fi, and they’re often overlooked. Most libraries offer high-speed connections with no time limits, and you don’t always need a library card to use the Wi-Fi. City parks, train stations, and airports also offer free public Wi-Fi. However, these networks often have time or data limits.
I didn’t include Instabridge despite it being one of the most popular Wi-Fi finder apps out there. Although it has a large number of users, it attempts to do too much beyond simply finding Wi-Fi. The app pushes unnecessary installations and even attempts to replace your Android launcher during setup. When I need to find Wi-Fi quickly, the last thing I want is an app that clutters my phone with extras I didn’t ask for.
The key is to have at least one of these apps installed before you need it. Download offline maps for your destination, save your favorite spots, and always use a VPN on public networks for security. With a little planning, you’ll most likely find a working Wi-Fi hotspot when you need it the most.
Asking ChatGPT general questions works well for basic queries, but I got tired of being left in the dark when I needed something more complex. That’s where ChatGPT’s special tools for image creation, web search, research, and coding are super useful—and I know just when to use them.
Creating an Image
ChatGPT’s ability to create images has come on leaps and bounds since it first launched. Images of humans now look like actual human beings, and the text in them is legible, especially compared to the sludge of yesteryear.
1. When I Want to Make Graphs and Diagrams
ChatGPT’s image generation tools are pretty good at making graphs and diagrams. I use this feature when I need something mapped out, and outlining within the chat isn’t enough. Moreover, it’s a great feature when I’m planning timelines.
I use ChatGPT to create a wide range of diagrams and graphs. From personal experience, I think it’s equally as competent with Venn diagrams, bar charts, and pie charts. I aim to keep instructions simple so I don’t overwhelm the tool, which is one of the best AI prompting tips and tricks.
2. To Visualize My Goals and Ideas
I have lots of abstract ideas and goals I want to achieve, and sometimes, it’s hard to understand what they’ll look like. With ChatGPT’s image generation, I’ll occasionally ask it to visualize what my goals and ideas could look like.
Generating images normally takes a few minutes, but I can easily access them in my library whenever I need to. Since GPT-4o is much more photorealistic than the early days of DALL-E, I have a better understanding of what my life would look like if I made it a reality.
Visualizing my goals and ideas in ChatGPT is one of the best ways I use tech for goal manifestation.
3. When I Want to Create Prototypes
I’m passionate about photography and web design; while much of my creativity comes from my mind, I like to occasionally see how the finished product might look. Besides scanning Pinterest and saving ideas to my boards, not relying on others’ existing ideas—and using AI—has helped.
When I want to make prototype pictures and visuals, I’ll use ChatGPT’s Image Generation. I don’t need the writing and whatnot to be top-tier; I just need the outline to make at least some sense. Once I’ve done so, I can decide whether to move forward with the final piece.
Searching the Web
ChatGPT’s special tools are excellent at searching the web and finding useful information. In some cases, I actually think ChatGPT Search is better than Google. While I don’t believe it’ll fully replace traditional search, it excels at doing a select few things exceptionally well.
1. Statistics
I used to hate searching for statistics through Google. Most of the time, I’d find articles with light SEO tweaks for the current year (but still including statistics from 2017 in 2022). Since using AI tools, such as ChatGPT search, finding accurate stats has become much more straightforward.
Besides simplifying how I source statistics, I also use ChatGPT search because it makes them easily digestible. I don’t need to worry about reading multiple articles and bringing everything together; the tool does this for me.
If I really want to view statistics in more detail or add context, I can then combine ChatGPT with Google or Perplexity to get a clearer picture. ChatGPT itself shows the resources it has cited, making extra research straightforward.
2. To Find Resources
Finding resources, such as books, has often been time-consuming for me when done manually. Thankfully, this has become much easier since I started using ChatGPT’s special tools.
If I want a list of books, academic papers, articles, or videos, I’ll ask ChatGPT’s search feature to find a list. Once I have done that, I can then review everything and delve into more detail on what I think will be useful.
ChatGPT provides the sites it used to find these resources. For books, I sometimes need to manually search for the title myself if I want to buy it. This isn’t a huge issue, however. For academic papers, I often need to click through directly from ChatGPT.
Writing or Coding
ChatGPT has plenty of uses in programming, including the ability to generate code via its special coding tools. It’s also possible to use ChatGPT for writing inspiration and for structuring essays and articles better.
1. Coding to Update a Website
While I have my own websites where I share information, I’m not very good at coding—nor do I like doing it. Since I can’t afford a web developer, I sometimes ask ChatGPT to generate code within a controlled environment.
When I ask ChatGPT to generate code, the tool shows me a preview of what it might look like when it goes live. Based on this information, I can then decide if I wish to make changes. If not, I’ll test it on my website to ensure everything looks good (and is secure!)
2. To Outline Ideas and Get Inspiration
I don’t use ChatGPT to write articles outright, as I often find it’s easier for me to write them myself. ChatGPT makes far too many mistakes to be reliable and often requires heavy editing that takes longer than it would for me to start from scratch. However, ChatGPT is good for outlining ideas and getting inspiration.
If I feel like it’s necessary, I’ll use ChatGPT’s Canvas feature to create comprehensive outlines. Moreover, I may ask the tool to create an article for inspiration; this is particularly helpful when I have writer’s block. If I really wanted to, I could edit within the canvas. The chat, meanwhile, is useful if I want clarity or extra sections added.
Running Deep Research
ChatGPT has an excellent Deep Research tool that hands-down beats every other AI chatbot’s equivalent. I use it for a handful of tasks, and since I’m no longer tied down by strict monthly limits, I continue to experiment.
1. Studying Research Projects
Studying for research projects is one of the best uses I’ve found for Deep Research. The tool provides comprehensive analyses of hard-to-understand topics and presents them in a digestible format. While manual research is still necessary, I get a strong overview and a decent idea of which direction I should take my research.
When presenting information to me, ChatGPT provides sources where necessary. Moreover, it asks me follow-up questions so its responses are more accurate for me.
2. Language Learning
ChatGPT Plus can help with language learning in many ways, and while Deep Research is available with the free version, upgrading has helped me learn new languages much more effectively. I can use Deep Research to get a breakdown of phrases and find useful websites, which is particularly helpful if I’m learning something completely new.
Deep Research is also capable of finding useful stories in the language I’m trying to learn, along with giving exam prep tips and much more.
3. Book Summaries
While I love reading, I also don’t want to buy a book before I know I’ll probably enjoy it. Searching the web for book summaries can be time-consuming, and I prefer not to watch video summaries. ChatGPT’s Deep Research tool, meanwhile, is a fantastic way to summarize books before deciding whether I should purchase.
I ask ChatGPT for a comprehensive summary of the book overall, which helps me determine if I should go further. From that point on, I can then ask for a chapter-by-chapter summary if needed. To make my reading more effective beyond ChatGPT, I also incorporate multiple tech habits to read more books.
ChatGPT’s special tools add context, perform menial tasks with ease, and provide useful starting points for research. They’re also ideal for visualizing goals and creating prototypes. I’ve found multiple ways to use them to my advantage, and you should try them out to see how they work for you.
I admit my mistakes when I’m wrong: I’ve been missing the point of active-noise cancellation (ANC). After some trial and error and finally picking up some hardware with ANC worth using, I’m a true believer.
How I’ve Been Using ANC Completely Wrong
What initially gave me a knee-jerk reaction to ANC was this idea of my thoughts being isolated from background noises. My thoughts are always running, so it just didn’t sound pleasant to be in an environment where I had to hear more of my thoughts.
However, I was fortunate enough to get a care package of electronics, and one of the gifts included a pair of Raycon Everyday Pro Earbuds, which have ANC. Being earbuds, that was my first holy moment. I now knew how ANC truly worked.
Related
Raycon Everyday Earbuds Pro Review: Great, But Not for the Price
There isn’t much to complain about, but these buds won’t wow you either.
All I Needed Was a Pair of Earbuds
Sergio Rodriguez / MakeUseOf
I don’t like headphones—period. My ears always get hot, despite my headset having breathable earcups. It kept being the length of time because my ears hurt after an hour. Earbuds, on the other hand, feel infinitely better. I can wear earbuds for an hour without getting too hot, although I do make it a point to avoid wearing them when I’m exercising. The debate on headphones vs. earbuds has a clear winner in my book.
Since I could never stand to wear my headset for long, I just never had much of an opportunity to experience the difference between ANC being on and off. The ANC feature is why I picked up the headset in the first place, after being convinced that earbuds don’t have good ANC due to their size. How wrong I was!
It Was Hard to Notice ANC At First
My house is pretty noisy most of the time, but since I regularly enjoy music too, the combination acted like its own filter, preventing me from really hearing the difference. I also wasn’t sure what to expect.
Related
Why Do ANC Headphones Hurt My Ears?
ANC headphones are supposed to give you a better listening experience, but why is it painful for you?
It took moving to a quieter part of the house and playing music on a separate device while I enabled ANC on my Raycons. Aha! There it was—the noticeable muffling and softening of the surrounding environment.
I Didn’t Appreciate Awareness Mode, Either
Brady Meyers / MakeUseOf
On the flip side of ANC is Awareness Mode—at least that’s what my Raycons call it. I’ve also heard it called Hear-Through and Transparency Mode. It amplifies the surrounding noises, though to me, it sounds like someone cranked up the gain in my ears.
Paired with music, Awareness Mode solved two problems: music sounded better with ANC disabled, while allowing me to keep an ear on my surroundings. That’s helpful to me because I can then hear my dog when she whines to go outside, when the doorbell rings for a delivery, or when the kids are about to have a meltdown.
Now that I’ve come around to ANC, its use has become second nature to me. I store my Raycons in their capsule and charge the entire device without thinking. It’s one of my few good habits.
More importantly, I can reap the benefits of this technology and finally understand why people love it so much. Of ANC’s useful benefits, three stood out to me the most.
ANC is Protecting My Ears From Damage
I may not be old, but I’m also keenly aware of my health and wouldn’t want to cause unnecessary strain. One of my bad habits is listening to music at a high volume, and since it’s usually metal, I have no doubt my ears are taking a beating.
Now that I understand how ANC affects my hearing, I can notice it more clearly with music. It sounds louder, but that’s only because I’ve practically muted the outside world. So, I bring the volume down to safer, if not the safest, levels.
Enabling ANC Has Made My Focus Better
As I’ve mentioned, the idea of separating my thoughts from background noise gave me the chills, but it ended up being what I needed to help me focus. Having those background noises was part of the problem.
Related
I Own Good Speakers, but I Still Prefer the Tiny Ones in My Ears
I love my speakers, but sometimes, my earbuds are the better option.
What background noise was doing to my ADHD-addled brain was giving it a distraction. Once ANC was on and the background was muted, I was more focused on my thoughts and getting words onto paper.
ANC Has Cut Down on Stimulation When I Travel
I don’t travel often, but when I do, it makes me antsy, especially if I’m sitting for hours on end. All those noises catch my attention, and I’m bouncing between sounds until my brain is exhausted. With ANC, I get to experience a more meditative state because it turns out ANC works without music, too.
ANC lets me relax and enjoy the ride. I don’t wear my earbuds for the entire trip, though. The chance to miss something important is real, so I only use ANC when I’m feeling overstimulated and when I know I can zone out for an hour.
If you only use burner emails for spam, you’re missing out. They’re surprisingly useful for testing apps, managing free trials, protecting your identity on public Wi-Fi, and keeping your inbox focused on what actually matters.
6
One-Time Account Verification
Writing software reviews means I’m constantly downloading and testing new tools, sometimes even 10 or 15 of them, to curate the best software list. Almost all of them require me to sign up before I can test or download the tool. Once you enter your email, your inbox is flooded with promotional content consistently asking you to upgrade and offering deals you never asked for.
While AI assistants can make email less agonizing by filtering and organizing messages, prevention through burner emails is still your best defense. I can create a temporary email to activate the account and try the service. Most of the time, you don’t need to manually delete the email, as it’ll expire in a few hours or days. More importantly, your main inbox stays clean and focused on important messages.
Two popular disposable email services include Temp-Mail and 10-Minute Mail for quick downloads. These disposable emails are valid for a few minutes, long enough to activate the account with a confirmation link. For newsletters that I might actually want to read occasionally, I use a more permanent burner email through services like SimpleLogin or ProtonMail, which let me create aliases that forward to my main inbox. These are just two of many email apps that create extra addresses for privacy.
Email forwarding services are also a great way to identify which service leaked or sold your email. If the alias starts receiving spam, you can delete it to stop the spam and block the service.
5
Testing Your Own Websites and Apps
As someone who also builds apps and websites, I need multiple email addresses to test different user scenarios. How does the signup process work? What does the welcome email look like? How do password resets function? Testing these features with your main email gets messy fast.
Burner emails are perfect for this. I can create dozens of test accounts without cluttering my inbox or worrying about deleting test data later. Services like Mailinator even let you create emails on the fly—just make up any address @mailinator.com and check it instantly without signing up.
This approach also helps when testing email marketing campaigns. I can see how emails render in different inbox providers, test spam filters, and verify that unsubscribe links work properly without affecting real user accounts or my personal email.
4
Protecting Your Identity on Public WiFi
Public WiFi networks at coffee shops, airports, and hotels are convenient but highly insecure. Even then, you need to sign up using your email to access online services on public networks.
I use burner emails for new signups or services I haven’t used before. If someone intercepts my connection and captures login credentials, they’re getting access to a disposable email, not my primary one, that may be connected to banking, work, and personal accounts.
Jason Fitzpatrick / MakeUseOf
3
Limiting Exposure to Data Breaches
Data breaches happen so often that they barely make headlines. Last year alone, major companies like Ticketmaster, AT&T, and countless others exposed millions of email addresses and personal data.
When you use the same email address everywhere, a breach at any one service exposes you across all of them, making it easy for attackers to cross-reference breaches, build detailed profiles, and launch sophisticated phishing attacks. This is one of the most common email security mistakes people make, treating their primary email as a universal login.
Related
How I Use a Backup Email Address to Keep My Online Accounts Secure
It’s easy to add another layer of protection to your online accounts.
I use burner emails for any service I don’t completely trust. For example, when buying a phone case from an online store or signing up for a social media platform, my secondary email address allows me to sign up and verify without exposing my primary email, which is connected to critical services such as banking, government services, and primary work accounts.
My caution has paid off. Although many of my secondary email addresses and passwords have appeared in numerous data breaches, I didn’t have to scramble to change passwords everywhere or deal with targeted phishing attempts.
2
Testing Apps, Services, or Products Anonymously
Free trials are great, but companies make it incredibly difficult to cancel before they charge you. They bank on you forgetting about that 30-day trial that automatically converts to a $50 monthly subscription. Even worse, canceling often requires keeping track of emails with account information.
Sure, you can use virtual credit cards to prevent services from charging you for the service that you no longer intend to use. However, I use burner emails paired with virtual credit cards to add a layer of protection. If I forget to cancel, the virtual card can be set to decline charges. Moreover, if the company tries to reach out about payment issues, those emails go to an address I’m not checking.
Jason Montoya / MakeUseOf
Some services detect and block common burner email domains, but there’s usually a workaround. Premium burner email services offer custom domains that look legitimate, or you can use the plus-sign trick with Gmail (like [email protected]) to create unique addresses that still route to your main inbox.
1
Participating in Surveys and Polls
Online surveys, polls, and giveaways often require your email address to participate. While some offer compensation and others don’t, almost all of them require your contact information, including email. The collected data is a goldmine for marketers, and they’ll definitely use it for marketing, which means more spam.
Burner emails are extremely useful for participating in one-time polls and surveys. This way, I can still partake in legitimate opportunities without sacrificing my inbox to endless promotional emails. Most contests require your email to verify the account and claim rewards, so temporary emails that expire in minutes won’t work. You may need to look for something more permanent but still disposable.
Personally, I use a few custom domains I own to create disposable aliases without worrying about managing multiple accounts or exposing my primary email addresses. While this solution may not be feasible for everyone, services like SimpleLogin or ProtonMail as email aliasing tools offer a very effective spam control mechanism and help you control your privacy online.
Setting Up Your Burner Email System
Setting up a burner email is easy. For temporary needs, bookmark a service like Temp-Mail to help you quickly generate a disposable email without any signup process.
For more permanent burner emails, consider services like ProtonMail or SimpleLogin. Start with the free plan to try email aliasing and see how it fits your workflow. Once you’re comfortable, you can upgrade to paid tiers for more aliases, custom domains, or advanced features like catch-all addresses that let you create aliases instantly.
Before going all-in on disposable emails, know that they have some limitations. Many online services block burner emails to prevent people from abusing free trials. You might need to try a few different services to find one that works, or use a paid service that offers more legitimate-looking email domains.
There’s also the flip side to consider. While burner emails protect regular users like us from spam and data breaches, some people use them for harassment or scams. That’s why many legitimate services have started blocking them—they’re trying to keep the bad actors out, even if it makes things harder for privacy-conscious users.
Related
These 5 Email Apps Let You Create Extra Addresses for Privacy
Your email addresses don’t have to fall into the wrong hands.
The goal isn’t to complicate your life with dozens of email accounts. Start with one or two burner emails for your most common use cases, then expand as needed. Keep a simple note in your password manager about which email you used for what purpose.
Remember, burner emails are just another tool in your privacy toolkit. Use them smartly, and you’ll wonder how you ever managed without them.
Let’s face it: expensive, high-end smart TVs tend to have the best features. But I’m a frugal spender at heart and always on the lookout for a good deal, and have found a few ways to pick up that ultra-lux smart TV screen without breaking my bank balance.
5
Have You Tried Garage Sales?
Where I live, there are garage sales every year, and it always seems like I have junk to sell off. So do other people. I highly recommend taking advantage of these, but if there aren’t local garage sales, there are garage sale apps you can try.
If you were to find a smart TV, get the model number and check the TV’s age. This is to avoid buying a smart TV that is so old it no longer receives updates. Maybe in its prime, it could’ve streamed Netflix, but eventually, the hardware isn’t enough, and the security updates stop rolling in.
Related
Your Smart TV Might Not Get Updates Anymore—Here’s How to Keep Using It Safely
Don’t risk turning your outdated smart TV into a security breach.
4
Check Your Area’s Local Facebook Groups
Perhaps garage sales don’t happen for you on a local level—I have the privilege of living in a part of Pennsylvania with half a dozen or so small towns. That’s where Facebook comes in handy, giving you a wider scope of communities near you. My entire county has a Facebook page dedicated to yard sales.
Related
How I Reduce What Facebook Knows About Me (Without Deleting My Account)
There’s no reason for Facebook to know every itty bitty detail about me.
I suggest searching a nearby town or county, followed by “yard sale” or “garage sale,” and specify Facebook. You’re bound to find one. It’s essentially Facebook Marketplace, but focused on specific areas. You may even be able to get a cheaper smart TV if you’re willing to pick it up yourself (in a nearby public area, please).
3
When in Doubt, Go Thrifting
When garage sales and yard sales come up short, thrifting has been my saving grace on a number of times. Your child’s drink topples over, drenching the monitor in juice, so you have to replace it quickly. Need a second monitor because your previous one just gave up? Thrifting is the way to go. I don’t just use it for technology, but to expand the media on my Plex server, too.
Related
The 5 Best Online Thrift Stores for Sustainable Shopping
It’s important to bear sustainability in mind when you’re shopping online. Here are the best online thrift stores to help you do just that.
Just like finding a cheap replacement monitor, you can thrift some mighty cheap smart TVs, too. Getting it from a store also means you can usually trust it’ll work. Be sure to check the model of the smart TV before you buy, just like you would check if you were at a garage sale. Stick to smart TVs no more than two or three years old. Any older and you risk losing smart TV functionality a lot sooner.
2
Use These Sites to Compare Prices
If you want to buy a cheap smart TV that’s brand new, there are sites that help compare costs across multiple retailers rather than checking the inventory for each one.
Price: Perfect name, right? Price compares prices across multiple online stores, allowing you to filter by price. Price won’t tell you much about the product, so for more details on what you see, you’d have to visit the product page on at least one site.
Google Shopping: Naturally, Google Shopping lets you compare prices across a multitude of sites and has good filter options. You can even key in on options like where the smart TV was manufactured.
Versus: Excellent site for comparing specs, pricing, and reviews. Maybe your definition of cheap is the cheapest smart TV with all the features you need. You’d find out on Versus!
I tend to use Versus and Google Shopping together—one to find a good price and the other to compare smart TVs. Price is good as a shorthand tool.
Related
The 5 Best Second-Hand Fashion Apps for Thrifting at Home
Try these apps if you’re looking to expand your shopping habits into the realm of pre-owned and handmade fashion.
1
Wait For Cyber Monday or Black Friday
How often do you think you should replace your smart TV? Not every year, that’s for sure. All smart TVs eventually become dumb TVs, anyway. If you’re looking to replace it, why not wait until Cyber Monday or Black Friday?
Cyber Monday is the perfect opportunity to get a great deal on a smart TV with all the bells and whistles of a top-end model. Cyber Monday is always in very late November or early December. If you do participate in Black Friday, be sure you know how to spot Black Friday scams.
With these tips, I have managed to snag a couple of cheap smart TVs I’m still getting use out of. Sure, it’ll be a dumb TV in a couple of years, but there are ways to make a dumb TV smart again.
Hotel Wi-Fi often limits the number of devices, shared networks are insecure, and the signal can be weak or come with bandwidth restrictions. If you travel with several gadgets or work on the go, these solutions could save you a major headache.
Use a Travel Router to Create a Secure Network
Gavin Phillips/MakeUseOf
A travel router should be included on every frequent traveler’s checklist, as one of the easiest and most dependable ways to share your hotel’s Wi-Fi connection. These are scaled-down routers that connect to the hotel network and broadcast their own private signal to which you can connect all your devices. Setup is easy and requires just a few steps:
Connect your travel router to a mains outlet or a laptop via USB.
Connect the travel router to the hotel’s network (using an Ethernet cable or wireless connection).
Configure the router using its web interface or native app.
Connect your devices to the new private network, using your unique password credentials.
Once set up, there are several benefits to using a travel router when connecting to a public Wi-Fi network, including:
You can access the hotel’s Wi-Fi network using a single login.
All devices share the same secure connection.
You create an extra layer of privacy and security between you and the public network.
You streamline use for work and leisure with a consistent connection.
My trusty TP-Link model serves me well and cost me less than $35. However, I am considering upgrading to a model that supports both 2.4GHz and 5GHz for better compatibility and a faster connection in the near future (my current travel router only supports 2.4GHz Wi-Fi).
Related
Acer’s New 5G Wi-Fi Hotspot Is One of the Best New Products From CES 2025
It’s small, sturdy, and packed with features.
Turn Your Laptop Into a Wi-Fi Hotspot
If you don’t travel frequently or don’t want to purchase a travel router, you can use your laptop as a makeshift Wi-Fi hotspot as an alternative solution. Both Windows and macOS provide this function via their settings menus.
Windows
Connect your laptop to the hotel’s Wi-Fi network.
Go to Settings > Network & Internet > Mobile Hotspot.
Turn on Share my internet connection.
Name your Wi-Fi network and create a secure password for your hotspot.
macOS
Connect your laptop to the hotel’s Wi-Fi network.
Open System Settings > General > Sharing.
Select Internet Sharing.
Choose the Wi-Fi option as your sharing method.
Activate Internet Sharing and create a secure password for your hotspot.
Using my laptop as a mobile hotspot has come in handy as an alternative to using a travel router, especially on short trips when I wasn’t thinking ahead. However, it’s worth noting that the laptop must remain switched on and connected while in hotspot mode, and performance is generally slower compared to that of my dedicated travel router.
Your online security should be a priority when using a public network. Both travel routers and laptop hotspots add an extra layer of security while browsing, with some travel routers providing built-in firewalls and VPN support for added convenience and peace of mind.
How I Fix These Problems When I Share the Hotel Wi-Fi
I travel as often as my free time and bank balance allow, and I’ve experienced plenty of hiccups while sharing hotel Wi-Fi over the years. Here are some common issues I’ve encountered and their corresponding troubleshooting methods.
Problem
Solution
Login Portal Issues
Most hotels nowadays use captive portals, where Wi-Fi networks are accessed via a web page login. As someone who travels with several devices, including a TV streaming stick, a smart speaker, a laptop, a tablet, and a smartphone, these are annoying and prohibitive.
Connect your laptop and complete the login process, then share the connection via your hotspot or travel router. Some travel routers support MAC address cloning, which allows you to mimic your laptop’s login session on other devices.
Limited Device Access
I am seeing more frequent limitations on the number of devices that I can use simultaneously, as hotels try to preserve bandwidth among their guests.
Use a travel router or a laptop’s Wi-Fi hotspot to connect your gadgets and make them appear as a single device.
Slow and Unstable Connections
Hotel Wi-Fi reception is rarely efficient across the entire facility, and it’s always a gamble as to how strong a signal will be in your particular room.
I always look for a 5GHz option in the list of available networks, as these tend to experience less interference and support higher data speeds. Additionally, a travel router can act as a signal booster between your devices and the hotel’s Wi-Fi. This is especially useful if the hotel’s access point is out in the corridor or another room.
As my work and leisure activities demand more efficient Wi-Fi connections, my list of essential gadgets grows with every trip. Yet limitations are being increasingly placed on the number of devices I can connect.
Thankfully, with a bit of preparation, it is easy to share your hotel Wi-Fi across all your devices. Whether you choose to use a travel router or opt for the laptop hotspot solution, you can enjoy a more stable and secure connection for all your work, entertainment, and social needs.
Every morning, I watch some of the important emails get buried under promotional clutter. While most people rely on basic folders or labels, there’s a more powerful solution hiding in plain sight: domain filter rules, yet surprisingly few people know about them.
What’s a Sender Domain Filter Rule?
A sender domain filter rule automatically sorts emails based on the domain they come from—that’s everything after the @ symbol in an email address. Instead of creating filters for individual senders, you’re organizing by entire companies or services.
Consider this: when Amazon emails you, it may come from addresses such as [email protected] or [email protected], among dozens of others. Creating individual filters for each would be exhausting, so a domain filter catches them all by targeting @amazon.com instead.
It is helpful for managing newsletters, work emails, and shopping notifications. You can create and use rules in Outlook to manage inbox organization, and most major email providers offer similar functionality.
Most people miss this feature because they focus on filtering specific senders. But when you realize that companies use multiple email addresses for different purposes, domain filtering suddenly makes perfect sense.
How to Set Up a Domain Filter
Setting up domain filters takes just a few minutes, as both Gmail and Outlook offer built-in tools. However, each platform has its quirks, but the key is targeting the domain, not individual addresses.
Setting Up Domain Filters in Gmail
Gmail doesn’t have a dedicated filter-by-domain button. Instead, you use its powerful search operators within the filter creation tool. It’s a simple workaround that works flawlessly once set. Here’s how I set mine up:
Click the filter icon on the right of the search bar at the top. This opens the advanced search menu.
In the From field, type *@domain.com. The asterisk (*) acts as a wildcard for any sender at that domain.
Click Create filter and select what happens to these emails. Deleting it is my go-to for actual spam. You can also apply labels to categorize them neatly.
Check Also apply filter to matching conversations to clean existing emails, and then click Create filter.
The asterisk before the @ symbol is crucial as it tells Gmail to catch all emails from that domain. Otherwise, the filters won’t work correctly.
Test new filters with one domain first, as it avoids accidentally hiding important emails.
Over time, outdated rules can hinder email clients or cause errors. Here’s how to purge them:
Go to the Settings by clicking the gear icon, then select See all settings.
Click on Filters and blocked addresses, and find the filter you want to delete from the list.
Click the Edit or Delete button next to the filter.
To remove labels, hover over the label name in the left sidebar and click Remove label.
Gmail lets you combine multiple domains in one filter. Just separate them with OR (in caps), like: *@amazon.com OR *@ebay.com. This feature has proved handy for managing all my shopping emails in one sweep.
Setting Up Domain Filters in Outlook
Outlook’s browser version buries rules deeper than the desktop app—a mild frustration. But once you know where to look, it’s simple. Follow these steps to set up domain filters:
Click the Settings icon in the top-right corner.
Go to Mail and then select Rules.
Click + Add new rule and name it (e.g., Shopping).
Under Add a condition, select From and then type @domain.com.
Under Add an action, select Move to and then choose a folder (create a new folder first via right-click in your folder list). You can also add multiple actions.
Check the Run rule now and click Saveto create the rule.
Related
How to Fix Outlook Rules Not Working on Windows
Those who say “rules are meant to be broken” have never used Outlook before. Bring structure back into Outlook with these Windows tricks.
The wildcard character (*) works similarly to Gmail’s asterisk. After creating a domain filter, you can apply it retroactively to clean up your current inbox. But if you no longer need a rule, you can delete that unwanted rule by following the first two steps.
Both platforms also support exceptions, which is essential. For instance, you can filter all emails from your company’s domain into a work folder, except those from your boss, which stay in your primary inbox.
How I Use Domain Filters Beyond Basic Organization
The domain filters keep newsletters out of your inbox, but that’s the baseline win. My deep work hours are sacred. I filter domains like @news.site straight to a Read Later folder. It’s not about ignoring them forever; it’s about choosing when they get my attention. This deliberate separation drastically cuts down on context switching and allows me to concentrate.
Secondly, not all @bankname.com emails are equal. I created a rule that filters anything not from @secure.bankname.com or @alerts.bankname.com (the official channels my bank uses for critical communications) into a Verify folder. It instantly flags potential phishing attempts using look-alike domains, forcing me to scrutinize them before they hit my main view.
Related
Use These 5 Rules to Block Phishing Emails From Your Inbox
Phishing emails flooding your inbox? Fight back with these simple rules.
On the other hand, I allow specific domains to bypass all other filters and land directly in my inbox, marked as important. Doing so ensures truly urgent or personal messages never get lost in the automated shuffle and they rise to the top immediately.
Filtering @every.retailer.ever straight to an archive or trash folder keeps your inbox clean.You can check that folder only when you’re actively looking to shop, turning relentless marketing into something you control, not something that controls you.
Setting up your first domain filter might seem like a small step, but it’s a better way to organize emails. Don’t wait until you’re drowning in a sea of unread messages. Take five minutes today to set up that first filter for which your future self will thank you.
Apple’s upcoming iOS 26 update promises more than just a visual refresh with its sleek new Liquid Glass look. It’s also playing catch-up, finally adding some of the best features Android users have had for years.
6
Call Screening
If you’ve ever been caught off guard by a call from an unknown number, only to be greeted by a robocall, you’ll probably like what’s coming in iOS 26. Apple is adding a new Call Screening feature that answers unfamiliar calls for you. Rather than picking up blindly, you’ll see a live transcription of what the caller is saying. You can then decide whether to jump in or let it head to voicemail.
Android phones have been able to use Call Screen since 2018, a feature that lets Google Assistant answer and transcribe calls. Samsung Galaxy devices offer something similar, letting you use Bixby Text Call, which turns voice calls into a text chat.
iOS 26 will also bring a feature called Hold Assist. It activates when you’re stuck listening to hold music, automatically muting your end until a real person joins the call. Google’s Pixel devices already offer something similar with a feature called “Hold for Me,” which waits on hold for you and lets you know when someone picks up.
5
Spam Message Detection
Another iOS 26 feature that’ll cut down on spam is automatic message filtering for unknown senders. If someone who’s not in your contacts texts you, their message won’t appear in your main inbox. Instead, it’ll be tucked away in a separate folder.
Your iPhone won’t even ring or show those messages on the lock screen. Once you open the folder, you can mark the sender as known or simply delete the message.
Now, if you’ve been using Android for any length of time, this might not sound all that exciting. And you’re right to feel that way. Google Messages has had similar spam filtering and controls for years.
4
Estimated Charging Time
One of those small-but-surprisingly-useful features Android users have enjoyed for years is the simple ability to see how long it’ll take for their phone to finish charging. Plug it in, and within seconds, it’ll tell you something like “50 minutes until full.” It’s not flashy, but it’s practical. And for iPhone users, it’s been noticeably absent.
That’s finally changing. With iOS 26, Apple is adding estimated charging times to the lock screen and battery settings. As soon as you plug in your iPhone, it’ll show how long it’ll take to fully charge based on the current charging speed. If you’re using a slower charger, it’ll point that out too.
3
Live Translation
iOS 26 is bringing real-time language translation for messages, FaceTime, and regular phone calls. This means you can have a conversation with someone who speaks a different language and get live translations as you talk. And it works both ways.
Everything is processed directly on your iPhone, so your chats stay private and secure. If you’re using AirPods, your phone can even read the translations aloud while you’re talking.
Google introduced a similar feature called Live Translate with the Pixel 6. It works with phone calls, text messages, video chats, and even audio messages. Live Translate also works offline on Pixel phones, which makes it more versatile in situations without internet access.
2
Visual Intelligence
Apple’s Visual Intelligence feature isn’t new, but iOS 26 gives it a serious boost. If you spot something you like while scrolling Instagram or browsing a site—say, a jacket or a table lamp—just take a screenshot and scribble or circle the item. Your iPhone will recognize what you marked and help you find it online.
If this sounds familiar, it’s probably because Android users have had a similar feature for a while. Google’s “Circle to Search” works in much the same way on Android phones, with one key advantage—you can use Circle to Search without capturing a screenshot.
1
Visited Places in Apple Maps
Finally, Apple Maps in iOS 26 is getting a new feature called Visited Places. Just like the name implies, it’ll keep a record of where you’ve been—whether it’s restaurants, shops, parks, or stops along a trip—so you can easily look back and retrace your steps. And don’t worry, all of this data is protected with end-to-end encryption, so not even Apple can access it.
This feature will also help your iPhone learn your typical routes and routines. So, if there’s ever a delay on your usual commute or a disruption along your regular route, it can give you a heads-up.
Google Maps has offered a similar feature for years called Timeline. So, if you prefer Google Maps to Apple Maps, you can already use the Timeline feature on your iPhone.
It’s never a bad thing when one operating system draws inspiration from another, especially if it means a better experience for users. The real test, though, will come when iOS 26 rolls out and people will actually start using these features. That said, since it’s Apple, it wouldn’t be a surprise if the implementation ends up being even smoother than it is on Android.
Gmail is one of the biggest and most popular email providers out there, but that doesn’t make it the best. After years of loyalty, I finally ditched it. Then, I found free email apps that made me wish I’d switched sooner.
5
Proton Mail
If you value your privacy, Proton Mail is the best pick for your needs. Many people have left Gmail for Proton, and it’s not surprising, given how much better it is in terms of privacy. The security standards are among the best in the world, thanks to the company being headquartered in Switzerland.
Unlike a lot of email providers that track your activity and send that data to advertisers, Proton Mail blocks trackers and protects your data with end-to-end encryption.
There are zero intrusive ads on the platform, even on the free plan. Additionally, Proton Mail even comes with all the regular features, including PhishGuard, which protects your inbox from spam and phishing. There’s also password protection and options to schedule, undo, or snooze emails. It even lets you hide your real email address when you sign up for new websites with aliases.
The free plan has some restrictions, like a 1GB storage cap and messages being limited to 150 per day. If the free plan is too restrictive, you can always upgrade to one of the premium tiers, which offers more storage, priority support, and more.
Download: Proton Mail for Android | iOS (free and premium versions available)
4
Apple Mail
Apple Mail has come a long way and is now a pretty solid alternative to Gmail, especially if you’re already in the Apple ecosystem. Like Gmail, it sorts your emails into categories, but the categories are more intuitive and helpful.
For instance, there’s a Primary inbox, where you can find important everyday communication. There’s also a Transactions inbox, which makes it easy to locate transaction confirmations, receipts, and other payment updates, without having to dig through your inbox or look up keywords. Combined with the Summarize feature, writing tools, alias management, and more, Apple Mail is worth considering if you want a cleaner, more organized experience.
I’ve used Outlook for years, both professionally and personally, and I don’t think there’s too much amiss with it. It’s dependable and integrates with the rest of Microsoft 365 (which can come in handy if you’re already using tools like Teams, Calendar, or OneDrive. If you’re a Copilot user, this experience gets even better, given that you can directly use Copilot within Outlook.
It’s fairly easy to navigate as well. I’ll admit this wasn’t always the case, but Outlook’s interface has changed for the better over time. I’d also say it’s better at managing emails from different accounts, unlike Gmail. In fact, you can even set up Gmail in Microsoft Outlook.
Additionally, I appreciate that I can create folders in Outlook with just a couple of clicks. Sure, Gmail lets you use labels, but it’s not quite as intuitive. Labels can be a tad confusing, especially if you’re someone who prefers a more straightforward folder-sorting system.
My only gripe is that the ecosystem can feel a little closed off and restrictive. Most websites and apps these days allow you to sign in with Gmail, but I haven’t seen as many offering Microsoft account integration by default.
Download: Microsoft Outlook for Android | iOS (free and premium versions available)
2
Yahoo Mail
Yes, Yahoo Mail still exists, and it actually is a solid alternative to Gmail, especially if you’re always running out of storage. I think Gmail’s 15GB across its platform, Google Drive, and Photos are sort of limited, so this was a huge draw for me. Sure, 1TB might be overkill, but I’d rather have it than not.
It has a bunch of other useful features as well. For instance, Yahoo Mail auto-identifies and highlights important emails for you, so you don’t miss anything. Also, you can check in or get yourself scheduled with a single click. Additionally, Yahoo Mail offers AI-powered summaries, which can really help bring key points to light, so you’re not wasting time reading an entire email to grasp important details.
Download: Yahoo Mail for Android | iOS (free and premium versions available)
1
Zoho Mail
If you’re a small business owner, Zoho Mail is a solid option. It offers excellent collaboration features, and the best part is that it allows you to obtain a custom domain-based email address, even on the free plan. The free plan supports up to five users within an organization, and each user gets 5 GB.
If you have a larger team or need more storage, you can upgrade to one of the paid plans, which are relatively affordable.
Download: Zoho Mail for Android | iOS (free and premium versions available)
Gmail might be what you currently use, but it’s far from your only option. If you want a different experience and are looking to explore other options, give these email apps a shot.
Installing Brave was meant to be a weekend experiment. Now, it’s my daily driver. It’s like trying a free sample and ending up with a lifetime subscription, and you should make the switch, too.
Privacy-First, Always
Most browsers claim to protect your privacy, but Brave actually does. From the moment you install it, it blocks ads and unwanted scripts automatically. There’s no need to mess around with settings or add extensions. Websites load faster, distractions disappear, and your browsing experience feels cleaner and uninterrupted.
Then there’s Brave Shield, which acts like a personal firewall for your browser. It blocks cross-site cookies and other tracking methods that monitor your activity across the web. It also stops intrusive scripts that slow pages down or gather data about you. If a site doesn’t load properly, you can turn off specific protections just for that page without compromising your overall privacy.
Shield also includes fingerprinting protection, which prevents websites from identifying you based on your screen size, browser version, installed fonts, and other system traits. You can even enable a setting that automatically forgets sites when you close them. It clears cookies and local data in the background, so you stay private without doing manual cleanups. For more control, Brave supports custom content filters, similar to those in advanced ad blockers like uBlock Origin.
To keep your browsing secure, Brave upgrades connections to HTTPS by default. Even if you click a non-secure link, it will try to connect to the encrypted version instead. This adds an extra layer of safety, especially when you’re on public Wi-Fi or unfamiliar networks.
Most importantly, Brave avoids Google’s surveillance ecosystem. Unlike Chrome, it doesn’t ping Google when you type in the address bar or open a new tab. There’s no hidden data funnel quietly monitoring your activity in the background.
Built-In Tor Mode
Sometimes, private browsing falls short. Maybe you’re trying to access content restricted to your region or searching for something you’d rather keep anonymous. For those moments when standard protections aren’t enough, Brave includes a more advanced option powered by the Tor network, built right into the browser.
Unlike regular private browsing, which only hides your activity from others using your device, Brave’s Tor window masks your identity online. It routes your traffic through multiple encrypted layers before reaching the site you’re visiting. Your IP address stays hidden, and your connection is protected from websites, internet providers, and even network surveillance.
There’s no extra software to install and no complex setup required. Open the Brave menu (hamburger icon) and select New private window with Tor. If you don’t see the option, go to Settings > Privacy and security > Tor windows, and toggle it on. Once enabled, it will appear in the menu like any other browsing mode.
Of course, the connection might be slower due to the extra layers of encryption, but that’s a reasonable trade-off when privacy matters most. It’s especially useful for bypassing geo-restrictions, researching sensitive topics, or simply staying off the radar. And having this level of anonymity built into the browser is exactly what sets Brave apart.
Fast and Lightweight by Design
After switching to Brave, I was surprised by how lightweight it felt. There’s no lag, no sluggishness, and nothing secretly eating up memory in the background. Just fast, uninterrupted browsing right from the start.
Compared to Chrome, which is notorious for hogging RAM and overworking the CPU, Brave keeps things light and efficient. Even with several tabs open or media playing, it won’t cause your fans to blare. It runs silently without slowing your system down or draining its battery. That difference is especially noticeable on older laptops, where every bit of performance counts.
But it’s not just about using fewer resources. Brave speeds things up by blocking ads, trackers, and unnecessary scripts before they even load. With all that junk out of the way, websites load faster and feel much more responsive. And this isn’t just on paper; you’ll notice it when scrolling through pages, opening tabs, or jumping between sites.
Sync Across Devices Without an Account
Most browsers tie syncing to an account, which usually means handing over your data to their servers. Brave skips all that and still keeps your devices connected.
Instead of the usual sign-in process, you just scan a QR code or type in a one-time sync code to link them. Bookmarks, browsing history, passwords, and open tabs sync seamlessly across your phone, laptop, and tablet. And since the data is encrypted before it leaves your device, not even Brave can see what you’re syncing.
To get started, head to Settings > Sync > Start using sync, then scan the QR code with your phone or type in the sync code manually. Just make sure to treat that code like a password; if someone else gets it, they could access or even change your synced data.
You can also choose what to sync on each device, so your work laptop won’t mirror your smartphone. Once connected, everything stays in sync automatically with zero effort on your part.
Open Source with Native IPFS Support
Brave isn’t just privacy-focused; it’s also open source. Its entire codebase is publicly available for anyone to inspect, audit, or contribute to. Unlike closed-source browsers, where you’re left trusting whatever runs behind the scenes, Brave puts everything on display. Developers and security researchers can verify exactly how it works, confirming there are no hidden trackers, surprise data collection, or backdoors.
It also comes with built-in support for the InterPlanetary File System (IPFS), a decentralized method for storing and accessing content online. Instead of pulling data from a single server like most websites do, IPFS fetches it from multiple peers that already have a copy. Think of it like torrenting: rather than relying on one central source, you ask the entire network who has the file, and whichever node sends it to you.
Each piece of content on IPFS has a unique hash, like a fingerprint. When you access a file by its hash, you get that exact version, unchanged and verifiable, regardless of who provides it. This makes IPFS content more resistant to censorship, takedowns, and outages. And if the data is already cached nearby, it can load even faster than traditional web pages.
With Brave, there’s nothing extra to install. You can open IPFS links (which usually start with ipfs://) just like any other URL. Brave can resolve them through a public gateway or connect directly to a local IPFS node if you’re running one. It’s a small but powerful feature that fits perfectly with Brave’s mission to build a more open, transparent, and user-controlled web.
Play YouTube in the Background—No Premium
YouTube usually stops playing when you leave the app or lock your screen, unless you’re a Premium subscriber. It’s a frustrating limitation, especially when you only want to listen while doing other things on your phone.
But if you’re using Brave on your phone, there’s a way around this. The feature isn’t turned on by default, but once enabled, Brave allows YouTube videos to keep playing in the background even if you switch apps or lock your phone.
To turn it on, go to Brave’s settings, scroll to the DISPLAY section, tap Media, and toggle on Enable Background Audio.
Once it’s on, hit play and continue with whatever you’re doing. You can reply to messages, jot down notes, or even turn off your screen. The audio keeps going without interruption.
BAT Rewards for Viewing Non-Intrusive Ads
Instead of flooding your screen with noisy, disruptive ads, Brave takes a cleaner approach. It shows small, privacy-friendly pop-ups, and if you choose to engage with them, you can earn BAT (Basic Attention Token) as a reward for your attention.
You won’t be tracked, your browsing history stays private, and you remain in control the whole time. You can even adjust how many ads you see per hour or turn them off entirely if you’re not interested.
Over time, your BAT earnings add up. You can use them to support your favorite websites or content creators directly through Brave, or just let them sit in your wallet; it’s entirely up to you.
These are the reasons I’ve stuck with Brave. It respects my privacy, rewards my attention, and simply feels better to use. After experiencing all of that in one place, everything else feels excessively bloated.
Your ISP knows when you use Tor—it just can’t see what you’re doing when you’re using it. So while using Tor Browser and the Tor Network makes you feel completely anonymous, you might be surprised by its limitations and how using it can catch you out.
How Tor Hides Your Activity from Your ISP
Tor operates by routing your internet traffic through multiple servers before it reaches its final destination. When you use Tor, your data gets encrypted in three layers and passes through three different types of nodes: the entry node, middle node, and exit node. Each node only knows where the data came from and where it needs to go next, but no single node knows the complete path from your computer to the website you’re visiting.
Here’s how this process actually works. When you want to visit a website using Tor, your browser first encrypts your request three times using the public keys from each of the three nodes it plans to use. Your computer sends this triple-encrypted package to the entry node, which removes the first layer of encryption and forwards the data to the middle node. The middle node strips off the second layer and sends it to the exit node, which removes the final layer and forwards your request to the actual website.
This system prevents your ISP from seeing which websites you’re visiting, as it only sees encrypted traffic going to the first Tor node. Your ISP knows you’re connecting to a Tor entry node, but it can’t see that you’re actually trying to reach Facebook, Gmail, or any other specific website. The website you visit sees the IP address of the exit node, not your real IP address, which helps protect your identity from the websites themselves.
The encryption Tor uses makes it nearly impossible for your ISP to decrypt your traffic and figure out what you’re doing online. Even if your ISP wanted to intercept and analyze your data, it would only see scrambled information that doesn’t reveal your actual browsing activity.
What Your ISP Can (and Can’t) See When You Use Tor
While Tor does an excellent job of hiding your browsing activity, your ISP can still detect certain things about your internet usage. It can tell that you’re using Tor in the first place because your ISP can see that you’re connecting to known Tor entry nodes. Most Tor entry nodes are publicly listed, so ISPs can easily check if you’re connecting to one of these servers.
Your ISP can also see how much data you’re sending and receiving while using Tor, along with the time of your connections. It knows when you start using Tor, how long you stay connected, and roughly how much traffic passes through during your session. This metadata doesn’t reveal which specific websites you’re visiting, but it does provide a general picture of your Tor usage patterns.
However, there are important limitations to what your ISP can observe. It cannot see the specific websites you visit, the content you download, or the searches you perform while using Tor. Your ISP also can’t read your messages, see your login credentials, or access any other sensitive information you transmit through the Tor network because your data is encrypted before leaving your computer.
If you want to prevent your ISP from knowing that you’re using Tor, consider using a VPN. A VPN acts as a secure tunnel between your device and the internet, which is one of the main reasons to subscribe to a reputable VPN service. When you connect to Tor through a VPN, your ISP will only see that you’re connected to a VPN server, not that you’re using Tor. This makes your activity appear like ordinary VPN traffic, reducing the likelihood of drawing attention or suspicion from your ISP.
Is Tor Safe to Use?
Tor is safe to use and offers strong privacy protection, but it’s not flawless. The easiest and most reliable way to use Tor is through the official Tor Browser, which is designed to keep your connection secure and your identity private. If you try other ways to access the Tor network, you need to be careful with your settings and understand how your tools work, since mistakes or poor cyber hygiene can weaken your privacy.
When it comes to possible conflict with the law, Tor itself is completely legal to use in the United States and most other countries. Law enforcement agencies and authoritarian governments sometimes try to block or monitor Tor usage, but using the software won’t get you in legal trouble in most places. Though any country with strong laws surrounding encryption will certainly differ, such as China, Russia, Iran, Belarus, and Turkmenistan. Always check local laws before firing up Tor, as you may be breaking the law without realizing.
Many legitimate users rely on Tor, including journalists, activists, and privacy-conscious individuals who want to protect their online activities from surveillance. So, you shouldn’t be worried when using Tor.
Related
These Are My 9 Tips on Using the Tor Network Safely
The dark web sounds fun, but there are some important security steps you need to take first.
However, the software does have some practical drawbacks that you should consider. Tor connections are significantly slower than regular internet browsing because your traffic has to bounce through multiple servers. Some websites also block connections from known Tor exit nodes, which means you might not be able to access certain services while using the browser.
Overall, Tor offers solid protection for users who need anonymity online, but you should understand its limitations and use it as part of a broader privacy strategy rather than relying on it as your only security tool.
This week, my Mum messaged me asking if a message she’d received from a delivery service was real or not. Now, I’m lucky that she’s pretty savvy when it comes to spotting scams and knows what to look for. It’s just useful to have a son who’s the Security Editor for a leading tech website to check with.
But obviously, not everyone has that opportunity—and that’s where Malwarebytes’ new Scam Guard AI chat can save the day.
What Is Malwarebytes AI-Powered Scam Guard Chatbot?
Malwarebytes Scam Guard is a free AI chatbot integrated into Malwarebytes Mobile Security, the security company’s free smartphone app.
Download: Malwarebytes Mobile Security for iOS | Android (Free, subscription available)
Scam Guard basically does what it says on the tin. It’s designed to provide an instant response on whether what you’re reading or an email that’s landed in your inbox is a scam.
So, instead of having to figure out whether what you’re looking at is a scam that could pilfer your banking details, you can grab a screenshot or paste the suspicious content into Scam Guard, and it’ll immediately start figuring out what it is, and most importantly, give you tips on how to stay safe.
Now, Malwarebytes isn’t the first to market with an AI chatbot that can detect phishing emails and other online scams. Bitdefender launched a similar premium product in 2024, and folks have used ChatGPT and other AI chatbots for the same task since their inception. But Malwarebytes Scam Guard is different for a couple of reasons.
First, Malwarebytes Mobile Security is a full security app for your smartphone. It has a heap of other protections worth using, not least its malware detection. Second, while using ChatGPT and other AI chatbots to detect scams is useful, they don’t have the same extensive catalog of malware, scams, and phishing data as Malwarebytes.
Oh, and better still, it’s a free tool, which means you can install it on almost any device running Android or iOS.
How Good Is Scam Guard at Detecting Scams?
Before recommending that you go ahead and install Scam Guard on your loved ones’ smartphones and other devices, I took Scam Guard for a spin against a few different scam emails and text messages I’ve received recently, including the one sent by my mother. Overall, I’m convinced that Scam Guard knows its stuff and will help you quickly figure out if you’re about to be scammed or not.
1. Email Advising Me to Avoid Kegels
First up, an email with remarkable medical advice, which is usually a giant red flag. In this case, I was told to avoid kegels due to some revolutionary research discovered by a Ukrainian doctor (why the doctor’s nationality makes a difference, I don’t know!).
I provided an email that shows the core of the message. Scam Guard advised me to be skeptical, but also asked if I could show the email address and URL the email was trying to send me to.
Once provided, Scam Guard said that while this email address and URL aren’t in its scam database, it strongly advises ignoring the email as this is a classic scam format.
Related
If You Think You Can Spot Phishing Emails, Take This Quiz
Why not brush up your skills and make sure you know how to spot phishing scams.
2. You’ve Won an Unexpected Prize!
This one was much easier. I received an email claiming that I’d won some new Ray-Ban Meta Wayfarer Smart Glasses, which is remarkable, as I didn’t enter a competition.
Within a few seconds, Scam Guard confirmed that this is a phishing email, and I should avoid it at all costs.
3. A Suspicious Text Message From a Real Service
During the week, I received an email purporting to be from a real service, informing me that the request I’d made for a rewiring job was “almost complete.”
As I hadn’t made any such request, I figured this was a scam of some sort. However, figuring this out is made all the more difficult because the message included links to the real website, and the service is very much legitimately used for requests like this.
Scam Guard advised that this had some hallmarks of a scam, specifically referencing that the message came from a mobile number (and not a registered account), and that the URL in the message also looked suspicious.
4. A Fake Shipping Invoice Request
This is the message that was sent to my mother, requesting that she update her shipping information. It’s a standard scam format designed to steal your data, but it can be difficult to detect because it appears to link to a legit site.
What made this harder to figure out at a glance was that my Mum was waiting for two packages to arrive—exactly what the scam message claimed to need information on. Scammers rely on this confusion to steal your data, and unfortunately, it works a great deal of the time.
In this case, Scam Guard identified the fake email URL and found that it had nothing to do with the shipping service; this wasn’t actually that easy to do with a regular internet search. It confirmed our suspicions that this was a phishing email that just happened to get its timing right and sow some seeds of doubt. Indeed, I nearly fell for a well-timed Netflix phishing scam that just happened to land when my account was up for renewal and I’d had some trouble signing in.
5. Earn Heaps of Money Through TikTok
My final test was one of the most obvious scams in my inbox: earn up to £800 per day in my spare time! And wouldn’t you know it, the message was sent by TikTok’s HR Department!
Scam Guard unraveled this scam instantly, with a big old red flag and a message saying, “Don’t touch this at all.”
Malwarebytes Scam Guard Is the Easy Way to Protect Your Loved Ones From Scams
I have to say, I’m impressed with Malwarebytes Scam Guard. It’s simple to use, provides an almost instantaneous response, and offers a clear explanation behind its decisions. It’s also free to use, and as it works on Android and iOS devices, you can install it on basically any smartphone to spread some well-needed scam protection.
There are some small issues that you may have to work around, mind. For example, you’ll need to explain how to long-press on URLs and phone numbers to copy them over without opening them, or explain how to take a screenshot and then paste that into the Scam Guard. In that, it’s not completely automated. I’d hazard that taking a screenshot and posting it into Scam Guard is the best option, as it saves someone from accidentally interacting with a phishing URL, fake SMS, or other malicious content. However, this is a small step compared to what Scam Guard’s AI chatbot can do, which is help spot scams and deliver specific advice tailored to each situation.
Scam Guard might not stop your family and friends from falling victim to every scam, but I’m impressed enough that I’ll be installing it on my kids’, parents’, and grandparents’ smartphones.
Try this with any old to-do list: does it actually tell you why you got something done, or didn’t? Mine didn’t. They just piled up like monuments to guilt. So I ditched the list and fused two journaling methods to turn regrets into action.
Why Journaling Became a Better Alternative for Me
For years, I struggled to keep up with to-do lists that felt overwhelming or incomplete by midday. Crossing off items gave a minute’s satisfaction, but didn’t capture my evolving priorities or thoughts. I needed a system that did more than list tasks; something that could blend planning with context, reflection, ideas, and progress tracking.
Journaling offered that richer experience. Instead of static checklists, journaling lets me connect tasks to context and personal insights. This approach reduced anxiety and boosted my focus. I found that when I journaled, I naturally captured tasks as part of my day’s flow instead of as isolated action items. That’s when the traditional to-do list started to feel less useful.
My Productivity System: Bullet Journaling + Interstitial Journaling
My productivity system merges two journaling techniques: Bullet journaling and Interstitial journaling.
Bullet journaling uses rapid logging. A hat tip to Ryder Carroll, who designed it. You just have to write short, concise notes combined with symbols to track tasks, events, and notes flexibly. It’s great for capturing daily to-dos, marking completed tasks, and scheduling. What I love is its adaptability. I can migrate unfinished tasks or highlight priorities easily.
Interstitial journaling fills the gaps between tasks and events. It’s a practice of jotting down thoughts, reflections, challenges, or progress notes as they arise throughout the day. This type of journaling bridges planning and execution. It lets me process feelings or ideas related to work without breaking flow. Plus, it highlights blockers like an energy dip or moments of deep work that often go overlooked on a typical to-do list. My friend Lando uses Logseq; I opted for a more common tool in my pocket.
Bullet journaling includes Notes, which you can use for “interstitially” journaling your thoughts. Just notice the moments when you switch from one task to the next or take a break.
Combining these two gives me a dynamic daily log of what I need to do, why it matters, and how I’m feeling while doing it. It also gave me another missing piece I can review anytime: a chronological narrative that made sense of the everyday chaos.
How I Integrated Them Digitally
At first, I used a physical notebook. While the benefits of paper for to-do lists or journaling are well known, it wasn’t practical for quick edits or syncing across devices. Moving digital solved that. Here’s how I integrated bullet and interstitial journaling using Apple Notes as my journaling tool of choice.
Designing a simple bullet journal template helps maintain consistency. To start, organize your journal by creating a dedicated folder named “Bullet Journal.”
Inside this folder, set up notes or subfolders for daily logs, habit tracking, and weekly or monthly reviews. The sub-folders are optional and up to you. For instance, you can set up notes in sub-folders for specific projects. You can view folders as galleries, sort them around, and search for anything within them.
A basic layout might include the date, today’s Tasks, Events, and space for Notes, which holds my interstitial reflections. You can customize this template to fit your needs and duplicate it daily or save it as a reusable note.
I am now experimenting by adding a focused Daily Highlight too. I keep it on top of the list and mark it with a distinct emoji.
For capturing thoughts and insights between tasks in the Notes section, I create new notes throughout the day. I use these notes to quickly jot down what I’m working on, how I feel (For instance, why am I procrastinating), or any ideas that arise.
If relevant, I link notes in Apple Notes to my bullet journal entries or any other notes for easy reference. Just enter “>>” next to your keyword. You can even backlink notes to each other. This approach helps to add more content while capturing the flow of my day. A look back at them gives clues on my work patterns that a simple to-do list misses.
You can also tag Events and Notes entries with #energy-low, #focus-high, #distracted. Later, you can filter them from the search bar and discover any lurking patterns.
Apple Notes offers several useful features to enhance this journaling system. Use checklists to mark completed tasks, create tables for habit tracking, and if you use an iPad, take advantage of handwriting with Apple Pencil for a more personal touch.
You can also attach photos, documents, or sketches to enrich your notes, making the journal more interactive and visually engaging. These features transform Apple Notes into a versatile tool for managing both tasks and reflections.
Apple Notes also has Lines and Grids, which can give your notes the feel of a physical journal. Plus, locking your logs gives it an added sense of privacy.
Remember, it’s not about the tool. It’s about the habit and system that works for you. Both journaling methods are so simple, you can use any digital tool (even Google Keep is good enough as a journal) or simple paper. You only need simple but consistent symbols to track your tasks.
A bullet journal’s core principle is rapid logging with bullets (tasks •, notes -, events ○). These are easy to create in any notetaking app. If you prefer, you can even use emojis.
But what makes a bullet journal stand out is its second core principle: intentional migration.
At the end of the day (or start of the next), I ruthlessly review the Daily Log. What should move forward? What’s irrelevant now? This intentional act prevents task pile-ups and ensures focus. As you can see in the screenshot, I used a simple arrow emoji to suggest the migration to the next Daily Log entry. I check the Events and think about the actionables I can convert to tasks or mini-projects for later.
I usually prefer free writing my interstitial journaling entries in the Notes section. Here’s an idea: you can set up a template like this, which follows my general pattern:
What you just did.
How long did it take?
How you felt (energy, focus, emotion).
What you’re about to do next (and often, why).
Tasks are no longer isolated items. Making them intentional helps me visualize them, too.
Any journaling method that brings together task capture with context, reflection, and intentional review has the power to render a sterile context-free to-do list obsolete. The trick is not to allow the system to become a beast where it (rather than the tasks) hijacks your attention. So, for me, consistency and simplicity of the system are the true hack.
Fake Android apps aren’t just found on shady, third-party app stores. Sometimes, they manage to find their way to the Play Store as well. And if you’ve got any of these apps installed, your crypto wallet is at risk.
Fake Wallet Apps Are Stealing Your Crypto
Researchers at Cyble Research and Intelligence Labs (CRIL) have discovered 20 cryptocurrency phishing apps on the Google Play Store. These apps impersonate legitimate wallet apps like SushiSwap, PancakeSwap, Hyperliquid, and others only to lead you to a fake login page and steal your mnemonic phrase.
These mnemonic phrases, also called seed or recovery phrases, are a randomly generated sequence of words you get when you create a new crypto wallet. You must keep these phrases hidden because they’re essentially human-readable backups of your wallet’s private keys.
They can help you regain access to your wallet if your device is lost or stolen. But in the wrong hands, they can also empty your crypto account. Anyone with access to your mnemonic phrase can access and control assets in your crypto account.
You’ll notice that some apps are repeated in the list above. That’s because multiple apps are impersonating the same app or sharing a name to pass off as legitimate. You can tell them apart using their package names.
These apps aren’t using some technical wizardry to trick you either. They’re originally phishing websites that have been converted to Android apps using the Median framework and distributed on the Play Store using developer accounts that were originally offering legitimate apps. Some apps skip the framework and load the phishing website directly in Android WebView.
11 Essential Tips I Use to Keep My Android Phone Secure
Be mindful and be secure.
Some of these developer accounts have as many as 100,000 downloads. Researchers believe that these are older developer accounts that were compromised and are now being used to deliver these phishing apps instead.
Once you see the phishing website, which impersonates a legitimate wallet, you’re asked to enter your 12-word mnemonic phrase. As soon as you do that, you’ve handed the keys to your crypto wallet to the hackers.
Keep Your Wallet Close, and Your Codes Closer
This campaign is another reminder that you should always check app reviews and descriptions before downloading them, even if you’re on the official app store for your platform. When dealing with crypto apps, check to ensure you’re downloading the app from the official developer, and not an impostor.
Related
What to Do If Your Crypto Wallet Gets Hacked
Crypto wallets aren’t impervious to attack—they’re a prime target. So, what do you do if your crypto wallet gets hacked?
Keep in mind that legitimate crypto services will never ask for your mnemonic phrase unless you manually try to recover your account. If you’re asked for a mnemonic phrase during usual logins, something is off. In such cases, immediately check the site URL, and if it’s anything but the legitimate site, it’s time to close that tab immediately.
Not making an active effort to protect your emails can result in an open door that’s too tempting for hackers to resist. Thankfully, switching on these settings will help to keep them out—and they don’t take long to get up and running.
6
2FA Via an Authenticator App
One of the easiest ways to reduce the risk of having your emails hacked is by enabling two-factor authentication (2FA). Even if a hacker correctly guesses your password, they’ll have to verify their identity in another way that they probably won’t have access to. It’s one of the best forms of multi-factor authentication (MFA).
You can turn on 2FA in many ways, but I recommend using an authenticator app. For example, I use Google Authenticator. Many password manager tools have their own version, and the differences between them are few and far between.
Once you’ve switched on 2FA via an authenticator app, you’ll typically see an ever-changing code you’ll have to enter when prompted. In some cases, you can scan a QR code instead.
Signing into accounts with your email address is often easier than setting up a separate profile and creating a new password. But while it’s helpful to easily log into services you frequently use, providing third-party tools access to your email can put you at risk.
While many tools you use with your email will have robust security infrastructures, this isn’t the case for all of them. You should be particularly careful when signing up for new tools that haven’t yet been tested over extended periods. If the app or service later becomes obsolete and no longer receives updates, hackers could expose this flaw.
Only keep access to the third-party tools you use frequently. You can go to your email account’s settings and remove access to apps you no longer want to access; make a habit of doing this at least once every few weeks. Take the same precautions when signing in with your social logins, too.
4
Using Your Email’s External Image-Loading Feature
While normally fine, external images can sometimes present a security threat and a hacking loophole. For example, cybercriminals might inject code or add tracking pixels to the spam mail they send. Unless you 100% trust the sender (or it’s evidently from a verified company account), you should tread carefully when accessing external images in your email.
Using your email client’s image loader can reduce the risk of hacking by ensuring your data stays safe. For example, Outlook has a feature that allows you to do precisely this.
Go to Settings > Privacy and data > External images.
Tick the circle next to Always use the Outlook service to load images.
Not using this tool is one of the many email security mistakes you can make. If your email client doesn’t have such a feature, you may want to consider switching to a different service.
3
Strict Incoming Email Handling
Your email account is, unfortunately, the starting point for many scams. You’re likely to receive more scam and phishing emails than real correspondence, which means you need your email account and service to have a great spam filter. While many email clients are good at filtering out spam and phishing emails, they won’t catch everything, and you shouldn’t trust them to do so, either.
Instead, you should use them as an initial filter, but then take matters into your own hands. Most email clients allow you to individually choose who is allowed to send you emails, using a whitelist approach.
Since you have full control over who can send you emails, you’re less likely to fall victim to hacking. Moreover, you’ll protect yourself from other email security threats, such as phishing.
2
Blocking Attachments
While blocking external images will help reduce your chances of getting hacked, you may want to take things a step further and block attachments from senders you don’t trust. With some tools, you can block anyone who isn’t on your safelist from sending you images, documents, and other content that could pose a security threat.
Besides adding safe senders, you can allow attachments from people in your contacts or on your list of trusted domains. Moreover, you have the option to add safe mailing lists. You don’t need all of these features enabled, but having at least one of them switched on is a good idea.
1
Strong Passwords
Even with every form of online authentication, having strong passwords is still one of the best ways to prevent your email account from being hacked. These days, it’s easier than ever; password-generation apps, such as Apple Passwords, will create a hard-to-guess password for you in less than a minute.
All of your email account passwords should be original. Even if your password is hard to guess on one account, it shouldn’t be reused. If your data is ever compromised, you’ll needlessly increase the threat of hacking against multiple accounts.
You can also switch to passkeys, which—besides protecting from hackers—can also act as a phishing-resistant password alternative.
Protecting your email account from hackers doesn’t need to be strenuous. With a few simple steps, you can keep your information safe and continue getting the benefits of email with fewer of the downsides. Adding multiple layers of security will reduce the chances of something bad happening even more.
The dark web is rammed full of illegal and dangerous content—but chances are you won’t encounter it unless you go looking. However, even if you’re not actively looking for trouble, there are still plenty of risks you need to avoid.
7
Accidental Exposure to Disturbing or Illegal Content
Exploring the dark web with good intentions doesn’t shield you from stumbling across deeply disturbing or illegal content. Unlike the surface web, which is moderated to some degree, the dark web is largely unregulated. Clicking a link that seems harmless could lead you to graphic imagery, exploitative material, or violent media.
Dark web directories are often intentionally disorganized or misleading. If you know how the dark web works or use it frequently, you’ll have experienced this. A site that looks like a privacy-focused forum might redirect you to something entirely different. In some jurisdictions, viewing certain types of content can result in legal consequences. Beyond the legal risk, many report lingering psychological distress after accidental exposure, especially when graphic or predatory content is involved.
Hackers thrive on the dark web, and unprepared visitors are easy targets. Malware, spyware, keyloggers, and ransomware are often embedded in files or links that appear as legitimate resources. One careless click can compromise your entire system.
Unlike mainstream websites that typically avoid hosting malware and endangering users, some dark web platforms host infected downloads intentionally. Some files are booby-trapped to infect systems the moment they’re opened, particularly on sites mimicking popular tools or privacy apps.
Many dark web sites operate on outdated or unpatched platforms, making them more vulnerable to exploitation. While tools like Tor can hide your IP address, they don’t protect you from infected downloads or malicious scripts.
Some hackers actively target casual users, knowing they’re more likely to make rookie mistakes. Your data could be harvested, your accounts breached, or your device enrolled in a botnet within hours of visiting the wrong site.
5
Attracting the Attention of Law Enforcement
Christian Cawley / MakeUseOf
Just visiting the dark web can put you on the radar. Law enforcement agencies around the world, including the FBI and Europol, actively monitor known dark web hubs. Even if you’re doing nothing wrong, traffic to certain websites (or regular use of tools like Tor) can raise questions.
As far back as 2014, the NSA already had systems that log and tag Tor users as surveillance targets, per a Wired report. In other words, using the dark web can draw attention. Authorities often use browser fingerprinting, time correlation attacks, and zero-day exploits to identify users.
Being flagged doesn’t mean you’re guilty, but it can complicate your digital footprint. Law enforcement may collect metadata over time to build profiles of suspicious behavior. Even if you’re never contacted, your activity could be stored and referenced in unrelated investigations later, particularly in jurisdictions where digital surveillance is aggressive and long-term.
Scammers flourish in the anonymity of the dark web. Whether you’re exploring forums, using tools, or browsing marketplaces, deception is a constant risk.
You don’t need to engage in transactions to get caught. Phishing pages, fake login portals, and malware-laced services are often disguised as community resources. Even the act of trying to learn can land you on a spoofed site designed to harvest your data or siphon cryptocurrency.
And when you do get scammed, there’s little to no recourse. No customer support, no platform accountability, and certainly no legal help.
Tor, VPNs, and encryption tools are powerful, but they’re not invincible. A single misstep can expose your identity, even if you’re using the most privacy-respecting tools available.
Tor protects your location but not your behavior. If your browser isn’t properly configured or if you access surface web links, you may leak identifying information.
Related
How to Access the Dark Web Safely and Anonymously
There are the crucial steps you need to take if you want to know how to access the dark web in a safe and anonymous way.
Browser fingerprinting, WebRTC leaks, and improper DNS configuration can all compromise anonymity. Many users assume that Tor is completely secure, but combining it with poor habits or risky clicks defeats its protections.
Even experts make mistakes. Resizing a browser window, enabling JavaScript, or downloading the wrong file can be enough to give away your identity. Law enforcement agencies have developed advanced de-anonymization techniques.
A Harvard student tried to stay anonymous by using Tor and Guerrilla Mail to send a bomb threat in 2013. However, as The Harvard Crimson noted, they were tracked down after using the campus network to access Tor.
2
Unintentional Legal Violations
You don’t have to consciously commit crimes to break the law. On the dark web, it’s alarmingly easy to violate legal boundaries without realizing it. Accessing certain marketplaces, downloading unknown files, or interacting in the wrong forum can be illegal depending on where you live.
In some countries, clicking on a link to prohibited material is enough to face consequences, even if you didn’t know what was behind it. Sharing or reposting content can also be interpreted as distribution, which carries severe penalties.
Much of the dark web is vague and poorly labeled, which makes it difficult to know what you’re seeing or downloading until it’s too late. By the time you realize what’s happened, you could already be in legal jeopardy.
Ignorance is not always a valid defense. Laws related to child exploitation, terrorism, and contraband often operate under strict liability. That means intent might not matter in determining whether you’ve broken the law.
Related
How I Use the Dark Web Without Doing Anything Illegal
You can use the dark web without encountering any scary or illegal content; you just have to know where to go.
The dark web isn’t just technically dangerous—it can be emotionally damaging. Even brief exposure to its darker content can lead to anxiety, stress, or emotional distress.
It’s a space where trust doesn’t exist and where some of the internet’s most disturbing content is a click away. Whether it’s graphic violence, disturbing ideologies, or content that should never have been shared, what you encounter can stick with you long after you log off.
Navigating the dark web also means constantly looking over your shoulder and double-checking every link and interaction. That persistent paranoia and tension can erode your peace of mind. Some users even report changes in their worldview or sense of safety after prolonged exposure.
The dark web might seem mysterious and even exciting, but it’s far from harmless. Even if you’re not doing anything illegal, just being there can open the door to malware, scams, legal trouble, and emotional distress. Curiosity isn’t protection. If you step into the dark web without knowing what you’re doing, you may come away with more than you bargained for.
Windows 11 often feels like a beta, its features constantly shifting. This isn’t a bug, mind you—it’s Microsoft’s new strategy of continuous iteration and evolution. But it’s not without some trade-offs.
The Evolutionary, Not Revolutionary Approach
Microsoft designed Windows 11 primarily as an evolution of Windows 10, sharing the same foundational code. This was a deliberate choice, allowing for a smoother upgrade path to Windows 11 compared to past radical OS shifts, especially for IT departments in organizations.
By building on a familiar foundation, Microsoft aimed for better user retention and easier enterprise adoption, making the “work-in-progress” a more palatable, gradual process rather than a jarring overhaul.
A key part of this evolution is a new pace of updates. Unlike Windows 10’s twice-yearly major updates, Windows 11 moved to a single, significant feature update annually. But it also introduced smaller, more frequent feature drops, enabling Microsoft to roll out new functionalities as soon as they are ready.
This allows Microsoft to evolve the user experience bit by bit—the operating system remains familiar while integrating modern aesthetics and functionality. For power users and casual adopters alike, this can mean a smoother learning curve and fewer disruptions to daily workflows.
That said, these piecemeal updates can also subtly fragment the community’s experience over time. People on the same annual version of Windows 11 might have different feature sets, potentially complicating support and the community’s shared understanding of the OS.
The gradual rollout of new functionalities is intended to allow for extensive real-world testing and user feedback. In this context, the “work-in-progress” maxim isn’t a bug; it’s a feature.
However, despite the theoretical elegance of an evolutionary approach, real users like us often bear the brunt of its growing pains. You might have experienced sporadic bugs, performance glitches, and occasional compatibility issues with legacy applications. These frustrations can lead to a perception that the system is unfinished or not fully optimized for everyday use. When you’re in the middle of an important task, those small yet persistent issues can disrupt productivity and test your patience.
Unlike traditional software releases that promise full, polished experiences from the outset, Windows 11’s strategy banks on releasing new builds and updates at a rapid pace—each one addressing previous shortcomings while occasionally introducing new quirks. For many, these challenges can be maddening. Imagine suddenly discovering that a feature you’ve grown accustomed to has been moved or outright changed. Or, worse, dealing with a minor compatibility hiccup that disrupts your entire workflow.
This trade-off seems like a damning flaw at first glance. But it’s also what keeps the operating system fresh and responsive to the needs of its user base. In a rapidly changing digital landscape, an OS that remains static risks quickly becoming obsolete. Windows 11’s iterative nature allows the platform to respond to emerging trends, security threats, and user feedback in near real time.
Moreover, the rapid cycle of fixes and improvements means that your frustrations can be met with swift responses—albeit not without some inconvenience at times.
Related
I Love Windows, but Can’t Ignore These 9 Huge Annoyances in Windows 11
Seriously, Microsoft?
Innovation versus Stability Trade-off
At the heart of Windows 11’s design philosophy is a continuous balancing act between pushing the envelope of innovation and ensuring core system stability. There’s a relentless drive to incorporate new features, improved security, and modern design aesthetics. On the other hand, there’s the equally important need to provide a rock-solid experience that users can depend on day in and day out.
This constant push-pull is no stranger to the tech industry. Innovation is rarely linear or without missteps. Your Windows 11 experience, too, is in a near-constant state of evolution. While this brings new experiences faster, like the recent integration of AI features with Microsoft Copilot, it also means the ground beneath your feet is always shifting.
The constant cycle of updates and patches can lead to a sense of never-ending change. For users who prioritize a stable, reliable environment—particularly in professional or enterprise settings—this can be a significant drawback.
This innovation-stability dilemma is not just technical but also perceptual, amplified by the diverse expectations within the massive amount of people that use Windows. What constitutes “stable enough” for a tech enthusiast is vastly different from the needs of a small business owner relying on an accounting app that must not break.
The most radical shift in Microsoft’s approach with Windows 11 is the full embrace of the “Windows-as-a-Service” (WaaS) model. Traditionally, operating systems were released as static, monolithic packages, with periodic service packs or major revisions. Windows 11, however, functions as an evolving service—constantly updated, refined, and expanded.
This allows Microsoft to react swiftly to security vulnerabilities, performance issues, or even emerging trends that could shape future computing experiences. However, that constant state of flux can be jarring, with new features sometimes feeling shoehorned in. WaaS effectively transforms Windows into a dynamic platform for delivering and monetizing Microsoft’s broader ecosystem of services like Microsoft 365 and Copilot.
For many, embracing Windows-as-a-Service means shifting expectations. Rather than expecting a one-and-done, polished product at the time of purchase, one must now anticipate an evolving ecosystem. The continual cycle of updates, however, demands that we learn to adapt to periodic changes in workflows and interfaces.
Related
Windows Updates: What’s in the Name and Number?
Windows updates usually have some strange numbers and letters tacked onto the end, but they’re by no means randomly assigned.
So, if Windows 11 feels like it’s perpetually under construction, that’s because, in many ways, it is. This isn’t an accident or an oversight; it’s a deliberate strategic direction towards perpetual cycle of innovation, deeply embedded in the ‘Windows-as-a-Service’ model.
Whether you view the frequent updates as minor annoyances or as exciting opportunities to shape a living platform depends largely on your expectations as a user.
You don’t need a fancy app or pro camera to make your photos stand out—just a setting buried in your phone’s menus. Most people never touch it, but it’s the quickest way I’ve found to go from bland to eye-catching in seconds.
What Spot Color Actually Does and Why It Works
Spot Color is a Motorola photo feature that isolates your subject in full color while turning the background grayscale. The effect is subtle but bold. It draws your eye directly to what matters in the frame, stripping away distractions and giving even casual shots a deliberate, stylized look.
Tyler Fyock/MakeUseOf
Unlike filters that alter the tone or warmth of an image, Spot Color reshapes the focus of a photo. It mimics what high-end portrait lenses do by creating visual separation without the need for the most advanced photography software or camera gear.
Where To Find Spot Color on Your Motorola Device
Motorola doesn’t advertise this feature prominently; it takes a bit of digging in order to enable the setting.
Here’s how to access this stunning feature:
Open the Camera app and go to the More section to access additional shooting modes.
Select Spot Color to activate the feature.
Point the reticle at the color you want to keep and tap to lock it in, turning the rest of the image black and white.
Adjust the color intensity using the slider until you achieve the desired effect.
Capture the photo by pressing the shutter or using a volume button.
Tyler Fyock/MakeUseOf
Tyler Fyock/MakeUseOf
Tyler Fyock/MakeUseOf
Any type of scene can benefit from this feature, but it tends to work best on portraits, pets, or objects with clear contrast against the background. My Motorola Edge 2023 handles the processing quickly and cleanly, which makes experimenting with it seamless.
When This Feature Works Best and When to Skip It
Spot Color shines in specific situations. It’s not something you’ll want to use on every photo, but when the conditions are right, it can elevate an ordinary image into something visually striking.
When Spot Color Works Best
Tyler Fyock/MakeUseOf
Spot Color shines when your subject is bold and clearly defined. A red jacket in a snowy street or a bright flower in a green field are a couple examples of compositions that would work well for this tool. It’s especially effective in portraits, pet photos, or product shots where isolating one color helps the subject stand out without distraction.
In visually cluttered environments, such as busy streets or messy countertops, it simplifies the frame by turning the background grayscale. Spot Color is more than just a visual effect, it adds a storytelling layer. It allows you to direct the viewer’s attention with precision and create photos that feel intentional, emotional, and artistic.
When to Skip Spot Color
Tyler Fyock/MakeUseOf
Spot Color isn’t suitable for every photo. In low-contrast scenes or when the subject doesn’t clearly stand out from the background, the effect can feel flat or muddled. It’s best avoided when the background plays an important role in the image’s mood or story—such as colorful landscapes or sunsets—because turning it black and white can reduce emotional impact.
The tool can also struggle with complex or multicolored scenes. When faced with a shot where isolating a single hue cleanly is difficult, it can sometimes cause unwanted artifacts.
Ultimately, Spot Color is a stylistic choice that shines when used thoughtfully. Its real strength comes from knowing when not to apply it.
Related
8 Cool Smartphone Photography Tricks That Actually Work
If you want to give your smartphone photography an edge, try these unique tricks.
It’s Not Just a Motorola Feature: Other Brands Have It Too
Motorola’s Spot Color stands out for how easy and flexible it is, but other major phone brands have introduced similar features under different names. Some are accessible only during editing, while others are built into the camera app itself.
Samsung Galaxy Devices: Color Point in Portrait Mode
Samsung phones come with a lot of useful features, including a similar tool called Color Point. Unlike Motorola’s version, which you apply after you’ve taken the photo, Samsung’s approach happens in real time while shooting in Portrait Mode.
To use it:
Open the Camera app and swipe to select Portrait mode.
Tap the circle icon in the bottom right corner to access effect options.
Choose Color Point from the available effects.
Adjust the effect strength using the slider to your preference.
Capture the photo by pressing the shutter button.
You won’t be able to change the effect afterward if you don’t turn it on before taking the shot, you’ll have to retake the photo. The tradeoff is that Samsung gives you live previews, so you can compose your photo with the effect already active.
Google Photos: Color Pop via AI Suggestions
Google also has a feature named Color Pop, but it works differently from both Motorola and Samsung. Instead of a manual tool, Google Photos uses AI to suggest the effect on eligible images—mainly portrait shots with depth information.
Here’s how to find it:
Open Google Photos and select the image you wish to edit; portrait photos tend to work best.
Tap the Edit icon (the pencil) at the bottom of the screen.
Navigate to the Suggestions tab.
Apply the effect by tapping on Color Pop.
Adjust the intensity using the slider to your preference.
Save the edited photo by tapping Done.
The catch is that you can’t manually apply it to any photo; it only shows up if Google’s algorithm thinks the image fits. There’s also no way to fine-tune the effect manually, which limits flexibility compared to other versions.
It’s fast and effective when it works, but you’re at the mercy of the software deciding when to offer it. For the sake of convenience, you can choose to use the editor tool in Google Photos on your computer, rather than on your phone.
Related
You Need to Learn These 9 Awesome Mobile Photography Effects
Looking to add some creative flair to your smartphone shots? Try these effects.
What makes features like Spot Color so compelling isn’t just the visual punch, they offer a surprisingly intuitive way to tell a story through your photos. While there are plenty of apps that can instantly improve your smartphone photography, this is an incredibly simple and powerful tool for directing attention, evoking emotion, and giving your photos a unique look.
Nothing ruins a relaxing vacation night like flipping through a hotel TV stuck on reruns. That’s why I always pack a few compact streaming tools that turn any screen into my personal entertainment center.
Chromecast is my go-to travel essential for its simplicity. It’s about the size of a car key fob, but surprisingly powerful. All I need is a TV with an HDMI port and a decent Wi-Fi connection, and I can stream anything from my phone or tablet straight to the screen.
It’s familiar, flexible, and incredibly easy to use. Whether I’m watching Netflix, YouTube, or even casting home videos from Google Photos, everything works smoothly. And because I use my own device as the remote, I don’t have to fumble with clunky remotes or awkward on-screen keyboards.
Setup is quick—just plug it in, connect to Wi-Fi, and start casting. I also pack a travel-friendly HDMI extender in case the TV is mounted tightly against the wall. It’s a small detail that can make a big difference.
4
Tablet with Downloaded Streaming Apps
Jack Mitchell/MakeUseOf
Sometimes, I skip the TV altogether. Whether I’m on a plane, by the pool, or stuck inside during a rainy day, my tablet becomes a full entertainment hub. It’s lightweight, comfortable to hold, and powerful enough to stream anything I want.
Before any trip, I make it a habit to download episodes, movies, and even offline playlists from apps like YouTube, Netflix, and Spotify. Most streaming platforms now allow you to download content for offline use, which is a lifesaver in areas with weak connections or no internet access at all.
Tablets are also personal. I don’t have to worry about bothering others, and with a good pair of headphones, the experience feels immersive.
A USB-C to HDMI cable might not sound exciting, but it’s a streaming must-have for me. The cable lets me mirror my phone, tablet, or laptop screen directly onto a TV. With a good USB-C to HDMI adapter, there’s no need for Wi-Fi, logins, or extra apps. Just plug in and play.
I’ve used this in hotels where the Wi-Fi was too slow for streaming or the TV’s smart features were locked down. With the cable, I can display anything from my device, whether that’s a downloaded film, a slideshow, or even use it as a monitor if I’m mixing work with travel.
It also helps in places where internet access is limited or metered. Because everything plays directly from my device, I control the content and avoid unnecessary data usage. It’s one of those devices you don’t always need, but when you do, you’re glad it’s in your bag.
2
Wireless Hard Drive
A wireless hard drive is one of those underrated essentials that make every trip smoother. I download movies and TV shows (legally) before I leave, so I’m never stuck with bad hotel TV or weak Wi-Fi. It creates its own wireless network, allowing me to stream content directly to my phone, tablet, or laptop without needing an internet connection at all.
Some drives even support Plex, so you can set up your own mini streaming service on Plex. But even without that, most let you connect to a built-in Wi-Fi network and stream directly using simple media apps like VLC. It’s especially handy on long flights or in places where the internet crawls.
Related
How I Turned My Old Laptop Into a Plex Media Server
It’s simple to turn your old laptop into a powerful Plex server, and you can use Windows or Linux to get the job done.
While not technically a streaming device, my smart speaker still makes the cut. I usually bring a small model, like the Nest Mini or Echo Dot. It’s a simple way to bring a bit of home with me wherever I go.
Once it’s connected to Wi-Fi, it syncs with my streaming accounts—Spotify, YouTube Music, and more. I can ask it to play a playlist, start a podcast, or fill the room with white noise. It’s perfect for setting the mood in an Airbnb, unwinding after a day of exploring, or getting ready in the morning.
When Wi-Fi is spotty, most smart speakers can also act as Bluetooth speakers. I just connect my phone and play directly. The sound quality is surprisingly good, especially compared to hotel TV speakers or a phone’s built-in audio.
Traveling doesn’t have to mean giving up great entertainment. With just a few smart, portable devices, I can turn any room into my personal streaming setup. Whether I’m casting, watching offline, or streaming from my own server, I never have to settle for reruns or clunky TV interfaces again.
After 17 years of service, Pocket, the beloved popular read-it-later service, will cease operations on July 8, 2025. As such, you must migrate your data to another read-it-later or bookmarking service. While there are plenty of apps to choose from, these are your five best Pocket alternatives.
5
Instapaper
Instapaper is one of the best read-it-later apps—it’s been around for more than a decade! It’s available on the web, iOS, Android, and macOS, and you can use it to save unlimited articles, web pages, and videos for later reading and viewing.
You can organize your saved content by moving it into folders. All your saved content is synced across all your devices, and you can access it even when you’re offline. Instapaper also offers permanent archiving, a paid feature that ensures your saved content remains accessible even if it disappears from the internet. You can even send articles directly to your Kindle device if you prefer reading on it.
Besides saving content, Instapaper allows you to highlight text and add notes within articles, though you’re limited to just five notes per month on the free plan. Plus, it supports integrations, too, so you can automate your reading workflows by automatically saving articles from social media or RSS feeds to your reading list.
You can use Instapaper for free. But to do away with its limitations and access advanced features, like send to Kindle, full-text search, and permanent archiving, you need to subscribe to Instapaper Premium, priced at $5.99 per month or $59.99 per year.
If you loved Pocket’s no-frills approach, Instapaper is a natural fit. It’s the most direct alternative to Pocket, thanks to its simplicity, excellent offline mode, and distraction-free reading experience.
4
Raindrop.io
Raindrop.io is an all-in-one bookmark manager for storing and organizing all kinds of content—from web links to images, videos, and documents—that you may want to revisit later. It’s available on all major smartphone and desktop platforms, including the web, and it’s one of the apps I always install on my Android phone.
Compared to most bookmarking apps, Raindrop.io offers a generous free plan that lets you save unlimited items, use tags or organize saved content into collections (like folders), and highlight and annotate pages to revisit important bits later. You can also upload files from your device or integrate some of the popular apps and services to save their content effortlessly.
That said, if you want complete access to Raindrop.io’s feature set, you need to upgrade to the Pro plan. This plan costs $3.54 per month if billed monthly or $33.04 per year if billed annually, and it unlocks AI-powered suggestions, an increased file upload limit, and more granular organizational tools, among other things.
Unlike Pocket, Raindrop.io doesn’t have an offline reading mode. This could be a serious limitation for those who save content from the internet to read it when they’re offline.
3
Matter
Matter is a sleek and modern-looking read-it-later app available exclusively on iOS, iPadOS, and the web. Aside from letting you save pretty much anything (PDFs, Threads, videos, and more) on the web, it also allows you to sync your newsletter subscriptions and follow your favorite writers or feeds to receive their latest content as soon as it’s published.
All your content is synced across devices and available offline. You can organize your saved content using tags for easy access. Similarly, you can highlight important stuff in your articles and access all your highlights in one place.
If you use knowledge management tools like Obsidian and Notion, Matter can help you sync and store all your highlights on them. You can even export your content to Kindle for a distraction-free reading experience. Other notable Matter features include AI-generated summaries and a text-to-speech player for hands-free listening to articles.
Coming from Pocket, Matter is a great option if you only use Apple devices and want a premium bookmarking and reading experience. You may also want to choose it if you plan to build more consistent reading habits.
Matter isn’t entirely free, though, as many of its features, like Kindle export, third-party integrations, and unlimited highlighting and note-taking, require a Matter Premium subscription that costs $14.99 per month or $79.99 per year.
2
Readwise Reader
Readwise Reader is a feature-rich read-it-later app for power users. It’s available across all popular mobile and desktop platforms, including the web, and you can use it to save various types of content, such as articles, newsletters, PDFs, EPUBs, RSS feeds, and even YouTube videos with transcripts.
Related
How to Open ePub Books on a Kindle
It’s all rather simple and easy to do, which is nice.
Readwise Reader allows you to highlight important content and add supporting notes. It even surfaces them through daily reviews—via email or in-app—to help you remember them. Alternatively, you may save the highlights automatically to your personal knowledge base in apps like Obsidian, Notion, or Logseq.
It also packs some useful AI features. A couple of notable ones include Ghostreader, which helps define terms, summarize passages, or get answers to questions you may have about the text, and AI chat for highlights, which lets you seek answers for your queries related to your highlights.
Overall, Readwise Reader is a great Pocket alternative for those who want the ability to store a wide range of content, along with advanced reading, annotation, and knowledge management features. However, most of its features require a paid subscription. You do get a 30-day free trial, but you’ll need to subscribe to the paid plan to take full advantage of the app. Readwise Reader’s premium plan costs $12.99 per month or $9.99 per month if billed annually.
1
Recall
Recall is more than just a bookmarking or read-it-later app. It’s essentially an AI-powered knowledge management app that leverages AI to help you make better sense of your saved content. As of the time of writing, Recall is available only on Android, iOS, and the web.
You can use Recall to save articles, PDFs, podcasts, YouTube videos with transcripts, and more from anywhere on the internet. Once saved, you can generate summaries of the content with AI and get help with your questions related to the content by asking its built-in chatbot. There’s also the option to highlight important points, take notes, and save all the important information to the Recall Notebook for easier access.
Another highlight of Recall is that it automatically tags and organizes your saved content, making it easier for you to find it. It also uses a graph database that automatically links the related content to give you a visual representation of the connections between your saved content. That way, you can add the missing bits of information if required to complete your knowledge base.
As someone who used Pocket just to save content, you may find Recall overkill. Unless, of course, your needs have evolved over the years, and you want an app that helps you save varied content and build a long-lasting knowledge base around it. Mind you, at the time of writing, Recall doesn’t support bulk importing, so you’ll have to move your bookmarks from Pocket over to it manually. You do have the option to import your browser bookmarks, though.
Recall is free to use for the most part. You can use most of its core features without paying extra, albeit with limited AI summaries and chats per month. To unlock the entire AI suite of features, you’ll need to update to Recall Plus for $7 per month (billed annually).